Table of Contents
Advertisement
POWER
INPUT SELECTOR
2
TUNE
2
MENU
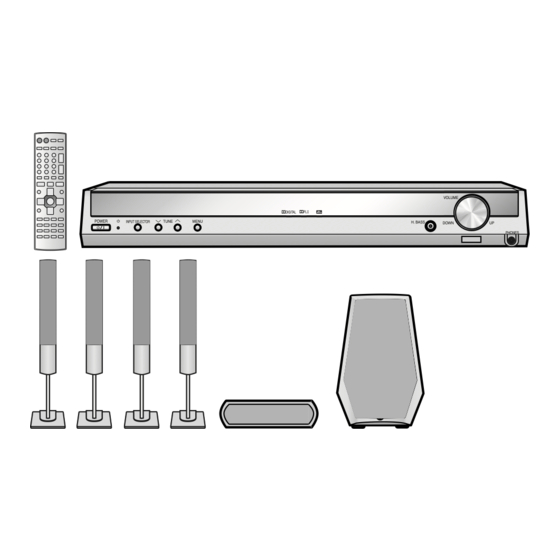
SC-HT17
Dear customer
Thank you for purchasing this product.
Before connecting, operating or adjusting this product, please
read the instructions completely.
Please keep this manual for future reference.
SC-HT17 is used in the illustrations unless otherwise
mentioned.
SC-HT16 is only for the U.S.A.
For Canada only: The word "Participant" is used in
place of the word "Partner".
P
PC PP
VOLUME
%DIGITAL %PL
H. BASS
DOWN
UP
PHONES
Operating Instructions
Home Theater Audio System
Model No.
Table of contents
Before use
IMPORTANT SAFETY INSTRUCTIONS................. 2
Supplied accessories ............................................ 3
The remote control ................................................ 3
Step 3
Operations
Basic operations .................................................. 15
Control guide........................................................ 16
The radio............................................................... 18
Other functions .................................................... 19
Making a recording .............................................. 21
The RESET function ............................................ 21
Remote control operation guide......................... 22
Reference
Specifications....................................................... 25
Listening caution ................................................ 26
Maintenance ........................................................ 26
Product service .................................................... 26
Warranty (U.S.A.).................................................. 27
Troubleshooting guide .........................Back cover
SC-HT17
SC-HT16
SC-HT15
4
8
10
13
RQT7949-1P
Advertisement
Table of Contents

Related Manuals for Panasonic SC-HT16


Summary of Contents for Panasonic SC-HT16
-
Page 1: Table Of Contents
Please keep this manual for future reference. SC-HT17 is used in the illustrations unless otherwise mentioned. SC-HT16 is only for the U.S.A. For Canada only: The word "Participant" is used in place of the word "Partner". PC PP... -
Page 2: Important Safety Instructions
IMPORTANT SAFETY INSTRUCTIONS Read these operating instructions carefully before using the unit. Follow the safety instructions on the unit and the applicable safety instructions listed below. Keep these operating instructions handy for future reference. Read these instructions. Keep these instructions. Heed all warnings. -
Page 3: Supplied Accessories
System cable (K1HA25HA0001) FM indoor antenna (RSA0007-L) AM loop antenna (N1DAAAA00002) Remote control transmitter (EUR7722KK0) SC-HT17 SC-HT16 SC-HT15 Batteries (x 2) Speaker cable(s) (REE1203A) (4 m x 1) SC-HT17 (REE1203A) (4 m x 1) SC-HT16 SC-HT15 (REE1203C) (10 m x 2) -
Page 4: Step 1 Speaker Setup
• There is no difference between the right and left speakers. Speaker stands (x 2) SC-HT17 SC-HT17 SC-HT16 Secure the pipe to the base. Ensure the screws are securely fastened by lightly tightening the left and right side screws alternately until fully tightened. Match the holes. - Page 5 Press the speaker cable into the groove. Thread the excess cable. Slot Center speaker Surround speaker (L) Surround speaker (R) SC-HT16 SC-HT15 Front speakers About 10 cm (4”) FRONT Surround and center speakers Use the long speaker cables for the surround speakers (SB-FS15).
- Page 6 Note the following points. • Attach the included rubber pads to the base of the center speaker (SC-HT16 and SC-HT15: center and surround speakers). This prevents vibration from causing the speakers to move or fall over. Use 4 pads per speaker.
-
Page 7: Attaching To A Wall
( page 6). è • (SC-HT17: front and surround speakers, SC-HT16 and SC-HT15: front speakers) Use of optional speaker cables are recommended when mounting. (You can also remove the speaker cables from the pipes supplied with this system.) SURROUND 4 Ω... -
Page 8: Home Theater Step 2 Connections
Home theater connections Step Stereo connection cable Other (not included) accessories Left Right Coaxial cable (not included) Turn off all components before making any connections. To connect equipment, refer to the appropriate operating instructions. DVD player TV (Monitor) VIDEO LOOP FRONT SURROUND SUBWOOFER GAME/AUX DVR / VCR... - Page 9 • Dolby Digital RF signals from a laser disc player VIDEO OUT Household AC outlet (AC 120 V/60 Hz) Catch System cable (included) AC power supply cord (x 1) SC-HT16 SC-HT15 (TV) IN (DVR) IN (DVD) IN OPT 1 OPT 2 COAXIAL DIGITAL IN...
-
Page 10: Other Connections
TV MONITOR COMPONENT VIDEO LOOP 75 Ω LOOP TO SB-WA17 GAME/AUX DVD recorder or VCR Refer to the SC-HT35R SETUP GUIDE when connecting a DMR-ES10 DVD recorder. SC-HT16 LOOP 75 Ω LOOP TO SB-WA15 GAME/AUX AUDIO COMPONENT VIDEO OUT COMPONENT... - Page 11 DVR / VCR S-VIDEO IN S-VIDEO MONITOR OUT DVR / VCR (DVR) IN (DVD) IN OPT 2 COAXIAL DIGITAL IN DIGITAL AUDIO SC-HT16 SC-HT15 (DVR) IN (DVD) IN OPT 2 COAXIAL (DVR) IN (DVD) IN DIGITAL IN OPT 2 COAXIAL DIGITAL IN...
- Page 12 LOOP AM loop antenna (included) LOOP Black 75 Ω LOOP White GAME/AUX DVR / VCR Click! AUDIO SC-HT16 CENTER MONITOR OUT DVD / DVD 6CH DVR / VCR GAME/AUX TV MONITOR GAME/AUX VIDEO COMPONENT VIDEO VIDEO OUT AM loop antenna...
-
Page 13: Step 4 Settings
Settings Step Change the settings to suit your equipment to the environment in which you are using it. Before making any changes, read the descriptions of the settings, note the factory settings and ranges, and refer to the equipment’s instructions. DISTANCE See below è... - Page 14 Settings Adjusting speaker output level -LEVEL/ - TEST Press and hold Output the Adjust the main signal. volume. C (center), RS (right surround) and LS (left surround) can be adjusted between –10 dB and +10 dB, with 0 dB being the level of the front speakers.
-
Page 15: Basic Operations
Basic operations POWER TUNE MENU INPUT SELECTOR POWER INPUT SELECTOR Switch on. Select input. TUNER GAME/AUX (SC-HT17) When playing video sources connected to DVD The picture remains on the screen even if you select TUNER. Adding surround effects to stereo sources Using Dolby Pro LogicII Dolby Pro LogicII processor works not only on sources recorded with Dolby Surround, but also on... -
Page 16: Control Guide
Control guide Main unit Standby indicator [^] When the unit is connected to the AC mains supply, this indicator lights up in standby mode and goes out when the unit is turned on. [8, POWER] Press to switch the unit from on to standby mode or vice versa. - Page 17 (SC-HT17) When DVD ANALOG 6CH input is selected: Set your DVD player speaker output to "small", provided it has a speaker output setting function. SC-HT17 SC-HT17 [DVD PLAYER, –ANALOG 6CH] [TV] [DVD RECORDER] [VCR] SC-HT16 [DVD PLAYER] [TV] [DVD RECORDER] [VCR] RECEIVER AV SYSTEM PLAYER...
-
Page 18: The Radio
The radio RECEIVER AV SYSTEM DRIVE SELECT RECORDER DIRECT TUNING DISC DIRECT TUNING ENTER SKIP > DISC STOP DIRECT NAVIGATOR TOP MENU SUB MENU/ PLAY LIST TV VOL DVD REC REC MODE INPUT MODE SUBWOOFER TONE/ EFFECT Direct tuning Input the frequency of the station. Remote control 1. -
Page 19: Other Functions
Other functions %DIGITAL %PL POWER INPUT SELECTOR TUNE MENU Input mode This unit automatically detects whether input is digital or analog, but you can fix the input mode. Remote control Press [INPUT MODE] to select "AUTO", "ANALOG" or "DIGITAL". Tone You can adjust the level of the bass and treble. - Page 20 Other functions TUNE INPUT SELECTOR POWER INPUT SELECTOR TUNE MENU A/D attenuator Turn the A/D attenuator on if “OVERFLOW” lights frequently when using 2-channel analog input. Main unit 1. Press [TUNE 2 and 1] at the same time to enter the setup mode.
-
Page 21: Making A Recording
Other functions TOP MENU ENTER SUB MENU/ PLAY LIST RETURN TV VOL TV VOL DVD REC REC MODE TV/VIDEO MUTING - H.BASS/ -LEVEL/ INPUT MODE SUBWOOFER - C.FOCUS - TEST EFFECT TONE/ EFFECT BALANCE MUSIC AV/MOVIE Center Width Control "C-WDTH" You can adjust the effect of MUSIC and PANORAMA with the center width control. -
Page 22: Remote Control Operation Guide
Remote control operation guide This remote control can operate Panasonic and Technics audiovisual components that have remote control sensors. You may need to change the remote control code. ( Note that this remote control cannot operate some equipment and that it may not be able to perform some operations. - Page 23 TV/VCR Watching TV Switch on RECEIVER AV SYSTEM PLAYER ANALOG 6CH DRIVE - TUNER/ SELECT RECORDER - BAND VOLUME DIRECT TUNING ENTER > DISC SKIP SLOW/SEARCH STOP PAUSE PLAY Switch off DIRECT NAVIGATOR FUNCTIONS TOP MENU Operating the TV ENTER SUB MENU/ PLAY LIST RETURN...
- Page 24 Remote control operation guide Using this remote control to operate equipment manufactured by Panasonic, Technics, and other companies It can also operate some other brands of televisions, video cassette players, and DVD players. Check the table for the brand and enter the code as follows.
-
Page 25: Specifications
0.2 % Dimensions (W x H x D) 0.3 % [SC-HT17] 285 x 402 x 520 mm (11-7/32'' x 15-13/16'' x 20-15/32'') [SC-HT16] [SC-HT15] 200 x 367.5 x 492 mm (7-7/8'' x 14-7/16'' x 19-3/8'') 71 dB Mass 65 dB... -
Page 26: Listening Caution
For product information or assistance with product operation: In the U.S.A., refer to “Customer Services Directory” on page 27. In Canada, contact the Panasonic Canada Inc. Customer Care Centre at 905-624-5505, or visit the website (www.panasonic.ca), or an authorized Servicentre closest to you. -
Page 27: Warranty (U.s.a.)
Carry-In or Mail-In Service For Carry-In or Mail-In Service in the United States call 1-800-211-PANA (1-800- 211-7262) or visit Panasonic web site: http://www.panasonic.com For assistance in Puerto Rico call Panasonic Puerto Rico, inc. (787)-750-4300 or fax (787)-768-2910. Limited Warranty Limits And Exclusions This warranty ONLY COVERS failures due to defects in materials or workmanship, and DOES NOT COVER normal wear and tear or cosmetic damage. -
Page 28: Troubleshooting Guide
There is a lot of noise when listening to AM. Panasonic Consumer Electronics Company, Division of Panasonic Corporation of North America One Panasonic Way Secaucus, New Jersey 07094 http://www.panasonic.com 2005 Matsushita Electric Industrial Co., Ltd...