Table of Contents
Advertisement
DVD Stereo System
Operating Instructions
SC-HDV600
Model No.
The model for the United Kingdom does not include center and
surround speakers.
DIGITAL VIDEO
EB
E
Note:
"EB" on the outer packaging indicates the United
Kingdom.
Before connecting, operating or adjusting this
product, please read these instructions completely.
Please keep this manual for future reference.
RQT5941-B
Advertisement
Table of Contents

Related Manuals for Technics SC-HDV600

Summary of Contents for Technics SC-HDV600
-
Page 1: Operating Instructions
DVD Stereo System Operating Instructions SC-HDV600 Model No. The model for the United Kingdom does not include center and surround speakers. DIGITAL VIDEO Note: “EB” on the outer packaging indicates the United Kingdom. Before connecting, operating or adjusting this product, please read these instructions completely. -
Page 2: Dear Customer
For optimum performance and safety, please read these instructions carefully. Please check and identify the supplied accessories. These operating instructions are applicable to the following system. System SC-HDV600 AC mains lead ............1 pc. Amplifier SE-HDV600 For United Kingdom For others... -
Page 3: Table Of Contents
Table of contents Before use Cassette deck operations Region numbers Cassette tapes ..............................Caution for AC Mains Lead ............. Safety precautions ..............Recording operations Disc selection and care ............DVD jacket symbols ..............Before recording The remote control ..............Preparatory steps ................33 Type of disc for the type of connected TV ...... -
Page 4: Caution For Ac Mains Lead
Caution for AC Mains Lead Safety precautions (For United Kingdom) Placement (“EB” area code model only) Set the unit up on an even surface away from direct sunlight, high For your safety, please read the following text carefully. temperatures, high humidity, and excessive vibration. These conditions can damage the cabinet and other components, thereby This appliance is supplied with a moulded three pin mains plug for shortening the unit’s service life. -
Page 5: Disc Selection And Care
Disc selection and care DVD jacket symbols Use this chart when selecting discs. You can use both 8-cm and The following table shows examples and explanations of symbols 12-cm discs. Do not use a disc adapter for 8-cm discs. found on DVD jackets. Refer to the table before play. Explanation Example symbols Video... -
Page 6: The Remote Control
The remote control Batteries Insert so the poles (+ and –) match those in the remote control. R6 (AA, UM-3) Do not use rechargeable type batteries. Do not; ¡mix old and new batteries. ¡use different types at the same time. ¡heat or expose to flame. -
Page 7: Installation And Connections
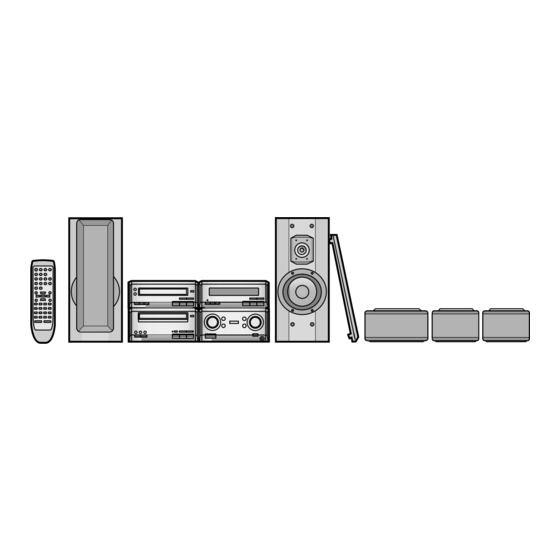
Installation and connections Installation Side-by-side setup Tuner (ST-HDV600) DVD player (SL-HDV600) Audio components You can set up the components side-by-side or stacked. The explanations show the side-by-side setup. Speakers and TV (not included) The figure shows an example of when you have connected all the speakers it is possible to connect to this system. - Page 8 Installation and connections To unplug cable Press both ends and pull out. White line Amplifier Speaker Gray Gray Blue Black Blue Black S U R R O U N SUBWOOFER S U R R O U N Gray Blue C E N T E R Surround speaker (L) Subwoofer Surround speaker (R)
- Page 9 Connections Notes on speaker use Do not play distorted sounds over extended periods. Note You can damage your speakers by playing sounds that include high Do not connect the AC mains lead until all other connections are levels of noise. Reduce the volume in the following cases. complete.
- Page 10 Installation and connections AM ANT EXT LOOP VIDEO OUT Adhesive tape S-VIDEO To household mains socket To unplug cable Hold down the lever and pull. AC IN VIDEO IN White line [VIDEO] [AUDIO] RQT5941...
-
Page 11: Am Loop Antenna
AM loop antenna. To prepare antenna, twist the vinyl tip and pull off (a). Keep loose antenna cord away from other wires and cords. FM antenna. Fix the other end of the antenna where reception is best. Surround cable. (United Kingdom only) BE SURE TO READ THE CAUTION FOR THE AC MAINS LEAD ON PAGE 4 BEFORE PROCEEDING TO STEP 7. -
Page 12: Front Panel Controls
Front panel controls DVD player q q V.S.S. (Virtual Surround Sound) button/indicator (V.S.S.) ..................23 w w Cinema mode button/indicator (CINEMA) ......23 e e Disc tray r r Disc tray open/close button (; OPEN/CLOSE)....16 t t Time mode button (TIME MODE) ...........19 y y Repeat button (REPEAT)............20 u u CD edit button (EDIT) .............35 i i Skip/search buttons (u/t , y/i) ......18, 19... - Page 13 Front panel controls Amplifier # # 1 1 Input selector (INPUT SELECTOR) ........46 # # 2 2 VGCA indicator (VGCA) ............36 # # 3 3 Volume control (VOLUME) .............16 # # 4 4 Standby indicator When the unit is connected to the AC mains supply, this indicator lights up in standby mode and goes out when the unit is turned on.
-
Page 14: Setting The Time
Setting the time This is a 24-hour clock. The example shows how to set the clock for 16:25 (4:25 pm). Press [8] to turn the unit on. q q Press [CLOCK/TIMER] to display “CLOCK”. Each time you press the button: CLOCK / z PLAY / z REC / Original display Within 7 seconds Press [SET]. -
Page 15: Television Settings
Television settings The menu language has been factory preset to English. You can change the language by going to Display–Menu Language (a pages 41–42). CLOCK/ SLEEP TIMER CANCEL Set the screen size to suit your television. The initial setting is for a regular television with an aspect ratio of 4:3. -
Page 16: Playing Dvds And Cds
Playing DVDs and CDs Screens illustrated are examples. Normal play Preparation ¡Turn the unit on. ¡When playing DVDs or video CDs, turn the television on and switch its video input mode to suit the connections you have made (e.g., VIDEO 1). Press [;... -
Page 17: Resume Function
Playing DVDs and CDs If a menu screen is shown A menu screen is shown on your (menu example) television shortly after starting some Main Menu DVDs and Video CDs. To continue play you must make a selection. Chapter Options CLOCK/ Staff SLEEP... -
Page 18: Other Modes Of Play
Other modes of play Skipping tracks and chapters TIME MODE Press [u] (backward) or [i] (forward) u/t y/i on the remote control. [u/t] or [y/i] on the main unit. Each press increases the number of skips. CLOCK/ The first skip backwards takes you to the beginning of the current SLEEP TIMER CANCEL... -
Page 19: Fast Forward And Rewind - Search
Fast forward and rewind - Search Frame-by-frame viewing During play While paused Press [t] (backward) or [y] (forward) Press the cursor buttons (w or q). w: Backward on the remote control. q: Forward Each press increases the speed of the search. There are five speeds. -
Page 20: Repeat Play
Other modes of play Repeat play REPEAT This feature allows you to repeat titles, tracks and chapters. Press [REPEAT] during play to select the required repeat play mode. The mode changes each time you press the button. The modes depend on the type of disc you are playing. CLOCK/ SLEEP CANCEL... -
Page 21: A-B Repeat
A-B repeat Using menus to play This feature repeats play between two points that you specify. Menu content depends on disc. These operating instructions describe the basic steps. During play While stopped or playing Press [SHIFT] + [A-B REPEAT] at ∗... -
Page 22: Changing Soundtracks
Other modes of play CINEMA Changing soundtracks V.S.S. Some DVDs have more than one soundtrack recorded on them, such as multiple languages or PCM, and you can change soundtracks during play. During play Press [AUDIO] to % Digital display the 2 ENG 3/2.1 ch soundtrack number. -
Page 23: Changing Subtitle Language
Changing subtitle language Virtual Surround Sound (V.S.S.) Some DVDs have more than one subtitle language recorded on Use this feature to enjoy a surround-like effect if you are using two them, and you can change the language during play. front speakers. This effect only works with DVD recorded using Dolby Digital with two or more channels. -
Page 24: Random Play
Other modes of play Random play CLOCK/ You can play all the tracks on the disc once each in random order. SLEEP CANCEL TIMER CANCEL While stopped Press [PLAY ≥10/-/-- 1–0, ≥10/-/-- MODE] to display Random Playback “RANDOM”. Press PLAY to start SUB TITLE AUDIO ANGLE MENU... -
Page 25: Playing Tracks In A Selected Order - Program Play
Playing tracks in a selected order – Program Play Select up to 24 tracks to play in the order you choose. To stop program play Press [g]. “RESUME” lights on the unit’s display. While stopped To return to the programming screen Press [PLAY During play, press [g] twice. -
Page 26: Graphic User Interface - Gui
Graphic User Interface - GUI GUI are icons that appear on the screen that allow you to interact CLOCK/ SLEEP TIMER CANCEL with the player. The long thin GUI that show information about the CANCEL player and discs are called GUI screens. Basic GUI operation ≥10/-/-- Numbered... -
Page 27: Icons For Disc Information
Icons for disc information Note Icon Content ¡DVD time search can only be performed within a title. ¡You cannot do time search during random or program play. Title number ¡Press [CANCEL] to cancel partway through. [ENTER] ¡You cannot change the time display when “PBC” is displayed on the unit’s display. -
Page 28: Icons For Unit Information
Graphic User Interface - GUI Icons for unit information Play menu Audio menu Icon Content Icon Content A-B repeat (a page 21) (Dolby Digital, 2-channel or over only) [ENTER] (start point) / [ENTER] (finish point) Virtual Surround Sound (V.S.S.) (a page 23) ∗... -
Page 29: The Radio: Manual Tuning
The radio: manual tuning Radio stations can be tuned manually by selecting the station’s frequency or they can be preset into channels to make it easy to tune with the remote control ( a page 30). Preparation: Turn the unit on. Press [FM/AM] to select the band. -
Page 30: The Radio: Preset Tuning
The radio: preset tuning Choose either automatic presetting, which presets all the stations the tuner can receive, or manual presetting, which allows you to select the stations to preset and the order they are to be preset in. There are 39 channels available for presetting. TUNE/TIME ADJUST 2, 1 Automatic presetting Do the following once each for FM and AM. -
Page 31: Cassette Tapes
Cassette tapes Preparation: Turn the unit on. Press [; OPEN/CLOSE], insert the cassette with the tape facing in. Make sure the cassette is fully inserted and press [; OPEN/CLOSE] to close the deck. Press [DOLBY NR] to select Dolby NR or off. - Page 32 Cassette tapes Fast-forwarding and rewinding Press [t (TPS)] or [(TPS) y] while the tape is stopped. Rewind Fast-forward Tape direction One touch play Remote control only When a cassette is loaded and the unit is off, press [TAPE]. t (TPS) y The unit comes on and starts play in the direction last selected with the volume fading in.
-
Page 33: Before Recording
Before recording Selection of tapes for recording The unit automatically identifies the type of tape. Normal position/TYPE 1 High position/ TYPE 2 Metal position/ TYPE 4 To display the tape counter while recording Press [COUNTER]. The counter is displayed for about five seconds. Erasure prevention COUNTER The illustration shows how to remove the tabs to prevent recording. -
Page 34: Recording The Radio
Recording the radio Preparation: Do the preparatory steps ( a page 33). Tune to the required station. ( a page 29 or 30) Press [* REC PAUSE]. The deck goes into the recording standby mode, [* REC PAUSE] indicator lights and a play indicator starts flashing. Press [w] or [q] to start recording. -
Page 35: Recording Discs
Recording discs Preparation: Do the preparatory steps ( a page 33). Insert a disc ( a page 16). Normal recording Press [w] or [q] then [g] to set the tape direction. q: to record on the forward side w: to record on the reverse side Press [* REC PAUSE]. -
Page 36: Changing The Sound Quality
Changing the sound quality BASS TREBLE The VGCA circuit VGCA: Variable Gain Control Amplifier You can achieve a clearer sound by using this feature. Turning the VGCA on and off Press [-VGCA –CINEMA BASS]. The indicator lights while the VGCA is on. How this unit’s VGCA works Generally, the rate of noise (N) to sound (S) worsens as you lower the volume on an amplifier. -
Page 37: Convenient Functions
Convenient functions To adjust left-right balance Press [SHIFT] + [BALANCE (L) or (R)] to adjust the sound balance. For your reference The following display appears when you adjust the volume to indicate that you have adjusted the balance to the left or right. PHONES Dot display CLOCK/... -
Page 38: Using The Timers
Using the timers The play timer This timer starts play of the selected source at the selected time. The example shows settings for preset radio channel 3 to play between 6:30 and 7:40, at –40 dB. Preparation: Turn the unit on, set the time ( a page 14), preset radio stations if you want the timer to start playing the z PLAY/z REC radio ( a page 30). -
Page 39: The Record Timer
Using the timers The record timer This timer records the radio at the set time. The example shows settings for recording radio channel 3 from 18:30 to 19:30. Preparation: Turn the unit on, set the time ( a page 14), preset radio stations ( a page 30). -
Page 40: The Play And Record Timers
Using the timers The play and record timers Checking the timers Press [CLOCK/TIMER] to select “z PLAY” (or “z REC”). The timer conditions are shown in the following order: z PLAY/z REC Start time / finish time / source / volume (“z PLAY” only) The timers can be checked even if the unit is off. -
Page 41: Changing The Settings
Settings Changing the settings ≥10/-/-- You can decide how to play discs before you start play. Refer to the chart on the following pages and use the operations described below to change the settings. Preparation: Turn the television on and switch its input mode to SUB TITLE AUDIO suit the type of connection you have made (eg., VIDEO 1). -
Page 42: Summary Of Settings
Settings Summary of settings This chart shows the settings for this unit. Underlined items are the factory settings. The menu and on-screen message language has been factory preset to English. You can change the language by going to “Menu language” in Display and selecting the preferred language. - Page 43 Changes to the settings remain intact after the unit is turned off. Do the setting procedures again to restore to the original settings. Setting details Select the soundtrack language. Some discs are designed to start in a certain language despite any changes you make here. Select the subtitle language.
-
Page 44: Speaker Settings
Settings Speaker settings Refer to “Changing the settings” (\ page 41). CLOCK/ SLEEP TIMER CANCEL CANCEL For the United Kingdom Do these settings if you connect center and surround speakers. For others ≥10/-/-- You can enjoy multi-channel audio from DVDs without doing these settings. -
Page 45: Ratings
Ratings Delay time To set a ratings level Changing the delay time allows you to make up for differences in Go to “Ratings”, select a level between 7 and 0, press [ENTER]. distance between the speakers and the listening position. Press the numbered Ratings Icon... -
Page 46: Using Other Equipment
Using other equipment MD deck, record player, etc. Tuner ¡Turn off the power to all units before making connections. ¡Refer to the manual of the other unit for details. AUDIO EXT IN (Cables and equipment not included.) OUTPUT Analogue connection Connect other equipment to the EXT IN terminals to output sound Stereo phono cable (not included) through this unit's speakers or to record onto the cassette deck. - Page 47 Digital output settings Optional antenna connections Change these settings if you have connected this unit to another Use outdoor antennas if radio reception is poor. piece of equipment through DIGITAL OPTICAL OUT. FM outdoor antenna Go to the Audio menu. (\ page 41–42) Note Press the cursor buttons (e or r) to select...
-
Page 48: How Different Kinds Of Software Appear On Your Television
How different kinds of software appear on your television DVD software is recorded in a variety of picture formats, and how they appear on your TV depends on the software, the kind of TV you have, and the picture mode your TV is set to. ¡Letterbox refers to pictures where black bands appear at the top and bottom. -
Page 49: Glossary
Glossary Video Other Frame Track Frames are the still pictures that go together to make a moving This is the smallest division on CDs and Video CDs and usually picture. equates to a single song. There are about thirty frames shown each second. Chapter Field This is the smallest division on DVDs and is roughly equivalent to a... -
Page 50: Troubleshooting Guide
Troubleshooting guide Before requesting service, make the below checks. If you can’t fix the system as described below, or if something not listed here occurs, refer to the enclosed directory to locate an Authorized Service Center convenient to you or contact your dealer. Reference pages are shown as black circled numbers Common problems Ensure the AC mains lead and flat cables are connected correctly. -
Page 51: Maintenance
Listening to the radio Use an outdoor antenna. $7 Noise is heard. The stereo indicator flickers or doesn’t light. Sound is distorted. A beat sound is heard. Turn the TV off or separate it from the unit. A low hum is heard during AM Separate the antenna from other cables and leads. -
Page 52: Technical Specifications
Technical specifications TUNER General FRONT SPEAKER Power supply Pre-amplifier section Type 2 way, 2 speaker, bass-reflex system For United Kingdom Input sensitivity/impedance Speaker(s) AC 230–240 V, 50 Hz EXT IN 300 mV/15 kΩ Woofer: 12 cm cone type For others Tuner section Tweeter: 2.5 cm semi-dome type...