
Related Manuals for COMO AUDIO Solo


Summary of Contents for COMO AUDIO Solo
- Page 1 Solo and Duetto Complete User Manual Download the free Como Control iOS or Android App from iTunes or the Google Play store. The Como Control App will allow you to control many functions along with multi-room.
-
Page 2: Introduction
Welcome to the Como Audio community and thank you for your purchase! We hope you will enjoy using your “smart speaker” just as much as we enjoyed creating it for you. Please read this complete manual to familiarize yourself with all the available features. -
Page 3: Safety Instructions
Safety Instructions 1. Read these instructions. 2. Keep these instructions. 3. Heed all warnings. 4. Follow all instructions. 5. CAUTION- Danger of explosion if remote control’s batteries are incorrectly replaced. Replace only with the same or equivalent type. 6. Remote control batteries must be disposed of in accordance with applicable laws and regulations on the transport, shipping and disposal of batteries. - Page 4 Solo and Duetto comply with the RoHS (Restriction of Hazardous Substances) directive. FCC Part 15: This equipment has been tested and found to comply with the limits for a Class B digital device, pursuant to Part 15 of the FCC Rules. These limits are designed to provide reasonable protection against harmful interference in a residential installation.
-
Page 5: Table Of Contents
Table of Contents Introduction…………………………………………………………………………………………..………………..…2 Safety Instructions……………………………………………………………………………………..……………..…3 Table of Contents………………………………………………………………………..…………………………..….5 Front panel controls………………………………………………………………..…………………………………...7 Remote control………………………………………………………………………..………………………………...8 Rear panel inputs/outputs…………………………………………………………..………………………………….9 Display………………………………………………………………………………..………………………………...10 Display off……………………………………………………………………………..……………………….….……10 Expanding album art………………………………………………………………………………………….….……11 Setup wizard………………..…………………………………………………………..………..…………………….12 Auto update, Time zone, DST, Keep network connected, Wlan region, Skip WPS…………..…………..…13 Selecting a network……………………………………………………………………………………………………14 Web-based configuration………………………………………………………………………………………….….16 Embedded web pages.……………………………………………………………………………………….……….18 Operation/Menu………………………………………………………………………………………………………..19... - Page 6 Music Player Shard media/UPnP…………………………………………………………………………………………………..36 Wake-on-lan/Prune servers……………………………………………………………………………………….….37 USB input/Charging.…………………………………………………………………………………………………..37 Browsing…………………………………………………………………………………………………………….….38 Meta data……………………………………………………………………………………………………………….38 My playlist…………………………………………………………………………………………………………...….38 Repeat and Shuffle………………………………………………………………………………………………….…39 Now playing……………………………………………………………………………………………………………..39 DLNA…………………………………………………………………………………………………………………..42 DAB/DAB+ Scanning………………………………………………………………………………………………………………...43 Tuning…………………………………………………………………………………………………………………...43 Now playing……………………………………………………………………………………………………………..43 Slideshow……………………………………………………………………………………………………………….44 Settings………………………………………………………………………………………………………………….44 Dynamic range………………………………………………………………………………………………………….44 Station order…………………………………………………………………………………………………………….44 Tuning stations………………………………………………………………………………………………………….45 Now playing…………………………………………………………………………………………………………..…45 RDS/RBDS……………………………………………………………………………………………………………...45 Scan setting…………………………………………………………………………………………………………..…45 Audio settings………………………………………………………………………………………………………..…45 Bluetooth Pairing…………………………………………………………………………………………………………………..46 Changing paired devices……………………………………………………………………………………………...46 Clearing all paired devices……………………………………………………………………………………………46...
-
Page 7: Front Panel Controls
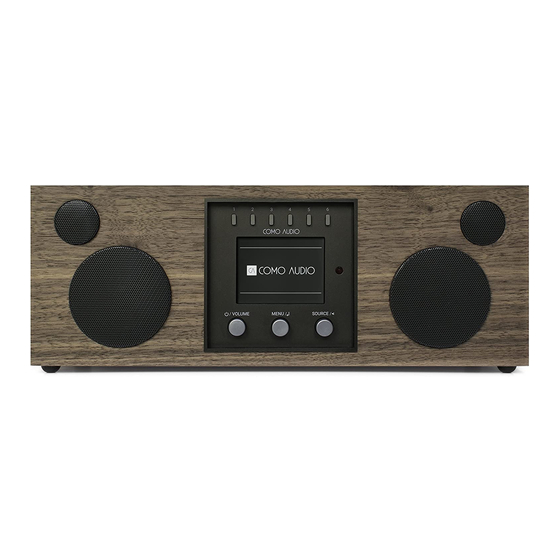
Presets: Press and hold to save a tuned station or a source. Push in briefly to recall the saved station or source. The Presets are independent and recall is not restricted to whichever source is playing. There are six diverse Internet radio stations already set for you to enjoy after you’ve connected Solo or Duetto to your WiFi network. -
Page 8: Remote Control
Once Solo or Duetto is turned on, the display will return to the previous Backlight Menu setting when placed in standby again. -
Page 9: Rear Panel Inputs/Outputs
10. RCA out (Solo only): For connecting to the Ambiente Speaker as part of the Ambiente system. 11. Audio switch (Solo only): Set to ‘M’ for Mono, or; set to ‘ST’ if the Ambiente Speaker is connected; or when using two Solos, set one to ‘L’ and the other to ‘R’ for dedicated wireless stereo if desired. Due to the nature of WiFi, it is possible there may be some latency (delay) between the right and left channel information. -
Page 10: Display
Once Solo or Duetto is turned on, the display will return to the previous Backlight Menu setting when placed in standby again. -
Page 11: Expanding Album Art
Now playing screens show information about the audio source and track now playing, where available. When artwork is displayed, such as an album cover or station logo, push the Menu knob in briefly to expand the image to fill the display. Push in briefly again to return to the standard display. -
Page 12: Setup Wizard
Optical in requires a connection via the Optical in socket with a Toslink cable (not included). To start Solo or Duetto, connect the unit to a suitable power source using the power cord provided. The unit starts up after a slight delay before the display is initialized. -
Page 13: Auto Update, Time Zone, Dst, Keep Network Connected, Wlan Region, Skip Wps
Network”, or “No update” to set the time manually. We strongly suggest selecting “Update from Network”. Solo and Duetto will auto-update from the selected source when time information is available from that source. If you select “Update from DAB” (or FM) and find the time to be inaccurate (not all stations keep their time information updated), set the Auto Update to “Update from Network”, or set the time... - Page 14 Keep network connected This option allows you to define whether Solo and Duetto remain connected to its network in standby mode. This is necessary for App operation, audio streaming in Music Player mode, and recapturing the time after a power outage (if Auto Update from Network is selected). We strongly recommend keeping the network connected.
-
Page 15: Selecting A Network
You can also visit our web site for setup help videos: www.comoaudio.com Solo and Duetto remember login details for the last four wireless networks they have connected to and will automatically connect to one of them when they are available. If connection to a network is temporarily lost, Solo and Duetto will automatically reconnect, typically within 3 minutes or less, from when the network becomes available again. -
Page 16: Web-Based Configuration
Using PCs, Mac OS, or Android smart devices to connect Solo or Duetto to your network: 1. Ensure Solo or Duetto is active, if in Standby or Sleep mode press the Power knob in briefly or press the Power key on the remote.. - Page 17 When enabled the network connection is maintained to allow activation/control from network apps 16. Click Apply. 17. Click OK to confirm you wish to apply the selected settings. Solo or Duetto restarts and connects to the preferred network. 18. Setup Complete The Solo or Duetto’s wireless network is no longer be available.
-
Page 18: Embedded Web Pages
PC, connected to your network. To connect to the web page enter your Solo or Duetto’s IP address into your web browser. To view the IP address, on Solo or Duetto’s menu, navigate to: Menu > System Settings > Network >... -
Page 19: Operation/Menu
Operation After the initial setup, Solo and Duetto are ready for operating in most modes. To select a mode, rotate the Source knob through the source icons. Press the Source knob in briefly to switch to the highlighted mode. The mode splash screen is displayed. After a brief moment the unit switches to that mode. - Page 21 Figure 2 System Settings and Main Menu Structure Note: Software changes or additions effected since the writing of this manual may not necessarily be reflected in the above Menu trees.
-
Page 22: > System Settings > Equalizer
System settings All the setting parameters for Solo and Duetto are available in the “System settings” menu. Push and hold the Menu knob > System settings. System settings menu options: a. Equalizer b. Network Time/Date d. Language e. Factory Reset Software update g. -
Page 23: Network
This guides you through the necessary steps to join a network. This is automatically run as part of the Setup wizard when you first turn on Solo/Duetto. The screens and options presented will depend on the type of network and network protection used. -
Page 24: Keep Network Connected
NetRemote PIN setup Allows you to define a PIN number to be entered before being able to connect to Solo or Duetto remotely over a network so only those who know the PIN number can connect the unit to your network. -
Page 25: Standby Clock Format
Press and hold the Menu knob > System settings > Setup wizard. The Setup wizard runs automatically when Solo or Duetto is powered on for the very first time, but this menu option allows you to run the Setup wizard at any time. See Section 5.2. -
Page 26: Backlight
Once Solo or Duetto is turned on, the display will return to the previous Backlight Menu setting when placed in standby again. -
Page 27: Listening Mode
Listening mode (Non-North American units only) For energy conservation, if Solo or Duetto is left on but there has been no sound and none of the controls have been used after approximately 20 continuous minutes, the unit will automatically go into standby. -
Page 28: Internet Radio
Solo and Duetto can access thousands of radio stations and podcasts from around the world through a broadband Internet connection. When you select Internet radio mode, Solo and Duetto contact the Internet radio portal to get a list of stations, organized into different categories like Country, Most popular, and Genre. Once you select a station, the Solo or Duetto connect directly to that station. -
Page 29: Favorites
Internet radio Favorites Favorites are stored on the Internet radio portal. Before you set up an account on the portal from its Web interface (www.wifiradio-frontier.com), the favorites are associated solely with the radio on which you set them. After you set up a portal account (see Page 32), all the favorites from all of your Solos and Duettos are merged into a combined favorites list. -
Page 30: Search
Choose a station from the list to tune to that station. BBC radio ‘Listen Again’ programs are accessible through the Podcast menu. For example, press Note: and hold the Menu knob > Podcasts > Location > Europe > United Kingdom > All shows > BBC Radio 4 >... -
Page 31: My Added Stations
Internet radio stations can be stored and recalled as Presets as described in Front panel controls. The Presets will also turn on Solo/Duetto from standby if a station has been save to that Preset. In North America only, you may see a category under Station list called HDi. This lists HD Radio stations that also broadcast on the Internet. -
Page 32: Internet Portal
Internet radio portal Portal registration is not required to use your Solo or Duetto, or to listen to Internet stations, but the Internet radio portal website will allow you to organize your Internet radio station favorites list. To register your Solo or Duetto with the portal, switch to Internet radio mode, then obtain your radio’s unique portal access code by... -
Page 33: Spotify Connect
3. Play a song on Spotify and press ‘DEVICES AVAILABLE’. 4. Choose ‘CA Solo’ or ‘CA Duetto’ and your music will start playing out loud. Note it may take a moment for Solo or Duetto to show in the “Devices Available” list. - Page 34 Spotify Connect as shown on a smart device. To expand the displayed artwork on Solo or Duetto, press the Menu knob in briefly. Press again to return to the standard display. Note: Once a connection has been established, the Spotify account is linked to both the App and the unit,...
- Page 35 Spotify can be stored and recalled as a Preset as described in front panel controls. The Presets will also turn on Solo/Duetto from standby if a station or source has been save to that Preset. Note when going to Spotify Playlist from a Preset it usually starts playing at the beginning of the Playlist.
-
Page 36: Music Player
WMA, or FLAC from a computer on the same network your Solo or Duetto is connected to, or from a USB Flash stick or a hard drive. Ensure Solo or Duetto has the ‘Keep Network Connected’ option turned On to enable ‘Play to’ Note: functionality. -
Page 37: Wake-On-Lan/Prune Servers
(typically Windows Media Player). The first menu shows a list of media types, for example Music, Video, Pictures and Playlists. Solo and Duetto can only play music and playlists, not videos or pictures. There is also a search function which finds tracks in a similar way to the Internet radio search. -
Page 38: Browsing
Each time you press Info , a different item of metadata is displayed. My playlist Solo and Duetto hold a queue of up to 500 tracks in My playlist. Playlist tracks can be a mixture from multiple (available) UPnP servers and an attached USB device. To manage the playlist, press and hold the Menu knob >... -
Page 39: Repeat And Shuffle
Setting up a music server In order for Solo and Duetto to play music files from a computer, the computer must be set up to share files or media. UPnP media sharing allows devices like Solo and Duetto to play music from a shared media library, navigating through tag menus such as Artist, Album, or Genre. - Page 40 4. In WMP, enable media sharing (Library > Media sharing…). Make sure Solo or Duetto has access to the shared media by selecting it and clicking Allow. You can also set a name for the shared media in Settings… Click OK to close the dialogue boxes.
- Page 41 Using the “Play To” feature in Windows 7 to stream media One of the new Windows 7 features includes a feature called “Play To” and this lets your PC running Windows 7 control Solo or Duetto to push media and use as a universal remote control for your media collection.
-
Page 42: Dlna
Artist, album, codec/sampling rate, playback buffer DLNA Solo and Duetto support the industry standard DLNA (Digital Living Network Alliance) 1.5 digital media renderer. This allows you to "Play To" other devices like Solo or Duetto on your home network. -
Page 43: Dab/Dab+ Scanning
To start a scan manually in DAB mode, press and hold the Menu knob > Scan. Once the scan is complete, Solo or Duetto shows a list of available DAB stations. A question mark before a station in a list indicates the station is currently unavailable. Depending on the cause of the loss of signal this may be only temporary. -
Page 44: Slideshow
To change station order in DAB mode, press and hold the Menu knob > Station order > then Alphanumeric, Ensemble, or Valid. Presets DAB stations can be stored and recalled as Presets as described in Front panel controls. The Presets will also turn on Solo/Duetto from standby if a station has been save to that Preset. -
Page 45: Tuning Stations
Menu knob > Audio setting > Listen in mono only > Yes. Presets FM stations can be stored and recalled as Presets as described in Front panel controls. The Presets can also turn Solo and Duetto on from standby mode if a station is saved. -
Page 46: Bluetooth
Duetto. Connected Device – details of the currently connected Bluetooth device. Paired Device List – list of up to eight devices that have been paired with Solo or Duetto. PRESETS: Bluetooth can be saved as a Preset and Presets can turn on the unit from standby. -
Page 47: Nfc
If your Bluetooth-enabled device (such as a smart phone or tablet) has NFC, be sure your device’s screen is unlocked and has NFC turned on. Put Solo or Duetto in Bluetooth mode by rotating the Source knob to the Bluetooth icon and pressing the knob in briefly to select. Now place the backside of your smart device in the vicinity of the NFC sticker atop Solo or Duetto’s cabinet. -
Page 48: Auxiliary Inputs
Optical in is highlighted and press the Source knob in to select. To use Solo or Duetto as a sound bar for your TV, change your TV’s PCM output to On (consult your TV’s user manual on how to do this, but it is typically found in the TV’s “Settings” menu), and turn your TV speakers Off. -
Page 49: Alarms
If you set the Alarm source to wake to Aux in or Optical in and you have a device connected to Solo or Duetto, Solo and Duetto cannot activate the device. The device needs to be on and playing when the unit wakes in Aux or Optical mode. -
Page 50: Power Failure
Power failure In the event of a loss of power, Solo and Duetto will remember a set alarm time. However, the alarm cannot activate if there is no power. If the time has been set to “Update to Network”, and “Keep Network connected”... -
Page 51: Error Messages
Duetto. Connect to the unit using a Spotify Connect account. Spotify mode – Waiting for playback information; for example, when the ‘Press Play on smart audio playback is moved by the device…’ Spotify App to a different Solo or Duetto or the smart device itself. -
Page 52: Troubleshooting
View settings, and add to router list. Check distance to your router; see if your Insufficient Wi-Fi signal computer can connect to the same network strength in the same location as Solo or Duetto. Unknown encryption Change encryption method on router. Solo Cannot connect to method and Duetto support WEP, WPA, and WPA2. -
Page 53: About The Wood Cabinets, Sound, And Placement
Playing a poor quality video on a high quality HDTV can expose flaws in the recorded picture. Likewise, streaming a low quality or low bit rate recording on Solo and Duetto may reveal artifacts or noise you had not previously heard. Solo and Duetto cannot make a substandard recording sound superior. -
Page 54: Specifications
The Bluetooth® word mark and logos are registered trademarks owned by the Bluetooth SIG, Inc. and any use of such marks by Como Audio, LLC is under license. Other trademarks and trade names are those of their respective owners. -
Page 55: More Information/Contact
21 Drydock Avenue Boston, MA 02210 USA info@comoaudio.com Copyright 2016 by Como Audio, LLC. All rights reserved. This manual was written by Peter Skiera and cannot be reproduced in whole or in part without permission from Como Audio, LLC. CM0916...