
Summary of Contents for Swann SWADS-140DCM
- Page 1 READ ME FIRST Navigator HD Dash Camera Portable Vehicle Recorder with GPS Tracking FULL CAPTURE ACCIDENTS & INCIDENTS ON THE ROAD TRACK EXACT MOVEMENTS & Instruction Manual LOCATIONS...
-
Page 2: About This Manual
For the latest version of this user manual, please visit: www.swann.com FCC Statement This equipment has been tested and found to comply with the limits for Class B digital device, pursuant to part 15 of the FCC Rules. -
Page 3: Ce Regulatory Notice
The values displayed in this system, such as speed, position, and the distance warning to the speed camera set points, may be inaccurate due to the influence of surrounding environment. They are for your reference only. • Swann is NOT responsible for the loss of any data/content during operation. -
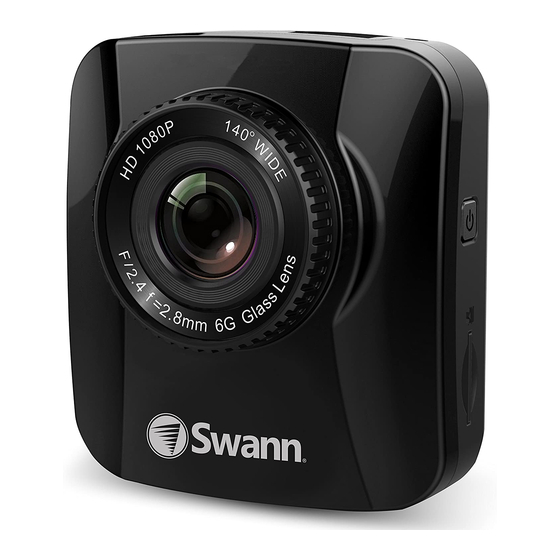
Page 4: Getting Started
GETTING STARTED Camera Overview Speaker Camera Lens LED Indicator Yellow = charging Red = recording Display Function Buttons Use these buttons to perform operations corresponding to the icons displayed on the bottom of the screen... - Page 5 GETTING STARTED Bracket Slot Mini USB Port Power Button Mini HDMI Port microSD Card Slot Reboot Button Microphone...
-
Page 6: Camera Setup
GETTING STARTED Camera Setup Insert a microSD memory card Contacts Notes • Do not remove or insert the microSD card when your camera is powered on. This may damage the card. • Your camera supports microSD cards of up to 32GB in capacity. - Page 7 GETTING STARTED Getting Started Mount to vehicle Notes • To obtain the best open-field view, install your camera above the center of the dashboard near the rear-view mirror. • Never install the camera in a location that will block your view of the road, interfere with the mirror or controls, or obstruct the airbag.
- Page 8 GETTING STARTED Connect to power Plug the USB power adapter into the cigarette lighter socket in your vehicle, and then connect to the mini USB port on your camera using the 4 meter USB charging cable. Your camera turns on and off automatically with the start and stop of your vehicle engine.
-
Page 9: Using Your Camera
USING YOUR CAMERA Turning on and off • Starting the engine will automatically turn on your camera that is connected via the USB power adapter / port in your vehicle. • Your camera goes into Video mode and starts recording immediately after it powers up. -
Page 10: Video Mode
USING YOUR CAMERA Video Mode Your camera automatically starts capturing HD (High-Definition) quality videos onces it powers up in your vehicle. The Video Mode screen The status bar at the top of the screen instantly provides you with information about video resolution, available recording time, GPS connectivity, active features,... - Page 11 USING YOUR CAMERA • You can take a snapshot without interrupting the video recording by pressing . You can view your snapshots on the Photo Album screen in Photo mode - see page 14. • You can manually stop an ongoing recording by pressing .
- Page 12 USING YOUR CAMERA Viewing and managing videos to display the Video When your camera is on standby, press Playback screen. Thumbnails for your video clip recordings are shown on the screen. • To browse and select video clips, press or . Protected video clips are displayed with the icon and have the label "SOS"...
- Page 13 USING YOUR CAMERA To... Choose Protect One and press OK. The Protect the selected video icon appears on the selected video clip clip thumbnail. Choose Protect All, press OK and Protect all video confirm your choice by choosing Yes. clips currently on the memory card icon appears on all video clip thumbnails.
-
Page 14: Photo Mode
USING YOUR CAMERA Photo Mode In addition to HD video recording, you can use your camera to capture super clear photos wherever you go. The Photo Mode screen When your camera is on standby, press to toggle to Photo mode. Icons tell you about picture resolution, number of images remaining and memory card &... - Page 15 USING YOUR CAMERA To... Choose Delete One and press OK. Delete the selected photo Protected photos cannot be deleted. Remove file protection from the photo first. Choose Delete All, press OK and Delete all photos confirm your choice by choosing Yes. currently on the memory card A notification is displayed if the memory...
-
Page 16: Connecting To A Computer
USING YOUR CAMERA Connecting to a computer You can transfer your HD video recordings and photos on the memory card to a computer. Use the short USB data cable included with your camera to make the connection. Notes • The first time you use a USB connection, your computer will install the appropriate USB drivers. -
Page 17: Camera Settings
CAMERA SETTINGS You can customize video, photo and other various camera settings via the Settings screen. (when your camera is on standby) until the Settings Press screen appears. The Settings screen Video/Photo settings Device settings The Settings screen is organized under two menu tabs: •... - Page 18 CAMERA SETTINGS Video/Photo Settings The Video Settings menu contains the following options: Options Movie Mode Select the resolution of the video recordings. Still Image Size Select the resolution of the captured photos. The higher the resolution, the more detailed the captured photo. Note: Higher resolution photos take up more memory storage.
- Page 19 CAMERA SETTINGS Options Motion Detection Select the motion detection sensitivity to enable the camera's motion detection feature. This feature is handy when you want to keep your vehicle protected when it's parked. To start Motion Detection recording, simply press and hold the OK button when your camera is on standby in Video mode until a 10-second countdown is initiated on the screen.
-
Page 20: Device Settings
CAMERA SETTINGS Device Settings The Device Settings menu contains the following options: Options Car ID Enter your car license plate number. Your Car ID will be displayed on the screen. Driver Fatigue Turn this on to hear an audible warning after 3 hours of continuous driving. - Page 21 CAMERA SETTINGS Options GPS Stamp Select if your GPS position and speed information is captured along with the recordings. This is dependent on your camera acquiring a GPS fix during your journey. Clock Settings Set the current date and time. USB Function Select the appropriate USB mode when using the USB data cable to connect to...
- Page 22 Navigator GPS software on your computer. Installing the Navigator GPS software Download the Swann Navigator GPS Setup file from the Navigator HD Dash Camera product page at: www.swann.com Double-click the Setup file, and then follow on-screen instructions to install the Swann Navigator GPS software.
- Page 23 NAVIGATOR GPS Video playback pane Video timeline G-sensor chart Video playlist Find and play recordings Capture screenshot from the video Save any selected files to another folder Delete any selected files Configure map and language settings Compass Speed Playback and volume controls Turn on/off Autoplay Save GPS data as a KML file (KML is a file format used to display geographic data in an Earth browser such as...
-
Page 24: Helpdesk / Technical Support Details
Helpdesk / Technical Support Details Swann Technical Support All Countries E-mail: tech@swann.com Telephone Helpdesk 1800 627 2799 USA Parts & Warranty 1800 627 2799 (M-F, 9am-5pm US PT) AUSTRALIA 1800 788 210 NEW ZEALAND 0800 479 266 0808 168 9031 ©...