Samsung GEAR S User Manual
Hide thumbs
Also See for GEAR S:
- User manual (115 pages) ,
- Quick reference manual (21 pages) ,
- Experience manual (11 pages)
Table of Contents
Advertisement
Quick Links
Download this manual
See also:
Quick Reference Manual
Advertisement
Table of Contents

Related Manuals for Samsung GEAR S


Summary of Contents for Samsung GEAR S
-
Page 1: User Manual
User Manual Please read this manual before operating your device and keep it for future reference. -
Page 2: Table Of Contents
Optional Accessories . . . . . . . . . . . . . . . . . . . . . . . . . . 10 Customizing Your Gear S Style . . . . . . . . . . . . . . . . 39 Device Layout . - Page 3 Upgrading the Gear S . . . . . . . . . . . . . . . . . .
- Page 4 Samsung Gear . . . . . . . . . . . . . . . . . . .
-
Page 5: Read Me First
Read Me First • Please read this manual before using the Gear S Samsung is not liable for performance issues to ensure safe and proper use. or incompatibilities caused by edited registry settings or modified operating system software. • Descriptions are based on the Gear S default Attempting to customize the operating system settings. - Page 6 Wi-Fi feature. upgrade the device. • Default apps that come with the Gear S are Instructional Icons subject to updates and may no longer be Warning: Situations that could cause injury to supported without prior notice. If you have yourself or others.
-
Page 7: Intellectual Property
All Intellectual Property, as defined below, owned by or which is otherwise the property of Samsung or its respective suppliers relating to the SAMSUNG mobile device, including but not limited to, accessories, parts, or software relating thereto (the “mobile device”), is proprietary to... -
Page 8: Disclaimer Of Warranties; Exclusion Of Liability
PAGE ENCLOSED WITH THE PRODUCT, USE OF THE PRODUCT OR ARISING FROM THE PURCHASER TAKES THE PRODUCT THE BREACH OF THE EXPRESS WARRANTY, “AS IS”, AND SAMSUNG MAKES NO INCLUDING INCIDENTAL, SPECIAL OR EXPRESS OR IMPLIED WARRANTY OF CONSEQUENTIAL DAMAGES, OR LOSS OF ANY KIND WHATSOEVER WITH RESPECT ANTICIPATED PROFITS OR BENEFITS. -
Page 9: Notice From At&T
Modification of Software DOWN THE DEVICE AND CONTACT YOUR CARRIER TO RESTORE THE DEVICE TO THE SAMSUNG IS NOT LIABLE FOR CARRIER AUTHORIZED SETTINGS. PERFORMANCE ISSUES OR INCOMPATIBILITIES CAUSED BY YOUR Notice from AT&T EDITING OF REGISTRY SETTINGS, OR YOUR... -
Page 10: Samsung Electronics America (Sea), Inc
However, Samsung Knox™ is Samsung’s security AT&T’s privacy tools do not apply to applications platform and is a mark for a Samsung device available outside of AT&T. Please review the tested for security with enterprise use in mind. - Page 11 Inc. Samsung, Samsung Galaxy, S READ THIS INFORMATION BEFORE USING Voice, and S Health are all trademarks of YOUR MOBILE DEVICE. Samsung Electronics Co., Ltd. Other marks are the property of their respective owners. Samsung Limited Warranty Samsung Limited Warranty - This product Note: Screen images are simulated.
- Page 12 The EULA for this device is found in the Gear Manager application, which is required for operation of your device. You may also access this EULA at: samsung. com/us/Legal/SamsungLegal-EULAGEAR...
-
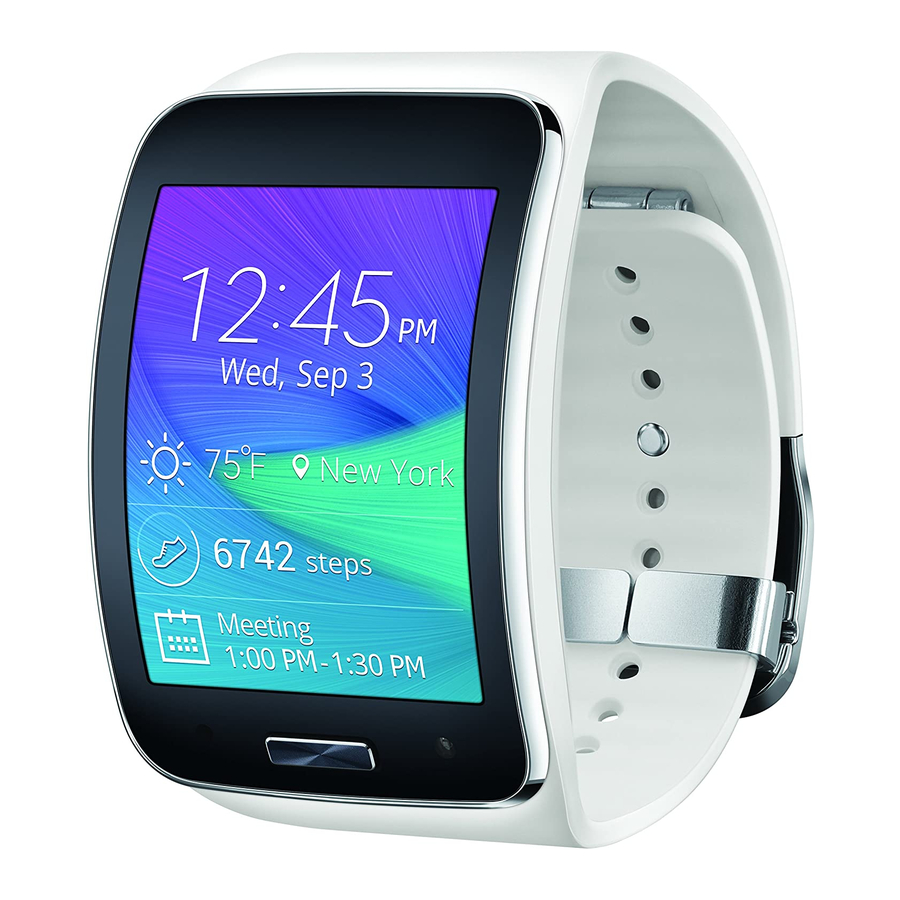
Page 13: Getting Started
Gear S calls, view and send messages, and more. • Charging dock and cable After you pair the Gear S with your smartphone, • you can use it in Gear Only mode to make calls, Quick start guide and send and receive messages, even if Gear S The items supplied with the Gear S and any is outside Bluetooth range of the smartphone. -
Page 14: Optional Accessories
Optional Accessories Device Layout • You can purchase additional accessories from your local Samsung retailer. Make sure they are compatible with the Gear S before Proximity purchase. sensor • Some accessories, such as docking devices, UV Sensor may not have the same water- and dust- resistance certification. - Page 15 • Press and hold to restart the not disassemble, modify, or repair your Gear S. device. Magnetic stripe cards, including Proximity Sensor • Detects when the Gear S is credit cards, phone cards, passbooks, near other items. and boarding passes, may be damaged by magnetic fields.
-
Page 16: Using The Sim Card
Using the SIM Card 2. Insert the SIM card on the inside of the SIM card cover with the gold-colored contacts facing outwards. Installing the SIM Card Insert the SIM card provided by the mobile telephone service provider. 1. Using the SIM ejector tool, remove the SIM card cover. - Page 17 Removing the SIM Card 3. Place the SIM card cover on the Gear S and press the cover to close it. 1. Using the SIM ejector tool, remove the SIM card cover. 2. Pull out the SIM card. Caution: Ensure that the SIM card cover is closed tightly to prevent water and dust entering the device.
-
Page 18: Charging The Gear S
About the Charging Dock Use the charging dock to charge the battery in Charging dock with battery your Gear S. The charging dock also contains a battery. Take care not to lose the dock. • To charge the Gear S, connect it to the charging dock. -
Page 19: About The Battery
Battery operating time is affected by device Before using your Gear S for the first time, usage patterns and the condition of the battery. charge the battery. You can charge the Gear S by connecting it to the charging dock and plugging •... - Page 20 1. Connect the Gear S to the Charging dock with Note: Make sure the Gear’s microphone the charging terminals facing each other. is not obstructed when you are speaking into it while charging. 2. Connect the USB charger to the USB port on...
- Page 21 3. After charging, disconnect the Gear S from the Checking the Battery Level Charging dock and unplug the USB charger from the electrical outlet.
- Page 22 Wearing the Gear S 2. Open the clasp and place the strap around your wrist. Adjust the length of the the strap by moving the clasp, and then secure it with the 1. Release the buckle. pin and press the buckle to close it.
-
Page 23: Replacing The Strap
Replacing the Strap 2. Insert one end of the Gear S into the mounting hole of a new strap. Then, insert the other end of the Gear S into the hole and pull the strap Detach the strap from the Gear S to replace it up at the same time. -
Page 24: Maintaining Water And Dust Resistance
Maintaining Water and Dust 3. Ensure that the Gear S is sitting securely in the mounting hole and that it is properly aligned Resistance with the strap. This device is rated IP67 using the Ingress Protection rating system. Your device has been tested in a controlled... -
Page 25: Turning The Gear S On Or Off
[071516] • Do not expose the device to salt water or Turning the Gear S On or Off ionized water, or to water over 1.0 meters deep for more than 30 minutes. If your device is exposed to fresh water, dry it thoroughly with a clean, soft cloth. -
Page 26: Connecting The Gear S To A Smartphone
Gear S and Samsung Gear app functions. Connecting the Gear S to a You will not receive calls or SMS messages to the Gear S number until you have set the Mobile Smartphone Data setting to Always On. - Page 27 Pairing Your Gear S to a Smartphone When connected remotely, the Gear S is not The first time you turn on the Gear S, follow the connected to the smartphone via Bluetooth, but is on-screen instructions to download and install still connected to the smartphone via the mobile the Samsung Gear app on your smartphone.
- Page 28 Samsung Gear Manager app launches on the 2. On Smartphone: Make sure Bluetooth is on, smartphone. and then select the Gear S from the list of scanned devices. Tap OK when the Bluetooth pairing request window appears. 3. On Gear S: When the Bluetooth pairing request appears, tap OK.
- Page 29 Signing in to Your Samsung Account During the pairing process, the smartphone will prompt you to sign in to your Samsung account. Signing in to your Samsung account allows the Gear S and the smartphone to remain connected remotely when they are not connected via Bluetooth.
-
Page 30: Basics
Basics Using the Touchscreen To open an app, to select a menu item, or to Caution: To avoid damaging the press an on-screen button, tap it with a finger. touchscreen, do not tap it with anything sharp or apply excessive pressure to it with your fingertips. - Page 31 Touch and Hold Touch and Hold with Two Fingers Touch and hold to access available options. Touch and hold with two fingers to open a list of recently-used apps.
- Page 32 Double-tap Double-tap With Two Fingers When viewing a picture, SMS message, or email, To check Gear S status, including Bluetooth, double-tap to zoom in. Double-tap again to return. the connection to the smartphone, sound mode, mobile network status, and remaining battery power, double-tap anywhere on the screen with two fingers.
- Page 33 Swipe Drag Use your finger to swipe from the top, bottom, left To move an app on the Apps screen, touch and or right edges of the screen to perform actions. hold it and drag it to a new position. When using an app, swipe left or right to perform an action, such as scrolling through pictures in Gallery, or moving to a new song in Music Player.
-
Page 34: Basic Controls
Turning the Screen On or Off zoom out. To turn the screen on: ► Press the Power/Home key. The Gear S will display the Clock screen. Tip: The screen turns off if the Gear S is not used for a period of time. You can specify the screen timeout period in the Gear Settings. - Page 35 On the Clock screen, drag the screen upwards Adjusting the Volume from the bottom edge of the screen, and then Adjust the volume of sound that Gear S plays. tap Settings > Sound > Sound mode > Vibrate or Mute.
-
Page 36: Home Screen Layout
Widget or feature Notifications View events, such as missed calls or new messages, received on the Notifications Widgets Gear S and on the smartphone. Moments Bar View current status. For more information, see “Moments Bar” on page 36. Clock (Home) View the time, plus other info, depending on the clock style. - Page 37 Navigating the Home Screen Panel Widget or feature From the Clock screen: Widgets Music Player, S Health, and News briefing Widgets available by default, • Swipe up from the bottom to display the Apps or you can Add widgets. screen. •...
- Page 38 Returning to the Previous Screen Adding Widgets to the Home Screen Drag the screen downwards from the top edge of You can customize the home screens by adding the screen to return to the previous page. widgets to the right of the Clock screen. To add a widget: ►...
-
Page 39: Notifications
Gear S. To clear a single notification: When the Gear S is not connected to the smartphone via Bluetooth, you can still receive 1. From the Notifications screen, select a notifications from the smartphone. -
Page 40: Moments Bar
You can choose the types of notifications you To view status icons, or activate features quickly, want to receive on your Gear S. The Gear S must drag down from the top of the Clock screen to be connected to the smartphone via Bluetooth display the Moments bar. -
Page 41: Clock Screen
• Clock Screen Connection mode: The current connection between the Gear S and smartphone. Modes include: Gear Only, Connected remotely, and The Clock screen is the home screen for the Connected via BT (Bluetooth). Gear S. • Volume: Drag the slider to adjust sound When you press the Power/Home key from any volume. - Page 42 Customizing the Clock Screen To choose when the clock displays: You can choose to have the clock display all the You can choose the type of clock to display on time, even when the screen times out. When the Clock screen, and even customize the clock’s the Clock always on option is enabled, the features.
-
Page 43: Customizing Your Gear S Style
Customizing Your Gear S Style Choosing a Color Theme The color theme applies to the Gear S menus. You can make your Gear S your own by choosing ► From the Apps screen, tap Settings > Style > the wallpaper, color theme, and font. -
Page 44: Apps
Apps Opening Apps To open an app: To open the Apps screen: ► From the Clock screen, drag upwards from the ► On the Clock screen, drag upwards from the bottom edge of the screen to display the Apps bottom edge of the screen. screen, and then select an app icon to open it. -
Page 45: Status Icons
When the Gear S and the smartphone are Common icons are listed in the table below. connected via Bluetooth, you can download and install apps on the Gear S via the smartphone. Icon Status ► On the Apps screen, swipe upwards and tap Bluetooth connected. - Page 46 Gear S cannot use Gear Only play a vibration for notifications, instead of mode. a sound. 4G service. The Gear S is connected to Airplane mode enabled. Gear S is not the mobile network, and 4G coverage is connected to the mobile network. While in available.
-
Page 47: Setting A Privacy Lock
Gear S when it is disconnected call or send messages, or use the other from the smartphone. features. If you set a privacy lock, the Gear S will lock automatically when it disconnects from the smartphone. Setting a Privacy Lock You can set a 4-digit PIN to secure the Gear S. -
Page 48: Entering Text
Entering Text Changing the Input Language While entering text, you can change the input Keyboard layout language at any time. Use one of these methods: • When you tap a text entry field on the screen, a Touch and hold 123 at the lower-left corner of keyboard displays to enter text. - Page 49 Changing the Keyboard Layout Use Additional Keyboard Functions ► Touch and hold 123 at the lower-left corner of ► Touch and hold 123 at the lower-left corner of the keyboard, tap , and then select a the keyboard to access other functions. keyboard layout.
-
Page 50: Motions
Motions Entering Text by Voice Speak the text you want to enter. You can use motions to control the Gear S. ► Touch and hold 123 at the lower-left corner of the keyboard, and then tap Wake-up Gesture When the Wake-up gesture is enabled, the Gear S recognizes when you pick it up and displays a screen. - Page 51 To enable or disable the Mute/Pause gesture: ► On the Apps screen, tap Settings > Motions and tap Mute/pause. Note: Excessive shaking or impact on the Gear S may result in unintended inputs.
-
Page 52: Power Saving Features
All functions except calling, messaging, and Move audio, images, or other types of files from a notifications are turned off, and mobile data computer to the Gear S, or vice versa. connection deactivates when the screen turns Caution: Do not disconnect the off. -
Page 53: Upgrading The Gear S
2. Connect the charging dock to a computer software. using a USB cable. To upgrade the Gear S, connect the Gear S to the 3. On the computer, use the file browser and smartphone via Bluetooth, and use the Samsung double-click Gear S (XXXX) >... - Page 54 • Do not turn off the smartphone while the Gear S is upgrading. • While upgrading the Gear S, do not launch other apps on the smartphone or operate the Gear S. Doing so may overload the smartphone.
-
Page 55: Connections
When connected remotely, the Gear S is not When you configure Gear S connection settings, connected to the smartphone via Bluetooth, but is they may affect the way your Gear S works with a still connected to the smartphone via the mobile connected smartphone. -
Page 56: Bluetooth
Bluetooth Gear Only In Gear Only mode, the Gear S is not connected When you connect the Gear S to your to the smartphone, and is operating as a smartphone via Bluetooth, the Gear S can independent device. access all Gear S and Samsung Gear app While in Gear Only mode, the Gear S will only functions. - Page 57 To disconnect from a Bluetooth headset: ► On Gear: From the Apps screen, tap Settings When you pair the Gear S with a Bluetooth > Connections > Bluetooth, and then tap the headset, the Gear S remembers the pairing and name of the headset.
- Page 58 Some devices, especially those that are not tested or approved by the Bluetooth SIG, may • Ensure that your Gear S and the other be incompatible with your Gear S. Bluetooth device are within the Bluetooth connection range (10 m). The distance may •...
-
Page 59: Mobile Networks
Bluetooth. Access to the mobile network will turn off automatically when the Gear S is connected to the smartphone via The Gear S can connect to mobile networks, to Bluetooth, and turn on when the Bluetooth is allow remote connection to a smartphone, and for disconnected. -
Page 60: Wi-Fi
Wi-Fi Adding Wi-Fi Networks You can also add Wi-Fi networks manually, by You can connect the Gear S to Wi-Fi to connect entering information about the network. You may to your smartphone remotely, or to update your need to do this if the Wi-Fi network is hidden, or news and weather information when the Gear S not visible in a scan. -
Page 61: Remote Connection
Remote Connection You can remotely connect the Gear S to the smartphone when a Bluetooth connection between the devices is not available. When this feature is activated, you can receive notifications from the smartphone and use apps that require a network connection on the Gear S. For more information, refer to “Connection Modes”... -
Page 62: Apps
You can choose the phone number that displays Make a voice call using the keypad, from your for calls you make from the Gear S. By default, contacts list, or from the call logs. outgoing calls display the smartphone phone number. - Page 63 Select a contact, and then tap select a phone number. Note: If the Gear S becomes hotter than usual due to a long call or a hot environment, calls may disconnect. To make a call again, wait for the Gear S to cool down.
- Page 64 Receiving calls Rejecting a Call When a call comes in, you can reject the call, and send the caller to voicemail. To reject a call, use one of these methods: • Drag to the left. To send a message to the caller, select a message from the list of rejection messages.
- Page 65 If you miss a call, a notification displays on the When you receive a new voicemail notification, screen. you can access voicemail from Gear S to listen to the message. To view missed call notifications: 1. From the Clock screen, swipe from the left •...
- Page 66 Gear S. Turn off call forwarding before switching • If you do not answer the call on your Gear S, or removing SIMs in either the the caller may leave a voicemail that you can smartphone or Gear S, to avoid calls listen to on your Gear S.
- Page 67 Turn Call Forwarding On or Off from Gear S Options During Calls ► From the Apps screen, tap Settings > Call > During a call, you can use in-call options. Auto call forwarding, and then tap the check box beside Turn on.
- Page 68 Transferring Calls to the Smartphone Muting the Microphone You can transfer the call from the Gear S to You can to turn off the microphone so that the the smartphone, to continue the call on the other party cannot hear you.
-
Page 69: Contacts
Contacts Using Contacts When you find a contact on the Gear S, tap the When the Gear S and the smartphone are contact to access options: connected, the Gear S automatically retrieves • Make a call: Tap , or tap a phone number if contacts from the smartphone and displays them the contact has more than one number saved. -
Page 70: Messages
When you send and view messages from View messages and reply, or call the sender Gear S, the connection mode affects how the using the Gear S. The Gear S displays messages messages are handled: that are sent to the Gear S and smartphone. - Page 71 Viewing Incoming Messages Gear Only: • All messages are sent from the Gear S phone Viewing messages as they arrive: number. Only messages sent to the Gear S When you receive a new message, Gear S alerts phone number can be viewed on Gear S.
- Page 72 Responding to Messages Clearing Message Notifications While viewing a message notification, you can After you view a message, you can clear respond to the message, call the sender, or open the notification so it no longer displays on the Messages app to view the message thread. Notifications.
-
Page 73: Email
Email Reading Emails ► On the Apps screen, tap Email and select an View emails received on the smartphone and email to view it. While viewing an email, you reply to them. can use these options: • To zoom in on the screen while viewing an Sending Emails email, double-tap the screen or spread your fingers apart on the screen. -
Page 74: S Health
Before using these apps, read the instructions carefully. Consult a When the Gear S is synced with a compatible medical professional if you experience S Health app on the smartphone, you can use any health problems or need medical additional features. - Page 75 • suggest that you talk with your doctor before you A heart murmur or a rapid or pronounced start an exercise program, particularly if you have heartbeat any of the following conditions: • Muscle pain when walking upstairs or up a hill •...
- Page 76 • • You have impaired glucose tolerance, also call Do not look directly at the heart rate sensor’s pre-diabetes. lights. Doing so may impair your vision. Please make sure children do not look directly at the lights. When in Doubt - Check it Out •...
- Page 77 • Do not talk, yawn, or breathe deeply while between the device’s strap and your wrist, taking heart rate measurements. Doing so such as body hair, dirt, or other objects may may cause your heart rate to be recorded prevent the light from reflecting evenly. Please inaccurately.
- Page 78 When measuring your heart rate, wear the Gear S snugly above your wrist as shown in the figure 2. Read the information about using this app and below. Do not fasten the Gear S too tightly. tap OK. 3. Follow the on-screen instructions to select your gender, and enter your birth date, physical statistics, and choose other options.
- Page 79 Setting an Alert for Inactive Time Access Display alerts on the screen if you do not move additional options for a specific period of time. ► On the Pedometer main screen, tap > Inactive time, and then tick Inactive time. Viewing Your Step Count in a Graph Exercise Total calories...
- Page 80 6. To finish exercising, tap the screen and tap Location feature is active and that Stop > OK. the Gear S and the smartphone are connected at all times while using this 7. Swipe to the left or right to view your exercise information.
- Page 81 If you set the maximum professional. heart rate to be measured automatically, the Gear S will calculate it using “210 - (0.65 x Be aware of following conditions before age)”. exercising in cold weather conditions: Caution: If you feel discomfort while •...
- Page 82 Using the Coaching Feature while Exercising The feedback is provided by the feature via prompts, such as ‘speed up’, ‘keep up this pace’, in Running Mode and ‘slow down’. When you first start to use the Use the personalized coaching feature to coaching feature, it will estimate an appropriate exercise safely and effectively.
- Page 83 Viewing a Log of Burned Calories Running Compare your burned calorie records for a period 1. On the Exercise main screen, tap Running. by viewing them in a graph. 2. Tap and enable Coaching, and then tap ► On the Exercise main screen, select a type of Coaching to set a training goal, duration, and exercise and swipe upwards.
- Page 84 For more information on proper wear and use, see samsung. com/us/heartratesensor.
- Page 85 • Be Aware of Following Conditions Before Do not apply excessive force to the sensor. Measuring your Heart Rate: • Heart rate measurements may vary depending • Rest for 5 minutes before taking on the measurement method and the measurements. environment they are taken in.
- Page 86 Access additional options. Maximum heart rate View data in a graph Viewing Heart Rate Records in a Graph Tip: Only records from the past thirty days are saved. You can view previous View and compare your heart rate records for a data on the mobile device where the period in a graph.
- Page 87 Viewing Sleep Information Monitor your sleep patterns and record how much sleep you get by detecting body movements while you sleep. You can transfer the records to the smartphone. When the Gear is monitoring your sleep duration, blocking mode is activated. 1.
- Page 88 Viewing your Sleep Data in a Graph Measuring the UV Level ► On the Sleep main screen, swipe upwards. Measure UV levels in your current location and record the UV level data. Tip: Only records from the past thirty 1. On the All apps screen, tap S Health > UV. days are saved.
- Page 89 Viewing the UV Level Records in a Graph Be Aware of the Following Conditions Before Measuring UV Level: On the UV main screen, swipe upwards. • During winter or in humid environment, measurements may differ from the actual UV Access additional options. level.
- Page 90 Gear may be affected by electronic store, nor transmit your personal information. interference from other devices. Avoid using (But if you sign in to your Samsung account the Gear near other devices that transmit radio from S Health, your data may be saved waves.
-
Page 91: Schedule
Schedule S Voice View the events scheduled on the smartphone’s Perform various tasks simply by speaking. Calendar. Once you activate S Voice , you can wake up the ™ 1. On the Apps screen, tap Schedule. Gear from any screen when you say “Hi Gear.” 2. - Page 92 Changing the Wake-up Command Tips for Better Voice Recognition • Speak clearly. You can speak the wake-up command to launch S Voice when the device is in standby mode. By • Speak in quiet places. default, the wake-up command is “Hi Gear”, but •...
-
Page 93: Alarm
Alarm Stopping Alarms ► Drag outside the large circle to stop an alarm. If the alarm includes a snooze option, Setting Alarms drag outside the large circle to repeat the 1. On the Apps screen, tap Alarm > alarm after a specified length of time. 2. -
Page 94: Find My Device
3. On Gear: The address of the current location on the smartphone, or tap Stop on the Gear S. of the smartphone displays. To display the location on a map, tap Show on map. -
Page 95: Gallery
3. Select a photo. Gear S Use the Samsung Gear app to transfer photos to Deleting Photos your Gear S, to view on the Gear S. Deleting one photo 1. On smartphone: From the Apps screen, tap Samsung Gear > My apps. -
Page 96: Music Player
Music Player Automatically Transferring Music from a Smartphone to Gear S During Charging Listen to music saved on the Gear S and on the When Auto send tracks to Gear is turned smartphone. on, tracks from the selected playlist will be... - Page 97 Playing Music Controlling Music Playback on the Smartphone 1. On the Apps screen, tap Music Player. When you play music on your smartphone, you 2. When the pop-up window with information can control playback from the Gear. about transferring music to the Gear appears, tap OK.
-
Page 98: Milk Music
Galaxy Apps. To download and install an app on bicycle. the Gear S, the Gear S must be connected to the 1. On the Apps screen, tap Navigator. smartphone via Bluetooth, and the smartphone must have access to the mobile network or to 2. -
Page 99: News Briefing
• To view your current location and the route Note: To set the Gear to vibrate to to the destination, tap warn you of an upcoming turn, drag the • To view the search history, swipe to the right. screen downwards from the centre of •... -
Page 100: Running
Running Starting to Exercise 1. Gear On the All apps screen, tap Running Running records your exercising by tracking your and tap the screen. distance, pace, and time. Check your monthly 2. Gear Tap to play music or tap not to records and compare them with your friends. -
Page 101: Weather
Weather View weather information on the Gear S. When the Gear S and smartphone are connected via Bluetooth or remote connection, you can get weather information for locations you set on the smartphone. In Gear Only mode, the app displays local weather information. -
Page 102: Settings
Settings Style Wallpapers Choose a background for the screens. Clocks 1. On the Apps screen, tap Settings > Style. 1. On the Apps screen, tap Settings > Style. 2. Tap Wallpapers, and then configure options: 2. Tap Clocks, and then configure options: •... -
Page 103: Call
You may need to swipe left or right to Configure options for forwarding incoming calls view available themes, from your smartphone to your Gear S. 1. On the Settings screen, tap Call. Font 2. Tap Auto call forwarding to configure Change the font type and size for the screen. - Page 104 SIMs in either the • Caller ID: Set whether to display your caller smartphone or Gear S, to avoid calls ID to other parties for outgoing calls. being routed to unintended devices. •...
-
Page 105: Sound
Sound Display Change the settings for various sounds on the Change the settings for the display. Gear. ► On the Settings screen, tap Display. • ► On the Settings screen, tap Sound. Brightness: Adjust the brightness for the • display. Sound mode: Select Gear’s sound mode •... -
Page 106: Connections
Gear S. secured. If there are obstacles between • Make visible: Set the Gear S to appear in the devices, the operating distance may be other devices’ lists when they search for reduced. - Page 107 Always on: When enabled, the Gear S is always connected to the mobile network, when it is available. Always off: When enabled, the Gear S never accesses the mobile network. Note that if the Gear S can’t access the mobile network, you cannot use the remote...
-
Page 108: Airplane Mode
Wi-Fi connection or Gear Only modes. • Mobile data: Set the Gear to use data Activate the Wi-Fi feature to connect to a Wi-Fi connections on any mobile network. network. This feature is available when the Gear • Data roaming: Set the Gear to use data is not connected to the smartphone. - Page 109 Notifications Data Usage Keep track of your data usage amount. Stay up-to-date with a variety of events, such as missed calls or new messages, received on the ► On the Settings screen, tap Connections > Gear and on the smartphone. Data usage.
-
Page 110: Messages
Messages Double Press Configure options for messaging. Set an app that instantly launches when you press the Power/Home key twice. ► On the Settings screen, tap Messages • ► On the Settings screen, tap Double press and Tap Outgoing number to choose to have select an option. -
Page 111: Accessibility
Screen reader on or off from any screen. what you can tap, select or turn on when a screen displays. Screen reader also affects Note: When you connect your Gear S to the way you interact with the screen with a smartphone, taps or touches. -
Page 112: Motions
Motions Language & Input Activate the motion recognition feature and Change the settings for text input. Some options change the settings that control motion may not be available depending on the selected recognition on your Gear. language. ► On the Settings screen, tap Motions. Language •... - Page 113 Change the Samsung keyboard settings. mark. ► On the Settings screen, tap Language & input Auto spacing: Set the Gear to > Keyboard settings > Samsung keyboard: automatically insert a space between • English (US): Select a default keyboard words.
-
Page 114: Power Saving
• Uses a grayscale Home screen. tapped. • Turns off all functions except calling, • Reset settings: Reset Samsung keyboard messaging, and notifications. settings. • Turns off access to Mobile networks. • Turns off Wi-Fi. -
Page 115: Reset Gear
Gear. Resetting the Gear will • Report diagnostics: Set the Gear to allow remove the data from the memory. After Samsung to collect the diagnostic and usage the reset, you can connect the Gear to a data for service improvements. different smartphone. -
Page 116: Samsung Gear App
You can disconnect the currently used Gear from You will not receive calls or SMS messages to the smartphone and connect a new Gear to the the Gear S number until you have Set the Mobile device. Data setting to Always On. - Page 117 Gear Only • Software version: View the Gear’s version In Gear Only mode, the Gear S is not connected information. to the smartphone, and is operating as an independent device. While in Gear Only mode, the Gear S will only...
-
Page 118: Edit The Gear Home Screen
1. On the Apps screen of the smartphone, tap Samsung Gear > Home screen styler > Samsung Gear. Clock and select a desired clock type. 2. Tap Image, and then tap images to select them. Tap Done to send the files to the Gear S... -
Page 119: Apps And Settings
Gear or on the smartphone. smartphone. You can configure notification settings. ► On the Apps screen of the smartphone, tap Samsung Gear > My apps > , select an ► On the Apps screen of the smartphone, tap app, and then tap Samsung Gear >... -
Page 120: Find My Gear
You can download apps for your Gear from Samsung Gear Apps. After you download apps 2. Tap Share location. with Samsung Gear, they are sent to your Gear 3. When the legal notice window appears, tap I automatically. Agree and tap OK. -
Page 121: Settings
Bluetooth connection ► On the Apps screen of the smartphone, between the devices is not available. Refer to tap Samsung Gear > Settings > Double “Remote Connection” on page 57 for more pressing home key, and then select an information. - Page 122 Samsung Gear > Settings > Voice control. forwarded to your Gear S. • If you do not answer the call on your Gear S, the caller may leave a voicemail that you can listen to on your Gear S. To use call forwarding, you must sign in to...
- Page 123 Turn Call Forwarding On or Off from Call forwarding continues until your Gear S and smartphone are connected again, via Bluetooth Samsung Gear App or remote connection. ► On smartphone: On the Apps screen, tap Samsung Gear > Settings > Auto call...
- Page 124 Gear. messages. 1. On the Apps screen of the smartphone, When your smartphone can’t detect the Gear, tap Samsung Gear > Settings > Edit text the pattern lock activates automatically on the templates. smartphone. 2. Select a template to edit. To add more...
- Page 125 Safety Assistance Uninstall Applications Set the Gear S to allow you to quickly send a You can uninstall apps that you’ve downloaded message to primary contacts in an emergency. from Samsung Gear Apps. Apps that are installed ►...
- Page 126 Security update: Set the Gear to check and download security updates. • Open source license: View open licence information. Samsung Gear Version View version information of the Samsung Gear app. ► On the Apps screen of the smartphone, tap Samsung Gear > Settings > Application version. ATT_R750A_UM_EN_NJ7_080116_FINAL...