Advertisement
Quick Links
Thank you for purchasing an OmniMount product.
Specifications are subject to change without prior notice.
Every effort has been made to provide accurate and error-free assembly and installation.
OmniMount Systems disclaims liability for any difficulties arising from the interpretation
of information contained in these instructions. If OmniMount products are used for pur-
poses other than their original intent, OmniMount, its distributors and retailers shall not
be held responsible or liable for injuries or property damage, direct, indirect, or conse-
quential, which may arise from the inability to use this product safely, properly, and in the
manner for which it has been designed and manufactured. Warranty does not apply to
products which have been lost, damaged by misuse, abuse, or accident.
OmniMount Systems, Inc.
8201 South 48th Street • Phoenix, AZ 85044-5355
1-800-MOUNT-IT • www.omnimount.com
8
P/N 1002082—Rev. D 9/2004
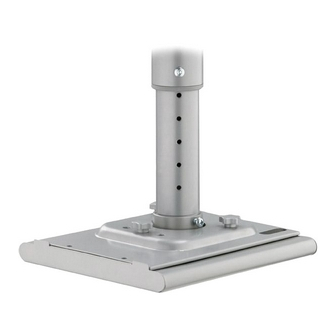
Installation Instructions
PMD.5 — PMD1— PMD2:
Universal Projector Mounts
Universal Mounting Grid
Superior Mounting Flexibility
Adjustable Ceiling Pipe Drop
IMPORTANT:
To utilize the
PMD projector mount, the projector must have
mounting lands (threaded inserts) on the base. Contact OmniMount if you have any
questions regarding the proper installation of this projector mount system.
Questions? 1-800-MOUNT IT
Advertisement

Related Manuals for Omnimount PMD.5


Summary of Contents for Omnimount PMD.5
- Page 1 Every effort has been made to provide accurate and error-free assembly and installation. OmniMount Systems disclaims liability for any difficulties arising from the interpretation of information contained in these instructions. If OmniMount products are used for pur- poses other than their original intent, OmniMount, its distributors and retailers shall not...
- Page 2 Models: PMD.5 — PMD1 — PMD2 Part Description Mount Assembly Hard- ware Top Projector Plate Bottom Projector Plate Pipe Drop Assembly Plastic Cover Ceiling Plate Hex Screw: ¼”-20 X ¼” Screw: ¼”-20 X 3/8” Hex Screw: ¼”-X 5/8” Hex Screw: ¼”-X ½”...
- Page 3 Step 5 Fig. 6 Determine required mounting screw size (4, 5 or 6 mm) for projector. Note: Consult projectors owners’ manual for screw sizes and mounting holes. Lay projector on table with mounting surface face up. Place grid section of bottom projector mounting plate onto top of projector in desired mounting orientation (horizontal or vertical).
- Page 4 Proceed to step 3. Wall Mount With the addition of the OmniMount PMD-WM wall mount (sold separately); the PMD can be mounted to a wall instead of the ceiling. This is particularly useful for small confer- ence/classrooms where a ceiling mount is impractical.