
Related Manuals for Omega Engineering HH147


Summary of Contents for Omega Engineering HH147
- Page 1 User’ s Guide Shop online at omega.com e-mail: info@omega.com For latest product manuals: omegamanual.info MADE IN TAIWAN HH147 Handheld Thermometer K/J/T/E/R/S/N Types...
- Page 2 The information contained in this document is believed to be correct, but OMEGA Engineering, Inc. accepts no liability for any errors it contains, and reserves the right to alter specifications without notice. WARNING: These products are not designed for use in, and should not be used for, human applications.
-
Page 3: Table Of Contents
Introduction ... 1 Features ... 2 General Specifications ... 3 Electrical Specifications ... 4 Names of Parts ... 5 Operation ... 6 RS-232 Operation ... 16 RS-232 Installation Proceedure ... 24 RS-232 Operation of Software ... 26 Battery Replacement ... 34... -
Page 4: Introduction
Introduction Thank you for purchasing model HH147, RS232 Data Logger Thermometer. Please take a few minutes to browse through this user manual before you begin to operate the unit to ensure that you are fully familiarized on how to best operate the meter. -
Page 5: Features
Features 1. Displays maximum value for four temperatures. 2. Resolution: 0.1°C/0.1°F, 1°C/1°F. 3. Swift response. 4. Alert temperature range, setting. 5. Auto power off function. 6. Low batttery indicator function. 7. Perpetual calendar function. 8. “Count” function. 9. T1-T4 exchange to main display function. 10. -
Page 6: General Specifications
General Specifications 1. Display Mode: Four-digit liquid crystal display. 2. Polarity indicator: No indicator is shown when readouts are in the positive value while the symbol “-” is prompted when readouts fall into the negative value. 3. Overload indicator: “OL” or “-OL” is displayed. 4. -
Page 7: Electrical Specifications
Electrical Specifications 1. Temp. unit: Celsius temp. (°C). Fahrenheit temp. (°F), Absolute temp. (K). 2. Measurement Range: (At 23±5°C,<80%RH) K-type: -100~1300°C (-148~2372°F) J-type: -100~1000°C (-148~1832°F) T-type: -100~400°C (-148~752°F) E-type: -50~800°C (-58~1472°F) R&S-type: -0~1700°C (32~3092°F) NK-type: -100~1300°C (-149~2372°F) 3. Accuracy: The basic accuracy does not include the error of the thermocouple. -
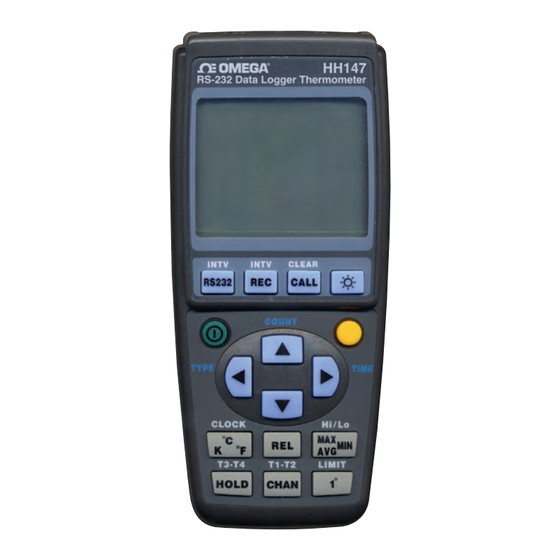
Page 9: Operation
Operation : Power ON/OFF Key. Press the power button to turn the power ON or OFF. 2. °C/°F/K: The Temp. Unit Selection Key. Press the key to sequentially alternate the three temp. units of °C, °F, and K. 3. HOLD: The Readout Hold Function Key. Press the “HOLD”... - Page 10 Operation 5. REL: The Minus Relative Readout Function Key. Press the “REL” key, a “REL” icon will display on the LCD and the original temp. will go to 0 and save the original temp. to make a standard value. Whenever the input temp. shifts, the LCD will show the minus value of the original temp.
- Page 11 Operation...
- Page 12 Operation 8. TYPE: Select a thermocouple type function key. HH147 includes seven diffferent thermocouple types. The method of operation:...
- Page 13 Operation 8. COUNT: The Count Time Setting Function Key. The max count time is 99 hours and 59 minutes. 10. TIME: To set the present time function key.
- Page 14 Operation...
- Page 15 Operation 13. LIMIT: To Enforce Alarm Function Key NOTE 1: The alarm will continue to be activated when the main display temp. value is higher than the alarm setting Hi temp. value or lower than the alarm Lo setting value. The Hi/Lo setting temp.
- Page 16 Operation...
- Page 17 Operation 15. CLOCK: To Enforce Date Setting Function Key.
- Page 18 Operation 16. Perpetual Calendar: Backlight: A. Press the backlight button to turn the backlight ON or OFF. B. If you do not disable the backlight feature, the backlight will stay on for 1 minute.
-
Page 19: Rs-232 Operation
Operation 1. RS-232: When you turn on the “RS-232” function the auto power off and the power off will be cancelled. 2. REC: When you turn on the “REC” function the reading value of the meter will transmit the settlement of interval in time, and will write down in the memory in real time. - Page 20 Operation 3. CALL: The HH147 can display the data of every channel, and can also inquire about the surplus space of the memory. When the “CALL” function is on, the auto power off will be cancelled.
- Page 21 Operation : When the RS-232 function is on the biggest settlement time is 59 minutes and 59 seconds. Minimum set time is one second.
- Page 22 Operation...
- Page 23 Operation : When the record interval function is on, the biggest settlement time is 59 minutes 59 seconds. Minimum set time is 1 second.
- Page 24 RS-232 Data Form...
- Page 25 RS-232 Data Form...
- Page 26 RS-232 Data Form RS-232 Data Form...
-
Page 27: Rs-232 Installation Proceedure
RS-232 Software Installation Procedure 1. Place CD-R into the CD-ROM driver. 2. Installation may be automatic or manual in accordance with your personal software. The manual installation is: A. Pushing my computer, the mouse clicked two times. B. Pushing the CD-ROM driver, the mouse clicked two times. - Page 28 RS-232 Software Installation Procedure...
-
Page 29: Rs-232 Operation Of Software
RS-232 Operation of Software... - Page 30 RS-232 Operation of Software...
- Page 31 RS-232 Operation of Software...
- Page 32 RS-232 Operation of Software...
- Page 33 RS-232 Operation of Software...
- Page 34 RS-232 Operation of Software...
- Page 35 RS-232 Operation of Software...
- Page 36 RS-232 Operation of Software...
-
Page 37: Battery Replacement
Battery Replacement 1. The symbol “ left of the LCD display indicates that the battery is running low. Please replace the AAA battery at once to ensure the test accuracy. 2. Remove the battery cover with a screwdriver. 3. Replace the old batteries with four new AAA batteries and lock the battery cover. - Page 38 7.9 mm between the two prongs. 3. Please DO NOT place the HH147 inside a microwave for temperature testing. 4. A correct thermocouple slot should be chosen when operating the temperature gauge.
- Page 39 This affords our customers the latest in technology and engineering. OMEGA is a registered trademark of OMEGA ENGINEERING, INC. © Copyright 2009 OMEGA ENGINEERING, INC. All rights reserved. This document may not be copied, photocopied, reproduced, translated, or reduced to any electronic medium or machine-readable form, in whole or in part, without the prior written consent of OMEGA ENGINEERING, INC.
- Page 40 Where Do I Find Everything I Need for Process Measurement and Control? OMEGA…Of Course! Shop online at omega.com TEMPERATURE Thermocouple, RTD & Thermistor Probes, Connectors, Panels & Assemblies Wire: Thermocouple, RTD & Thermistor Calibrators & Ice Point References Recorders, Controllers & Process Monitors Infrared Pyrometers PRESSURE, STRAIN AND FORCE Transducers &...