Table of Contents
Advertisement
Quick Links
Advertisement
Table of Contents

Related Manuals for LG WINE 4


Summary of Contents for LG WINE 4
-
Page 1: User Guide
USEr GUIdE LG-UN540 www.lg.com MFL69455701 (1.0) -
Page 2: Limited Warranty Statement
[See 15 USC §2311.] 1. WHAT THIS WARRANTY COVERS: LG offers you a limited warranty that the enclosed subscriber unit and its enclosed accessories will be free from defects in material and workmanship, according to the following terms and conditions:... - Page 3 LG, including damage caused by shipping, blown fuses, spills of food or liquid. (3) Breakage or damage to antennas unless caused directly by defects in material or workmanship.
- Page 4 LG may choose at its option to use functionally equivalent re-conditioned, refurbished or new units or parts or any units. In addition, LG will not re-install or back-up any data, applications or software that you have added to your phone.
- Page 5 LG Electronics Service- Mobile Handsets, P.O. Box 240007, Huntsville, AL 35824 DO NOT RETURN YOUR PRODUCT TO THE ABOVE ADDRESS. Please call or write for the location of the LG authorized service center nearest you and for the procedures for obtaining warranty claims. PROCEDURE FOR RESOLVING DISPUTES:...
- Page 6 AAA unless you seek more than $25,000 in damages, in which case the payment of these fees will be governed by the AAA Rules. Except as otherwise provided for herein, LG will pay all AAA filing, administration and arbitrator fees for any arbitration initiated in accordance with the AAA Rules and this arbitration provision.
- Page 7 LG for all monies previously disbursed by it that are otherwise your obligation to pay under the AAA Rules. Except as otherwise provided for, LG waives any rights it may have to seek attorneys’ fees and expenses from you if LG prevails in the arbitration.
- Page 8 Warranty in any way, and you will continue to enjoy the full benefits of the Limited Warranty. If you keep this product and do not opt out, then you accept all terms and conditions of the arbitration provision described above.
-
Page 9: Table Of Contents
Table of contents Basics .......... 10 Contacts in Your Phone’s Memory ...30 Creating a Contact .............30 Accessories ..........11 Customizing Individual Entries ......30 Phone layout ..........12 Speed Dial ................30 Storing a Number with Pauses ......31 Phone Components ...........12 Adding Another Phone Number ......32 Menus Overview ........16 Changing Saved Information ........33 Menu Access ..............16... - Page 10 Bluetooth ..........52 Appendix ........98 Add New Device............53 Q&A ............99 My Device Info ...............55 More information ........100 Discovery Mode ............56 .............56 Open Source Software Notice Information ..............100 Multimedia ..........57 Trademarks ..............100 1. Take Picture ...............57 2. Record Video ............58 For Your Safety ......101 3.
-
Page 11: Basics
Basics Basics... -
Page 12: Accessories
USB Cable Battery NOTE Always use genuine LG accessories. The supplied items are designed only for this device and may not be compatible with other devices. The items supplied with the device and any available accessories may vary depending on the region or service provider. -
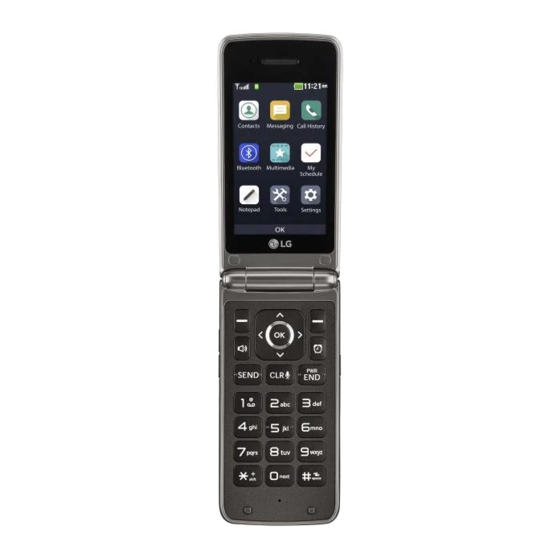
Page 13: Phone Layout
Phone layout Phone Components Earpiece Main Screen Left Soft Key OK Key / Navigation Key Headset Jack Right Soft Key < Alarm Clock Key Speakerphone Key SEND Key PWR/END Key Clear Key Vibrate Mode Key USB/Charger Port Basics... - Page 14 Camera Lens Camera Key Volume Keys Speaker Displays messages, indicator icons and active Main Screen functions. Performs functions identified on he bottom-left Left Soft Key corner of the screen. Allows you to plug in an optional 3.5mm headset for Headset Jack convenient, hands-free conversations.
- Page 15 Deletes single spaces or characters with a quick press, or press and hold to delete entire words in Clear Key text entry screens. Press to back out of menus, one level at a time. USB/Charger Connects the phone to the charger adapter or other Port compatible accessories.
- Page 16 Use to listen to the audio from the selected function Speaker (e.g., music, videos, sound clips, etc.). Use to adjust the Master Volume in standby mode and the Earpiece Volume during a call. Use to adjust Volume Keys font sizes when viewing messages, entering phone numbers (in standby mode) or browsing menus (except for the Main menu).
-
Page 17: Menus Overview
Menus Overview Menu Access While in the home screen, press [MENU] to access the phone’s main menu. There are two methods of accessing menus and submenus: Use the Directional Key to highlight a menu/option and press to select it. Press the number key on the keypad that to activate the corresponding menu/option. - Page 18 1. Erase Sent/ Received 6. Ringtones 2. Erase Drafts 7. Music 3. Erase All Messages My Schedule Call History 1. Calendar 1. Missed Calls 2. Alarm Clock 2. Received Calls 3. Dialed Calls Notepad 4. All Calls 1. Notepad 5. Call Timer 6.
- Page 19 6. World Clock 5. Software Update 7. Notepad 7. Power On/Off 8. USB Mass Storage 1. Power On 2. Power Off Settings 8. Hearing Assist 1. Sounds Settings 2. Display Settings 1. Master Volume 1. Banner 2. Call Sounds 2. Backlight 1.
- Page 20 1. Airplane Mode 1. Pictures 2. Set Shortcut Keys 2. Videos 1. Set My Shortcuts 3. Sounds 2. Set Directional Keys 2. Phone Memory 3. Voice Commands 1. Memory Usage 1. Confirm Choices 2. My Pictures 2. Sensitivity 3. Videos 3.
- Page 21 5. Software Update 1. Status 2. Check for Update 6. Front Display Patterns 8. Accessibility 1. Readout 2. Invert Color 3. Large Text 4. Mono Audio 5. Turn Off All Sounds Basics...
-
Page 22: Getting Started With Your Phone
Getting Started with Your Phone Step 1. Remove the Back Cover Use the fingertip cutout at the bottom of the phone to pull the back cover off. Step 2. Insert the Battery Align the battery contacts with the terminals in the battery compartment and push the battery down until it clicks into place. -
Page 23: Step 3. Replace The Back Cover
Step 3. Replace the Back Cover Place the back cover over the battery compartment, the press it downward until it clicks into place. Step 4. Charge the Phone Your device comes with a charging adapter and a USB cable which connect together to charge your phone. -
Page 24: Removing The Battery
Removing the Battery Turn the phone off. Use the fingertip cutout at the bottom of the phone to pull the back cover off. Use the fingertip opening near the bottom of the battery compartment to lift the battery out. Charging with USB You can use your computer to charge your phone. -
Page 25: Signal Strength
Signal Strength Call quality depends on the signal strength in your area. You can tell how much signal strength you have by the number of bars next to the signal strength icon : the more bars, the stronger the signal. If you’re having problems with signal quality, move to an open area or, when inside a building, try moving near a window. -
Page 26: Redialing Calls
Redialing Calls With the flip open, press the SEND Key twice to redial the last number dialed. Receiving Calls When the flip is open and you receive an incoming call, the following options are available. [Quiet] Press the Left Soft Key to mute the ringing or vibration for that call. -
Page 27: Quick Access To Convenient Features
Quick Access to Convenient Features Vibrate Mode Sets the phone to vibrate instead of ringing ( is displayed). To set Vibrate Mode, with the flip open, press and hold . To return to Normal Mode, press and hold again. Sounds Off Quickly deactivate your phone's sounds when you're in a place where phone sounds would be disruptive. -
Page 28: Quick Font Resize
Quick Font Resize When you view messages, enter phone numbers, or view sub-menus, press the Volume Keys simultaneously to quickly adjust the font size. NOTE Not supported on the Main menu. Call Waiting During a call, one beep indicates another incoming call. Press the SEND to answer it and put the first call on hold. -
Page 29: Voice Commands
Voice Commands Voice Commands allow you to do things by verbal command (e.g., make calls, check Voicemail, etc.). Call Say "Call" and then call someone simply by saying the name or phone number. Send Msg to Say "Send Message" and the command will prompt you for the type of message. -
Page 30: Entering And Editing Information
Entering and Editing Information Text Input The following key functions are available to help with text entry: Left Soft Key: Press to change the text input mode. Shift: Press to change capitalization (initial cap, caps lock, lowercase). Next: Press to display other matching words in the database in T9 word mode. -
Page 31: Contacts In Your Phone's Memory
Contacts in Your Phone’s Memory Creating a Contact With the flip open, enter a number (max. 48 digits), then press the Left Soft Key [Save]. Use the Navigation Key to highlight Add New Contact or Update Existing, then press . Use the Navigation Key to highlight Mobile 1/ Home/ Business/ Mobile 2/ Fax, then press . -
Page 32: Storing A Number With Pauses
Select a Speed Dial digit. Enter a digit using the keypad, then press [SET]. Use the Navigation Key to highlight the Speed Dial digit, then press [SET]. Press [Yes] to confirm, then press [SAVE] to update your contact entry. Storing a Number with Pauses Pauses allow you to enter additional series of numbers to access automated systems such as Voice mail or credit billing numbers. -
Page 33: Adding Another Phone Number
Adding a Pause to an Existing Contact Entry With the flip open, press the Right Soft Key [Contacts]. Use the Navigation Key to highlight a Contact entry, then press the Left Soft Key [Edit]. Use the Navigation Key to highlight the number, then press the Right Soft Key [Options]. -
Page 34: Changing Saved Information
Changing Saved Information To edit any information you stored, access the Edit Contact screen: With the flip open, press the Right Soft Key [Contacts]. Use the Navigation Key to highlight a Contact entry, then press the Left Soft Key [Edit]. Use the Navigation Key to highlight the field you want to change. -
Page 35: Speed Dialing
Removing a Speed Dial With the flip open, press the Right Soft Key [Contacts]. Use the Navigation Key to highlight a Contact entry to edit and press [VIEW]. Highlight the phone number with the Speed Dial, then press [EDIT]. Press the Right Soft Key [Options]. -
Page 36: General Functions
General Functions General Functions... -
Page 37: Contacts
Contacts The Contacts menu allows you to store names, phone numbers and other information in your phone’s memory. SHORTCUT The Right Soft Key is a shortcut key to the Contact List from standby mode. 1. New Contact Allows you to add a new contact to your Contact List. NOTE Using this submenu, the number is saved as a new Contact, not into an existing Contact. -
Page 38: Favorites
Press the Right Soft Key [Options] to select one of the following: New Contact/ Erase/ New Message/ Call/ Manage Contacts/ Set As Favorite/ Search Entry Mode Press the Left Soft Key [Edit] to edit. Press [VIEW] to view the entry details. Use the Go To field, for quick access to an entry without scrolling. -
Page 39: Groups
4. Groups Allows you to view your grouped Contacts, add a new group, change the name of a group, delete a group, or send a message to everyone in the selected group. Open the flip and press [MENU]. Press Contacts. Press Groups. -
Page 40: Speed Dials
5. Speed Dials Allows you to view your list of Speed Dials or designate Speed Dials for numbers entered in your Contacts. Open the flip and press [MENU]. Press Contacts. Press Speed Dials. Use the Directional Key to highlight the Speed Dial position, or enter the Speed Dial digit and press [SET]. -
Page 41: Messaging
Messaging SHORTCUT From standby mode, pressing the Left Soft Key is a shortcut to Messaging. Depending on the content and size of your messages, the phone can store up to 790 messages (including a max. of 300 text messages, 100 CMAS messages, 100 multimedia message notifications, and 100 multimedia messages in the Inbox;... -
Page 42: New Message
1. New Message Allows you to send messages (Text, Picture, Video and Voice). Depending on the type of message you choose to send, you can also attach files to your messages including pictures, videos, sounds, record voice and name cards. The Basics of Sending a Text Message Open the flip and press [MENU]. - Page 43 Multimedia Message Using Options Allows you send messages with text, picture, video, sound and name card attachments. Open the flip and press [MENU]. Press Messaging. Press New Message. Enter a phone number or a recipient's name in the To field. Press to access the text field.
-
Page 44: Messages
2. Messages The phone alerts you in up to 3 ways when you receive a new message: By displaying a notification message on the screen. By sounding a tone or vibration, if set. By displaying (The icon will be when you get a high priority message.) Viewing Your Inbox Open the flip and press the Left Soft Key [Message]. -
Page 45: Drafts
Multiple Messages Multiple Pending Delivered Messages Multiple Message Delivery TXT Message Draft Incomplete Multiple Messages Sent Namecard Media Message Draft Lock High Priority Unlock * Multimedia Message indicates Picture/Video/Voice Message. 3. Drafts Saved message drafts are stored here. Open the flip and press [MENU]. -
Page 46: Voice Mail
4. Voice mail Allows you to view the number of new voice messages recorded in the Voice mail box. Once you exceed the storage limit, old messages are overwritten. When you have a new voice message, your phone will alert you. -
Page 47: Settings
6. Settings Allows you to configure settings for your messages. With the flip open, press [MENU]. Press Messaging. Press Settings. Use the Directional Key to highlight one of the settings and press to select it. Message Settings Sub-Menu Descriptions 1. Message View Select Time to display messages chronologically in Inbox and Sent folders. - Page 48 6. TXT Auto View Select On to automatically display message content on the screen. Select On + Readout to automatically display content and read it aloud. Select Off for more security and privacy by requiring the message to be opened to view it.
-
Page 49: Erase All
11. Voice mail # Allows you to manually enter the access number for Voicemail Service. This number should be only used when a VMS (Voicemail Service) access number is not provided by the network. 12. Callback # Select On to automatically send a designated callback number with your messages. -
Page 50: Call History
Call History The Call History menu is a list of the last phone numbers or Contact entries for calls you placed, accepted, or missed. It's continually updated as new numbers are added to the beginning of the list and the oldest entries are removed from the bottom of the list. -
Page 51: Dialed Calls
3. Dialed Calls Allows you to view the list of outgoing calls; up to 90 entries. Open the flip and press [MENU]. Press Call History. Press Dialed Calls. Use the Directional Key to highlight an entry, then Press [OPEN] to open the entry. Press the Send Key to place a call to the number. -
Page 52: Call Timer
5. Call Timer Allows you to view the duration of selected call types. Open the flip and press [MENU]. Press Call History. Press Call Timer. Use the Directional Key to highlight a call list. Last Call/ All Calls/ Received Calls/ Dialed Calls/ Roaming Calls/ Last Reset/ Lifetime Calls Press the Left Soft Key [Reset] to reset the highlighted timer. -
Page 53: Bluetooth
Bluetooth The phone is compatible with devices that support the Headset, Handsfree, Stereo, Phonebook Access, Object Push and File Transfer.* You may create and store 20 pairings within the phone and connect to one device. The approximate communication range for Bluetooth® wireless technology is up to 30 feet (10 meters). -
Page 54: Add New Device
Add New Device Pairing is the process that allows the handset to locate, establish, and register 1-to-1 connection with the target device. For pairing with a new Bluetooth® device Follow the Bluetooth® accessory instructions to set the device to pairing mode. Open the flip and press [MENU]. - Page 55 Icon References When a Bluetooth® Wireless Connection is Searched (neither connected nor paired) When a carkit device is found by your device When an audio device is found by your device When a PC is found by your device When a PDA is found by your device When another phone device is found by your device When other undefined devices are found by your device The following options are available in the paired device.
-
Page 56: My Device Info
NOTE While in the Bluetooth Menu, you can turn the Bluetooth functionality off by pressing the Left Soft Key [Turn Off]. You can turn it on by pressing the Left Soft Key [Turn On] again. When connected with a phone or PC supporting OPP, the following menus are available after selecting the device: Send Name Card: Allows my contact data to send other device up to 999 Contacts. -
Page 57: Discovery Mode
Discovery Mode Allows you to set whether your device is able to be discovered/found by other Bluetooth® devices in the area. Open the flip and press [MENU]. Press Bluetooth. Press Bluetooth Menu. Press the Right Soft Key [Options]. Press Discovery Mode. Use the Directional Key to highlight a setting, then press [SET]. -
Page 58: Multimedia
Multimedia Allows you to access your multimedia files and features. 1. Take Picture Lets you to take digital pictures. SHORTCUT Press the Camera Key to open the camera function. Open the flip and press [MENU]. Press Multimedia. Press Take Picture. Set the brightness by pressing the Directional Key up and down, zoom by pressing the Directional Key... -
Page 59: Record Video
2. Record Video Lets you to record videos. SHORTCUT Press and hold the Camera Key to open the video recording function. Open the flip and press [MENU]. Press Multimedia. Press Record Video. Set the brightness by pressing the Directional Key up and down, zoom by pressing the Directional Key left and right, and press the... -
Page 60: Pictures
4. Pictures Allows you to view and manage the pictures stored in your phone. You can also take new photos and download new pictures. Open the flip and press [MENU]. Press Multimedia. Press Pictures. Press My Pictures. Highlight a picture with the Navigation Key The following options are available: Press [VIEW] to view it. -
Page 61: Videos
5. Videos Allows you to view and manage videos stored in the phone. Open the flip and press [MENU]. Press Multimedia. Press Videos. Highlight a video with the Directional Key Press [PLAY] to play it. Press the Left Soft Key [Erase] to delete it. -
Page 62: Ringtones
6. Ringtones Allows you to record a new sound or select a desired sound. How to record a new sound Open the flip and press [MENU]. Press Multimedia. Press Ringtones. Press My Sounds. Select Record New and press to start recording, then press [STOP] to end recording. -
Page 63: Music
7. Music Allows you to listen to desired music. Supported formats are MP3 and WMA. Open the flip and press [MENU]. Press Multimedia. Press Music. Select from the following sub-menus: All Songs/ Playlists/ Artists/ Genres/ Albums Select the name of the song you want to hear to start the music player. Play your Music It is easy to find and play the music you've stored in your phone and memory card. -
Page 64: My Schedule
My Schedule 1. Calendar Allows you to store and access your agenda(s). Simply enter your appointments in the Calendar, and your phone can (depending on your settings) alert you with a reminder. Open the flip and press [MENU]. Press My Schedule. Press Calendar. -
Page 65: Alarm Clock
2. Alarm Clock Allows you to set up to ten alarms. At the alarm time, any set alarm can sound (depending on your Master Volume settings) the tone of your choice, and an alarm message will be displayed on the LCD screen. Open the flip and press [MENU]. -
Page 66: Notepad
Notepad Allows you to add, read, edit, and erase notes to yourself. Open the flip and press [MENU]. Press Notepad. Press the Left Soft Key [Add] to write a new note. Press the Left Soft Key to change the entry mode. Or press the Right Soft Key [Options] to copy and paste text or to cancel the notepad entry. -
Page 67: Tools
Tools Your phone’s tools include: Voice Commands, Calculator, Ez Tip Calculator, Info Search, World Clock, Stopwatch, and Unit Converter. 1. Voice Commands This feature provides you with the following options equipped with AVR (Advanced Voice Recognition) technology. Each option has its detailed information on the phone and you can check it out by pressing the Left Soft Key [Info]. - Page 68 Call <Name or Number> Say "Call" and then call someone simply by saying the name or phone number. Please speak clearly and say the name or number exactly as it is entered in your Contact List. When you have more than one contact number, you can state the name and number type of the contact (for example, 'Call John Work').
-
Page 69: Calculator
Help Provides a general guideline to using Voice Commands. 2. Calculator Allows you to perform simple mathematical calculations. Open the flip and press [MENU]. Press Tools. Press Calculator. Enter the numbers to get the value you want. To clear entered items, press the Left Soft Key [Clear]. -
Page 70: Info Search
4. Info Search Allows you to search information stored on the phone. Open the flip and press [MENU]. Press Tools. Press Info search. Enter information you want to search on the phone in the text field. Highlight the Categories field and press the Left Soft Key [Set] to set the search categories. -
Page 71: Notepad
NOTE Press the Left Soft Key [Set DST] to set daylight saving time. Highlight Yes and press to set DST. 7. Notepad Allows you to add, read, edit, and erase notes to yourself. Open the flip and press [MENU]. Press Tools. -
Page 72: Settings
Settings Settings... -
Page 73: Settings
Settings 1. Sounds Settings Allows you to customize your phone's sounds. 1.1 Master Volume Allows you to set the Master Volume settings. Open the flip and press [MENU]. Press Settings. Press Sounds Settings. Press Master Volume. Adjust the volume with the Directional Key and press [SET] to save the setting. -
Page 74: Alert Sounds
To hear a ringtone before you set it, press the Left Soft Key [Play]. 1.2.2 Call Vibrate Open the flip and press [MENU]. Press Settings. Press Sounds Settings. Press Call Sounds. Press Call Vibrate. Use the Directional Key to highlight a setting, then press [SET]. -
Page 75: Keypad Volume
1.4 Keypad Volume Allows you to set the keypad volume. Open the flip and press [MENU]. Press Settings. Press Sounds Settings. Press Keypad Volume. Adjust the volume with the Directional Key and press [SET] to save the setting. 1.5 Digit Dial Readout Allows you to set the phone to read out the digits entered in the dialing screen. -
Page 76: Hearing Assist
Use the Directional Key to highlight a setting, then press [SET]. NOTE When highlighting On, you can play the alert option by pressing the Left Soft [Play]. 1.7 Power On/Off Allows you to set the phone to sound a tone when the phone is powered on/off. -
Page 77: Display Settings
2. Display Settings Provides options to customize the phone’s display screen. Open the flip and press [MENU]. Press Settings. Press Display Settings. 2.1 Banner Allows you to enter a string of up to 18 characters which displays on the LCD screen. Open the flip and press [MENU]. -
Page 78: Menu Settings
2.3 Brightness Allows you to set the backlight levels. Open the flip and press [MENU]. Press Settings. Press Display Settings. Press Brightness. Use the Directional Key to highlight a setting, then press [SET]. NOTE Brightness level can be 1 to 7. 2.4 Wallpaper Allows you to choose the kind of background to be displayed on the phone's LCD in standby mode. -
Page 79: Font Type
Position Menu Items Select the item you want to move, then press [MOVE]. Move highlight to desired position by pressing the Navigation Key, then press [SWAP]. Reset Menu Settings Menu Style/ Menu Items/ Item Positions/ All. NOTE This User Guide gives navigation instructions according to the default "Grid" Main Menu Layout in the Display Settings menu. -
Page 80: Clock Format
Use the Directional Key to highlight a setting, then press [SET]. Dial Digits: Resizable/ Small/ Normal/ Large Menu & Lists: Resizable/ Small/ Normal/ Large Message: Resizable/ Small/ Normal/ Large NOTE Press the Left Soft Key [Preview] to preview the selected font size. 2.8 Clock Format Allows you to choose the kind of clock to be displayed on the front and main LCD screens. -
Page 81: Phone Settings
3. Phone Settings The Phone Settings menu allows you to designate specific settings to customize how you use your phone. 3.1 Airplane Mode Turning on Airplane Mode will disable all wireless communications. Open the flip and press [MENU]. Press Settings. Press Phone Settings. - Page 82 3.2.2 Set Directional Keys NOTE To access these shortcuts open the flip, then press the Directional Key the direction (up, left, down) set from standby mode for the Shortcut you want to access. Open the flip and press [MENU]. Press Settings.
- Page 83 3.5 Location Allows you to set GPS (Global Positioning System: Satellite assisted location information system) mode. Open the flip and press [MENU]. Press Settings. Press Phone Settings. Press Location. Use the Directional Key to highlight a setting, then press [SET]. NOTE GPS satellite signals are not always received by the phone, especially under bad atmospheric and environmental conditions, indoors, etc.
- Page 84 Press Phone Settings. Press Security. Enter the four-digit lock code. Press Edit Codes. Select Phone Only or Calls & Services. Enter your new four-digit lock code. For confirmation, it will ask you to enter the new lock code again. 3.6.2 Restrictions Allows you to set separate restrictions for Location Setting, Calls and Messages.
- Page 85 3.6.3 Emergency #S Allows you to enter 3 emergency numbers. You can call these emergency numbers and 911, even when the phone is locked or restricted. Open the flip and press [MENU]. Press Settings. Press Phone Settings. Press Security. Enter the four-digit lock code. Press Emergency #S.
- Page 86 3.6.5 Lock Phone Now Locks your phone immediately. Open the flip and press [MENU]. Press Settings. Press Phone Settings. Press Security. Enter the four-digit lock code. Press Lock Phone Now. NOTE To unlock the phone from standby mode, press the Right Soft Key [Unlock] and enter the four-digit lock code.
-
Page 87: Call Settings
3.7 System Select Allows you to set up the phone management environment. Leave this setting as the default unless you want to alter system selection as instructed by your service provider. Open the flip and press [MENU]. Press Settings. Press Phone Settings. -
Page 88: Auto Retry
4.2 Auto Retry Allows you to set the length of time the phone waits before automatically redialing a number when the attempted call fails. Open the flip and press [MENU]. Press Settings. Press Call Settings. Press Auto Retry. Use the Directional Key to highlight a setting, then press [SET]. - Page 89 Connecting TTY Equipment and a Terminal Connect a TTY cable to TTY connection on the terminal (TTY connection location is the same as a headset jack). Enter the phone menu and set the desired TTY mode. After setting a TTY mode, check the LCD screen of the phone for the TTY icon.
-
Page 90: Voice Privacy
4.4 One Touch Dial Allows you to initiate a speed dial call by pressing and holding the speed dial digit. If set to Off, Speed Dial numbers designated in your Contacts will not function. Open the flip and press [MENU]. Press Settings. -
Page 91: Usb Mode
4.7 Assisted Dialing Supports easy dialing on international calls while traveling in non-U.S. roaming region. If set to On, Assisted Dialing is displayed in calling screen. Open the flip and press [MENU]. Press Settings. Press Call Settings. Press Assisted Dialing. Use the Navigation Key to highlight a setting, then press . -
Page 92: Memory
6. Memory Allows you to check your phone's internal memory. Shows the memory information saved in your phone. Open the flip and press [MENU]. Press Settings. Press Memory. Use the Directional Key to select file storage type in the phone, then press to view the memory used. -
Page 93: Phone Info
Press Memory, then press Card Memory. Choose Memory Usage/ My Pictures/ Videos/ Music/ My Sounds/ My Contacts/ Move All To Phone. 7. Phone Info Allows you to view the information specific to your phone and software. Open the flip and press [MENU]. -
Page 94: Software Update
7.4 SW/HW Version Allows you to view the versions of various applications such as SW, PRL, AVR, MMS, Bluetooth®, OTADM Version, HW Version. Open the flip and press [MENU]. Press Settings. Press Phone Info. Press SW/HW Version. 7.5 Software Update This feature gives your phone the ability to upgrade to the latest software and keeps your phone operating with the latest features for the upgrade. -
Page 95: Accessibility
performed, status information will be unavailable. Press Check for Update to check if any new software updates are available to download. If a newer software version is available, it will automatically begin downloading after 30 seconds or you can begin the download immediately by pressing 7.6 Front Display Patterns Allows you to view patterns for notifications on the front display of your... - Page 96 Press Accessibility. Press Readout. Press Full Readout. Use the Navigation Key to highlight a setting, then press [SET]. 8.1.2 Menu Readout Allows the phone to read out the menu. Open the flip and press [MENU]. Press Settings. Press Accessibility. Press Readout.
-
Page 97: Invert Color
Use the Navigation Key to highlight a setting, then press [SET]. Ring Only/ Caller ID + Ring/ Name Repeat 8.1.5 Passwords Readout Allows you to set the phone to read out the password you are entering. Open the flip and press [MENU]. -
Page 98: Large Text
8.3 Large Text Allows you to set the text size to large. Open the flip and press [MENU]. Press Settings. Press Accessibility. Press Large Text. Use the Navigation Key to highlight a setting, then press [SET]. On/ Off 8.4 Mono Audio Plays the same sounds to both earpieces so you can hear everything with just one ear. -
Page 99: Appendix
Appendix Appendix... -
Page 100: Q&A
Q&A Please check to see if any problems you have encountered with the phone are described in this section before taking the phone in for a service or calling a service engineer. Q How do I view the list of outgoing Q Why won’t the LCD turn on? calls, incoming calls, and missed A Remove the battery, then replace it. -
Page 101: More Information
In addition to the source code, all referred license terms, warranty disclaimers and copyright notices are available for download. LG Electronics will also provide open source code to you on CD-ROM for a charge covering the cost of performing such distribution (such as the cost of media, shipping, and handling) upon email request to opensource@lge.com. -
Page 102: For Your Safety
For Your Safety For Your Safety... -
Page 103: Important Information
Important Information This user guide contains important information on the use and operation of this phone. Please read all the information carefully for optimal performance and to prevent any damage to or misuse of the phone. Any changes or modifications not expressly approved in this user guide could void your warranty for this equipment. - Page 104 Unplug the power cord and charger during lightning storms to avoid electric shock or fire. Only use chargers provided by LG. The warranty will not be applied to products provided by other suppliers. Only authorized personnel should service the phone and its accessories.
-
Page 105: Fcc Rf Exposure Information
Use and store your phone in temperatures between 0°C/32°F and 45°C/113°F, if possible. Exposing your phone to extremely low or high temperatures may result in damage, malfunction, or even explosion. HAC statement This phone has been tested and rated for use with hearing aids for some of the wireless technologies that it uses. - Page 106 cm) separation distance between the user’s body and the back of the phone and have not been tested for typical body-worn operations may not comply with FCC/IC RF exposure limits and should be avoided. Caution Use only the supplied antenna. Use of unauthorized antennas (or modifications to the antenna) could impair call quality, damage the phone, void your warranty and/or violate FCC regulations.
- Page 107 at (888) 463-6332 or (888) INFO-FDA. In June 2000, the FDA entered into a cooperative research and development agreement through which additional scientific research is being conducted. The FCC issued its own website publication stating that “there is no scientific evidence that proves that wireless phone usage can lead to cancer or a variety of other problems, including headaches, dizziness or memory loss.
- Page 108 You can place more distance between your body and the source of the RF, as the exposure level drops off dramatically with distance. The FDA/FCC website states that “hands-free kits can be used with wireless phones for convenience and comfort. These systems reduce the absorption of RF energy in the head because the phone, which is the source of the RF emissions, will not be placed against the head.
- Page 109 Where can I get further information about RF emissions? For further information, see the following additional resources (websites current as of April 2005): U.S. Food and Drug Administration FDA Consumer magazine November-December 2000 Telephone: (888) INFO-FDA http://www.fda.gov (Under “c” in the subject index, select Cell Phones > Research.) U.S.
-
Page 110: Consumer Information On Sar
Germany Telephone: 011 49 1888 333 2156 http://www.icnirp.de American National Standards Institute 1819 L Street, N. W ., 6th Floor Washington, D.C. 20036 Telephone: (202) 293-8020 http://www.ansi.org National Council on Radiation Protection and Measurements 7910 Woodmont Avenue, Suite 800 Bethesda, MD 20814-3095 Telephone: (301) 657-2652 http://www.ncrponline.org Engineering in Medicine and Biology Society, Committee on Man... - Page 111 standard operating positions specified by the FCC with the phone transmitting at its highest certified power level in all tested frequency bands. Although SAR is determined at the highest certified power level, the actual SAR level of the phone while operating can be well below the maximum value.
-
Page 112: For Wireless Devices
FCC Hearing-Aid Compatibility (HAC) Regulations for Wireless Devices On July 10, 2003, the U.S. Federal Communications Commission (FCC) Report and Order in WT Docket 01-309 modified the exception of wireless phones under the Hearing Aid Compatibility Act of 1988 (HAC Act) to require digital wireless phones be compatible with hearing- aids. - Page 113 A sum of 5 is considered acceptable for normal use. A sum of 6 is considered for best use. In the above example, if a hearing aid meets the M2 level rating and the wireless phone meets the M3 level rating, the sum of the two values equal M5.
-
Page 114: Avoid Potential Hearing Loss
Caution: Avoid potential hearing loss. Prolonged exposure to loud sounds (including music) is the most common cause of preventable hearing loss. Some scientific research suggests that using portable audio devices, such as portable music players and cellular telephones, at high volume settings for long durations may lead to permanent noise-induced hearing loss. -
Page 115: Tia Safety Information
Do not listen at any volume that causes you discomfort. If you experience ringing in your ears, hear muffled speech or experience any temporary hearing difficulty after listening to your portable audio device, discontinue use and consult your doctor. TIA Safety Information The following is the complete TIA Safety Information for wireless handheld phones. -
Page 116: Antenna Care
Antenna Care Use only the supplied or an approved replacement antenna. Unauthorized antennas, modifications, or attachments could damage the phone and may violate FCC regulations. Tips on Efficient Operation For your phone to operate most efficiently: Don’t touch the antenna unnecessarily when the phone is in use. -
Page 117: Hearing Aids
Hearing Aids Some digital wireless phones may interfere with some hearing aids. In the event of such interference, you may want to consult your service provider (or call the customer service line to discuss alternatives). Other Medical Devices If you use any other personal medical device, consult the manufacturer of your device to determine if it is adequately shielded from external RF energy. -
Page 118: Potentially Explosive Atmosphere
Potentially Explosive Atmosphere Turn your phone OFF when in any area with a potentially explosive atmosphere and obey all signs and instructions. Sparks in such areas could cause an explosion or fire resulting in bodily injury or even death. Areas with a potentially explosive atmosphere are often, but not always marked clearly. -
Page 119: Safety Information
interference in a residential installation. This equipment generates, uses, and can radiate radio frequency energy and, if not installed and used in accordance with the instructions, may cause harmful interference to radio communications. However, there is no guarantee that interference will not occur in a particular installation. -
Page 120: Charger And Adapter Safety
The charger and adapter are intended for indoor use only. Insert the battery charger vertically into the wall power socket. Only use the LG-approved battery charger. Otherwise, you may cause serious damage to your phone. Use the correct adapter for your phone when using the battery charger abroad. - Page 121 Battery life will vary due to usage pattern and environmental conditions. Please use only an approved charging accessory to charge your LG phone. Improper handling of the charging port, as well as the use of an incompatible charger, may cause damage to your phone and void the warranty.
-
Page 122: General Notice
LG Authorized Service Center to replace the damaged antenna. Do not immerse your phone in water, liquid, or expose to high humidity. Immediately, take it to an LG Authorized Service Center. Do not paint your phone. The data saved in your phone might be deleted due to careless use, repair of the phone, or upgrade of the software. -
Page 123: Fda Consumer Update
and videos could also be deleted.) The manufacturer is not liable for damage due to the loss of data. When you use the phone in public places, set the ringtone to vibration so you don't disturb others. Do not turn your phone on or off when putting it to your ear. Use accessories, such as earphones and headsets, with caution. - Page 124 to notify users of the health hazard and to repair, replace, or recall the phones so that the hazard no longer exists. Although the existing scientific data do not justify FDA regulatory actions, the FDA has urged the wireless phone industry to take a number of steps, including the following: Support needed research into possible biological effects of RF of the type emitted by wireless phones;...
- Page 125 3. What kinds of phones are the subject of this update? The term “wireless phone” refers here to handheld wireless phones with built-in antennas, often called “cell” , “mobile” , or “PCS” phones. These types of wireless phones can expose the user to measurable Radio Frequency (RF) energy because of the short distance between the phone and the user’s head.
- Page 126 from wireless phone RF exposures. However, none of the studies can answer questions about long-term exposures, since the average period of phone use in these studies was around three years. 5. What research is needed to decide whether RF exposure from wireless phones poses a health risk? A combination of laboratory studies and epidemiological studies of people actually using wireless phones would provide some of the data that are...
- Page 127 scientific oversight, obtaining input from experts in government, industry, and academic organizations. CTIA-funded research is conducted through contracts with independent investigators. The initial research will include both laboratory studies and studies of wireless phone users. The CRADA will also include a broad assessment of additional research needs in the context of the latest research developments around the world.
- Page 128 is deposited in the heads of wireless phone users. The test method uses a tissue-simulating model of the human head. Standardized SAR test methodology is expected to greatly improve the consistency of measurements made at different laboratories on the same phone. SAR is the measurement of the amount of energy absorbed in tissue, either by the whole body or a small part of the body.
- Page 129 the government in the United Kingdom distributed leaflets containing such a recommendation in December 2000. They noted that no evidence exists that using a wireless phone causes brain tumors or other ill effects. Their recommendation to limit wireless phone use by children was strictly precautionary;...
-
Page 130: Driver Safety Tips
(http://www.fcc.gov/oet/rfsafety) International Commission on Non-lonizing Radiation Protection (http://www.icnirp.de) World Health Organization (WHO) International EMF Project (http://www.who.int/emf) National Radiological Protection Board (UK) (http://www.hpa.org.uk/radiation/) Driving Check the laws and regulations on the use of wireless phones in the areas where you drive and always obey them. Also, if using your phone while driving, please observe the following: Give full attention to driving -- driving safely is your first responsibility;... - Page 131 speaker phone accessory, take advantage of these devices if available to you. 3. Make sure you place your wireless phone within easy reach and where you can reach it without removing your eyes from the road. If you get an incoming call at an inconvenient time, if possible, let your voicemail answer it for you.
- Page 132 fire, traffic accident, road hazard, or medical emergency. Remember, it’s a free call on your wireless phone! 9. Use your wireless phone to help others in emergencies. Your wireless phone provides you a perfect opportunity to be a “Good Samaritan” in your community.