Table of Contents
Advertisement
Advertisement
Table of Contents

Related Manuals for Profoto B1 500 AirTTL


Summary of Contents for Profoto B1 500 AirTTL
- Page 1 Profoto B1 500 AirTTL User´s Guide...
- Page 2 www.profoto.com...
-
Page 3: Congratulations On Your New Profoto Product
As a result, we are confident that your new Profoto product will stay with you for years and help you grow as a photographer. But getting the product is only the beginning of that journey. -
Page 4: General Safety Instructions
Equipment contains electrical and electronic components that could be harmful to the environment. Equipment may be returned to Profoto distributors free of charge for recycling according to WEEE. Follow local legal requirements for separate disposal of waste, for instance WEEE directive for electrical and electronic equipment on the European market, when product life has ended! www.profoto.com... -
Page 5: Table Of Contents
Table of Contents Congratulations on your new Profoto product! ............3 General safety instructions ..................4 Nomenclature ......................6 Operation ........................9 Quick guide ....................9 Power on/off ....................9 Select Freeze/Normal mode ...............10 Set light output (Energy) ................10 Select Sync setting ..................11 Modeling light settings ................12 Ready signal settings .................12... -
Page 6: Nomenclature
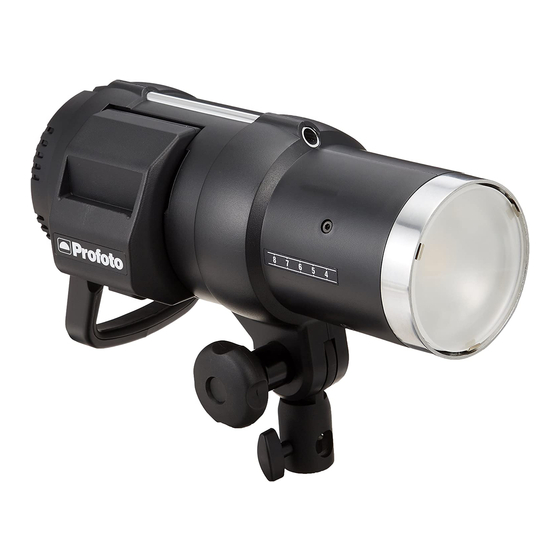
Nomenclature 1. Handle 6. Zoom scale 2. Tilt-lock knob 7. Umbrella holder 3. Stand adapter 8. Battery 4. Clamp screw 9. Battery release button 5. Reflector and Front glass www.profoto.com... - Page 7 10. USB port 12. IR-Slave eye 11. Sync connector 13. LCD display 16. ENERGY/SETTINGS dial 14. MODEL button 17. READY button 15. TEST button 18. SYNC button www.profoto.com...
- Page 8 19. Modeling light setting 24. Freeze mode indicator 20. Ready signal setting 25. Temperature limit indicator 21. Sync/Air setting 26. Automatic flash exposure (TTL) indicator 22. Battery level indicator 23. Light output setting 27. Battery charger 28. Case (Bag XS) www.profoto.com...
-
Page 9: Operation
2. To switch off the unit, press and hold down the TEST button [15] until the Display [13] is all black. The B1 unit automatically goes into sleep after 30 minutes and shuts off completely after one hour of inactivity to save battery life. www.profoto.com... -
Page 10: Select Freeze/Normal Mode
• Press and turn the ENERGY/SETTINGS dial [16] to change the energy level in 1 f-stop increments. The TEST button [15] is illuminated when the unit is fully charged and ready to flash. Press the TEST button [15] to release a test flash. www.profoto.com... -
Page 11: Select Sync Setting
When ‘AIR’ is selected in the Sync/Air setting section [21] on the Display [13], the B1 is set to be triggered and/or controlled from any of the optional Profoto Air transceivers offered by Profoto. The B1 supports all available Air accessories offered by Profoto including those listed in the table below. -
Page 12: Modeling Light Settings
After a few seconds, the display will stop blinking and the new value will be set. Ready signal settings The current setting is shown in the Ready signal setting section [20] on the Display [13]: • BEEP: The unit beeps when it is ready to flash again after recharging. • DIM: The modeling light is turned off after flashing, and is turned on when it is ready to flash again. • DIM BEEP: The modeling light is turned off after flashing. The unit beeps and the modeling light is turned on when it is ready to flash again. • Blank: No ready signal. Use the READY button [17] to select the Ready signal setting: • Press the READY button [17] to turn ‘BEEP’ on or off. • Press and hold down the READY button [17] to turn ‘DIM’ on or off. www.profoto.com... - Page 13 Thanks to this feature, the B1 can trigger up to 20 flashes per second on lower power output without triggering the “Wrong exposure alarm”. Note that the accuracy of the light output is slightly less precise when Quick burst is active. www.profoto.com...
-
Page 14: Handling
Battery Charger 4.5A, or Profoto Car Charger 1.8A. If the battery has not been used for a long time, the Profoto Battery Charger 2.8A should preferably be used. The Profoto Battery Charger 4.5A could be used, but puts more wear on a deeply discharged battery. -
Page 15: Replacing The Reflector/Front Glass
Replacing the Front glass The Front glass [5] can be replaced with optional front glass or glass domes. Domes can be used to enhance the “zoom effect” if using any of Profoto’s “zoomable” reflectors. 1. Switch off the B1 and remove the battery. -
Page 16: Other
We recommend that you regularly look for firmware upgrades on Profoto.com. Upgrade of firmware is made via the USB port [10], following the instructions provided on Profoto.com. You can always contact your local dealer or distributor for professional service. www.profoto.com... -
Page 17: Technical Data
Approx. battery level in percentage of the total capacity is indicated on the Display: 3 sections: 100-70% 2 sections: 70-40% 1 section: 40-10% 1 section blinking: <10% Battery charging time 2 h (1h with Battery Charger 4.5A) Auto power off Yes after 60 minutes. Sleep activated after 30 minutes. www.profoto.com... - Page 18 -20 °C to +60°C (-20 °F to +140 °F) range Wireless sync Yes, via all Air camera transmitters or IR (Slave) All figures are to be considered as nominal and Profoto reserves the right make changes without further notice. www.profoto.com...
- Page 19 www.profoto.com...
- Page 20 Profoto AB SWEDEN Phone +46 8 447 53 00 info@profoto.com www.profoto.com...