
Summary of Contents for Sylvania SKCR2706BT-B
- Page 1 Bluetooth Under-Cabinet TV / DVD / CD / Radio Music System SKCR2706BT-B MODEL NO.: INSTRUCTION MANUAL PLEASE READ BEFORE OPERATING THIS EQUIPMENT...
-
Page 2: Warnings And Precautions
Warnings and Precautions TO PREVENT FIRE OR SHOCK HAZARDS, DO NOT EXPOSE THIS UNIT TO RAIN OR MOISTURE. This symbol, located on back or bottom of the unit, is This device complies with part 15 of the FCC rules. intended to alert the user to the presence of uninsulated operation is subject to the following two conditions: “dangerous voltage”... -
Page 3: Important Safety Instructions
Important Safety Instructions 1. Read Instructions - All the safety and feature. If you are unable to insert the plug receptacles as this can result in a risk of fire or operating instruction should be read before the fully into the outlet, try reversing the plug. If electric shock. - Page 4 ACCESSORIES Before you start setting up please make sure you have all the accessories in the box. 1. User Manual 2. Power Adapter 3. Remote Control 4. Mounting Bolts & Spacers 5. Cable Pack 6. Mounting Template...
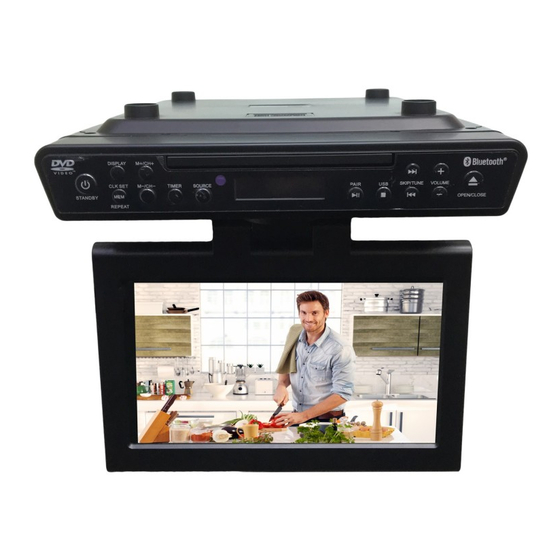
- Page 5 TV FRONT VIEW & INPUT CONNECTIONS Front view 9 10 1. LED SCREEN 10” screen size display. 2. CLK SET / MEM / REPEAT Press to set the clock or save a radio station or choose repeat mode. 3. STANDBY Press to power the system on or off. Press this button to show the clock a few time on LCD display.
-
Page 6: Input Connections
INPUT CONNECTIONS LEFT SIDE REAR SIDE 1. LINE IN Connected to external device by 3.5mm stereo plug audio input cable (not included). 2. AUDIO L. IN Composite Audio Left-White 3. AUDIO R. IN Composite Audio Right-Red 4. VIDEO IN Composite Video-Yellow 5. - Page 7 6. EXIT/USB In DVD Mode, press to switch USB mode. 7. OK Select/Confirm: For selecting a Menu or confirm a selected Option. Under DTV and TV Mode press once to display the Channels List. Press to choose one of items on-screen and to adjust one of its related values.
-
Page 8: Power Connection
OPERATING INSTRUCTIONS POWER CONNECTION This product operates on 120V~ 60Hz power supply. Plug the AC Adaptor into a household outlet AC source. CONNECTING THE AC ADAPTER 1. Insert the DC plug of the AC adapter (included) into the DC Jack of the unit. -
Page 9: Battery Care
BATTERY CARE • Use only the size and type of batteries specified. • If the unit is not to be used for an extended period of time, remove the battery. • Old or leaking batteries can cause damage to the unit and may void the warranty. -
Page 10: Dvd Operation
DVD OPERATION STANDBY button on the main unit or remote control to turn 1. Press the on the unit. 2. Press the SOURCE button on the main unit or remote control repeatedly to select DVD mode and the “dvd” will appear on LCD display and LED screen turn on. - Page 11 DISPLAY LANGUAGE – Choose the language for the operation system. Select from: ENGLISH / CHINESE / DEUTSH / SPANISH / FRENCH / PORTUGUESE. HORA OSD - Choose the setup menu show on the screen of the time. Select from : 5 seconds / 10 seconds / 30 seconds / 60 seconds / Never. AUDIO LANGUAGE –...
- Page 12 PROGRAMMING USB PLAYBACK This unit can be programmed to play up to 16 tracks/files in USB mode. Press PROGRAM button on remote control to come into program status; using direction button move the cursor to select the desired track, then press OK button to enter the program lists. When playback the program lists, press buttons to enter program menu, and press again this button to playback programmed list.
- Page 13 2. Press M+/CH+ or M-/CH-buttonson Main unit or Remote control select Auto Search to scan your available channels and auto saving. • Picture 1. Press the M+/CH+ or M-/CH- buttons on Main unit or Remote control to select Config Menu, then press OK button to enter the following sub menus.
-
Page 14: Bluetooth Operation
CC Display : Select CC OFF(Default) / CC1 / CC2 / CC3 / CC4 / CC5 /CC6 to displayed on screen. CC Position: Select AUTO (Default)/ Top / Bottom to displayed on screen. Font Color :Select Default / White / Black / Red / Green / Blue / Yellow / Magenta / Cyan font colorto displayed on screen. - Page 15 SKCR2706BT-B (see your device’s instructions to add or setup a Bluetooth device). 4. Select SKCR2706BT-B from the device list when it appears on you device screen. If required, enter the pass code “0000” to pair (link) SKCR2706BT-B with your device.
-
Page 16: Listening To The Radio
1. Your Bluetooth enabled device will not play the music through the speaker, even if connected (linked), if the device does not support A2DP profile. 2. Remember to turn off the SKCR2706BT-B when you have finished listening, s et the button to the STANDBY mode. -
Page 17: Line In Operation
LINE IN OPERATION This unit provides an auxiliary audio signal input jack for connecting external audio devices like MP3 players, CD players and listen to them through the speakers of this unit. 1. Use an audio cable (not included) with one 3.5 mm stereo plug on each end of the cable. -
Page 18: Specifications
SPECIFICATIONS Power Adaptor: AC input 120V~ 60Hz 15W DC Output 12V 1.5A Battery Back-up: 2x DC 1.5V UM-3 AA type batteries (not included) Remote Control : 2x DC 1.5V UM -4 AAA type batteries (not included) Bluetooth: Bluetooth Specification version 2.1 Support profile A2DP Frequency Range: FM 87.5 –... -
Page 19: Limited Product Warranty
LIMITED PRODUCT WARRANTY This quality product is warranted to be free from manufacturer’s defects in material and workman-ship, provided that the unit is used under the normal operating conditions intended by the manufacturer. Should you have any problem with this product, please and it is highly recommended to visit our website at www.curtisint.com before you take any other steps as we have additional copies of instruction manuals, operating manuals and trouble shooting tips on our website which gives you the answer on most of the questions you could have in operating the unit.