Table of Contents
Advertisement
Available languages
Available languages
Quick Links
DISR 57M17
IT
Italiano
Istruzioni per l'uso
LAVASTOVIGLIE - Sommario
Istruzioni per l'uso, 1
Assistenza, 9
Installazione, 10-11
Caricare i cesti, 14-15
Programmi, 17
EN
English
Operating instructions
DISHWASHER - Contents
Operating instructions,1
Product Data, 7
Assistance, 9
Installation, 21-22
Loading the racks, 25-26
Wash cycles, 28
Troubleshooting, 31
NL
Nederlands
Gebruiksaanwijzing
AFWASAUTOMAAT - Inhoud
Gebruiksaanwijzingen, 1
Productkaart, 8
Service, 9
Installatie, 32-33
Het laden van de rekken, 36 - 37
Programma's, 39
PL
Polski
Instrukcja obsługi
ZMYWARKA - Spis treści
Instrukcja obsługi,1
Instalacja, 43-44
Opis urządzenia, 45
Ładowanie koszy, 47-48
Programy, 50
Advertisement
Table of Contents

Related Manuals for Indesit DISR 57M17


Summary of Contents for Indesit DISR 57M17
-
Page 1: Table Of Contents
DISR 57M17 Italiano Nederlands Gebruiksaanwijzing Istruzioni per l’uso LAVASTOVIGLIE - Sommario AFWASAUTOMAAT - Inhoud Istruzioni per l’uso, 1 Gebruiksaanwijzingen, 1 Precauzioni e Consigli, 2-3 Voorzorgsmaatregelen en advies, 4-5 Scheda prodotto, 7 Productkaart, 8 Assistenza, 9 Service, 9 Installazione, 10-11 Installatie, 32-33 Descrizione dell’apparecchio,12... -
Page 2: Precauzioni E Consigli
• Non staccare la spina dalla presa della Precauzioni e consigli corrente tirando il cavo, bensì afferrando la spina. L’apparecchio è stato progettato e costruito • È necessario chiudere il rubinetto dell’acqua in conformità alle norme internazionali di e staccare la spina dalla presa della corrente sicurezza. -
Page 3: Precautions And Advice
stoviglie e al grado di sporco consultando la never clean or maintain it unless they are Tabella dei programmi: given supervision. - per stoviglie normalmente sporche utilizzare • The appliance was designed for domestic il programma Eco, che garantisce bassi use inside the home and is not intended consumi energetici e di acqua. -
Page 4: Voorzorgsmaatregelen En Advies
health. The crossed-out dustbin symbol - gebruik door klanten in hotels, motels en shown on all products reminds the owners andersoortige verblijfsmogelijkheden; of their obligations regarding separated - bed and breakfasts. waste collection. Haal het apparaat uit de verpakking en For further information relating to the correct controleer dat het geen schade heeft disposal of household appliances, owners... -
Page 5: Zalecenia I Środki Ostrożności
vallen. - als u een kleine vaat heeft, activeert u • De deur dient niet in openstaande stand de optie Halve lading (waar beschikbaar - zie gelaten te worden omdat men erover zou Speciale programma’s en opties). kunnen struikelen. • Als uw elektriciteitsbedrijf op bepaalde •... - Page 6 • Dzieci nie powinny bawić się urządzeniem. powinny podlegać selektywnej zbiórce w • Czyszczenie oraz konserwację urządzenia celu uzyskania maksymalnego wskaźnika musi przeprowadzać użytkownik. Nie mogą odzysku i recyklingu ich materiałów być one przeprowadzane przez dzieci bez składowych oraz uniknięcia ewentualnych zagrożeń...
-
Page 7: Scheda Prodotto
Scheda prodotto Scheda prodotto INDESIT Marchio DISR 57M17 Modello Capacità nominale in numero di coperti standard (1) Classe di efficienza energetica su una scala da A+++ (bassi consumi) a D (alti consumi) Consumo energetico annuo in kWh (2) 0.83 Consumo energetico del ciclo di lavaggio standard in kWh... -
Page 8: Productkaart
Productkaart Productkaart INDESIT Merk DISR 57M17 Model Beladingscapaciteit in standaard couverts (1) Energie-efficiëntieklasse op een schaal van A+++ (laag gebruik) tot D (hoog gebruik) Jaarlijks energieverbruik in kWh (2) 0.83 Energieverbruik van de standaard wascyclus in kWh Energieverbruik in de off-modus in W... -
Page 9: Assistenza
Please have the following information to hand: • The type of malfunction. Assistenza • The appliance model (Mod.). Prima di contattare l’Assistenza: • The serial number (S/N). (vedi • Verificare se l’anomalia può essere risolta da soli This information can be found on the appliance data plate Anomalie e Rimedi) (see Description of the appliance) . -
Page 10: Installazione
Installazione In caso di trasloco tenere l’apparecchio in posizione ATTENZIONE: TENSIONE PERICOLOSA! verticale; se fosse necessario, inclinarlo sul lato posteriore. Collegamenti idraulici Il tubo di carico dell’acqua, non deve in nessun caso, essere tagliato in quanto contiene parti sotto tensione. L’adattamento degli impianti idraulici per l’installazione deve essere eseguito solo da personale qualificato. - Page 11 Avvertenze per il primo lavaggio (secondo il La macchina, è dotata di segnali acustici/toni Dopo l’installazione, rimuovere i tamponi posizionati sui cesti e modello d lavastoviglie ) che avvisano dell’avvenuto comando: gli elastici di trattenimento sul cesto superiore (dove presenti). accensione, fine ciclo ecc..
-
Page 12: Descrizione Dell'apparecchio
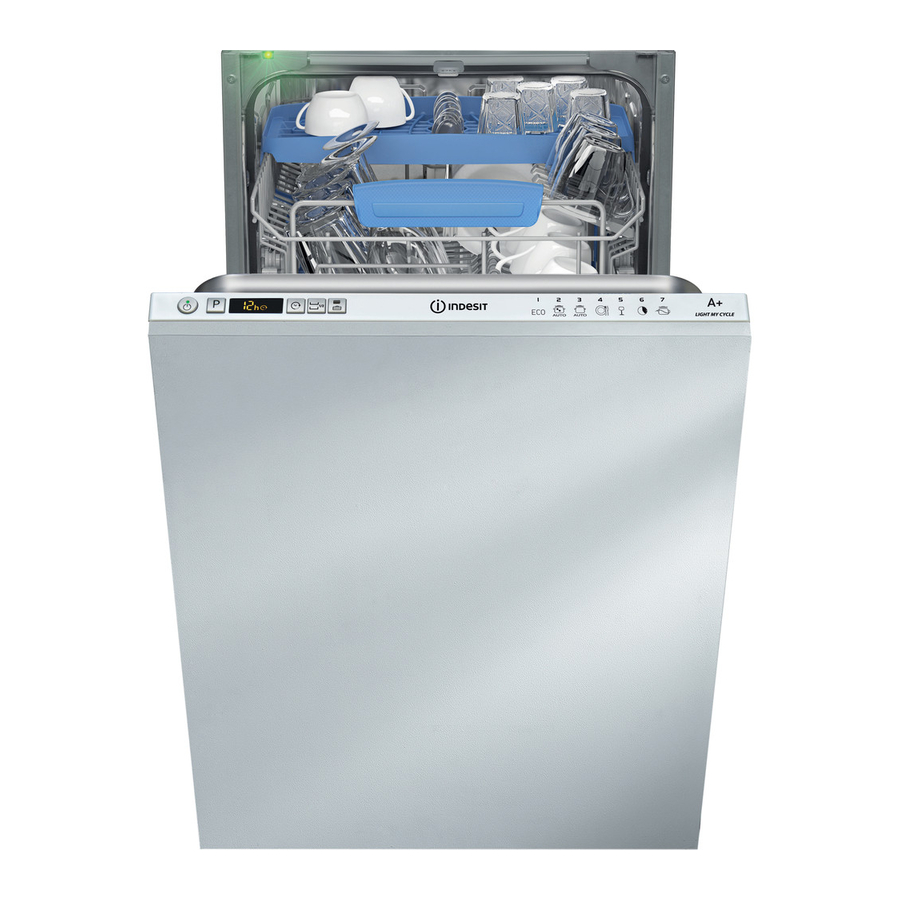
Descrizione dell’apparecchio Vista d’insieme Cestello superiore Irroratore superiore Ribaltine Regolatore altezza cestello Cestello inferiore Irroratore inferiore Cestello posate Filtro lavaggio Serbatoio sale Vaschette detersivo e serbatoio brillantante Targhetta caratteristiche Pannello comandi Pannello comandi spia Mancanza Sale indicatore Numero e Tempo Residuo Programma tasto Selezione tasto Opzione Mezzo Carico Programma... -
Page 13: Sale Rigenerante E Brillantante
Sale rigenerante e Brillantante Autonomia media Usare solo prodotti specifici per lavastoviglie. Non usare Tabella Durezze Acqua contenitore sale con 1 sale alimentare o industriale. lavaggio al giorno Seguire le indicazioni riportate sulla confezione. livello °dH °fH mmol/l mesi 0 - 6 0 - 10 0 - 1 7 mesi... -
Page 14: Caricare I Cesti
Caricare i cesti Suggerimenti Alcuni modelli di lavastoviglie, Prima di caricare i cesti, eliminare dalle stoviglie i residui di dispongono di settori reclinabili cibo e vuotare bicchieri e i contenitori dei liquidi rimasti. Non è gli stessi si possono usare in necessario un risciacquo preventivo sotto acqua corrente. - Page 15 Ribaltine a posizione variabile* Regolare l’altezza del cesto superiore Le ribaltine laterali sono posizionabili su tre altezze differenti per Il cesto superiore è regolabile in altezza: in posizione alta ottimizzare la disposizione delle stoviglie nello spazio del cesto. quando nel cesto inferiore si vogliono sistemare stoviglie ingombranti;...
-
Page 16: Detersivo E Uso Della Lavastoviglie
Detersivo e uso della lavastoviglie Caricare il detersivo Avviare la lavastoviglie 1. Aprire il rubinetto dell’acqua. Il buon risultato del lavaggio dipende anche dal corretto dosaggio del detersivo, eccedendo non si lava in modo 2. Aprire la porta e premere il tasto ON-OFF: le spie ON/OFF, più... -
Page 17: Programmi
Programmi I dati dei programmi sono misurati in condizioni di laboratorio secondo Norma europea EN 50242. A seconda delle diverse condizioni di utilizzo, la durata e i dati dei programmi possono variare. Il numero e il tipo di programmi ed opzioni variano in base al modello di lavastoviglie. Consumo Durata dei Consumo... -
Page 18: Programmi Speciali Ed Opzioni
Programmi speciali ed Opzioni Opzione Pastiglie Multifunzione (Tabs) Note: le migliori prestazioni dei programmi “Quotidiano ed Express”, Con questa opzione viene ottimizzato il risultato di lavaggio ed asciugatura. si ottengono preferibilmente rispettando il numero di coperti specificati. Quando si usano le pastiglie multifunzione premere il tasto PASTIGLIE MULTIFUNZIONE, la relativa spia si illumina. -
Page 19: Manutenzione E Cura
Manutenzione e cura Periodicamente, pulire il filtro entrata acqua posizionato all’uscita del rubinetto. - Chiudere il rubinetto dell’acqua. - Svitare l’estremità del tubo di carico acqua, togliere il filtro e pulirlo delicatamente sotto un getto di acqua corrente. - Inserire nuovamente il filtro e avvitare il tubo. Pulire i filtri Il gruppo filtrante è... -
Page 20: Anomalie E Rimedi
Anomalie e rimedi Può accadere che l’apparecchio non funzioni. Prima di telefonare all’Assistenza controllare che non si tratti di un problema facilmente risolvibile aiutandosi con il seguente elenco. Anomalie: Possibili cause / Soluzione: La lavastoviglie non parte o • Spegnere la macchina con il tasto ON/OFF, riaccendere dopo un minuto circa e non risponde ai comandi reimpostare il programma. -
Page 21: Installation
Installation If the appliance must be moved at any time, keep it in an WARNING: HAZARDOUS VOLTAGE! upright position; if absolutely necessary, it may be tilted onto its back. Under no circumstances should the water inlet hose be cut Connecting the water supply as it contains live electrical parts. - Page 22 Advice regarding the first wash cycle (depending on the The machine has a buzzer/set of tones After the installation, remove the stoppers from the racks and dishwasher model ) to inform the user that a command has the retaining elastic elements from the upper rack (if any). been implemented: power on, cycle end etc.
-
Page 23: Description Of The Appliance
Description of the appliance Overall view Upper rack Upper spray arm Tip-up compartments Rack height adjuster Lower rack Lower spray arm Cutlery basket Washing filter Salt dispenser Detergent and rinse aid dispensers Data plate Control Panel Control panel Select Wash Low Salt Cycle button indicator light Half Load Option button ON/OFF/RESET... -
Page 24: Refined Salt And Rinse Aid
Refined Salt and Rinse Aid Average autonomy Only use products which have been specifically designed Water Hardness Table salt dispenser with 1 for dishwashers. Do not use table salt or industrial salt. wash cycle per day Follow the instructions given on the packaging. level °dH °fH... -
Page 25: Loading The Racks
Loading the racks Tips Cutlery basket Before loading the racks, remove all food residues from the The basket is equipped with top grilles for improved cutlery crockery and empty liquids from glasses and containers. No arrangement. The cutlery basket should be positioned only at preventive rinsing is needed under running water. - Page 26 Adjusting the height of the upper rack Tray The height of the upper rack can be adjusted: high position Some dishwasher models are fitted with a sliding tray which to place bulky crockery in the lower rack and low position to can be used to hold small crockery and cutlery. make the most of the tip-up compartments by creating more For optimum washing performance, avoid positioning bulky space upwards.
-
Page 27: Detergent And Dishwasher Use
Detergent and dishwasher use Measuring out the detergent Starting the dishwasher 1. Turn the water tap on. Good washing results also depend on the correct amount of 2. Open the door and press ON-OFF button. detergent being used. Exceeding the stated amount does not 3. Measure out the detergent. (see detergent information). result in a more effective wash and increases environmental 4. Load the racks (see Loading the racks) . -
Page 28: Wash Cycles
Wash cycles Wash-cycle data is measured under laboratory conditions according to European Standard EN 50242. Based on the different conditions of use, the wash-cycle duration and data can change. The number and type of wash cycles and options may vary depending on the dishwasher model. Wash cycle Approximate Water Energy which duration of wash Wash cycle Options consumption... -
Page 29: Special Wash Cycles And Options
Special wash cycles and Options Notes: Multi-functional tablets Option (Tabs) Optimum performance levels when using the “Daily and Express” This option optimises washing and drying results. cycles can be achieved by respecting the specified number of When using multi-functional tablets, press the MULTI- place settings. FUNCTIONAL TABLETS button; the corresponding symbol will light up. If the button is pressed again, the option will be To reduce consumption even further, only run the dishwasher deselected. -
Page 30: Care And Maintenance
Care and maintenance Cleaning the filters The filter assembly consists of three filters which remove food residues from the washing water and then recirculate the water. They must be cleaned if you wish to achieve the best results in every wash. Clean the filters regularly. -
Page 31: Troubleshooting
Troubleshooting Whenever the appliance fails to work, check for a solution from the following list before calling for Assistance. Problem: Possible causes / Solutions: The dishwasher does not start • The water supply tap is not turned on. or cannot be controlled. •... -
Page 32: Installatie
Installatie Als u het apparaat verplaatst, moet u het verticaal houden; BELANGRIJK: GEVAARLIJKE SPANNING! is dit niet mogelijk, dan moet u het naar achteren kantelen. Hydraulische aansluitingen De toevoerbuis mag in geen geval worden doorgesneden: hij bevat onderdelen die onder spanning staan. Aanpassingen aan het hydraulisch systeem met het oog op de installatie mogen alleen door erkende technici worden Elektrische aansluiting... - Page 33 Het apparaat beschikt over een aantal geluidssignalen/ Aanwijzingen voor de eerste afwascyclus (aan de hand van het model vaatwasser tonen ) die Na de installatie moet u de beschermelementen op de rekken waarschuwen dat de betreffende functie van start is verwijderen, evenals de elastieken op het bovenrek (waar gegaan: inschakeling, einde cyclus, etc.
-
Page 34: Beschrijving Van Het Apparaat
Beschrijving van het apparaat Aanzichttekening Bovenrek Bovenste sproeiarm Opklaprekjes Regelen hoogte rek Onderrek Onderste sproeiarm Bestekkorf Filter Zoutreservoir Bakjes voor afwasmiddel en glansmiddelreservoir Typeplaatje Bedieningspaneel Bedieningspaneel toets Selecteren Programma controlelampje Zout Bijvullen toets Optie Halve Lading led Programmanummer toets en en Resterende controlelampje toets en controlelampje Optie Tabs... -
Page 35: Onthardingszout En Glansmiddel
Onthardingszout en glansmiddel Gebruik uitsluitend producten die speciaal voor • Schakel de afwasautomaat uit met de toets ON/OFF. afwasautomaten bestemd zijn. Gebruik geen keuken- of • Instelling voltooid! industrieel zout. Volg de aanwijzingen op de verpakking. Gemiddelde duur Als u een multifunctieproduct gebruikt, raden we toch Tabel Waterhardheid zoutreservoir met 1 aan onthardingszout toe te voegen, vooral als het water hard wascyclus per dag of zeer hard is. -
Page 36: Het Laden Van De Rekken
Het laden van de rekken Advies Het is aan te raden zeer vuile vaat in het onderrek te plaatsen, aangezien in dit deel van de vaatwasser de kracht van de Voordat u de vaat inlaadt moet u overtollige etensresten waterstroom groter is waardoor de wasprestaties verbeteren. verwijderen en glazen en bekers legen. - Page 37 Het regelen van de hoogte van het bovenrek Besteklade Het bovenrek kan in hoogte worden aangepast: in de hoge Enkele modellen vaatwasser beschikken over een stand als men in het onderrek volumineuze vaat wil plaatsen, verschuifbare besteklade die kan worden gebruikt om extra in lage stand om te kunnen profiteren van meer plek boven bestek of kleine vaat te bevatten.
-
Page 38: Vaatwasmiddel En Gebruik Van De Afwasautomaat
Vaatwasmiddel en gebruik van de afwasautomaat Het vaatwasmiddel toevoegen Start de vaatwasser Een goed wasresultaat hangt ook af van een correcte 1. Open de waterkraan. dosering van het vaatwasmiddel. Teveel wasmiddel betekent 2. Open de deur en druk op de ON-OFF toets. 3. Doseer het vaatwasmiddel. (zie vaatwasmiddel). -
Page 39: Programma's
Programma’s De gegevens van de programma’s zijn gemeten in laboratoriumomstandigheden volgens de Europese vorm EN 50242. Aan de hand van de verschillende gebruiksmogelijkheden kunnen de duur en de programmagegevens verschillen. Het aantal en het soort programma’s en opties verschilt aan de hand van het model afwasautomaat. Duur van het Programma’s Waterverbruik Energieverbruik Programma Opties programma (KWh/cyclus) (l/cyclus) -
Page 40: Speciale Programma's En Opties
Speciale programma's en opties N.B.: Multifunctie-tabletten (Tabs) de beste prestaties van de programma's "Dagelijks en Express Met deze optie krijgt u de beste was- en droogresultaten. " worden bereikt als u het aantal aangegeven couverts niet Als u multifunctie-tabletten gebruikt, moet u op de toets overschrijdt. -
Page 41: Onderhoud En Verzorging
Onderhoud en verzorging Reinig geregeld het watertoevoerfilter bij de kraan. - Doe de waterkraan dicht. - Schroef het uiteinde van de watertoevoerbuis los, verwijder het filter en reinig het voorzichtig onder stromend water. - Doe het filter op zijn plaats en schroef de buis vast. Reinigen van de filters De filtergroep wordt gevormd door drie filters die etensresten uit het waswater verwijderen en zorgen dat het weer schoon... -
Page 42: Storingen En Oplossingen
Storingen en oplossingen Het kan gebeuren dat de vaatwasser niet werkt. Voor u de Servicedienst opbelt moet u controleren of u het euvel niet gemakkelijk zelf kunt oplossen m.b.v. volgende lijst. Storingen: Mogelijke oorzaken / Oplossingen: De vaatwasser start niet of •... -
Page 43: Instalacja
Instalacja W przypadku przenoszenia należy trzymać urządzenie w pozycji pionowej; w razie konieczności przechylić je do tyłu. UWAGA: NIEBEZPIECZNE NAPIĘCIE! Połączenia hydrauliczne Węża doprowadzającego wodę nie można w żadnym wypadku przecinać, gdyż zawiera części pod napięciem. Przystosowanie instalacji hydraulicznej powinno być dokonywane wyłącznie przez wykwalifikowany personel. - Page 44 Przed pierwszym użyciem Maszyna jest wyposażona w systemy akustyczne/ (zależnie od modelu zmywarki tonowe ), które informują o Po zainstalowaniu, należy zdjąć elementy ochronne z koszy wykonanym poleceniu: włączeniu, końcu cyklu, itd. oraz gumki przytrzymujące kosz górny (jeśli je zastosowano). Symbole/lampki kontrolne/diody świetlne obecne na panelu Ustawienia zmiękczacza wody sterowniczym/wyświetlaczu mogą...
-
Page 45: Opis Urządzenia
Opis urządzenia Widok ogólny Kosz górny Spryskiwacz górny Półeczki Regulacja wysokości kosza Kosz dolny Spryskiwacz dolny Kosz na sztućce Filtr zmywania Pojemnik na sól Pojemniki na środek myjący i nabłyszczający Tabliczka znamionowa Panel sterowania Panel sterowania przycisk Wyboru Programu Kontrolka soli Wskaźnik świetlny numeru przycisk i kontrolka przycisk i kontrolka... -
Page 46: Sól Regeneracyjna I Środek Nabłyszczający
Sól regenerująca i środek nabłyszczający Autonomia średnia Stosować wyłącznie produkty przeznaczone do Tabela twardości wody pojemnik soli przy 1 zmywarek. Nie stosować soli jadalnej lub przemysłowej. myciu dziennie Stosować zgodnie z zaleceniami podanymi na opakowaniu. poziom °dH °fH mmol/l miesiące 0 - 6 0 - 10 0 - 1... -
Page 47: Ładowanie Koszy
Ładowanie koszy Zalecenia Aby ich użyć wystarczy chwycić za kolory uchwyt pociągając go do góry i obracając do przodu. Suporty te można przesuwać w Przed napełnieniem koszy, usunąć z naczyń resztki żywności i opróżnić szklanki oraz kieliszki z pozostałych w nich płynów. Nie prawo lub w lewo, aby dostosować... - Page 48 Regulowanie wysokości górnego kosza (45 cm) Taca Wysokość kosza górnego można regulować: umieszczenie Niektóre modele zmywarek są wyposażone w przesuwną kosza w pozycji górnej umożliwia ułożenie w koszu dolnym tacę, na której można umieszczać sztućce lub niewielkie niewymiarowych naczyń; umieszczenie kosza w pozycji dolnej naczynia.
-
Page 49: Środek Myjący I Obsługa Zmywarki
Środek myjący i obsługa zmywarki Napełnianie dozownika detergentu Uruchomienie zmywarki 1. Otworzyć zawór wody. Dobry rezultat mycia zależy również od właściwego 2. Otworzyć drzwi i nacisnąć przycisk ON-OFF. dozowania środka myjącego, jego nadmierna ilość nie 3. Wprowadzić detergent. (zob. Napełnianie dozownika zwiększa skuteczności mycia, powoduje natomiast detergentu). -
Page 50: Programy
Programy Dane programów są mierzone w warunkach laboratoryjnych zgodnie z europejską normą EN 50242. W zależności od poszczególnych warunków użytkowania, czas trwania oraz dane programów mogą się zmieniać. Liczba i rodzaj programów i opcji zmieniają się w zależności od modelu zmywarki. Czas trwa- Zużycie wody Zużycie energii... -
Page 51: Programy Specjalne I Opcje
Programy specjalne i opcje Uwagi: Opcji Tabletki wielofunkcyjne (Tabs) najlepszą skuteczność działania programów “ Codzienny - Opcja ta pozwala uzyskać optymalne wyniki zmywania Express” uzyskuje się przestrzegając zaleceń dotyczących ilości i suszenia. wkładanych naczyń. W przypadku stosowania tabletek wielofunkcyjnych nacisnąć przycisk TABLETKI WIELOFUNKCYJNE, kontrolka zaświeci się;... -
Page 52: Konserwacja I Obsługa
Konserwacja i obsługa - Po zamknięciu zaworu należy odkręcić końcówkę przewodu doprowadzającego wodę do zmywarki, wyjąć filtr i delikatnie umyć go pod bieżącą wodą. - Następnie ponownie włożyć filtr i zakręcić przewód. Czyszczenie filtrów Zespół filtrujący składa się z trzech filtrów, które oczyszczają wodę... -
Page 53: Nieprawidłowe Działanie I Możliwe Środki Zaradcze
Nieprawidłowe działanie i możliwe środki zaradcze Jeśli w pracy urządzenia pojawiają się anomalie w pracy, należy skontrolować następujące punkty przed zwróceniem się do Obsługi technicznej (patrz Obsługa techniczna). Niektóre z usterek są sygnalizowane za pomocą lampek zapalających się na panelu sterowania. Przed wezwaniem pomocy technicznej należy zanotować, które z lampek świecą. - Page 56 195124066.00 - NC 05/2014 pb - Xerox Fabriano Indesit Company Spa Viale Aristide Merloni 47 60044 Fabriano (AN) www.indesit.com Italy...