Advertisement
Quick Links
※ご使用前にこの説明書を良くお読みになり十分に理解してください。
Before beginning assembly, please read these instructions thoroughly.
THE FINEST RADIO CONTROL MODELS
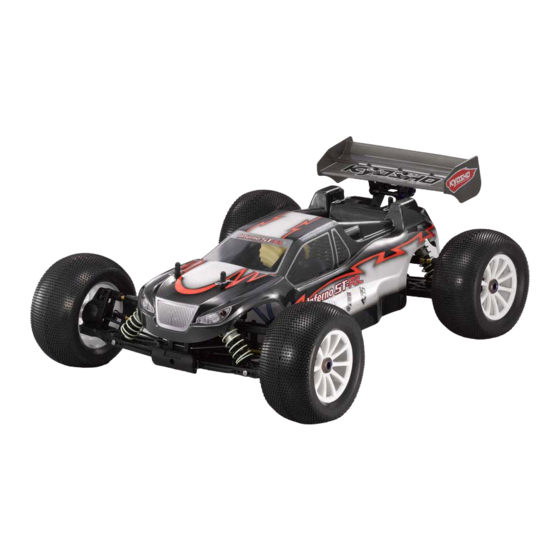
1: 8 Scale Radio Controlled .21-28 Engine Powered 4WD Stadium Truck
目 次 INDEX
●キットの他にそろえる物
RADIO PREPARATION
●プロポの準備
BEFORE YOU BEGIN
●組立て前の注意
●ランナー付プラパーツ配置図
ASSEMBLY
●本体の組立て
OPERATING YOUR MODEL SAFELY
●取扱いの注意
EXPLODED VIEW
●分解図
●スペアパーツ・オプションパーツリスト
安全のための注意事項
この無線操縦模型は玩具ではありません!
●この商品は高い性能を発揮するように設計されています。組立てに不慣れな方
は、模型を良く知っている人にアドバイスを受け確実に組立ててください。
●小さい部品があるので、組立て作業は幼児の手がとどかない所で必ずおこなっ
てください。
●動かして楽しむ場所は、万一の事故を考えて安全を確認してから、責任をもっ
てお楽しみください。
●組立てた後も、説明書がいつでも見られるように大切に保管してください。
●ラジコン保険に加入して安全に楽しみましょう。
※製品改良のため、予告なく仕様を変更する場合があります。 *SPECIFICATIONS ARE SUBJECT TO CHANGE WITHOUT NOTICE.
© Copyright 2007 KYOSHO CORPORATION/禁無断転載複製
31353-T02
R
REQUIRED FOR OPERATION
ARRANGEMENT OF PLASTIC PARTS ON RUNNERS
SPARE PARTS & OPTIONAL PARTS
INSTRUCTION MANUAL
インファーノ ST-RR
UNDER SAFETY PRECAUTIONS
This radio control model is not a toy!
●First-time builders should seek the advice of experienced modellers before
beginning assembly and if they do not fully understand any part of the
construction.
●Assemble this kit only in places out of children's reach!
●Take enough safety precautions prior to operating this model.
You are responsible for this model's assembly and safe operation!
●Always keep this instruction manual ready at hand for quick
reference, even after completing the assembly.
●Taking out liability insurance is recommended.
組立/取扱説明書
2 〜 3
3
4 〜 5
6 〜 7
8 〜 32
33
34 〜 36
37 〜 41
No. 31353
Advertisement

Related Manuals for Kyosho Inferno ST-RR


Summary of Contents for Kyosho Inferno ST-RR
- Page 1 ●Always keep this instruction manual ready at hand for quick reference, even after completing the assembly. ●組立てた後も、説明書がいつでも見られるように大切に保管してください。 ●Taking out liability insurance is recommended. ●ラジコン保険に加入して安全に楽しみましょう。 ※製品改良のため、予告なく仕様を変更する場合があります。 *SPECIFICATIONS ARE SUBJECT TO CHANGE WITHOUT NOTICE. No. 31353 © Copyright 2007 KYOSHO CORPORATION/禁無断転載複製 31353-T02...
- Page 2 Required for engine starting: Paint ●ボディの塗装には塗料が必要です。 ■燃料 ■燃料ポンプ ■プラグヒーター Glow Fuel Fuel Pump Plug Heater 京商では、モデル用塗料、スプレーを 販売していますのでご利用ください。 ●For painting the body, use Kyosho paints for models! No.76001〜76062 No.73112 No.96422B 京商スプレーカラー No.36217 No.36215 KANAI FUEL 30% クイックフュールポンプ KYOSHO SPRAY COLOR ブースターチャージャー 2.0 スパークブースター...
- Page 3 No.94402 LOCTITE ロックタイト ■ニッパー キットに入っている工具 Wire Cutters TOOLS INCLUDED ■瞬間接着剤 ■六角レンチ(1.5mm, 2mm, 2.5mm, 3mm) Instant Glue Hex Wrench (1.5mm, 2mm, 2.5mm, 3mm) KYOSHO スペシャルグルー KYOSHO Special Glue No.96154 ■グリス Grease Grease No.1829 ■リングギヤグリス No.36219 Ring Gear Grease SPナイフエッジリーマー ラウンドカッター&サンダー...
- Page 4 Read through the manual before you begin, so you will have an overall idea of what to do. キットの内容をお確かめください。万一不良、 不足がありましたら、 お買い求めの販売店にご相談いただくか、 当社 「ユーザー相談室」 までご連絡ください。 Check all parts. If you find any defective or missing parts, contact your local dealer or our Kyosho Distributor. 説明書の見かた...
- Page 5 組立て前の注意(2) BEFORE YOU BEGIN (2) キットには、形や長さが違うビスや小物部品が多く入っています。説明書には原寸図がありますので確認してから組立ててください。 また、ビス類は多めに入っているものもありますので、予備としてお使いください。 This kit contains screws and hardware in different metric sizes and shapes. Before using them, check the screws on the true-to-scale diagrams on the left side in each assembly step. Some screws are extras. ●ビスの種類...
- Page 6 ARRANGEMENT OF PLASTIC PARTS ON RUNNERS (1) ランナー付 プラパーツ配置図 (1) 部の部品は使用しません。 No.1 Shaded parts are not used. 部の部品は、セッティング用に使用してくだい。 No.4 Use the parts within the dotted lines as tunning options. 部の部品は使用しません。 Shaded parts are not used. No.5 部の部品は 使用しません。 Shaded parts are not used.
- Page 7 ARRANGEMENT OF PLASTIC PARTS ON RUNNERS (2) ランナー付 プラパーツ配置図 (2) 部の部品は、セッティング用に使用してくだい。 No.5 Use the parts within the dotted lines as tunning options. No.6 ( 22˚ ) ( 20˚ ) No.7 No.8 部の部品は、セッティング用に使用してくだい。 Use the parts within the dotted lines as tunning options. 部の部品は使用しません。...
- Page 8 デフギヤ No.2 Gear Differential (フロント/リヤ用) (For front and rear) 4x4mm 平らな面 Flat surface (センター用) (For center) 4 x 4mm セットビス 4 2.6 x 14mm シャフト (黒) Set Screw Shaft (Black) 5 6mm Oリング 7 8 x 16mm ベアリング O-ring Ball Bearing フロント/リヤ用...
- Page 9 リヤギヤボックス No.2, No.4, No.5, No.10 Rear Gearbox のベアリングを のバルクヘッドにしっかりと 押し込んでください。 Start by installing the pinion bearings in the gearbox, double-checking that both bearings are fully seated. You can use the handle of a screw driver for some extra force to press the bearings into place. リヤデフ...
- Page 10 4x10mm No.4, No.5, 5x4mm リヤギヤボックス Rear Gearbox No.10 5 x 4mm セットビス Set Screw 長い 4 x 10mm ビス Long Screw 4 x 15mm TPビス 平らな面にセットビス TP Screw を固定する。 Tighten the set screw to the flat spot. 4x15mm リヤダンパーステー 3 x 22mm 4 x 10mm キャップビス...
- Page 11 “ R ”のマーク リヤサスペンション No.4, No.5, No.10 < > “ R ” marked. Rear Suspension 右側用 < > For right side. 4 x 12mm 5 x 4mm セットビス セットビス 7 8 x 16mm ベアリング Set Screw Set Screw Ball Bearing E2.5 Eリング...
- Page 12 リヤサスペンション No.4, No.10 Rear Suspension 向きに注意。 3x25mm Note the direction. 3 x 25mm キャップビス Cap Screw 46 7.8mm ナイロンナット ツバ付ボール Nylon Nut Ball 取付穴 Holes for mounting. リヤサスペンション No.4, No.10 Rear Suspension 3x10mm 3x18mm 3 x 3mm セットビス 48 5.8mm ボールエンド...
- Page 13 シャシー Chassis No.10 4x20mm 4 x 20mm TPサラビス TP F/H Screw 4x20mm シャシー 3 x 8mm 3 x 18mm サラヘックスビス キャップビス 56 6.8mm No.4, No.9, No.10 ツバ付ボール Chassis F/H Hex Screw Cap Screw Ball 313 6.8mm ボールエンド トルクロッドボール Ball End Torque Rod Ball 3x18mm 長い...
- Page 14 フロントギヤボックス No.2, No.6, No.10 Front Gearbox のベアリングを のバルクヘッドにしっかりと 押し込んでください。 Start by installing the pinion bearings in the gearbox, double-checking that both bearings are fully seated. You can use the handle of a screw driver for some extra force to press the bearings into place. フロントデフ...
- Page 15 フロントギヤボックス No.5, No.6, No.10 Front Gearbox 上 5 x 4mm セットビス 平らな面にセットビスを Set Screw 固定する。 Tighten the set screw to the flat spot. 4 x 15mm TPサラビス 5x4mm TP F/H Screw 4 x 20mm TPサラビス TP F/H Screw 4x15mm 短い Short “L”を使用。...
- Page 16 フロントサスペンション No.6, No.10 4x10mm Front Suspension 4 x 10mm キャップビス < > 右側用 Cap Screw < > For right side. 8 x 16mm ベアリング “ 22˚ ”を使用。 Ball Bearing “R”のマーク Use the " 22˚ " “R” marked. marked piece. 4x10mm 2.6 x 17mm シャフト...
- Page 17 フロントサスペンション < > No.5, No.6, No.10 左側用 Front Suspension < > For left side. < > 右側用 < > For right side. Lのマーク 長 Marked “L” Long Rのマーク 79 6.8mm ツバ付ボール Marked “R” Ball 逆ネジ Reverse screw フロントアッパーロッド Front Upper Rod 321 6.8mm ボールエンド...
- Page 18 フロントサスペンション No.6, No.10 Front Suspension 3x10mm 3x18mm 3 x 3mm セットビス Set Screw 3 x 4mm セットビス Set Screw 3x3mm 5.8mm ボール Ball 3 x 10mm セットビス Set Screw 3x3mm スタビボール (銀) Stabilizer Ball (Silver) 3 x 18mm ビス Screw 2.6 x 5mm サラビス...
- Page 19 センターギヤボックス No.8 Center Gearbox 約10mm approx. 10mm ブレーキパッド Brake Pad センターデフ Center Differential 324 16.5mm ディスクプレートボルト Disk Plate Bolt センターギヤボックス No.8, No.9, No.10 Center Gearbox 325 326 327 各スペーサーとオプションのスパーギヤは、 下の様に組み合わせて使用します。 When using spacers 325 326 327 with the optional spur gears, please use the below chart for matching.
- Page 20 No.8, No.9, センターギヤボックス 3x3mm 12mm Center Gearbox No.10 3 x 3mm セットビス Set Screw 3x12mm 3 x 12mm TPサラビス TP F/H Screw 227 3mm サラワッシャー F/H Washer ロッドがプレートにあたる場合は ペンチで曲げる。 Bend the rods if they contact the plate. 3x3mm 厚いものを使用。 Use thick one. ステアリング...
- Page 21 ステアリング 仮止めのビスを外して使う。 Remove these screws and retighten after installing Steering 3x10mm 4x10mm 長い Long No.4, No.7, No.10 短い Short 3 x 10mm サラヘックスビス F/H Hex Screw 4 x 10mm サラビス 向きに注意。 F/H Screw Note the direction. 短い Short トルクロッドボール Torque Rod Ball 313 6.8mm ボールエンド...
- Page 22 エンジン No.36206 3PCクラッチシューツールを No.3 エンジン 使用すると便利です。 Engine Engine When assembling the clutch shoe, it is easier to assemble using the 3pc Clutch Shoe Tool (No.36206). クランクシャフトを引っ張り 出した状態で組み立てます。 Assemble the following parts with pulling the crankshaft. エンジン Engine 必ずキット付属の テーパー コレットを使用する。 taper collet included in the kit.
- Page 23 エンジン 紙1枚分のすきまをあける。 No.3, No.10 Engine Insert a sheet of paper before installing. 前 Front 4 x 6mm サラビス F/H Screw 4x10mm 4x10mm 4 x 10mm フランジ付キャップビス 4x6mm Flanged Cap Screw 4x6mm マフラー No.9, No.10 Muffler 4 x 4mm セットビス Set Screw 3 x 6mm サラビス...
- Page 24 燃料タンク 3x15mm 3 x 15mm TPビス Fuel Tank TP Screw 3x15mm No.8, No.9, 3 x 12mm TPサラビス No.10 TP F/H Screw Oリング P3 O-ring P3 エンジン、マフラーに合せてシリコン チューブの長さを調節する。 Cut the Silicone Tube, depending on Engine and Muffler. Oリングの 向きに注意。 Note the direction for O-ring.
- Page 25 プロポ No.9, No.10 フックピン Radio Hook Pin 受信機 アンテナ Receiver Antenna メカボックスのすき間には、 スポンジ等を入れると良い。 Better to fill some sponge between radio box and receiver as well as battery. バッテリー Battery カットした溝にアンテナ を通す。 The Antenna code must be in the groove. プロポ No.10 Radio 3 x 12mm...
- Page 26 334 335 No.8, 各 スペーサーとオプションのスパーギヤは、 プロポ 下の様に組み合わせて使用します。スロットルサーボのみ使用します。 No.9, Radio 334 335 336 Spacers and the optional spur gears will need to be No.10 matched as the below chart. ビスの種類に注意。 Use spacers only for the throttle servo. 3x18mm(F/H) Note the types 3x18mm(F/H) of screws ! スペーサー...
- Page 27 2.6mm プロポ サーボホーン と の向きに注意。 Servo Horn Radio Note the directions of 2x6mm No.9, No.10 2.6x6x1mmカラーで高さを調整する。 Adjust the height with 2.6x6x1mm collar. OS. シリオ、ノバロッシエンジンの場合 2.6x6x2mmカラーで高さを調整する。 約19mm With O.S. ,SIRIO and NOVA Rossi engines : Adjust the height with 2.6x6x2mm collar. approx.
- Page 28 ホコリの多い場所で走行する時には、 エンジン No.3, No.10 を の上にかぶせる。 Engine When running the engine in a dusty enviroment, cover with 3x10mm オイルをしみ込ませておく。 短い Soak inner sponge with oil. Short 長い Long No.96176 HGエアークリーナーオイル (100cc) HG Air Cleaner Oil (100cc) 3 x 10mm TPサラビス (チタン) TP F/H Screw (Titanium) 3x15mm 3x15mm...
- Page 29 ダンパーオイル ダンパー Shock Oil Shock 多少もり上がる No.1 ぐらいまで入れる。 Fill in until shock oil nearly overflows. スムーズに動くか 確認する。 Check if piston 上下させ、気泡をとる。 moves smoothly. Then, gently move the piston up and down to get rid of air bubbles. ピストンを下げる。 Pull down the piston. スプリング調整用。...
- Page 30 番号順にタイヤを手で押さえ、瞬間接着剤を タイヤ / ホイール あらかじめシンナー等で接着面をきれいにしておく。 少しづつ流しこみ、最後に全体を接着します。 Clean the tire rims with thinner beforehand. Tire / Wheels Apply instant glue little by little in the order. ホイールのミゾにピッタリ タイヤをおしこむ。 Slide the tires into these slots in the wheels. タイヤ / ホイール No.4, No.6, No.10 Tire / Wheels 195 8 x 12 x 0.2mm シム...
- Page 31 Refer to the pictures on the After painting, remove the box for the color scheme. protective film from the body shell. 京商スプレーカラーで ボディ内側を塗装する。 Paint the body shell from the inside using Kyosho’s spray colors. デカール デカールは好みの位置に 貼ってください。 Decals Apply decals to any spots you like.
- Page 32 ボディ No.10 Body Shell ボディピンは、図のように曲げて ウイングプラワッシャー ボディピン おくと取外しが楽です。 Body Pin Wing Plastic Washer Slightly bend the body pins as shown in the diagram for easier removal. ギヤ比表 スターターボックス (No.36209 マルチスターターボックス 2.0) Gear Ratio Starter Box (No.36209 Multi Starter Box 2.0) イラストを参考に穴を追加し、シャシー位置を決めボスを取付けます。...
- Page 33 取扱いの注意 OPERATING YOUR MODEL SAFELY 次のような時、場所では走らせない。思わぬ事故の原因になります。 WARNING: Do NOT operate the model in the following places and situations: (Non-observance may lead to accidents!) 警告 ●プロポ関係の電池残量は常にチェックする。 ●周囲に人がいなくて、広い安全な場所で! 電池が減ってくると電波の送・受信が弱くコントロール 1. 自動車道路では走らせない。 ができなくなり、暴走や衝突の原因なります。 2. 近くに小さな子供がいたり、人の多い場所では走らせない。 Always check the dry batteries in the radio! 3.
- Page 34 Rear Shock W0142 92213 IFW304 IFW336GM XXXXXX IFW328BL W0141V W0142 IF325B W0141V W0202 IS054 IF137-1 IF137-1 IF318 IS051 IFW166 IF325B IF325B ISW051 92511 フロントダンパー IS053 Front Shock ISH050W IF318 IFW336GM 92511 © Copyright 2007 KYOSHO CORPORATION / 禁無断転載複製 Inferno ST-RR...
-
Page 35: Exploded View
< > EXPLODED VIEW デフギヤ Gear Differential IF102 IF39 IF39 ORG06 IF30-1 IF101 ORG06 IF102 BRG005 BRG005 IF102 IF103 IS101 BS107 < フロント/リヤ > IF102 < Front / Rear > IF101 IF102 IF39 IF39 IF30-1 ORG06 IF104 ORG06 IF102 BRG005 IF102 BRG005 IF103... - Page 36 スペアパーツ (1) SPARE PARTS (1) ★ FOR JAPANESE MARKET ONLY. 品番 パーツ名 内容 (キーNo.と入数) 発送 品番 パーツ名 内容 (キーNo.と入数) 発送 ★定価 ★定価 ★ ★ Part Names Quantity Part Names Quantity (税込) 手数料 (税込) 手数料 シムセット メカボックスセット 106 128 129 135 136 137 17 18 BS53 IF325B...
- Page 37 デカール (インファーノST-RR) デカール 3x5x0.3mm Shim x 10 ISD051 1680 Decal Set (Inferno ST-RR) decals キットの部品の一部にはスペアパーツとして販売していない物があります。京商ではオプションパーツを販売していますのでお買い求めください。 Some of the parts included are not available as spare parts. Purchase optional parts instead. オプションパーツ (1) OPTIONAL PARTS (1) ★ FOR JAPANESE MARKET ONLY.
- Page 38 デカール (インファーノST-RR) デカール 3x5x0.3mm Shim x 10 ISD051 1680 Decal Set (Inferno ST-RR) decals キットの部品の一部にはスペアパーツとして販売していない物があります。京商ではオプションパーツを販売していますのでお買い求めください。 Some of the parts included are not available as spare parts. Purchase optional parts instead. オプションパーツ (1) OPTIONAL PARTS (1) ★ FOR JAPANESE MARKET ONLY.
- Page 39 Prevents diff oil from leaking IFW336 KYOSHOスペシャルグルー (14g) ナイロン付ホイールナット (ブルー) と交換 瞬間接着剤 1260 96154 Wheel Nut With Nylon (Blue) instead of KYOSHO Special Glue (14g) Instant Glue IFW336 ナイロン付ホイールナット (レッド) と交換 リングギヤグリス (3g) 1260 96162 Wheel Nut With Nylon (Red) instead of Ring Gear Grease (3g) ハードスプリングサーボセイバーセット(MP777/ST-RR)...
- Page 40 Box Screwdriver (5.5mm) 単品売りあります。 There is a bit single KYOSHOツールバッグ ボックスドライバー (7.0mm) YKW010B 1260 YKW070BX 2415 article of a spare. KYOSHO Tool Bag Box Screwdriver (7.0mm) オイル類 ★ FOR JAPANESE MARKET ONLY. ★発送 ★発送 ★発送 品番 パーツ名 内容 (キーNo. と 入数)...
- Page 41 SCREW • NUT etc. ビス・ナット類 ★ FOR JAPANESE MARKET ONLY. 品番 サイズ(mm) 入数(各) 品番 サイズ(mm) 入数(各) 品番 径 入数(各) Size (mm) QUANTITY Size (mm) QUANTITY QUANTITY ナベビス ナット フランジ付キャップビス ★210 ★210 ★210 Round Head Screw Flanged Cap Screw (税込) (税込) (税込)...
- Page 42 THE FINEST RADIO CONTROL MODELS 京商ホームページ www.kyosho.com 京商株式会社 〒243-0034 神奈川県厚木市船子153 メーカー指定の純正部品を使用して ●ユ−ザ−相談室直通電話 046-229-4115 安全にR/Cを楽しみましょう。 お問い合わせは:月曜〜金曜(祝祭日を除く)10:00〜18:00 PRINTED IN JAPAN 61920709-2...