Table of Contents
Advertisement
Advertisement
Table of Contents

Related Manuals for Icom IC-41PRO


Summary of Contents for Icom IC-41PRO
- Page 1 BASIC MANUAL UHF TRANSCEIVER i41PRO...
-
Page 2: Important
In Australia, except in an emergency, a CB transmitter shall not be operated on UHF emergency channels 5 and 35. Icom, Icom Inc. and the Icom logo are registered trademarks of Icom Incor- v. No voice transmissions are permitted on data channels 22 porated (Japan) in Japan, the United States, the United Kingdom, Germany, and 23 (voice operation is inhibited on these channels). -
Page 3: Explicit Definitions
Icom transceivers or Icom chargers. Only DO NOT operate or place the transceiver in direct sunlight Icom battery packs are tested and approved for use with or in areas with temperatures below –30°C or above +60°C. Icom transceivers or charged with Icom chargers. Using... - Page 4 PRECAUTIONS (Continued) DO NOT modify the transceiver. The specifications may MAKE SURE to turn OFF the transceiver before connect- change and then not comply with the requirements of a cor- ing the supplied/optional equipment. responding regulation. The transceiver warranty does not cover any problems caused by unauthorized modification.
-
Page 5: Table Of Contents
SUPPLIED ACCESSORIES TABLE OF CONTENTS IMPORTANT ................i GENERAL INFORMATION ............ i EXPLICIT DEFINITIONS ............ii PRECAUTIONS ..............ii SUPPLIED ACCESSORIES ..........iv TABLE OF CONTENTS ............iv 1. PANEL DESCRIPTION ..........1–4 ■ Panel description ............1 ■ Display .................3 2. BASIC OPERATION ............5 ■... -
Page 6: Panel Description
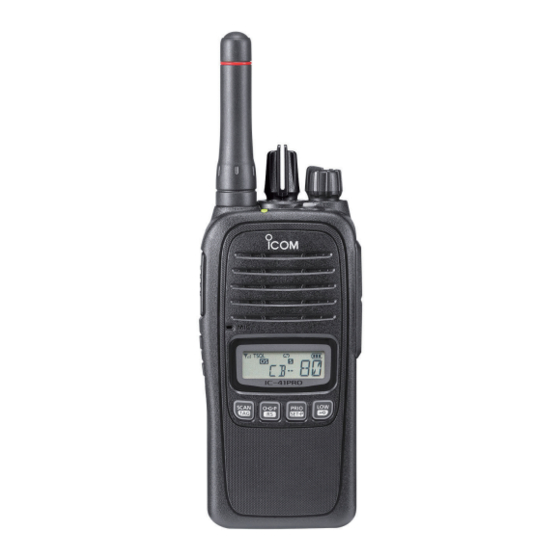
PANEL DESCRIPTION ■ Panel description [ROTARY SELECTOR] Antenna connector [VOL] [TOP] Normal mode STATUS INDICATOR • Push to start or stop a scan. Speaker Speaker-microphone jack • Hold down for 2 seconds to tag or untag the displayed channel. [PTT] The tagged channels will be scanned. - Page 7 PANEL DESCRIPTION [PTT] • Hold down to transmit. Release to receive. (p. 5) Normal mode • A PTT Hold function can also be used. • Push to set the transmit output power level to “HIGH (5W)” or “LOW (Push to start transmitting, push again to stop transmitting) (1W).”...
-
Page 8: Display
PANEL DESCRIPTION ■ Display r QUIET MODE ICON Displayed when the Selcall Quiet mode is ON. t PRIORITY CHANNEL ICON Displayed when the Priority channel is set. y SCRAMBLER ICON Displayed when the Voice scrambler function is ON. u DUPLEX ICON Displayed when a Duplex channel is selected. - Page 9 PANEL DESCRIPTION !2 LOW POWER ICON Information • Displayed when low output power is selected. “N/A (Not Applicable)” is • When the battery power decreases below a specific displayed when you push level, the transceiver automatically switches to low out- a key that has no setting or function.
-
Page 10: Basic Operation
BASIC OPERATION ■ Turning the transceiver ON Information Before using the transceiver for the first time, you must To maximise the clarity of the signal: charge the battery for optimum life and use. • Pause briefly after pushing [PTT]. This ensures that the first part of ➥... -
Page 11: Battery Charging
If pressure. Battery damage may not be visible on the outside any of these conditions occur, contact your Icom dealer or of the case. Even if the surface of the battery does not show distributor. -
Page 12: D Charging Caution
CAUTION: NEVER charge the battery outside of the speci- ating time of the transceiver may become short when: fied temperature range: +10˚C to +40˚C. Icom recommends • Approximately five years have passed since the battery was charging the battery at +20˚C. The battery may heat up or manufactured. -
Page 13: Rapid Charging With The Bc-213
BATTERY CHARGING ■ Rapid charging with the BC-213 The BC-213 rapid charges the Li-ion bat- desktop charger Turn OFF the power tery pack. The BC-213 is used with a power adapter or the Power adapter CP-23L (purchase separately). cigarette lighter cable Battery pack •... -
Page 14: Battery Charging
• Charging time of the BP-280: Approximately 3 to 4 hours. Transceiver Turn OFF Battery the power pack OPC-656 Connect to a DC power supply: 12 to 16 V, at least 7 A Red line: + BC-214 Black line: _ BC-157S For more information about Icom accessories, see page 11. -
Page 15: Options
OPTIONS ■ Optional HM-168LWP description Follow the steps below to attach the HM-168LWP. First, you must turn Alligator type clip OFF the transceiver, and detach the To attach the speaker-mic. jack cover. to your shirt or collar, and so on. D Detaching the jack cover PTT button q Unscrew the screws using a... -
Page 16: Options
Icom transceiver. Icom is not responsible for the destruction or 450–490 MHz damage to an Icom transceiver in the event the Icom transceiver is used with equipment that is not manufactured or approved by Icom. -
Page 17: Troubleshooting
Buttons have no effect or do not work as expected The keys may have been reassigned. Contact your authorized Icom dealer for details. Wish to hear the channels announced The Channel announce function is Turn ON the Channel announce function in the Set mode. -
Page 18: Warranty And Registration
(i.e. battery, antenna, battery chargers etc) ranty claim. Icom (Australia) Pty. Ltd. will, at its discretion, and subject to the terms and If the requested repairs or services are within the terms of warranty, conditions stated below, repair or replace any goods or component parts your equipment will be returned after repair (prepaid) to any desig- which after examination are found to be defective. - Page 20 P/Code : Purchaser Address: Email: Phone No: Occupation: Please provide the following optional information to help us meet your future needs: In what media have you seen Icom products advertised? Other: Newspaper Magazine Radio Website Magazines you regularly purchase from the Newsagent:...
-
Page 21: Index
INDEX ANTENNAS ..................11 .....................2 IMPORTANT ..................i Attaching the HM-168LWP .............10 Keylock function ................3 BASIC OPERATION .................5 Battery caution ................6 BATTERY CHARGING ..............6 Monitor function ................2 BATTERY PACKS ................11 .....................4 Caution .....................6 Normal mode ..................1 CHARGERS ...................11 No tone operation ................2 Charging caution ................7 Open scan ..................1, 4 DC CABLES ...................11... -
Page 22: Warranty And Registration
INDEX Rapid charging with the BC-213 ............8 WARRANTY AND REGISTRATION ..........13 Rapid charging with the BC-214 ............9 Receiving ..................5 Zone selection mode ................2 Receiving and Transmitting ...............5 Repeater scan ..................1 RX VFO ....................1 Selcall .....................3 Selcall code ..................1 Selcall function .................3 Selcall Quiet mode ...............1, 3 Set mode ..................1 Simplex mode ...................2... - Page 23 MEMO...
- Page 24 A-7255D-1AU Printed in Japan © 2015 Icom Inc. 1-1-32 Kamiminami, Hirano-ku, Osaka 547-0003, Japan Printed on recycled paper with soy ink.