Niles OS7.5 Installation & Operation Manual
Indoor/outdoor loudspeakers
Hide thumbs
Also See for OS7.5:
- Installation manual (24 pages) ,
- Installation & operation manual (24 pages)

Related Manuals for Niles OS7.5


Summary of Contents for Niles OS7.5
- Page 1 I N S T A L L A T I O N M O D E L S OS 7.5 OS 7.5 OS6.5 OS6.5 OS5.5 OS5.5 Indoor/Outdoor Loudspeakers L E N D I N G A N D & O P E R A T I O N I G H I D E L I T Y R C H I T E C T U R E...
-
Page 2: Table Of Contents
CONGRATULATIONS Thank you for choosing Niles OS Indoor/Outdoor loudspeakers. With proper installation and operation, you’ll enjoy years of trouble-free use. Niles manufactures the industry’s most complete line of custom installation components and accessories for audio/video systems. To learn more about Niles products, visit our website: www.nilesaudio.com or call us at 800-BUY-HIFI (800-289-4434). -
Page 3: Introduction
INTRODUCTION Niles once again raises the bar. With our first OS Indoor/Outdoor models we revealed a radical new understanding of loudspeaker capabilities. Niles original OS Indoor/Outdoor loudspeakers are constantly praised for their ability to deliver exemplary reliability and outstanding sound quality. These attributes have made Niles OS Indoor/Outdoor loudspeakers the best selling loudspeakers in their class. -
Page 4: Features & Benefits
FEATURES & BENEFITS Patent Pending Integrated Woofer/Baffle Assembly Increases the woofer cone-area to cabinet-width ratio for enhanced bass output Interlaced Carbon Fiber Woofer Cone Reduces breakup and lowers distortion Butyl Rubber Woofer Cone Surround Damps resonance and provides exceptional durability Dispersion Stabilizer Distributes midrange tones for clear off-axis sound Tri-laminate Teteron Dome Tweeter... - Page 5 Low Diffraction Grille and Front Baffle Ensures that the sound waves emanating from the woofer and tweeter are not reflected by the surrounding parts of the loudspeaker for precise imaging and acoustical accuracy Rigid, Acoustically Inert Cabinet Prevents transmission of unwanted vibrations for clean and dynamic bass response All-Weather Versatility Reduces installation limitations to provide great sound from the beaches of Miami to the harsh winters of Minneapolis...
-
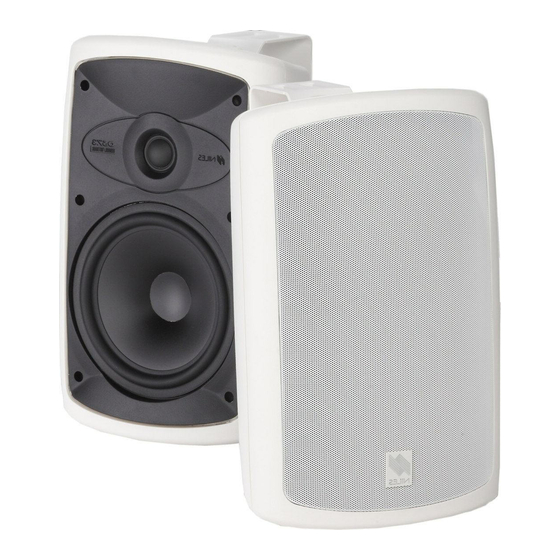
Page 6: Parts Guide
PARTS GUIDE... - Page 7 PARTS GUIDE Figure 1 OS .5 Parts Guide a. Mounting Bracket b. Nail Hole g. Cabinet c. Wire Hole h. Binding Posts d. Screw Hole e. Bracket Knob NOTE: Bracket and Shelf Stand are used depending upon installation requirements. See Installation Instructions. Grille Threaded Insert (1/4"-20 Thread size) Shelf Stand...
-
Page 8: Installation Considerations
INSTALLATION CONSIDERATIONS Tools and Materials Required • A wire stripper • A pencil • A level (optional) • Three screws or bolts suitable for the mounting surface • The proper screwdriver for your mounting hardware • A drill bit of the right size and type •... - Page 9 Figure 3 Figure 2 Wiring directly from a receiver Incorporating a volume control or amplifier Recommended Amplifier Power For optimum performance, we recommend an amplifier with a power rating of: five (5) to one hundred (100) watts per channel for the 0S 5.5 loudspeaker; five (5) to one hundred twenty five (125) watts per channel for the OS 6.5 loudspeaker;...
- Page 10 When using more than one pair, it is usually best to alternate a left channel and then a right channel, so that you have the best possible stereo coverage possible. The position of the loudspeakers and their surroundings play a very important role in how a stereo image is created.
- Page 11 If possible, mount the loudspeakers between eight and twelve feet high. The less the downward angle of the loudspeaker, the further the sound will carry. If the sound is carrying into areas where you do not want sound, try pointing the loudspeakers more downward, this will reduce the amount of sound further away from the loudspeaker.
- Page 12 Nail Mounting Figure 7 The OS loudspeaker can be mounted three ways. 2. The safest and most secure way to mount the loudspeaker is by screwing it to the mounting surface using your own hardware (suitable for the surface you are mounting to) and the bracket supplied with the loudspeaker (See Figure 7).
-
Page 13: Painting Os Series Loudspeakers
PAINTING THE LOUDSPEAKER The enclosure, the brackets, and the grilles of the loudspeaker can all be painted to match the surroundings. Because we want you to preserve the acoustic qualities of the grille, please paint the grille according to the grille painting instructions. Make sure you pick a paint that is appropriate for the mounting location. - Page 14 2. Wipe off the sides of the cabinet, the bracket, bracket knobs, and grille with a damp cloth. Do not touch or rub the loudspeakers on the front baffle. Make sure everything is dry before masking. 3. Mask off the binding posts and the brass threaded inserts on the back panel with masking tape.
- Page 15 If you are using an applicator or brush and a can of paint, thin the paint first. Thick paint will tend to clog the grille holes. To ensure a uniform appearance, paint the front and back of the grille. Replacing the Grille After the grille dries, carefully fit the grille into its recess so that it is barely in place.
-
Page 16: Installation
INSTALLATION Mounting the Bracket (if attaching the loudspeaker to a wall, ceiling, beam or other solid structure) 1. Loosen the bracket knobs and remove the bracket from the loudspeaker. 2. Hold the bracket up to the mounting surface. The loudspeaker can be mounted either horizontally or vertically. - Page 17 Attaching the foot (if using the loudspeaker in a free standing mode) 1. Loosen the bracket knobs and remove the bracket from the loudspeaker. 2. Tighten the top knob so it does not vibrate. 3. Remove the bottom knob by unscrewing it from the cabinet. 4.
- Page 18 5. Connect one stripped wire end to the black and one to the red terminal. Pay attention to the markings on the wire. Each loudspeaker wire must be connected to the amplifier in the same way. 6. If required, attach the safety cable to the loudspeaker enclosure. See Safety First section for details.
-
Page 19: Operation
OPERATION Listening at Higher Volumes Outdoors there are no walls to reflect and contain the sound. It requires more power to achieve a reasonable volume of sound outside than it does when you are indoors. You also frequently find yourself very far from the loudspeakers. It is possible to turn the volume so high that the amplifier runs out of power. -
Page 20: Specifications
SPECIFICATIONS OS 7.5 Loudspeaker Recommended Amplifier Power 5W – 150W Nominal Impedance 8 ohms Frequency Response 60Hz – 23kHz +/-3dB Sensitivity 91dB for 2.83V pink noise Wiring Requirements Sixteen to eighteen gauge 2-conductor (unshielded or shielded) wire for runs up to eighty feet. Fourteen gauge 2-conductor (unshielded or shielded) wire for runs up to two... - Page 21 PLEASE FILL OUT THE WARRANTY REGISTRATION CARD ON THE REVERSE SIDE, DETACH, AND MAIL TO: Niles Audio Corporation Warranty Registration Dept. P.O. Box 160818 Miami, Florida 33116-0818...
-
Page 22: Warranty Registration Card
WARRANTY REGISTRATION CARD Model Purchased__________________ ____________ _____ Serial Number_____________ ____________________________________________________________ Date Purchased (month/day/year)_______ _____________________ _____ ____________________ _____ Dealer Name and Location_______________ _____ ___________________________________________ ___________________________________________ _________ __________________________________ K Dr. K Miss K Mr. Name______ _ ________________________________________________ __________________________ Address_______________________________ _______________________________________________ _______________________________________ _____________________________________ _ _________ City___________________________________________State______ __________Zip_________________ Telephone (___________)________________________________________________________________ Please take a moment to fill out our warranty registration card. -
Page 23: Limited Warranty
2 YEAR LIMITED WARRANTY Niles Audio Corporation ("NILES") warrants its outdoor loudspeaker products to the original purchaser to be free of manufacturing defects in material and workmanship for a period of two years from date of purchase. This Warranty is subject to the following additional conditions and limitations. The Warranty is void... - Page 24 Niles Audio Corporation 12331 S.W. 130 Street Miami, Florida 33186 ©2004 Niles Audio Corporation. All rights reserved. Niles reserves the right to change product specifications without notice. Niles, the Niles logo Tel: (305) 238-4373 and Blending High Fidelity and Architecture are registered trademarks of Fax: (305) 238-0185 Niles Audio Corporation.