MUTOH ValueJet VJ-628 Startup Manual
Hide thumbs
Also See for ValueJet VJ-628:
- Operation manual (146 pages) ,
- Activation manual (23 pages) ,
- Technical information (4 pages)
Advertisement
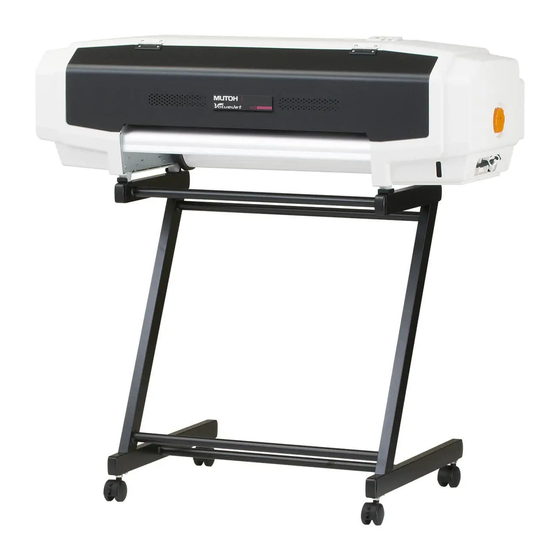
VJ-628
Startup Guide
Unpacking and Initial Setup
• Unauthorized copying or duplication of the whole or part of the contents of this Guide is prohibited.
• Every care has been taken in writing the contents of this Guide, but please contact MUTOH or the dealer you purchased the
product from if you find any unclear, erroneous or otherwise unsatisfactory content in the Guide.
• Please be aware that MUTOH will not be liable in any way for failures or accidents that result from handling or operating the
printer according to any procedures other than those set forth in this Guide.
• Company names and product names that appear in this Guide are registered trademarks of the respective companies.
Unpacking . . . . . . . . . . . . . . . . . . . . . . . . . . . . . 2
Assembly . . . . . . . . . . . . . . . . . . . . . . . . . . . . . . 5
Connecting the Cables . . . . . . . . . . . . . . . . . . 9
Setting up the Printer. . . . . . . . . . . . . . . . . . 11
Safety Instructions . . . . . . . . . . . . . . . . . . . . 13
Advertisement
Table of Contents

Related Manuals for MUTOH ValueJet VJ-628


Summary of Contents for MUTOH ValueJet VJ-628
-
Page 1: Table Of Contents
Guide. • Please be aware that MUTOH will not be liable in any way for failures or accidents that result from handling or operating the printer according to any procedures other than those set forth in this Guide. -
Page 2: Unpacking
Unpacking Unpacking The operations of unpacking and moving this product must be carried out by two or more • CAUTION persons working together. • Keep this product level when moving it. Unpacking the printer Open the packing box and take out each part. Installation instruction Startup Guide (this document) Printer body... - Page 3 Unpacking the stand (optional) The stand is an optional part. They are not included in the packing box of this product. Open the packing box and take out each part. Check if the followings are included. Stand top piece : 1 Stand bottom piece : 1 Stand middle piece : 1 Hexagon socket head...
-
Page 4: Installation Location
Installation location Minimum installation space 1390 mm Size of printer body width×depth: 1190 mm × 438 mm Height(with cover open) Rear Without stant: 573 mm Size of printer body Mounted on stand: 1373 mm Front Ensuring a suitable place for installation Install this product in a place that: •... -
Page 5: Assembly
Assembly Assembly Assembling the printer and option Installing the media guides and tying bands Install the two media guides in the positions shown in the figure. × 2 Install one of the accessory tying bands to the position shown in the figure. - Page 6 Assembling the stand (option) The operation of mounting the printer onto the stand must be carried out by two or more persons CAUTION working together. Assemble the stand. × 4 Lock the casters. • Align the printer’s rubber feet with the stand’s protrusions, and mount the printer on the stand.
-
Page 7: Removing The Protective Materials
Removing the protective materials Remove all the protective materials and tapes that are stuck onto the outside of the product. • Open the front cover. • Turn the media fixing knob, to release the fixing mechanism. Remove the roller protective sheet. Remove the protective material for the Steel Bare. - Page 8 Remove the screws, and remove the head fixing plate. Important! • Store the roller protective sheet, head fixing plate and screws, since they are reused when transporting. Assembly...
-
Page 9: Connecting The Cables
Connecting the Cables Connecting the Cables Connecting power and Ethernet cables Before connecting the cables... • Close the front cover. • Turn the media fixing knob to lock. • Check if the waste ink clip is locked. Connecting the power cable Make sure that the power button is turned off. -
Page 10: Connecting The Ethernet Cable
Use the tying band to fasten the power cable. Insert the power cable’s plug into the outlet. Be sure to insert it correctly. Connecting the Ethernet cable Connect the Ethernet cable to the product. Use the tying band to fasten the Ethernet cable. Connect the Ethernet cable to the computer. -
Page 11: Setting Up The Printer
Setting up the Printer Setting up the Printer Conduct setup referring to the set-up wizard screens. The set-up wizard is launched from the accessory software CD. Turn on the power Turn on the printer's Power button. Press! Note • The blue indicator will light up. •... -
Page 12: Installation Of Software
Setting up the Printer Installation of software Install to the computer the software that will be used with the printer. Initial settings for software Have an IP address set for the printer, and have the VSM initial settings and so forth implemented. -
Page 13: Safety Instructions
Safety Instructions Safety Instructions Important Notice For Users in Europe The CE marking is a mandatory European marking for certain product groups to indicate conformity with the essential health and safety requirements set out in European Directives. By affixing the CE marking, the manufacturer, his authorized representative, or the person placing the product on the market or putting it into service ensures that the item meets all the essential requirements of all applicable EU directives and that the applicable conformity assessment procedures have been applied. - Page 14 Concerning electric shock, short circuits and fire WARNING Do not install the printer where it is humid or dusty. Make sure to use only the specified power supply. It could lead to an electric shock and fire. If a power supply other than the specified voltage is used, it could cause an electric shock and fire.
-
Page 15: Installing The Printer
Concerning electric shock, short circuits and fire (continued) CAUTION Pay attention to the following points when Never open covers attached using screws under any circumstances. handling the power cord set. This may cause an electric shock or a malfunction. • Do not tamper with the power cord set. Before installing the dedicated stand, be sure to •... - Page 16 Concerning handling WARNING Do not step on this printer or place heavy things on top of it. It may cause an injury if the printer falls down. CAUTION Heed the following instructions for cleaning of the Heed the following when cleaning the print head cleaning wipers and the print head outer periphery.
-
Page 17: Warning Labels
Concerning consumable items WARNING You are obligated to properly dispose of waste fluid from the printer in compliance with Wastes Disposal and Public Cleansing Act and local ordinances. Delegate disposal to an industrial waste disposal contractor. CAUTION When handling Ink cartridges, pay attention so that Before operation, make sure to read the Material ink does not come into contact with your eyes or skin. - Page 18 Concerning operation instruction labels Operation instruction labels are stuck on the printer at places where caution in operation is required. The contents of these labels are as shown below. Ink color indicating Install ink cartridges that match labels the colors in the labels. Safety Instructions...
- Page 20 VJ628E-Q-01...