Table of Contents
Advertisement
Advertisement
Table of Contents

Related Manuals for Motorola CT202I


Summary of Contents for Motorola CT202I
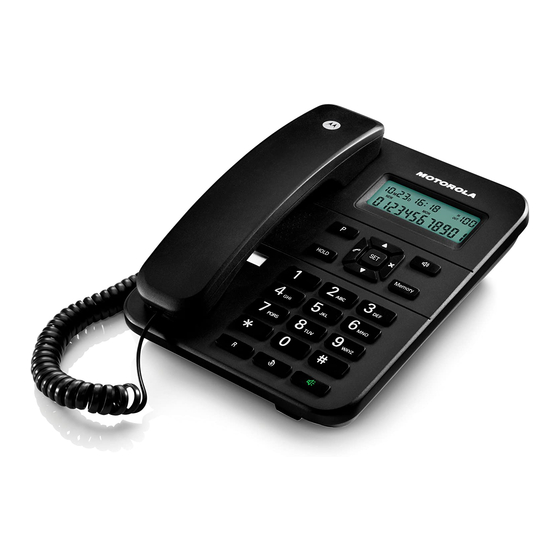
- Page 1 Corded Telephone Model: CT202I...
- Page 2 Call Timer the display will automatically time the duration of all external calls. Your CT202I uses dynamic software in the redial and received calls list, if the phone numbers in the list have less than 16 digits then the number of entries stored in the received calls list is increased.
- Page 3 This user guide provides you with all the information you need to get the most from your phone. To set up your phone, follow the simple instructions in ‘Getting Started’, on the next few pages. IMPORTANT Only use the telephone line cord supplied. Got everything? •...
-
Page 4: Table Of Contents
1. Getting started ..............6 2. Getting to know your phone ..........8 3. Using the phone ..............10 Calls .......................10 3.1.1 Make a call ..................10 3.1.2 Pre-dial ....................10 3.1.3 End a call ....................10 3.1.4 Receive a call ..................10 Hold ........................10 Redial ......................11 Redial list ......................11 Flash .......................11 4. - Page 5 11. Set the alarm ...............20 12. Calls lists ................21 12.1 Enter the Received calls list ................21 12.2 Dial a number from the Received calls list ............21 12.3 Enter the Redial list ..................21 12.4 Dial a number from the Redial list..............21 13.
-
Page 6: Getting Started
Do not place your CT202I in the bathroom or other humid areas. Location You need to place your CT202I base within 2 metres of the telephone wall socket so that the cable will reach. The socket-outlet shall be installed near the equipment and shall be easily accessible. -
Page 7: Date And Time
Overview of your handset A Earpiece To listen to your caller. Microphone To speak to your caller. C Curly cord socket Where you plug in your curly cord. Date and time If you have subscribed to a FSK type Caller ID Service, the date and time is set automatically when you receive your first call. -
Page 8: Getting To Know Your Phone
2. Getting to know your phone Overview of the base A Display See page 9 for an overview of display icons. Recall Use with some network services. C Menu Press and hold to open and scroll through the menu. Press to confirm an option. D Redial list Press to view last number dialled out and keep pressing to scroll through stored numbers. - Page 9 Flash Use to change the contrast of the display. During a call press to hang up a caller and reconnect to a new line. G Redial Press to redial the last number dialled. H Up Press to scroll up through the menu. In standby mode press to open the calls list.
-
Page 10: Using The Phone
3. Using the phone Calls 3.1.1 Make a call Lift the handset, when you hear the dial tone, dial the number. 3.1.2 Pre-dial 1. Enter the phone number (maximum 32 digits). If you make a mistake press . Lift the handset to dial the number. -
Page 11: Redial
Redial The last entry dialled is stored in the phone; this can be up to 32 digits long. 1. Pick up the handset and press 2. Press and then 3. Once the call is answered lift the handset to talk. Redial list At least the last 5 entries dialled are stored in the phone, the numbers can be up to 32 digits long. -
Page 12: Memory
4. Memory You can store ten telephone numbers in the two touch memory; the numbers can be up to 16 digits long. Store a two-touch memory number 1. Dial the number to be stored. 2. Press 3. Press one of the numbers on the keypad 0-9, the number is stored. Store a two-touch memory number when the handset is lifted 1. -
Page 13: Dial A Two-Touch Memory Number On Loudspeaker
Dial a two-touch memory number on loudspeaker 1. Press 2. Press one of the keypad buttons 0-9. 3. Press the loudspeaker button. 4. The memory number will be dialled out. 5. Once the call is answered lift the handset to talk. NOTE Remember to make a note of your memory numbers for easy reference. -
Page 14: Ringtone
5. Ringtone Your CT202I has a choice of 24 ringtones and choose from 4 volume levels and crescendo. Set the ringtone 1. Press . The current ringtone is played. 2. Press to scroll to the required ringtone. A sample of the ringtone is played. -
Page 15: Date And Time
6. Date and time If you have subscribed to a FSK type Caller ID Service, the date and time is set automatically when you receive your first call. If you do not have a FSK Caller ID service, you can set the date and time manually. Set the date and time 1. -
Page 16: Area Code
7. Area Code You can set your local area code into the phone. When a number from that area code calls only the local number will be displayed and stored. If you then redial the number from the calls list while Auto IP is switched on, the Auto IP number will not be dialled. Store the area code 1. -
Page 17: Pabx Access Code
8. PABX access code If the CT202I is connected to a switchboard, you may need to enter a one-digit access code in the dialling sequence to be able to connect to the outside line. The access code will be displayed at the beginning of a number on the screen. -
Page 18: Auto Ip
9. Auto IP Allows you to store your IP code in the phone for lower cost call charges for a long distance call. Store a number 1. Press and hold for 3 seconds, the display shows SEt 1 dAtE. 2. Scroll SEt 4 3. -
Page 19: Display
10. Display You can change the contrast of the display; there are 5 levels to choose from. 10.1 Change the display contrast Either: 1. Press , the display shows and the current contrast level (1-5). 2. Keep pressing until you see the contrast you require. Display... -
Page 20: Set The Alarm
11. Set the alarm 1. Press and hold for 3 seconds, the display shows SEt 1 dAtE. 2. Scroll SEt 5 ALErt. 3. Press and the display shows 00-00 OFF. 4. Scroll to set the first digit and to confirm. 5. -
Page 21: Calls Lists
12. Calls lists If you have subscribed to a Caller ID service, and provided the identity of the caller is not withheld, the number of the caller will be displayed together with the date and time of the call (if provided by the network). When the list is full and a new call is received, the oldest entry will be deleted automatically. - Page 22 NOTE If you have missed calls , will show on the display. If you have more than one missed call from the same number , will show on the display. Calls lists...
-
Page 23: Help
13. Help No dial tone • Use only the telephone line cord supplied. • Check that the telephone line cord is connected properly. Storing numbers • Once you have stored a number there is no confirmation tone. • A number cannot be deleted once stored, you can overwrite it with a new number. Memory numbers •... -
Page 24: General Information
14. General information IMPORTANT This product is intended for connection to analogue public switched telephone networks and private switchboards within India. Important safety instructions Follow these safety precautions when using your phone to reduce the risk of fire, electric shock, and injury to persons or property: •... -
Page 25: Product Disposal Instructions
Consumer Products and Accessories Warranty Thank you for purchasing this Motorola branded product manufactured under license by Suncorp Technologies Limited, 3001-3005 China Resources Building, 26 Harbour Road, Wan Chai, Hong Kong. (“SUNCORP”) - Page 26 Motorola or SUNCORP, are excluded from coverage. Use of Non-Motorola branded Products and Accessories. Defects or damage that result from the use of Non-Motorola branded or certified Products or Accessories or other peripheral equipment are excluded from coverage. Unauthorized Service or Modification. Defects or damages resulting from service,...
-
Page 27: Technical Information
How to Obtain Warranty Service or Other Information? To obtain service or information, please call: 1800 2700 361. You will receive instructions on how to ship the Products or Accessories at your expense and risk, to a SUNCORP Authorized Repair Center. To obtain service, you must include: (a) the Product or Accessory;... - Page 28 Manufactured, distributed or sold by Suncorp Technologies Ltd., official licensee for this product. MOTOROLA and the Stylized M Logo are trademarks or registered trademarks of Motorola Trademark Holdings, LLC. and are used under license. All other trademarks are the property of their respective owners.