Table of Contents
Advertisement
Advertisement
Table of Contents
Troubleshooting

Related Manuals for GE TuffSat


Summary of Contents for GE TuffSat
- Page 1 GE Healthcare ® TuffSat Pulse Oximeter User’s Guide and Service Manual...
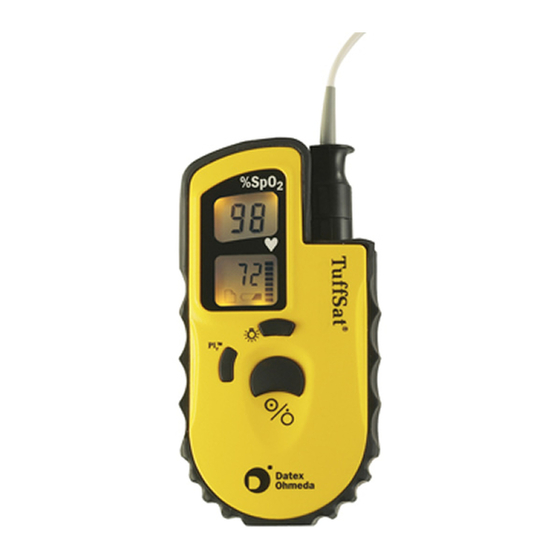
- Page 3 User’s Guide and Service Manual Sensor connector Oxygen saturation % (SpO 2 ) Connect a Datex-Ohmeda sensor (or sensor cable) approved for use with the TuffSat. Pulse rate in beats per minute Pleth bar Low battery and print icons Segments flash to match pulse rate.
-
Page 4: Service And Repair
Trademarks TuffSat®, OxyTip®, TruTrak®, and PI r ® are the property of GE Healthcare Finland Oy. All other product and company names are the property of their respective owners. -
Page 5: Table Of Contents
Contents 1. Overview Product description....................1-1 Clinical use ..............................1-1 Relative Perfusion Index (PI r ) pulsatile value................1-2 TruTrak data sampling system......................1-2 Theory of operation ....................1-2 Signal processing.............................1-2 Calibration..............................1-4 Assumptions .............................1-4 Methods ..............................1-4 Circuit board...............................1-5 Patient and operator safety.................1-6 Electrical shock and flammability hazard...................1-6 Fire/explosion hazard..........................1-6 Failure of operation ..........................1-6 Data validity ...............................1-6... - Page 6 Low battery indicator (screen icon) ..................4-4 Environment ..............................4-4 Dimensions and weight ........................4-4 A. Printer Features and Use Functions and features ...................A-1 How the TuffSat stores data......................A-1 Printer components ..........................A-2 Using the printer......................A-2 Powering the printer..........................A-2 Positioning the oximeter and printer.....................A-3 Printing data ..............................A-3...
-
Page 7: Overview
• Four 1.5V alkaline AA batteries. • Neoprene carrying case with belt clip. The TuffSat oximeter is capable of printing data through an infrared link to the optional Hewlett-Packard® Infrared Printer (HP 82240B). For information on ordering and using this printer with the TuffSat, see the appendix: Printer Features and Use. -
Page 8: Trutrak Data Sampling System
TruTrak data sampling system ® The TruTrak data sampling system, patented by Datex-Ohmeda, enables the TuffSat oximeter to calculate SpO many times each second through advanced statistical data processing. While other oximeters calculate only at the peak and trough of each waveform, the TuffSat assesses SpO continuously. - Page 9 Overview The two light wavelengths generated by the sensor light source (the red and infrared LEDs) pass through the tissue at the sensor site. The light is partially absorbed and modulated as it passes through the tissue. Arterial blood pulsation at the sensor site modulates transmission of the sensor’s light.
-
Page 10: Calibration
Two different methods of calibration are currently used by manufacturers of pulse oximeters: fractional and functional. Important: The TuffSat pulse oximeter uses the functional calibration method. The user cannot change the calibration method to fractional. Functional saturation is represented mathematically as the percentage of hemoglobin capable of carrying oxygen that is carrying oxygen. -
Page 11: Circuit Board
Overview Circuit board The circuit board contains all the circuitry for the TuffSat oximeter. The functions performed by this board are illustrated below. Power supply Keys Power on/off control Backlight LED (reset control) Alphanumeric Ambient light Processor LCD and LCD... -
Page 12: Patient And Operator Safety
TuffSat User’s Guide and Service Manual Patient and operator safety Warnings and cautions associated with following safe practices while using the oximeter appear throughout this manual. • WARNINGS indicate potentially harmful situations that may cause injury to a patient or operator. -
Page 13: Patient Safety (Oximeter)
Overview Patient safety (oximeter) Warning : The TuffSat oximeter is not intended for continuous monitoring. It has no alarms (audible or visual) and no user-definable parameters. Warning : Never test or perform maintenance on the oximeter while using it to monitor a patient. -
Page 14: Maintenance And Repair
TuffSat User’s Guide and Service Manual Maintenance and repair Caution: An operator may perform only maintenance procedures specifically described in this manual. Refer servicing to qualified service personnel who are trained in the repair of this equipment. Caution: Internal electronic components are susceptible to damage by electrostatic discharge. -
Page 15: Oximeter Features And Use
Labels on the TuffSat oximeter provide product information. Agency and regulatory symbols are described in chapter 4. Not for continuous monitoring. The TuffSat has no alarms (audible or visual). It is to be used only for spot- checking SpO and pulse rate. -
Page 16: Oximeter Features And Controls
TuffSat User’s Guide and Service Manual Oximeter features and controls Pleth bar The segments pulsate (flash on and off) to match the pulse rate. The number (or height) of Oxygen saturation % (SpO 2 ) lighted segments indicates the pulse strength. -
Page 17: Pi R Pulsatile Value Display
Oximeter Features and Use PI r pulsatile value display Indicates that the PI pulsatile value is being displayed. The PI pulsatile value. This number represents the relative perfusion (blood flow) at the sensor site. Top view Important: Only Datex-Ohmeda OxyTip+ sensors can be used with this monitor. Sensor connector Receptacle for connecting a Datex-Ohmeda sensor (refer to the instructions for the sensor). -
Page 18: Checking Normal Operation
TuffSat User’s Guide and Service Manual Checking normal operation Before monitoring a patient, always check that the oximeter is operating normally. WARNING: Patient safety. Never test or perform maintenance on the oximeter while using it to monitor a patient. WARNING: Failure of operation. -
Page 19: Using The Oximeter
Oximeter Features and Use Using the oximeter WARNING: Patient safety. • This device is not intended for use in a magnetic resonance imaging (MRI) environment. • To prevent patient injury or equipment damage, use only Datex-Ohmeda sensors approved for use with this oximeter. For complete information about the safe and appropriate use of a sensor, consult the instructions for that sensor. -
Page 20: Data Validity And Signal Strength
TuffSat User’s Guide and Service Manual Data validity and signal strength The SpO and pulse rate data are continuously calculated as a 12-second “moving” average. Both values are displayed when you begin to monitor a patient, however, their display may be delayed slightly for patients with lower pulse rates. -
Page 21: Maintenance, Troubleshooting, And Service
3. MAINTENANCE, TROUBLESHOOTING, AND SERVICE This chapter contains: • Maintenance instructions that include replacing the batteries and cleaning the oximeter. • A chart for troubleshooting situations that may occur while using the oximeter. • Repair procedures that may be performed by qualified service personnel. •... -
Page 22: Cleaning The Oximeter
TuffSat User’s Guide and Service Manual Cleaning the oximeter CAUTION: Follow these guidelines when cleaning the oximeter: • Do not autoclave, pressure sterilize, or gas sterilize the oximeter. • Use cleaning solution sparingly. Do not immerse the oximeter in liquid. -
Page 23: Troubleshooting
Maintenance, Troubleshooting, and Service Troubleshooting Error conditions activate messages that appear on the display. The following chart shows the messages that may appear and describes other conditions you may encounter while using the oximeter. Possible cause(s) and recommendations for responding to the message or for correcting the condition are provided. Message or Cause Recommendation... - Page 24 TuffSat User’s Guide and Service Manual Message or Cause Recommendation Condition The sensor is not properly connected to Reconnect the sensor cable to the the oximeter. sensor connector on the oximeter. Defective or incompatible sensor. Replace the sensor. The connected sensor is not an OxyTip+ sensor.
-
Page 25: Repair Procedures
Maintenance, Troubleshooting, and Service Repair procedures Follow the procedures in this section to inspect the oximeter for damage and replace damaged or defective parts. WARNING: Electrical shock and flammability hazard. Power off the oximeter before cleaning or servicing. CAUTION: Maintenance and repair. •... -
Page 26: Replacing Parts
TuffSat User’s Guide and Service Manual Replacing parts You can replace any part listed below with a new part as you assemble the oximeter: • Front case (with installed lens, lens gasket, and IR window) • Button cover • Bumper •... -
Page 27: Assembly Drawing
Maintenance, Troubleshooting, and Service Assembly drawing Battery door screw with washer Battery door Screw (3) Battery contacts Back case Sensor connector assembly Circuit board Battery contacts Bumper Button cover Lens gasket Front case IR window Lens... -
Page 28: Parts List
Parts list Sensors Refer to the sensor chart that accompanies this manual for a list of the sensors you can use with the TuffSat. Only OxyTIp+ sensors can be used with this monitor. TuffSat Pulse Oximeter TuffSat, yellow.......................6051-0000-159 TuffSat with finger sensor (1 m/3.3 ft.), yellow........6051-0000-160 TuffSat with finger sensor (1 m/3.3 ft.), blue...........6051-0000-185... - Page 29 Maintenance, Troubleshooting, and Service TuffSat User’s Guide and Service Manual Czech.......................... 6050-0007-248 Danish ........................6050-0006-077 Dutch.......................... 6050-0006-079 English........................6050-0006-075 Finnish........................6050-0006-081 French........................6050-0006-083 German........................6050-0006-085 Hungarian....................... 6050-0007-250 Italian........................6050-0006-087 Japanese........................6050-0006-089 Norwegian ......................6050-0007-334 Polish......................... 6050-0006-091 Portuguese......................6050-0006-093 Russian........................6050-0007-252 Spanish........................
-
Page 31: Compliance And Specifications
4. COMPLIANCE AND SPECIFICATIONS This chapter contains: • Information about the tests that were conducted and the regulations with which the oximeter complies to assure its safe use. • Performance specifications for the oximeter. Compliance with standards Medical electrical equipment classified in the US and Canada with respect to electric shock, fire, and mechanical hazards only, in accordance with the Canadian Standards Association CAN/CSA C22.2 No. -
Page 32: Electromagnetic Compatibility (Emc)
TuffSat User’s Guide and Service Manual Electromagnetic compatibility (EMC) The TuffSat pulse oximeter complies with the requirements of EN 60601-1-2: Electromagnetic compatibility – Requirements and tests. Emissions: EN 55011 Group I, Class B The oximeter was tested at room temperature while operating on battery power using alkaline batteries. -
Page 33: Performance Specifications
Compliance and Specifications Performance specifications Unless otherwise indicated, all specifications are nominal and are subject to change without notice. General Total operational time: approximately 17 to 20 hours at room temperature using alkaline batteries Automatic power off (5 minutes after monitoring stops) to conserve battery Microprocessor-controlled device Automatic self-test at power on;... -
Page 34: Alarms
TuffSat User’s Guide and Service Manual Alarms No alarms (audible or visual) for any situation, including low SpO and high/low pulse rate Displays Liquid crystal display (LCD): displays SpO , pulse rate, and PI r values; updated every second. Pleth bar: seven-segment column that indicates the pulse rate and signal strength;... -
Page 35: Printer Features And Use
A. PRINTER FEATURES AND USE This chapter contains: • Information about how the TuffSat pulse oximeter stores data for printing to the optional Hewlett-Packard infrared printer and descriptions of the printer’s components. • Instructions for using the printer. • Sample printouts. -
Page 36: Printer Components
TuffSat User’s Guide and Service Manual Printer components Power I/O (on/off) switch Slide right to power on the printer; slide left to power it off. Paper feed slot Paper feeds out from the printer through this slot. Use the top edge of the plastic slot cover to tear off the paper. -
Page 37: Positioning The Oximeter And Printer
Printer Features and Use Positioning the oximeter and printer To prevent data loss or incorrect characters on the printout, position the infrared transmitter on the oximeter and the infrared receiver on the printer in relation to each other as shown below. Transmitting distance and angle Do not block infrared link For the best result, place the printer and the oximeter on a flat surface. -
Page 38: Sample Printouts
TuffSat User’s Guide and Service Manual Sample printouts Real-time Trend #1 Trend #2 Real-time printout and Trend #1 printout Both printouts contain lines for adding comments. The trend printout contains a patient identification number (ID#). H:MM indicates the elapsed time since monitoring began for the patient in hours (H) and minutes (MM). -
Page 39: Trend #2 Printout
Printer Features and Use Trend #2 printout When the monitoring data exceed 32 data points, the oldest data are overwritten. However, the TuffSat oximeter reports the patient ID number, average SpO , and minimum SpO for up to 100 patients whose data were overwritten. - Page 40 TuffSat User’s Guide and Service Manual Printer maintenance Replacing printer paper To assure proper operation of the printer, be sure paper is installed before you try to print. Use only paper rolls supplied by Datex-Ohmeda. Press to advance the remaining paper through the mechanism.
-
Page 41: Cleaning The Printer
Printer Features and Use Cleaning the printer WARNING: Electrical shock and flammability hazard. Before cleaning the printer, turn it off and disconnect it from AC mains power. CAUTION: Follow these guidelines when cleaning the printer: • Do not autoclave, pressure sterilize, or gas sterilize the printer. •... -
Page 42: Printer Specifications
TuffSat User’s Guide and Service Manual Printer specifications Electromagnetic compatibility (EMC) The HP printer is suitable for use in the EM environment described in IEC/EN 60601-1- 2 with the limitations noted below. • When the printer is experiencing electromagnetic interference, extra print characters, spaces, or black boxes may be inserted in the printout. -
Page 43: Limited Warranty
This may be accomplished by installing new or remanufactured assemblies or by other repairs deemed appropriate by GE Healthcare. The choice of repair or replacement by GE Healthcare shall be the sole remedy of the buyer or user. Conditions...