Beurer bm 40 Instructions For Use Manual
Hide thumbs
Also See for bm 40:
- Instructions for use manual (112 pages) ,
- User manual ,
- Instructions for use manual (112 pages)
Table of Contents
Advertisement
Available languages
Available languages
BEURER GmbH • Söflinger Str. 218 • 89077 Ulm (Germany)
Tel.: +49 (0) 731 / 39 89-144 • Fax: +49 (0) 731 / 39 89-255
www.beurer.de • Mail: kd@beurer.de
BM 40
D Blutdruckmessgerät
Gebrauchsanweisung ................................................... 2 – 12
G Blood pressure monitor
Instructions For Use ..................................................... 13 – 23
F Tensiomètre
Mode D'emploi ............................................................. 24 – 34
E Tensiómetro
Manual De Instrucciones ............................................ 35 – 45
I Misuratore di pressione
Istruzioni Per L'uso ....................................................... 46 – 56
T Bilgisayarli tansiyon ölçer
Kullanım kılavuzu ........................................................ 57 – 66
r Прибор для измерения кровяного давления в
плечевой артерии
Инструкция по применению .................................... 67 – 78
Q Ciśnieniomierz
Instrukcja obsługi ........................................................ 79 – 89
.................... 90 – 92
Advertisement
Table of Contents

Related Manuals for Beurer bm 40


Summary of Contents for Beurer bm 40
- Page 1 Instrukcja obsługi ............79 – 89 Electromagnetic Compatibility Information ....90 – 92 BEURER GmbH • Söflinger Str. 218 • 89077 Ulm (Germany) Tel.: +49 (0) 731 / 39 89-144 • Fax: +49 (0) 731 / 39 89-255 www.beurer.de • Mail: kd@beurer.de...
-
Page 2: Wichtige Hinweise
Gebrauch auf, machen Sie sie anderen Benutzern zugänglich und beachten Sie die Hinweise. Hinweis Mit freundlicher Empfehlung Hinweis auf wichtige Informationen Ihr Beurer-Team 1. Kennenlernen Gebrauchsanweisung beachten Das Oberarm-Blutdruckmessgerät dient zur nichtinvasiven Messung und Überwachung arterieller Blutdruckwerte von Anwendungsteil Typ BF erwachsenen Menschen. - Page 3 • Verwenden Sie das Blutdruckmessgerät nicht bei Neugebo- Operating Zulässige Betriebstemperatur und renen, Schwangeren und Präeklampsie-Patientinnen. 40°C -luftfeuchtigkeit • Erkrankungen des Herz-Kreislaufsystems können zu Fehl- 10°C RH ≤85% messungen bzw. zu Beeinträchtigungen der Messgenauig- Vor Nässe schützen keit führen. Ebenso der Fall ist dies bei sehr niedrigem Blut- druck, Diabetes, Durchblutungs- und Rhythmusstörungen sowie bei Schüttelfrost oder Zittern.
- Page 4 • Sie können das Blutdruckmessgerät mit Batterien oder mit • Falls das Gerät über einen längeren Zeitraum nicht benutzt einem Netzteil betreiben. Beachten Sie, dass eine Daten- wird, wird empfohlen die Batterien zu entfernen. übertragung und Datenspeicherung nur möglich ist, wenn Hinweise zu Batterien Ihr Blutdruckmessgerät Strom erhält.
- Page 5 jedoch vor jeder Reklamation zuerst die Batterien und Anzeigen auf dem Display: tauschen Sie diese gegebenenfalls aus. 1. Datum • Bitte entsorgen Sie das Gerät gemäß der Elektro- und 2. Uhrzeit Elektronik Altgeräte EG-Richtlinie 2002/96/EC – WEEE 3. Aufpumpen , Luft ablassen (Waste Electrical and Electronic Equipment).
- Page 6 4. Messung vorbereiten Sie sollten Datum und Uhrzeit unbedingt einstellen. Nur so können Sie Ihre Messwerte korrekt mit Datum und Uhrzeit Batterie einlegen speichern und später abrufen. • Entfernen Sie den Deckel des Bat- Die Uhrzeit wird im 24-Stunden-Format dargestellt. teriefaches auf der Rück seite des Wenn Sie die Funktionstasten -/+ -/+ gedrückt halten, können...
- Page 7 Betrieb mit dem Netzteil Die Manschette ist am Oberarm so zu platzieren, dass der untere Rand Sie können dieses Gerät auch mit einem Netzteil betreiben. 2 – 3 cm über der Ellenbeuge und über Dazu dürfen keine Batterien im Batteriefach sein. Das Netzteil der Arterie liegt.
- Page 8 Richtige Körperhaltung einnehmen Bei einer bereits zu erkennenden Tendenz zu hohem Blutdruck wird nochmals nachgepumpt und der Man- schettendruck nochmals erhöht. Sobald ein Puls zu erkennen ist, blinkt das Symbol Puls Sie können die Messung jederzeit durch das Drücken der START/STOPP-Taste abbrechen.
- Page 9 kann nur durch eine Untersuchung bei Ihrem Arzt festgestellt WHO-Einstufung: werden. Gemäß den Richtlinien/Definitionen der Weltgesundheitsorgani- Wiederholen Sie die Messung, wenn das Symbol nach sation (WHO) und neuester Erkenntnisse lassen sich die Messer- der Messung auf dem Display angezeigt wird. Bitte achten Sie gebnisse gemäß...
- Page 10 • Drücken Sie die Speichertaste M. Zunächst wird der • Um den Speicher des jeweiligen Benutzerspeichers zu Durchschnittswert aller gespeicherten Messwerte löschen, wählen Sie zunächst einen Benutzerspeicher dieses Benutzerspeichers angezeigt AL. aus. Starten Sie entweder die Abfrage der Durch- schnittswerte oder der Einzelmesswerte und halten •...
- Page 11 Blutdrucks bzw. Aufpumpdruck 10. Technische Angaben Zubehör Gebrauchsanweisung, 4 x 1,5 V AA Bat- terien, Aufbewahrungstasche Modell-Nr. BM 40 Klassifikation Interne Versorgung, IPX0, kein AP oder Messmethode Oszillometrisch, nicht invasive Blut- APG, Dauerbetrieb, Anwendungsteil druckmessung am Oberarm Typ BF Messbereich Manschettendruck 0 –...
- Page 12 über eine primärseitige Siche- eines Zeitraumes von 3 Jahren ab Kaufdatum gegenüber der rung, die das Gerät im Fehlerfall vom Beurer GmbH, Söflinger Straße 218, 89077 Ulm, Germany Netz trennt. geltend zu machen. Der Kunde hat im Garantiefall das Recht...
-
Page 13: Important Information
Best regards, Note Your Beurer Team Note on important information 1. Getting to know your instrument Follow instructions for use The upper arm blood pressure monitor is used for non-invasive measurement and monitoring of adults’... - Page 14 • Do not use the blood pressure monitor on newborns, preg- Storage Permissible storage temperature and nant women or patients with preeclampsia. 55°C humidity • Cardiovascular diseases may lead to incorrect measure- -20°C RH ≤85% ments or have a detrimental effect on measurement ac- Operating Permissible operating temperature and curacy.
- Page 15 supplied with power. As soon as the batteries are empty or • Batteries should not be charged or reactivated with any other the mains part is disconnected from the power supply, the means, nor should they be taken apart, thrown in the fire or blood pressure monitor loses the date and time.
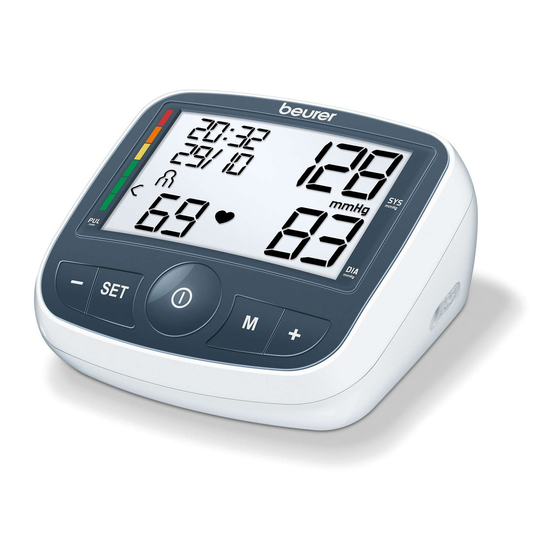
- Page 16 3. Unit description Icons in the display: 1. Date 2. Time 3. Inflate , release air 4. Systolic pressure 5. Memory display, average value 6. Unit in mmHg 7. Diastolic pressure 8. Battery replacement symbol 9. Pulse symbol 10. Memory space number 11.
- Page 17 4. Prepare measurement It is essential to set the date and time. Otherwise, you will not be able to save your measured values correctly with a date and Inserting battery time to retrieve them later. • Remove the battery cover from the The time is displayed in the 24-hour format.
-
Page 18: Measuring Blood Pressure
Operation with the mains part The cuff should be placed on the upper arm so that the lower edge is 2 to 3 cm You can also operate this device with a mains part. When do- above the bend of the elbow and ing so, there must not be any batteries in the battery compart- above the artery. -
Page 19: Evaluating Results
Correct posture Measuring can be cancelled at any time by pressing the START/STOP button • Systolic pressure, diastolic pressure and pulse read- ings are displayed. • appears if the measurement has not been per- formed properly. Observe the chapter on error mes- sages/trouble-shooting in these instructions for use •... - Page 20 However, these standard values serve only as a general guide- ing the measurement. If the icon appears often, please line, as the individual blood pressure varies in different people contact your doctor. Any self-diagnosis and treatment based and different age groups etc. on the test results may be dangerous.
- Page 21 • To clear the memory of the relevant user memory, you • Press the memory button M. The average value of all must first select a user memory. Start a request for ei- saved measured values in this user memory is dis- ther average values or individual measured values and played first AL.
-
Page 22: Specifications
Instruction for use, 4 x 1.5 V AA batteries, storage pouch 10. Specifications Classification Internal supply, IPX0, no AP or APG, con- Model no. BM 40 tinuous operation, type BF applied part Measurement Oscillometric, non-invasive blood pressure method measurement on the upper arm Technical information is subject to change without notification to allow for updates. -
Page 23: Mains Part
FW 7575M/EU/6/06 Input 100 – 240 V, 50 – 60 Hz Output 6 V DC, 600mA, only in connection with beurer blood pressure monitor Supplier Friwo Gerätebau GmbH Protection This device is double isolated and protected against short circuit and overload by a pri- mary thermal fuse. -
Page 24: Mode D'emploi
Ce symbole indique des informations impor- Avec nos sentiments dévoués tantes. Beurer et son équipe Respectez les consignes du mode d’emploi 1. Premières expériences Le lecteur de tension artérielle au bras sert à la mesure non Appareil de type BF invasive et au contrôle de la tension artérielle chez l’adulte. - Page 25 seules mesures (par ex. choix de médicaments et de leurs Storage Température et taux d’humidité de stockage dosages) ! 55°C admissibles • N’utilisez pas le tensiomètre sur des nouveaux-nés, des -20°C RH ≤85% femmes enceintes et les patientes atteintes de pré-éclampsie. Operating Température et taux d’humidité...
- Page 26 • Ne placez pas le brassard sur des plaies, son utilisation peut • N’appuyez pas sur les touches tant que vous n’avez pas mis les aggraver. le brassard. • Vous pouvez utiliser le tensiomètre avec des piles ou un • Au cas où vous ne vous servez pas de l’appareil pendant une adaptateur secteur.
- Page 27 avant de faire une réclamation, contrôlez d’abord les piles et Affichages à l’écran : changez-les, le cas échéant. 1. Date • Pour éliminer l’appareil, conformez-vous à la directive 2. Heure sur les appareils électriques et électroniques 2002/96/ 3. Gonflage , dégonflage CE –...
- Page 28 4. Préparation à la mesure Vous devez impérativement régler la date et l’heure. Sans ces réglages, il est impossible d’enregistrer et de consulter correc- Mise en place des piles tement vos mesures avec la date et l’heure. • Otez le couvercle du compartiment L’heure est affichée au format 24 heures.
- Page 29 tateur secteur est disponible en boutique spécialisée ou auprès Enroulez bien l’extrémité libre du brassard autour du bras, sans trop du service après vente sous la référence 071.19. serrer et fixez à l’aide de la bande agrip- • N’utilisez le tensiomètre qu’avec l’adaptateur secteur décrit pante.
- Page 30 il est important de rester tranquille durant la mesure et de ne • s’affiche lorsque la mesure n’a pas pu être pas parler. effectuée correctement. Lisez le chapitre Message • Installez-vous confortablement avant de prendre votre ten- d’erreur/Résolution des erreurs de ce mode d’emploi sion.
- Page 31 auto-diagnostic ou toute auto-médication découlant des résul- Ces valeurs ne doivent être utilisées qu’à titre indicatif car la tats mesurés pourra se révéler dangereux. Respectez impérati- pression sanguine varie selon les personnes, les âges, etc. vement les indications de votre médecin. Il est important de consulter votre médecin de manière régu- lière pour obtenir des conseils.
- Page 32 • Appuyez sur la touche mémoire M. La valeur moyenne • Pour effacer tous les enregistrements d’une mémoire de toutes les valeurs mesurées enregistrées pour cet utilisateur donnée, sélectionnez d’abord une mémoire utilisateur s’affiche alors AL. utilisateur. Lancez la consultation des valeurs moyennes ou des valeurs individuelles et mainte- •...
-
Page 33: Fiche Technique
Environ 250 mesures, selon le niveau de piles tension artérielle ainsi que la pression de 10. Fiche technique gonflage N° du modèle BM 40 Accessoires Mode d’emploi, 4 x piles AA 1,5 V, Mode de mesure Mesure de la tension artérielle au bras, pochette de rangement oscillométrique et non invasive... - Page 34 11. Adaptateur électrique N° du modèle FW 7575M/EU/6/06 Entrée 100 – 240 V, 50 – 60 Hz Sortie 6 V DC, 600 mA, uniquement en associa- tion avec les lecteurs de tension artérielle Beurer Fabricant Friwo Gerätebau GmbH...
- Page 35 Atentamente, Indicación El equipo de Beurer Indicación de información importante 1. Introducción Tenga en cuenta las instrucciones de uso El tensiómetro para brazo sirve para la medición y el control de los valores de la presión sanguínea arterial de forma no invasi-...
- Page 36 • No utilice el tensiómetro en recién nacidos, embarazadas o Storage Temperatura y humedad relativa de pacientes con preeclampsia. 55°C almacenamiento admisibles • Las enfermedades cadiovasculares.pueden producir errores -20°C RH ≤85% de medición o afectar a la precisión de la medición. Esto Operating Temperatura y humedad relativa de también es aplicable en caso de tener la presión sanguínea...
- Page 37 • El tensiómetro puede funcionar con pilas o con una fuente • Si no se va a utilizar el aparato durante un periodo de tiempo de alimentación. Tenga en cuenta que la transmisión de da- prolongado, se recomienda retirar las pilas. tos y su almacenamiento en memoria solo tienen lugar cuan- Indicaciones acerca de las pilas do el tensiómetro recibe alimentación.
- Page 38 • Deseche el aparato según la Directiva europea Indicaciones en la pantalla: 2002/96/CE sobre residuos de aparatos eléctricos y 1. Fecha electrónicos (RAEE). Para más información, póngase 2. Hora en contacto con la autoridad municipal competente en 3. Inflar , desinflar materia de eliminación de residuos.
- Page 39 4. Preparación de la medición En primer lugar, debe ajustar la fecha y la hora del aparato, ya que solo así se podrán almacenar los datos de sus mediciones Colocación de las pilas con la fecha y hora correctas para su posterior consulta. •...
- Page 40 Funcionamiento con la fuente de alimentación El brazalete debe colocarse en el brazo de forma que el borde inferior quede También podrá utilizar este aparato con una fuente de alimen- entre 2 – 3 cm por encima de la tación. Para ello no deberá haber pilas en el compartimento articulación del codo y sobre la arteria.
- Page 41 Adopción de una postura correcta El proceso de medición puede interrumpirse en cualquier momento pulsando la tecla de INICIO/ PARADA • Aparecen los resultados de las mediciones de la pre- sión sistólica, de la presión diastólica y del pulso. • aparece cuando la medición no se ha podido realizar correctamente.
- Page 42 Repita la medición si, tras efectuarla, aparece en la pantalla Clasificación OMS: el símbolo . Tenga en cuenta que debe reposar durante De acuerdo con las directrices y/o definiciones de la Organi- 5 minutos y que durante la medición no puede hablar ni mo- zación Mundial de la Salud (OMS) y los últimos hallazgos, los verse.
- Page 43 7. Almacenamiento, consulta y borrado de los • Pulsando las teclas de función -/+ -/+, cada valor de me- valores medidos dición individual se mostrará con su correspondiente fecha y hora. Con la pulsación de la tecla de función + Los resultados de todas las mediciones correctamente se muestran los últimos resultados de medición, con realizadas se guardan en la memoria junto con la fecha...
-
Page 44: Manual De Instrucciones
4 pilas x 1,5 V tipo AA 10. Datos técnicos Vida útil de las pilas Para unas 250 mediciones, según el nivel N.º de modelo BM 40 de la presión sanguínea y la presión de Método de Oscilométrico, medición no invasiva de la inflado medición... - Page 45 Salida 6 V CC, 600 mA, solo en combinación a la compatibilidad electromagnética. Tenga en cuenta que con tensiómetros de Beurer los dispositivos de comunicación de alta frecuencia por- Fabricante Friwo Gerätebau GmbH tátiles y móviles pueden interferir con este aparato.
-
Page 46: Istruzioni Per L'uso
Avvertenza Cordiali saluti Indicazione di importanti informazioni Il Suo team Beurer Seguire le istruzioni per l’uso 1. Note introduttive Lo sfigmomanometro da braccio serve per la misurazione non invasiva e il monitoraggio della pressione sanguigna di persone Parte applicativa tipo BF adulte. - Page 47 • Non utilizzare il misuratore di pressione su neonati, gestanti e Storage Temperatura e umidità di stoccaggio pazienti con preeclampsia. 55°C consentite • In caso di patologie del sistema cardiovascolare possono ve- -20°C RH ≤85% rificarsi errori di misurazione o una riduzione della precisione Operating Temperatura e umidità...
- Page 48 • Non applicare il manicotto su ferite per evitare rischi di ulte- Indicazioni sulle batterie riori lesioni. • L’inghiottimento delle batterie può essere mortale. Conserva- • Il misuratore di pressione può essere alimentato a batterie o re quindi le batterie e i prodotti fuori della portata dei bambini con un alimentatore.
- Page 49 domande specifiche su questo argomento rivolgersi all’uffi- Indicazioni sul display: cio comunale competente per lo smaltimento ecologico. 1. Data 2. Ora 3. Descrizione dell’apparecchio 3. Gonfiaggio , scarico aria 4. Pressione sistolica 5. Indicazione memoria valore medio 6. Unità mmHg 7.
- Page 50 4. Preparazione della misurazione La data e l’ora devono essere impostate necessariamente. Solo in questo modo è possibile memorizzare correttamente Inserimento delle batterie con data e ora i valori misurati e richiamarli successivamente. • Togliere il coperchio lato posteriore Il formato dell’ora è di 24 ore. dell’apparecchio.
-
Page 51: Misurazione Della Pressione Sanguigna
Funzionamento con l’alimentatore di rete Il bracciale va posizionato sul braccio in modo che il suo bordo inferiore L’apparecchio può essere utilizzato con un alimentatore di rete. venga a trovarsi 2 – 3 cm al di sopra A tale scopo non ci devono essere batterie nel vano batterie. della piega del gomito e al di sopra L’alimentatore di rete è... - Page 52 Assumere una posizione corretta del corpo • Il manicotto viene gonfiato fino a 190 mmHg, quindi la pressione viene rilasciata lentamente. In caso di tendenza all’ipertensione il manicotto viene gonfiato ulteriormente, aumentando la relativa pressione. Ap- pena è rilevabile il battito cardiaco, viene visualizzata il simbolo Battito cardiaco La misurazione può...
- Page 53 frequenza lenta o accelerata dei battiti) possono essere causati Classificazione dell’OMS: tra l’altro da malattie cardiache, età, predisposizione genetica, Nella seguente tabella viene indicata la classificazione e interpre- ingerimento spropositato di dolciumi, stress o sonno insuffi- tazione delle misurazioni in base alle direttive/definizioni dell’Or- ciente.
- Page 54 7. Memorizzazione, ricerca e cancellazione dei • Premendo il pulsante funzione -/+ -/+ , vengono visua- valori misurati lizzati i singoli valori di misurazione con data e ora. Premendo il pulsante + vengono visualizzati i valori I risultati di ogni misurazione corretta vengono memoriz- misurati più...
-
Page 55: Dati Tecnici
Ca. 250 misurazioni, in base alla pres- sione sanguigna e di pompaggio 10. Dati tecnici Accessori Istruzioni per l’uso, 4 batterie AA da Codice BM 40 1,5 V, custodia Metodo di misura- Oscillometrico, misurazione non invasi- Classificazione Alimentazione interna, IPX0, non fa... - Page 56 DC. assistenza. 11. Alimentatore di rete Modello n. FW 7575M/EU/6/06 Ingresso 100 – 240 V, 50 – 60 Hz Uscita 6 V DC, 600 mA, solo in abbinamento con sfigmomanometri Beurer Produttore Friwo Gerätebau GmbH...
- Page 57 Yeni cihazınızı iyi günlerde kullanmanızı dileriz Önemli bilgilere yönelik notlar Beurer Ekibiniz Kullanım kılavuzunu dikkate alın 1. Ürün özellikleri Üst kol tansiyon ölçme cihazı, yetişkinlerin atardamarlarında- ki tansiyon değerlerini, invaziv olmayan bir şekilde ölçmek ve Uygulama parçası...
- Page 58 • Tansiyon ölçme aletini yeni doğanlarda, gebe kadınlarda ve Storage İzin verilen depolama sıcaklığı ve nem preeklampsi hastalarında kullanmayın. 55°C • Kalp ve kan dolaşımı sistemi hastalıkları olması durumun- -20°C RH ≤85% da hatalı ölçümler meydana gelebilir veya ölçüm doğruluğu Operating İzin verilen çalışma sıcaklığı...
- Page 59 göz önünde bulundurun. Piller tükendiğinde veya şebeke • Piller şarj edilmemeli veya başka yöntemlerle yeniden aktif adaptörü elektrik şebekesinden ayrıldığında tansiyon ölçme hale getirilmemeli, parçalara ayrılmamalı, ateşe atılmamalı ve kısa devre yaptırılmamalıdır. cihazının tarihi ve saati kaybolur. • Piller tükendiğinde veya cihazı uzun süre kullanmayacağınız •...
- Page 60 3. Cihaz açıklaması Ekrandaki göstergeler: 1. Tarih 2. Saat 3. Havayla şişirme , havayı tahliye etme 4. Sistolik basınç 5. Hafıza göstergesi ortalama değer 6. Birim mmHg 7. Diyastolik basınç 8. Pil değişim sembolü 9. Nabız sembolü 10. Hafıza yeri 11.
- Page 61 4. Ölçüme hazırlık -/+ fonksiyon düğmelerini basılı tutarak değerleri daha hızlı bir şekilde ayarlayabilirsiniz. Pilleri yerleştirme • Ölçüm cihazının arka tarafındaki pil • SET düğmesine basın. bölmesinin kapağını çıkarın. Kullanıcı hafızası sembolü ekranda yanıp söner. • Dört adet 1,5 V AA tip (alkalin •...
- Page 62 • Elektrik adaptörünü tansiyon ölçme cihazının sağ tarafındaki Şimdi manşet hortumunu manşet fişi girişe takın. Elektrik adaptörü sadece tip levhasında belirtilen girişine takın. şebeke gerilimine bağlanabilir. • Ardından elektrik adaptörünün fişini prize takın. • Tansiyon ölçme cihazını kullandıktan sonra elektrik adaptö- rünü...
- Page 63 Tansiyon ölçümünü gerçekleştirme Bu, ritm bozukluğu (aritmi) göstergesi olabilir. Ritm bozukluğu (aritmi), kalp atışına kumanda eden biyoelektrik sistemde • Manşeti yukarıda açıklandığı gibi takın ve ölçümü hatalar nedeniyle kalp ritminin anormal olduğu bir hastalıktır. gerçekleştirmek istediğiniz duruşa geçin. Semptomların (atlayan veya erken kalp atışları, yavaş veya çok •...
- Page 64 Tansiyon değerleri aralığı Sistolik (mmHg) Diyastolik (mmHg) Önlem Kademe 3: Aşırı hipertoni > = 180 > = 110 Bir doktora gidiniz Kademe 2: Orta hipertoni 160 – 179 100 – 109 Bir doktora gidiniz Kademe 1: Hafif hipertoni 140 – 159 90 –...
- Page 65 • Ölçümden sonra ölçüm değerleri gösterilirken SET 10. Teknik veriler düğmesine basarak ölçüm değerlerini tek tek de silebi- Model no. BM 40 lirsiniz. Ölçüm yöntemi Üst koldan, osilometrik, invazif olmayan • Kapatmak için BAŞLAT/DURDUR düğmesine basın.
-
Page 66: Kullanım Kılavuzu
Giriş 100 – 240 V, 50 – 60 Hz Sınıflandırma Dahili besleme, IPX0, AP veya APG yok, Çıkış 6 V DC, 600 mA, sadece Beurer tansiyon devamlı kullanım, uygulama parçası tip ölçme cihazları ile birlikte Üretici Friwo Gerätebau GmbH Koruma Cihaz koruyucu izolasyonludur ve cihazı... - Page 67 ции, сохраняйте ее для дальнейшего использования, дайте ее прочитать и другим пользователям и строго следуйте приведенным в ней указаниям. Указание С дружескими пожеланиями сотрудники компании Beurer Отмечает важную информацию 1. Ознакомление Соблюдайте инструкцию по применению Аппарат для измерения кровяного давления в плечевой...
- Page 68 могут заменить медицинского обследования! Обсудите Допустимая температура хранения и Storage результаты Ваших измерений с врачом, но ни в коем 55°C влажность воздуха случае не принимайте самостоятельных решений относи- -20°C RH ≤85% тельно лечения (например, по использованию лекарств и Допустимая рабочая температура и Operating их...
- Page 69 • Убедитесь в том, что к кровеносным сосудам руки, на – Не используйте прибор вблизи сильных электромаг- которую накладывается манжета, не подсоединено нитных полей, например, вблизи радиоаппаратуры или медицинское оборудование (через внутрисосудистый до- мобильных телефонов. ступ, артериовенозный шунт или при внутрисосудистой –...
- Page 70 • Не открывайте прибор. Несоблюдение ведет к потере 3. Штекер манжеты гарантии. 4. Дисплей 5. Разъем для блока питания • Запрещается самостоятельно ремонтировать или регу- 6. Кнопка вызова памяти M лировать прибор. В этом случае больше не гарантирует- 7. Кнопка ВКЛ./ВЫКЛ. ся...
- Page 71 Индикация на дисплее: 4. Подготовка к измерению 1. Дата Установка батарейки 2. Время • Снимите крышку с батарейного 3. Накачивание , выпускание воздуха отсека на задней стенке аппарата. 4. Систолическое давление • Установите 4 алкалиновых бата- 5. Индикация среднего значения из сохраненных в рейки...
- Page 72 Ячейка памяти пользователя, настройка времени и даты На дисплее замигает год В этом меню можно последовательно настроить следую- • При помощи функциональных кнопок -/+ -/+ настрой- щие функции. те год и подтвердите нажатием кнопки SET. Ячейка памяти пользователя Дата Время ➔...
- Page 73 5. Измерение кровяного давления руки с окружностью от 22 до 35 см. Под номером 162.973 можно заказать манжету большего размера (для окруж- Пожалуйста, перед измерением храните прибор при ком- ности руки от 30 до 42 см) в специализированном магазине натной температуре. или...
- Page 74 ет сердечными сокращениями. Симптомы (пропущенные • Манжета накачивается до 190 мм рт. ст. Давление или преждевременные сердечные сокращения, медленный воздуха в манжете медленно снижается. При рас- или слишком быстрый пульс) могут вызываться, среди познавании склонности к высокому давлению ман- прочего, заболеваниями сердца, возрастом, физиологиче- жета...
- Page 75 Важно регулярно консультироваться с врачом. Врач определит Ваши индивидуальные значения нормального артериального давления, а также значения, которые могут быть для Вас опасными. Диапазон значений артериального давления Систола Диастола Мера (в мм рт. ст.) (в мм рт. ст.) Уровень 3: сильная гипертония >...
- Page 76 • Нажмите кнопку сохранения M. Сначала отобра- • Чтобы удалить содержимое соответствующей зится среднее значение всех сохраненных резуль- пользовательской памяти, сначала выберите поль- татов измерения данной пользовательской памяти зовательскую память. Запустите запрос средних значений или запрос отдельных измерений и удер- живайте...
- Page 77 установите батарейки или замените старые. хранения относительной влажности воздуха, 10. Технические данные 800 –1060 гПа давления окружающей Модель № BM 40 среды Метод измерения Осциллометрическое, неинвазивное из- Электропитание 4 x 1,5 В батарейки типа AA мерение кровяного давления на плече...
- Page 78 В связи с развитием продукта компания оставляет за со- 12. Гарантия бой право на изменение технических характеристик без Мы предоставляем гарантию на дефекты материалов и предварительного уведомления. изготовления этого прибора на срок 36 месяцев со дня • Данный прибор соответствует европейскому стандарту продажи...
- Page 79 2. Ważne wskazówki Dziękujemy, że wybrali Państwo produkt z naszego asortymen- Objaśnienie symboli tu. Firma Beurer oferuje dokładnie przetestowane, wysokiej jakości produkty przeznaczone do pomiaru ciężaru, ciśnienia W instrukcji obsługi, na opakowaniu i tabliczce znamionowej krwi, temperatury ciała i tętna, a także przyrządy do łagodnej urządzenia oraz akcesoriów znajdują...
- Page 80 • Choroby układu krążenia mogą powodować błędy pomiaru Operating Dopuszczalna temperatura i wilgotność lub zaburzać dokładność pomiaru. Dotyczy to także bardzo 40°C powietrza podczas pracy niskiego ciśnienia krwi, cukrzycy, zaburzeń rytmu serca i 10°C RH ≤85% ukrwienia, a także dreszczy i drgawek. Chronić...
- Page 81 • Jeśli w ciągu 3 minuty nie zostanie naciśnięty żaden przy- W przypadku połknięcia baterii należy niezwłocznie skorzy- cisk, nastąpi automatyczne wyłączenie ciśnieniomierza w stać z pomocy lekarskiej. • Baterii nie wolno ładować ani też regenerować w żaden inny celu oszczędzania baterii. sposób, demontować, wrzucać...
- Page 82 3. Opis urządzenia Informacje na wyświetlaczu: 1. Data 2. Godzina 3. Pompowanie , wypuszczanie powietrza 4. Ciśnienie skurczowe 5. Wskaźnik pamięci wartości średniej 6. Jednostka mmHg 7. Ciśnienie rozkurczowe 8. Symbol wymiany baterii 9. Symbol tętna 10. Numer pozycji w pamięci 11.
- Page 83 4. Przygotowanie do pomiaru Ustawienie pamięci użytkownika, daty i godziny W tym menu można po kolei ustawić następujące funkcje. Wkładanie baterii • Zdejmij pokrywę komory baterii z Pamięć użytkownika Data Godzina ➔ ➔ tyłu urządzenia. Koniecznie ustaw datę i godzinę. Tylko w ten sposób można •...
- Page 84 Eksploatacja urządzenia z zasilaczem Mankiet należy założyć na ramieniu w taki sposób, aby dolna krawędź Urządzenie można również używać z zasilaczem. W takim mankietu znajdowała się 2 – 3 cm wypadku w urządzeniu nie mogą się znajdować baterie. Za- powyżej zgięcia łokcia i tętnicy. Wężyk silacz można zamówić...
- Page 85 Prawidłowa pozycja ciała Pomiar można w każdej chwili przerwać naciskając przycisk START/STOP • Wyświetlane są wyniki pomiaru ciśnienia skurczowe- go, rozkurczowego i tętna. • Jeśli pomiar był nieprawidłowy, zostanie wyświetlony symbol . Przeczytaj rozdział „Komunikaty błędów/ usuwanie błędów” w niniejszej instrukcji obsługi, a •...
- Page 86 Jeśli po zakończeniu pomiaru na wyświetlaczu pojawi się sym- Klasyfikacja Światowej Organizacji Zdrowia: , pomiar należy powtórzyć. Przed rozpoczęciem pomia- Zgodnie z wytycznymi/definicjami Światowej Organizacji ru należy odpocząć co najmniej 5 minut, a podczas pomiaru nie Zdrowia oraz aktualnym stanem wiedzy wyniki pomiaru można rozmawiać...
- Page 87 • Naciśnij przycisk pamięci M. Najpierw wyświetli się • Aby skasować wybraną pamięć użytkownika, należy średnia wartość wszystkich zapisanych w pamięci ją najpierw wybrać. Wyświetl wartości średnie albo pomiarów użytkownika AL. pojedyncze wyniki pomiaru i przytrzymaj wciśnięty przycisk SET przez ok. 3 sekundy. Wszystkie wartości •...
-
Page 88: Instrukcja Obsługi
Na ok. 250 pomiarów, w zależności od W razie potrzeby włóż ponownie baterie lub wymień je. wysokości ciśnienia krwi lub ciśnienia 10. Dane techniczne pompowania Nr modelu BM 40 Akcesoria instrukcja obsługi, 4 x baterie AA 1,5 V, pokrowiec Metoda pomiaru Oscylometryczny, nieinwazyjny pomiar ciśnienia na ramieniu... - Page 89 FW 7575M/EU/6/06 Wejście 100 – 240 V, 50 – 60 Hz Wyjście 6 V DC, 600 mA, do używania wyłącznie z ciśnieniomierzami Beurer Producent Friwo Gerätebau GmbH Ochrona Urządzenie ma podwójną izolację ochron- ną i jest wyposażone w bezpiecznik po stronie pierwotnej, który w razie usterki...
-
Page 90: Electromagnetic Compatibility Information
Electromagnetic Compatibility Information Table 1 Guidance and declaration of manufacturer – electromagnetic emissions The device is intended for use in the electromagnetic environment specifi ed below. The customer or the user of the device should assure that it is used in such an environment. Emissions test Compliance Electromagnetic environment –... - Page 91 Guidance and declaration of manufacturer – electromagnetic immunity Immunity test IEC 60601 test level Compliance level Electromagnetic environment – guidance Power frequency (50/60 Hz) Power frequency magnetic fi elds should be at levels magnetic fi eld 3 A/m 3 A/m characteristic of a typical location in a typical com- IEC 61000-4-8 mercial or hospital environment.
- Page 92 Table 4 Recommended separation distances between portable and mobile RF communications equipment and the device The device is intended for use in an electromagnetic environment in which radiated therefore disturbances are controlled. The customer or the user of the device can help prevent electromagnetic interference by maintaining a minimum distance between portable and mobile RF communi- cations equipment (transmitters) and the device as recommended below, according to the maximum output power of the communications equip- ment.