Table of Contents
Advertisement
Quick Links
Advertisement
Table of Contents

Related Manuals for Motorola MD7000 Series


Summary of Contents for Motorola MD7000 Series
- Page 1 MD7000 Series User Guide Digital 5.8 GHz Two-Line Expansion Handset...
-
Page 2: Welcome
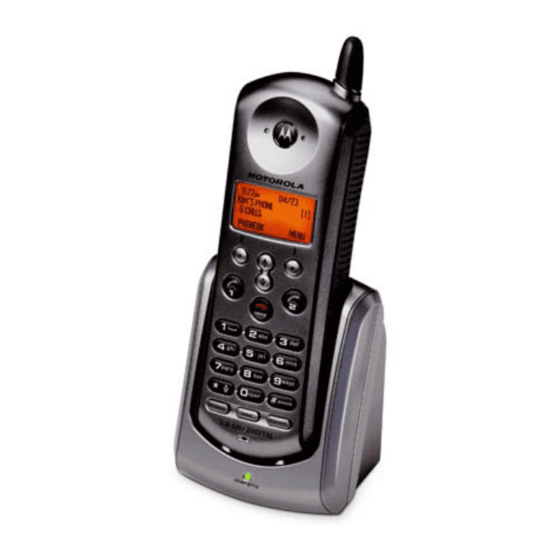
Welcome Congratulations on your purchase of a Motorola product! Handset Overview Adjust volume Left soft key Scroll up or down Line 1 Make or answer a call Use handset like a speakerphone Microphone Soft Keys The left and right soft keys perform the function displayed. - Page 3 Handset Charger Charge LED...
- Page 4 Product registration is an important step toward enjoying your new Motorola product. Registering helps us facilitate warranty service, and permits us to contact you should your Motorola product require an update or other service. Registration is not required for warranty coverage.
- Page 5 Motorola reserves the right to revise this publication and to make changes in content from time to time without obligation on the part of Motorola to provide notification of such revision or change. Motorola provides this guide without warranty of any kind,...
-
Page 6: Table Of Contents
Table of Contents Welcome ........i Important Safety Instructions . - Page 7 Monitoring a Room ......31 Motorola Limited Warranty ..... 33...
-
Page 8: Important Safety Instructions
Use a damp cloth for cleaning. 7. Do not disassemble this product. If service or repair work is required, contact the Motorola address found in the back of this user guide. 8. Do not overload wall outlets and extension cords. - Page 9 Unplug this cordless phone immediately from an outlet if: • The power cord or plug is damaged or frayed. • Liquid has been spilled into the product. • The product has been exposed to rain or water. Do not retrieve the handset or base until after you have un- plugged the power and phone from the wall.
- Page 10 8. Use only the power supply that came with this unit. Using other power supplies may damage the unit. 9. Because cordless phones operate on electricity, you should have at least one phone in your home that isn’t cordless, in case the power in your home goes out.
-
Page 11: Fcc Information
FCC Information This equipment complies with Parts 15 and 68 of the FCC rules and the requirements adopted by the Administrative Council for Terminal Attachments (ACTA). A plug and jack used to connect this equipment to the premises wiring and telephone network must comply with applicable FCC Part 68 rules and requirements adopted by the ACTA. - Page 12 Note: This equipment may not be used on coin service provided by the telephone company. Connection to party line service is subject to state tariffs. Contact the state public utility commission, public service commission or corporation commission for information. If your home has specially wired alarm equipment connected to the telephone line, ensure the installation of this cordless phone does not disable your alarm equipment.
- Page 13 • Afford you the opportunity to correct the situation • Inform you of your right to bring a complaint to the Commission pursuant to procedures set forth in Subpart E of Part 68, FCC Rules and Regulations. The telephone company may make changes in its facilities, equipment, operations, or procedures that could affect the operation of the equipment.
- Page 14 The FCC requires this product to be serviced only by Motorola or its authorized service agents. CAUTION / WARNING: Changes or modifications not expressly approved by Motorola could void not only the user's authority to operate the equipment, but also the limited warranty.
- Page 15 Hearing Aid Compatibility This telephone system meets the FCC standards for hearing aid compatibility.
-
Page 16: Industry Canada (Ic) Information
Industry Canada (IC) Information This equipment meets the applicable Industry Canada (IC) radio and terminal equipment technical specifications. This is confirmed by the certification/registration number found on the label on the bottom of the base unit. The abbreviation IC before the certification/registration number only signifies that registration was performed based on a Declaration of Conformity and that the Industry Canada technical specifications were met. - Page 17 Repairs Repairs to this equipment should be made by an authorized Canadian maintenance facility designated by Motorola. Any repairs or alterations made by the consumer, or any malfunctions of this equipment, may give the telecommunications company cause to request that you disconnect the equipment, and may void the limited warranty.
- Page 18 (2) This device must accept any interference received, including interference that may cause undesired operation. This equipment has been tested and found to comply with the limits for a Class B digital device, pursuant to Industry Canada’s ICES-003. These limits are designed to provide reasonable protection against harmful interference in a residential installation.
-
Page 19: Getting Started
Getting Started Before you can use your expansion handset to make or answer calls, you must charge the battery. This section provides the step-by-step instructions you will need. Battery Safety Instructions • Do not burn, disassemble, mutilate, or puncture the battery. -
Page 20: Charging The Battery
Charging the Battery Remove any stickers if present. Remove the battery door. Insert the battery into the battery compartment. Plug the battery connector into the receptacle in the battery compartment and replace the battery door. Black... - Page 21 Plug the power cord into the bottom of the charger and into an outlet. Note: Expansion handsets do not require connection to a phone line. Place the handset and its charging base anywhere a standard electrical outlet is available.
- Page 22 Place the handset in the charger. Notice that the charging LED lights. For the initial charge, charge the battery for at least 16 hours. Note: Every time a battery is plugged in, the phone must be charged in the base for at least 10 seconds for the phone to properly restart.
-
Page 23: Handset Display Screens
Handset Display Screens The handset display, soft keys, and navigation keys are used to select the various features and functions of the handset. This section describes how to use these components so you can set up your preferences. For step-by-step instructions on setting personal preferences, see “Setting Up.”... - Page 24 The menu display: In a menu display, points to the currently selected item, and b indicates there are more items above and below the currently selected item.
-
Page 25: Using The Soft Keys
Using the Soft Keys Two soft keys are used to select the functions shown above them on the display. The functions change as you move from one screen to the next. In this guide, soft key functions are shown as the function name. For example, if a step instructs you to “press MENU,”... -
Page 26: Setting Up
Deregistering an Expansion Handset Caution: If you deregister all handsets from the base unit you will render your cordless telephone system inoperable until at least one handset is reregistered to the base unit. Note: When deregistering a handset, delete or listen to all voicemail messages, if necessary, to clear the IN USE/Voice Mail indicator. -
Page 27: Personalizing Your Expansion Handset
Note: When replacing an expansion handset, you must deregister the old one before replacing it with a new one. If you do not deregister the handset being replaced, the slot used by that handset will be permanently inaccessible. Personalizing Your Expansion Handset You can personalize each handset by setting unique ring tones, adjusting the ringer volume for day and night, and naming each handset so you can... -
Page 28: Setting The Ring Tone And Ring Volume
Setting the Ring Tone and Ring Volume 1 Press MENU. 2 Scroll to Ringer. 3 Select 4 Scroll through the list of options (Day Volume, Night Volume, Ringer Tone, etc). 5 Select the desired option. 6 Press Change to listen to each tone/volume. 7 Stop at the desired tone/volume to set. -
Page 29: Setting Key Beeps On Or Off
8 Press DONE. 9 Press EXIT to return to the standby screen, or scroll to a different menu option. Setting Key Beeps On or Off The handset beeps each time you press a key. You can turn this feature off (the handset beeps by default), or set it to beep only when the ringer is on. -
Page 30: Naming A Handset
Naming a Handset When you register an expansion handset, it is assigned a default name of Handset(x), where x can be 1, 2, 3, 4, 5, 6, 7, or 8. You can change the name to something more useful, for example a location (Kitchen) or someone’s name (Ian). - Page 31 The following table shows how many times to press each button on the handset to enter letters and special characters. Button space The first letter of the entry is an uppercase letter. To change the entry from uppercase to lowercase, press .
-
Page 32: Setting The Handset Date And Time
Setting the Handset Date and Time 1 Press MENU. 2 Scroll to Date/Time. 3 Press SELECT. 4 Enter the time. (Two digits are required for both hour and minutes, so use a leading 0 for one-digit values.) 5 Select AM/PM to switch between AM and PM if you are using a 12-hour clock. -
Page 33: Setting The Language
Setting the Language 1 Press MENU. 2 Scroll to Language. 3 Press SELECT. 4 Scroll to your desired language. 5 Select DONE. 6 Select EXIT to return to the standby screen, or scroll to a different menu option. -
Page 34: Using The Handset
Using the Handset Making a Call Press , or . When you hear the dial tone, dial the number. Enter the phone number, then press , or . This lets you see the phone number on the display before the number is dialed. During a call, a timer on the display shows the length of the call. -
Page 35: Adjusting The Volume During A Call
Adjusting the Volume During a Call Inserting Pauses in a Number When you call a number featuring a pause, the phone waits three seconds before transmitting the next digits in the dialing sequence. This is useful, for example, when you have to dial 9 to get a dial tone or for accessing a voicemail system. - Page 36 1 While on a call, scroll until you want to recall. 2 Press DIAL softkey. 3 Repeat steps 1 and 2 as often as necessary to complete your transaction. points to the entry...
-
Page 37: Using The Speakerphone
Using the Speakerphone To make a call using the speakerphone, press HANDSFREE and dial the number. Note: For optimal handset speakerphone sound quality, make sure the belt clip is on. This raises the handset up so it is not lying flat (the speaker is on the back of the handset). -
Page 38: Putting A Call On Hold
Putting a Call on Hold Press the soft key HOLD. To return to the call, press soft key UNHOLD, , or When a call is on hold, you can use the intercom features (see “Using the Intercom”). Redialing a Number To redial the last number dialed, press , or and then press REDIAL. -
Page 39: Using The Phonebook
Using the Phonebook Your handset has its own phonebook, separate from the base unit’s, which holds 50 names and numbers. Storing numbers in the phonebook makes it easy to dial numbers you call frequently. You can enter numbers directly into the phonebook or add them from the caller ID or redial list. - Page 40 The following table shows how many times to press each button on the handset to enter letters and special characters. Button space The first letter of the entry is an uppercase letter. To change the entry from uppercase to lowercase, press .
-
Page 41: Storing A Recently Called Number
Storing a Recently Called Number 1 Press REDIAL. The display shows the last five numbers you dialed, with the most recent numbers at the top. 2 Scroll until points to the number you want to store. 3 Press STORE. 4 Enter the name (up to 12 characters). See “Storing a New Number”... -
Page 42: Storing A Caller Id Number
Storing a Caller ID Number 1 From the caller ID list, select OPTIONS. 2 Scroll to STORE and press SELECT. The caller’s name is displayed in the Name field. If you have changes, select DELETE to erase characters to the left of the input cursor. -
Page 43: Deleting A Phonebook Entry
7 To set the tones for incoming calls from this number, select CHANGE. A tone plays each time you select CHANGE. Stop at the ring tone you want to set. 8 Select DONE. Deleting a Phonebook Entry 1 Select PHONEBK. 2 Scroll down until you want to delete. - Page 44 2 Select OPTIONS. 3 When in your private phonebook, to copy an entry to the shared phonebook, select COPY TO SHARED. When in the shared phonebook, to copy an entry to your private phonebook, select COPY TO PRVT.
-
Page 45: Using Caller Id
Using Caller ID If you subscribe to caller ID service, the caller’s name and number are displayed when you receive a call. If information on the caller is not available, or if you do not subscribe to caller ID service, INCOMING CALL is displayed. -
Page 46: Deleting Caller Id Calls
Deleting Caller ID Calls 1 From the caller ID list, select OPTIONS. 2 Scroll to DELETE (to delete the current caller ID entry) or DELETE ALL (to delete all caller ID records) and select SELECT. If you select DELETE ALL, select YES at the DELETE ALL? prompt. -
Page 47: Multihandset Functions
Multihandset Functions With multiple handsets, you can: • Conference call • Talk handset to handset on the intercom • Set up handsets to automatically answer intercom calls • Transfer calls from one handset to another • Monitor a room Using the Intercom The handsets and base station can be used as an intercom system, allowing you to talk to people in other parts of your home. -
Page 48: Enabling Auto-Answer
Enabling Auto-Answer You can program a handset to automatically answer a page by turning on the speakerphone. The handsets are programmed not to do this by default. 1 Select MENU. 2 Scroll to and select INTERCOM SETUP. 3 Scroll to and select one of the following options: AFTER 1 RING: The handset automatically answers a page after one ring. -
Page 49: Conference Calling
6 Select UNHOLD. The call is transferred to the other handset and all three individuals are on the call. 7 Press to disconnect. Conference Calling Multiple handsets can participate in a call. When only one handset is on a call, LINE IN USE is displayed. - Page 50 5 If you have multiple additional handsets, scroll to the handset you want to monitor, and select PAGE. The handset being monitored automatically answers the page, the microphone is turned on, and the speaker is turned off. For example, MONITORING Kitchen (1) is displayed on the handset from which you are monitoring.
-
Page 51: Motorola Limited Warranty
Consumer Products, Accessories, and Software Purchased in the United States or Canada What Does this Warranty Cover? Subject to the exclusions contained below, Motorola, Inc. warrants its cordless telephones ("Products"), Motorola- branded or certified accessories sold for use with these Products ("Accessories"), and Motorola software contained... - Page 52 Products or Accessories for commercial purposes or subjecting the Product or Accessory to abnormal usage or conditions; or (d) Acts of God or nature, or other acts which are not the fault of Motorola, are excluded from coverage. Use of Non-Motorola Products and Accessories.
- Page 53 This warranty extends to the first end-user purchaser, only. What will Motorola Do? Motorola, at its option, will at no charge repair, or replace any Products, Accessories or Software that does not conform to this warranty. We may use functionally equivalent reconditioned/refurbished/pre-owned or new Products, Accessories or parts.
- Page 54 Products associated with such Motorola software. No other use, including without limitation disassembly of such Motorola software or exercise of the exclusive rights reserved for Motorola, is permitted.
- Page 55 Visit our website at: www.motorola.com/cordless 520116-001 02/05 MGBI...