
Related Manuals for Motorola MD680 Series


Summary of Contents for Motorola MD680 Series
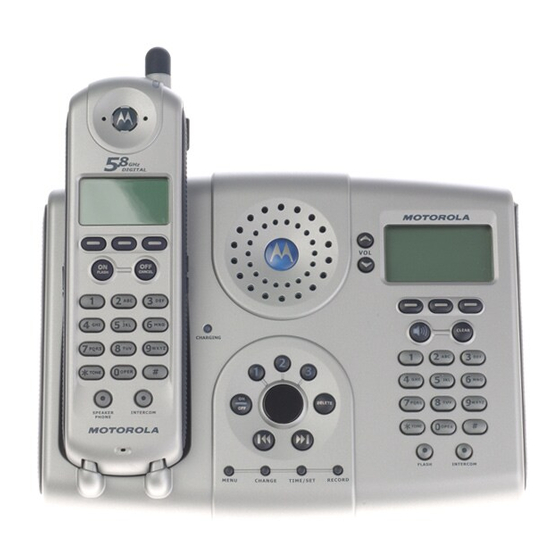
- Page 1 MD680 Series Digital 5.8 GHz Cordless Telephone System with Answering Machine User’s Guide >...
-
Page 3: Welcome
1-888-390-6456 TTY (Text Telephone) On the Web: www.motorola.com/cordless MOTOROLA and the Stylized M Logo are registered in the US Patent & Trademark Office. All other product or service names are the property of their respective owners. © Motorola, Inc. 2003... -
Page 4: Fcc And Interference Information
FCC and Interference Information This equipment complies with Parts 15 and 68 of the FCC rules and the requirements adopted by the Administrative Council for Terminal Attachments (ACTA). A plug and jack used to connect this equipment to the premises wiring and telephone network must comply with applicable FCC Part 68 rules and requirements adopted by the ACTA. - Page 5 Notice must be given to the telephone company upon permanent disconnection of your telephone from your line. • The FCC requires that you connect your cordless telephone to the nationwide telephone network through a modular telephone jack (USOC RJ11C/RJ11W or RJ14C/RJ14W).
- Page 6 Interference Information This device complies with Part 15 of the FCC Rules. Operation is subject to the following two conditions: 1. This device may not cause harmful interference. 2. This device must accept any interference received, including interference that may cause undesired operation. This equipment has been tested and found to comply with the limits for a Class B digital device, pursuant to Part 15 of the FCC Rules.
- Page 7 Government Printing Office, Washington, D.C. 20402. Please specify stock number 004-000-00345-4 when ordering copies. The FCC requires this product to be serviced only by Motorola or its authorized service agents. Changes or modifications not expressly approved by Motorola could void not only the user's authority to operate the equipment, but also the limited warranty.
-
Page 8: Important Safety Instructions
Use a damp cloth for cleaning. 7. Do not disassemble this product. If service or repair work is required, contact the Motorola address found in the back of this user’s guide. 8. Do not overload wall outlets and extension cords. -
Page 9: Installation Guidelines
Unplug this cordless phone immediately from an outlet if: • The power cord or plug is damaged or frayed. • Liquid has been spilled into the product. • The product has been exposed to rain or water. Do not retrieve the handset or base until after you have unplugged the power and phone from the wall. - Page 10 8. Use only the power supply that came with this unit. Using other power supplies may damage the unit. 9. Because cordless phones operate on electricity, you should have at least one phone in your home that is not cordless in case the power in your home goes out.
-
Page 11: Table Of Contents
Welcome ........1 FCC and Interference Information....2 Important Safety Instructions . - Page 12 Setting the Vibrate Control (handset only) ..25 Setting the Low Battery Tone (handset only)..26 Setting the Range Tone (handset only) ..26 Setting the Tone/Pulse (base station only) .
- Page 13 Finding a Lost or Misplaced Handset ... . 40 Entering Text ....... 41 Using the Belt Clip .
- Page 14 Base Station or a Handset ... . . 65 Motorola Limited Warranty for the United States and Canada ....66...
-
Page 15: Getting Started
Getting Started To set up your Motorola digital cordless phone, choose a location, connect the base station, and install the battery pack as described in this user’s guide. Choosing a Location The location should be: • Away from electrical appliances such as a TV, personal computer, or another cordless phone. -
Page 16: Optional Backup Battery Pack
Optional Backup Battery Pack Important: Before installing or handling batteries, read the Battery Safety Instructions on page 8. The base station uses the backup battery to power the handset for up to 2½ hours during a power outage. Note: You cannot use the base station when the backup battery is in use, only the handset. -
Page 17: Installing The Battery Pack In The Handset
Installing the Battery Pack in the Handset Important: Before installing or handling batteries, read the Battery Safety Instructions on page 8. 1. Remove the battery cover by pressing on the recess and sliding the cover down and off the handset. 2. -
Page 18: Charging The Handset
Charging the Handset Place the handset in the base station. The CHARGING LED is solid red when the handset is charging. Note: For the initial charge, charge the battery for at least 12 hours. Note: When the handset battery needs charging, flashes and handset. -
Page 19: Mounting The Base Station On A Wall
Mounting the Base Station on a Wall 1. Plug the power cord into the back of the base station and into an electrical outlet. 2. Plug one end of the telephone line into the jack on the back of the base station. Plug the other end into the phone jack. -
Page 20: Base Station Controls
Base Station Controls Volume Buttons Microphone Charging Handset Controls Left Soft Key On/Flash Speaker Phone Button (handsfree) Left Soft Menu 031617 Flash Answering Machine Controls Menu Key Right Soft Key Volume Buttons Off/Cancel Intercom Right Soft Clear Speakerphone Button (on/off) Intercom/Page Handset... -
Page 21: Using The Displays
Using the Displays Your base station and handset each have a display. When the base station and handset are not in use, the standby screen displays. Base Station Standby Screen Example Left Soft Key Function Handset Standby Screen Example Time Left Soft Key Function 2 NEW CALLS... -
Page 22: Using The Soft Keys
Using the Soft Keys On the standby screen, the left and right soft keys perform the function displayed above the key. For REDIAL example, pressing the left soft key ( ), opens the list of previously dialed phone numbers. MENU When in the list, use the soft keys to scroll ( ) through the list. -
Page 23: Setting Up Your Base Station And Handset
Setting Up Your Base Station and Handset Setting the Time on the Handset Note: The time displays only on the handset, not the base station. Action MENU 1 Press SET TIME 2 Scroll to 3 Using the keypad, enter the time (2 digits each for the hour and the minutes). -
Page 24: Setting The Ringer Volume
Setting the Ringer Volume If you set the volume to the lowest level, base station and handset do not ring when you receive a call. When set to Action 1 Press 2 Scroll ( HANDSET SETTINGS 3 Ensure then press 4 Press the left or right soft key ( increase or decrease the volume, then press... -
Page 25: Setting The Keypad Tone
Action 4 Scroll ( ) through the ring tones. Each tone plays as you scroll through them. When you hear the ring tone you want, press 5 Press CLEAR or OFF twice to return to the standby screen, or scroll ( option. -
Page 26: Setting The Contrast
Setting the Contrast This option adjusts the display contrast. Action 1 Press 2 Scroll ( HANDSET SETTINGS 3 Scroll ( 4 Press the left or right soft key ( adjust the contrast, then press 5 Press CLEAR or OFF twice to return to the standby screen, or scroll ( option. -
Page 27: Setting The Vibrate Control (Handset Only)
Action 4 Press the left or right soft key ( to the language of choice, then press 5 Press CLEAR or OFF twice to return to the standby screen, or scroll ( option. Setting the Vibrate Control (handset only) This option causes your handset to vibrate when you receive a call. -
Page 28: Setting The Low Battery Tone (Handset Only)
Setting the Low Battery Tone (handset only) This option alerts you when the battery charge is low. Action 1 Press 2 Scroll ( press 3 Scroll ( 4 Press the left or right soft key ( select 5 Press OFF twice to return to the standby screen, or scroll ( Setting the Range Tone (handset only) This option alerts you when the handset is out of... -
Page 29: Setting The Tone/Pulse (Base Station Only)
Setting the Tone/Pulse (base station only) This option sets the base station for either tone or pulse dialing. Action MENU 1 Press 2 Scroll ( ) to press 3 Scroll ( ) to 4 Press the left or right soft key ( TONE select 5 Press CLEAR twice to return to the standby... -
Page 30: Using The Basic Functions
Using the Basic Functions Making and Ending a Call Using the Base Station Action 1 Press up when the base station is on. 2 When you hear the dial tone, dial the number. Enter the phone number, then press This lets you see the phone number on the display before the number is dialed. -
Page 31: Adjusting The Speakerphone Volume On The Base Station During A Call
Adjusting the Speakerphone Volume on the Base Station During a Call Action Press the volume button up to increase volume, or press down to decrease volume. Making and Ending a Call Using the Handset Action 1 Pick up the handset and press ON. The keypad lights up when the handset is on. -
Page 32: Adjusting The Volume On The Handset During A Call
Adjusting the Volume on the Handset During a Call Action Press the volume button up to increase volume, or press down to decrease volume. Note: This procedure is the same for adjusting the volume on the handset speakerphone and the headset while on a call. Using the Speakerphone on the Handset (handsfree operation) Action... -
Page 33: Using Call Waiting
Using Call Waiting If you have call waiting service from your telephone company, you can put a call “on hold”, to answer a second call. Action 1 Press ON on the handset or FLASH on the base station to answer a second call. While on the second call, 2 Press ON again to end the second call and return to the first call. -
Page 34: Putting A Call On Hold
Putting a Call on Hold Action 1 Press flashes and handset. If Clock Mode is on, the reminder on the handset displays for only 5 seconds. 2 To return to the call, press station or ON on the handset. Note: A call can remain on hold for up to 5 minutes. -
Page 35: Inserting Pauses In A Phone Number
To save a number in either phonebook: Action 1 From the standby screen, enter the phone number, then press Note: Be sure to include long distance codes and pauses if required. ENTER NAME 2 At the to enter the name (see page 41). SAVE 3 Press number. -
Page 36: Saving A Caller Id Or Redial Number In The Phonebook
Saving a Caller ID or Redial Number in the Phonebook Action 1 Display and highlight the number, then press 2 Press through 4 on page 33 to save the number. Calling a Number from the Phonebook Action 1 From the standby screen, press PHNBK 2 Scroll ( then press... -
Page 37: Deleting Phonebook Entries
Deleting Phonebook Entries Action 1 From the standby screen, press PHNBK 2 Scroll ( ) to highlight the entry to delete. EDIT 3 Press THIS 4 Press entry, or press in the phonebook. THIS If you press deleted and the phonebook remains displayed. -
Page 38: Editing Phonebook Entries
Editing Phonebook Entries Action 1 From the standby screen, press PHNBK 2 Scroll ( then press 3 Press 4 Press 5 To edit the name or number: Press Press Press character. Press character in a phone number. 6 Press screen. 7 Press 8 Press and hold CLEAR on the base station or OFF on the handset to return to the... -
Page 39: Redialing A Number
Redialing a Number The base station and each handset saves the last 10 dialed phone numbers in memory. Action 1 From the standby screen, press REDIAL is the last number dialed. 2 Scroll ( ) to highlight the number to redial. -
Page 40: Using Caller Id
Using Caller ID If you subscribe to caller ID service from your telephone company, the phone can display the caller’s name and/or number when you receive an incoming call. If the phone company does not send caller ID information or you do not subscribe to caller ID service, the display shows Reviewing the List of Caller ID Calls The base station can hold up to 99 caller ID records. -
Page 41: Dialing A Number From Caller Id
Dialing a Number from Caller ID Action With a caller ID record displayed, press ON on the handset, or Saving a Caller ID Number in the Phonebook Action 1 With the caller ID number displayed, press SAVE ENTER NAME 2 At the to enter the name (see page 41). -
Page 42: Deleting Caller Id Numbers
Deleting Caller ID Numbers Action 1 Press 2 Scroll ( 3 Press 4 Press entry, or press If you press deleted and the list remains displayed. Scroll to another entry, or press and hold OFF for 2 seconds to return to the standby screen. -
Page 43: Entering Text
Entering Text Important: The base station and each handset can independently store names and numbers in memory. Adding, editing, or deleting entries in the base station or handset does not affect any other handset or the base station. Your phone system can store up to 50 names/ numbers. -
Page 44: Using The Belt Clip
Using the Belt Clip To attach the belt clip, align the pins on the inside edge of the belt clip with the notches on the sides of the handset near the antenna. Press the handset and belt clip together to attach them. Using a Headset The handset has a headset jack for an optional accessory headset. -
Page 45: Answering Machine
Answering Machine The answering machine stores up to 15 minutes of messages and/or memos, or up to 99 messages. You can listen to your messages from the base station, from the handset, or remotely from a touch-tone phone. The answering machine provides voice prompts and confirmations, as you press buttons to set and operate features. -
Page 46: Turning On The Answering Machine
Turning On the Answering Machine Action Press ON/OFF (@). Setting the Time on the Answering Machine Setting the time on the answering machine does not change the handset time. Action 1 Make sure the answering machine is on. 2 Press TIME/SET. The answering machine prompts, “To change clock, press TIME/SET.”... -
Page 47: Using The Mailboxes
Using the Mailboxes The answering machine has 3 mailboxes. Callers using a touch-tone phone can select the mailbox in which to store their message by pressing 1, 2, or 3 on their touch-tone phone. When the caller does not select a mailbox, the answering machine stores the message in mailbox 1. -
Page 48: Reviewing The Outgoing Announcement
Action 3 Press RECORD. When you hear “Now recording,” and a beep, speak clearly to record an announcement up to 90 seconds long. 4 Press 1 of the mailbox buttons ( to stop recording. The phone plays back the announcement. To delete your announcement, press DELETE during playback. -
Page 49: Setting Up Other Features
Setting up Other Features To set up other features, access the setup menu as described below and refer to the following section for a description of the features and settings. Action 1 Make sure the answering machine is on. 2 Press and release MENU until you hear the feature you want to set. -
Page 50: Feature Setup And Descriptions
Feature Setup and Descriptions The following table describes the features and the settings. An asterisk (*) indicates the default setting. To exit at anytime, press 1 of the mailbox buttons ( , or Feature Change announcement Change remote access code Change message alert Change... - Page 51 Feature Change call When set to On, you can hear screening incoming messages as the caller leaves them. Off or On*. Change Set the number of times the number of phone rings before the rings answering machine answers. 2, 4*, 6, or Toll Saver. The Toll Saver setting answers incoming calls after 2 rings if you have new...
-
Page 52: Using The Answering Machine
Using the Answering Machine The message window displays the number of new messages in the selected mailbox. As you listen to your messages, the window displays the number of the message being played in that mailbox. At the end of the last new message, the phone announces, “End of messages.”... -
Page 53: Deleting Messages
Deleting Messages Messages are stored until you delete them. You cannot delete a message until you have played it. After you delete the message, you cannot retrieve it. Action Press DELETE to delete the message that is playing. To delete all messages in a mailbox, press DELETE, then press the appropriate mailbox button. -
Page 54: Recording A Memo
Recording a Memo You can record a memo up to 4 minutes long that is stored as an incoming message. Action 1 Press RECORD. 2 Press 1 of the mailbox buttons ( 3 After the beep, speak toward the microphone. The message window displays the length of the message. -
Page 55: Using The Message Window
Using the Message Window The message window keeps you informed of the system’s status, such as the number of new calls, length of messages, and volume level. The following table lists and describes the message window indicators. Indicator (counting) (flashing) (displays for 1 second) Description... - Page 56 Indicator (displays for 1 second) normal display Description Answering machine is in Announce Only mode. Displays when you change a setting from on or off. Clock is not set. Phone is answering a call, is in remote operation, is in programming mode, or is initializing.
-
Page 57: Checking Messages Remotely From A Touch-Tone Phone
Checking Messages Remotely from a Touch-Tone Phone For your convenience, cut out this page and take it with you while you are away from home. Action 1 Dial your telephone number. 2 When the answering machine answers, enter your remote access code. The phone beeps once and announces the number of new messages. - Page 58 Action Press Press Press then a mailbox number Press Hang up Note: If the answering machine is off when you call in, it answers after 10 rings and prompts you to enter your remote access code. to listen to the announcement.
-
Page 59: Setting Up Optional Charging Bases And Expansion Handsets
Setting Up Optional Charging Bases and Expansion Handsets You can add 5 expansion handsets to your system, for a total of 6 handsets. Expansion handsets do not need to be plugged into a phone line. Instead, install the battery pack, as described on page 15, then plug the power cord into a power outlet where you want to place the handset. -
Page 60: Registering An Expansion Handset
Registering an Expansion Handset Note: When a handset is not registered or is searching for the base station, BASE displays. You can register up to 5 expansion handsets to the base station, for a total of 6 handsets. If you try to register a 7th handset, displays. -
Page 61: Personalizing And Using Expansion Handsets
Action 4 Press ENTER BASE ID 5 Using the keys on the handset, enter the 15-digit base ID code, then press If you make a mistake while entering the code, press the left soft key ( Important: The base ID code may contain numbers and characters such as #. -
Page 62: Advanced Features
• Conference call • Talk on the intercom between handsets and between handsets and the base station • Transfer calls to a handset or the base station To order expansion handsets, call: 1-888-390-6456 TTY (Text Telephone) www.motorola.com/cordless 1-800-353-2729 USA On the Web:... -
Page 63: Using Conference Calling
Using Conference Calling If 1 handset is on a call, the displays on other handsets, registered to the same base station, LINE IN USE display When a second handset joins the call, the other handset displays numbers. A maximum of 2 handsets and the base station can be on a conference call at the same time. -
Page 64: Using The Intercom
Using the Intercom Note: When in intercom mode, the INTERCOM buttons on the base station and the handset light up and k X displays. Where X is the number of the handset being used. From the Base Station to All Handsets Action 1 Press INTERCOM on the base station. -
Page 65: From A Handset To The Base Station
From a Handset to the Base Station Action 1 Press INTERCOM on the handset. 2 Scroll ( ) to 3 To end the intercom call, press INTERCOM on the base station, or OFF on the handset. From a Handset to a Handset Action 1 Press INTERCOM on the handset. -
Page 66: Answering A Base Station To Handset Intercom Call
Answering a Base Station to Handset Intercom Call Action 1 Press ON to answer the call. 2 To end the intercom call, press OFF. Transferring Calls Unannounced Transfer from the Base Station or a Handset Action 1 Press 2 Scroll ( BASE handset number), then press You can answer the ringing handset or base... -
Page 67: Announced Transfer From The Base Station Or A Handset
Announced Transfer from the Base Station or a Handset Action HOLD 1 Press MENU then press 2 Press INTERCOM. 3 Scroll ( ) to the desired destination BASE HANDSET handset number), then press 4 When the base station or handset answers, announce there is an active call on hold waiting to be transferred. -
Page 68: Motorola Limited Warranty For The United States And Canada
United States and Canada Motorola Limited Warranty What Does this Warranty Cover? Subject to the exclusions contained below, Motorola, Inc. warrants its telephones, pagers, messaging devices, and consumer two-way radios that operate via Family Radio Service or General Mobile Radio Service (“Products”), Motorola-branded or certified accessories sold... - Page 69 (c) use of the Products or Accessories for commercial purposes or subjecting the Product or Accessory to abnormal usage or conditions; or (d) other acts which are not the fault of Motorola, are excluded from coverage. Use of Non-Motorola Products and Accessories. Defects or...
- Page 70 Unauthorized Service or Modification. Defects or damages resulting from service, testing, adjustment, installation, maintenance, alteration, or modification in any way by someone other than Motorola, or its authorized service centers, are excluded from coverage. Altered Products. Products or Accessories with (a) serial numbers or date tags that have been removed, altered or obliterated;...
- Page 71 This warranty extends only to the first consumer purchaser, and is not transferable. What will Motorola Do? Motorola, at its option, will at no charge repair, replace or refund the purchase price of any Products, Accessories or Software that does not conform to this warranty. We may use functionally equivalent reconditioned/refurbished/pre-owned or new Products, Accessories or parts.
- Page 72 Laws in the United States and other countries preserve for Motorola certain exclusive rights for copyrighted Motorola software such as the exclusive rights to reproduce and distribute copies of the Motorola software.
- Page 73 Notes...
- Page 74 Notes...
- Page 76 6864110W43-O...