Advertisement
Advertisement

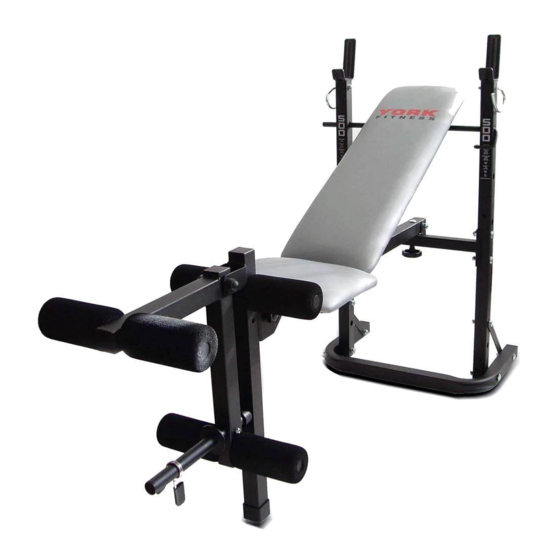
Related Manuals for York B500

Summary of Contents for York B500
- Page 1 Owner’s Manual York B500 Bench Item #45068 June 30,2013 www.yorkfitness.com...
-
Page 2: Table Of Contents
Table of contents Congratulations on CONTENTS purchasing your exercise equipment from Safety information Customer support Assembly instructions Important information You have chosen a high quality, safe and innovative piece of equipment as your Exploded drawing training partner and we are certain it will keep you motivated on the way to achieving your personal fitness goals. -
Page 3: Safety Information
• Use only the adjustment settings as described in • Due to our continuous policy of product the instructions. Always use the correct adjustment development, York Fitness reserves the right to pin and/or locking devices. • secure before use and / or after adjustment. -
Page 4: Customer Support
This product label is an example only, it is not the realserial number of the item you have bought. IMPORTANT!! - Please retain your sales receipt, York Fitness Customer Care may request proof of purchase to validate eligibility for warranty service. Warranty cover starts from the date shown on the proof of purchase. -
Page 5: Assembly Instructions
Assembly instructions Care & Maintenance • This equipment should not be placed outdoors, in a garage or an outbuilding. Keep the equipment in a dry place with as little temperature variation as possible. • We recommend placing a mat beneath the equipment to protect both the equipment and your flooring. •... - Page 6 Assembly instructions Blister Pack: 21 M10x55L 7pcs 24 M10x95L 1pcs 20 M10x90L 2pcs 25 M10x70L 1pcs 33 M6 1pcs 23 M6x45 1pcs 17 D8 1pcs 34 M8 2pcs 28 M8x20L 2pcs 30 11x20 22pcs 27 8.5x18 6pcs 45068 KH-30300 (MM) www.yorkfitness.com...
- Page 7 Step 1 • Make sure bracket of CROSS SUPPORT (4) is facing backwards. The nylon locknuts must be tightened so that the bolt penetrates through the nylon insert in the nut and the nut locks up against the tubing Cross Support 21 x 4 30 x 4 32 x 4...
- Page 8 Assembly instructions Step 2 IMPORTANT N.B. Make sure this hex head bolt is in the third hole from the bottom of u-bend basement. 21 x 2 22 x 2 20 x 2 30 x 8 32 x 6 www.yorkfitness.com...
- Page 9 Step 3 24 x 1 31 x 2 The nylon lock nuts must be tightened so that the bolt penetrates 21 x 1 through the nylon insert in the nut and the nut locks up 30 x 4 against the tubing 32 x 2 IMPORTANT H.B.
- Page 10 Assembly instructions Step 4 • N.B. First Fasten Backrest Supports (Part #10) to the Upholstery (Part #18). Do not tighten until the supports are fastened to the bench. 26 x 4 27 x 4 www.yorkfitness.com...
- Page 11 Step 5 29 x 1 30 x 2 32 x 1 H.B. The off entre hole should be towards the top. www.yorkfitness.com...
- Page 12 Assembly instructions Step 6 28 x 2 HOOKS IN LOCKED POSITION 27 x 2 31 x 1 30 x 2 32 x 1 These hooks should be in position when unloading or loading weights. Large weights should be only loaded or unloaded with bar on floor.
- Page 13 Step 7 23 x 1 17 x 1 33 x 1 44 x 1 39 x 2 25 x 1 30 x 2 32 x 1 Make sure you fit, the carraige bolt (23) in the square hole of leg unit (7). www.yorkfitness.com...
-
Page 14: Important Information
IMPORTANT INSTRUCTION Before using your bench check the following: 1. The bench has been set up correctly as shown. 2. The carriage bolts are in place 6 secure. 3. The Tri-knob is fastened securely. 4. The backrest adjustable post is correctly in position. 5. -
Page 15: Exploded Drawing
Exploded Drawing / Part List 30 32 32 30 30 32 REF. DESCRIPTION QTY. REF. DESCRIPTION QTY. U-BEND BASEMENT HEX BOLT (M10*1.5*70L) UPRIGHT POST HEX BOLT (M8*1.25*40L) CROSS BAR FLAT WASHER (D18*D8.5*1.2T) SPINE POST HEX BOLT (M8*1.25*20L) FRONT UPRIGHT POST HEX BOLT (M10*1.5*110L) LEG UNIT-WELDED FLAT WASHER (D20*D11*2T) - Page 16 www.yorkfitness.com...