Table of Contents
Advertisement
Quick Links
Download this manual
See also:
User Manual
Advertisement
Table of Contents

Related Manuals for Nagra NAGRA-SD


Summary of Contents for Nagra NAGRA-SD
- Page 1 NAGRA-SD PROVISIONAL USER MANUAL Copyright © NAGRAVISION S.A.2010...
-
Page 2: Table Of Contents
6.15 USB status ................................... 7 6.16 Keyboard status ................................7 6.17 Battery status ................................7 7 USING THE NAGRA-SD ..............................7 7.1 Recording audio in the field ............................7 7.1.1 The Automatic Gain Control (A.G.C) ........................8 Page 2 of 17 February 9, 2011 Copyright ©... - Page 3 8.2.15 System reset ................................ 13 8.2.16 System update ..............................13 9 MICROPHONES AND SETTINGS..........................14 10 LOW CUT FILTER OR NOT ON THE NAGRA-SD....................... 14 11 AUDIO COMPRESSION (WHY AND WHEN TO USE IT).................... 14 12 USB ....................................14 13 SPECIFICATIONS .................................
-
Page 4: Guarantee
1 GUARANTEE Nagra / Kudelski certifies that this instrument was thoroughly inspected and tested prior to leaving our factory. We guarantee the products of our own manufacture against any defect arising from faulty manufacture for a period of two years from the date of delivery. -
Page 5: Panel Description
To enter 2 markers for a playback loop. • DELETE key Deletes the selected index. • POWER key To turn on or off the Nagra-SD • DOWN key Stops a record. • To move downwards in the directory or menus. -
Page 6: Left Side
4 INSTALLING BATTERIES Insert 2 “AA” batteries taking care of the correct polarity and close the cover. Rechargeable batteries (NiCd or Ni-mH) can also be used but they can not be charged inside the NAGRA SD. 5 FIRST POWER ON Push and hold the “Power”... -
Page 7: Play / Record Counter
(mono or stereo). When ready, press the centre key (11) and the NAGRA-SD will go to the “PRE-REC” mode where the audio input can be heard on the headphones and the levels seen on the display. The centre LED starts blinking slowly. In this mode the Pre-record buffer when turned on (max. 3 seconds) is also active. -
Page 8: Playback Of A Previous Recording
Enter also the “SAMPLE RATE” as well as the “BIT RATE”. To quit the menus, press the left key several times. Once completed, the desired template can be selected on the rear side of the NAGRA-SD by selecting the “HIGH” or “LOW” template as well as the type of recording (stereo or mono file). -
Page 9: Menus
8 MENUS Most of the settings and parameters of the NAGRA-SD are made through a selection of Menu’s. Press the “FILES / MENU” key and a sub-menu appears giving access to the “RECORD SETTINGS” and “SYSTEM SETTINGS”. The “UP” or “DOWN” keys will highlight the different choices and the “RIGHT” key confirms the selection. - Page 10 Note: While surfing through the different menu windows in some cases the “CENTRE” key or “RIGHT” key can be used to advance one step but also the “UP” and “DOWN” keys. To go one step back or to escape from a particular screen press the “LEFT” key. Page 10 of 17 February 9, 2011 Copyright ©...
-
Page 11: Record Settings
8.1 Record settings 8.1.1 Templates Before the templates can be selected with the switch on the rear side, they first need to be stored. Maximum 2 templates, “High quality” and “Low quality”, for the file type can be entered. Several possibilities exist: WAV-PCM 16 or 24 bits, MPEG1L2, MPEG1L3, MPEG2L2. Select one of the possibilities using the “UP” or “DOWN” keys and press the “CENTRE”... -
Page 12: Matrix
8.1.2 Matrix The input matrix permits the selection to deliver the analog input signal to the left and or right recording channel. As an example: After having selected Stereo both from left, making a stereo recording with only one microphone connected to the left input will record the same signal on the left and right channels. -
Page 13: Speaker Settings
8.2.16 System update To update the Nagra-SD, first copy the update file (NagraSD.coe) in the root of the SD card. This can be done by inserting the card into a SD slot on the PC or via an USB connection with the Nagra-SD. -
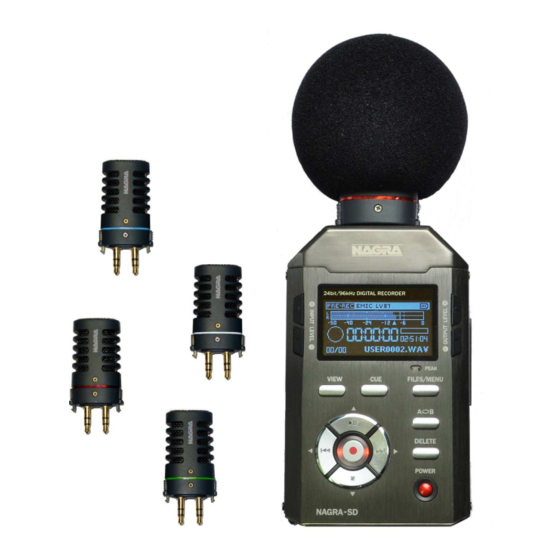
Page 14: Microphones And Settings
11 AUDIO COMPRESSION (WHY AND WHEN TO USE IT). The NAGRA-SD is able to record using different Audio qualities PCM Linear, MPEG Layer II (MP2) and MPEG layer III (MP3) that have their own particular advantages, which are explained below. - Page 15 The USB power position is for simply powering the NAGRA-SD through the USB port for normal operation without internal batteries. If the USB transfer is selected, the machine will immediately appear as a removable disk in the explorer of the PC/MAC. The NAGRA-SD display shows “USB Connecting”.
-
Page 16: Specifications
13 SPECIFICATIONS GENERAL Data Storage medium SD HC card FAT 32 Recording Method Digital (PCM) or Digital compression Compression type ISO MPEG Layer II / III File Format 16 Bit Wave Format (xxx.WAV) or MPEG Raw (xxx.MP2, xxx.MP3) Sampling Rate From 24 to 96 kHz selectable Compress Bit-Rates 32 to 384 kb/s... - Page 17 NAGRAVISION SA KUDELSKI GROUP Route de Genève 22 CH-1033 Cheseaux Switzerland Phone +41 (0)21 732-0101 Fax +41 (0)21 732-0100 E-mail: audio_pro@nagra.com All rights reserved-© February, 2011 Page 17 of 17 February 9, 2011 Copyright © NAGRAVISION S.A. 2011...