HP IBRIX X9720 System Administrator Manual
Hide thumbs
Also See for IBRIX X9720:
- Administrator's manual (189 pages) ,
- Administrator's manual (230 pages)
Table of Contents
Advertisement
Quick Links
HP IBRIX X9720/X9730 Network Storage
System Administrator Guide
Abstract
This guide describes tasks related to cluster configuration and monitoring, system upgrade and recovery, hardware component
replacement, and troubleshooting. It does not document X9000 file system features or standard Linux administrative tools and
commands. For information about configuring and using X9000 software file system features, see the HP IBRIX X9000 Network
Storage System File System User Guide.
This guide is intended for system administrators and technicians who are experienced with installing and administering networks,
and with performing Linux operating and administrative tasks. For the latest X9000 guides, browse to
support/manuals. In the storage section, select NAS Systems and then select HP X9000 Network Storage Systems from the
IBRIX Storage Systems section.
HP Part Number: AW549-96035
Published: June 2012
Edition: 9
http://www.hp.com/
Advertisement
Table of Contents
Troubleshooting

Related Manuals for HP IBRIX X9720


Summary of Contents for HP IBRIX X9720
- Page 1 It does not document X9000 file system features or standard Linux administrative tools and commands. For information about configuring and using X9000 software file system features, see the HP IBRIX X9000 Network Storage System File System User Guide.
- Page 2 The information contained herein is subject to change without notice. The only warranties for HP products and services are set forth in the express warranty statements accompanying such products and services. Nothing herein should be construed as constituting an additional warranty. HP shall not be liable for technical or editorial errors or omissions contained herein.
-
Page 3: Table Of Contents
Configuring HP Insight Remote Support on X9000 systems............23 Configuring the X9000 cluster for Insight Remote Support............23 Configuring Insight Remote Support for HP SIM 7.1 and IRS 5.7..........27 Configuring Insight Remote Support for HP SIM 6.3 and IRS 5.6..........29 Testing the Insight Remote Support configuration..............32 Updating the Phone Home configuration................32... - Page 4 Setting up automated failover....................39 Configuring standby pairs....................39 Identifying power sources....................39 Turning automated failover on and off................40 Manually failing over a file serving node................40 Failing back a file serving node...................41 Using network interface monitoring..................41 Setting up HBA monitoring....................43 Discovering HBAs......................43 Identifying standby-paired HBA ports................44 Turning HBA monitoring on or off..................44 Deleting standby port pairings..................44 Deleting HBAs from the configuration database..............44...
- Page 5 Monitoring storage and storage components.................61 Monitoring the status of file serving nodes..................64 Monitoring cluster events......................65 Viewing events........................65 Removing events from the events database table..............66 Monitoring cluster health......................66 Health checks........................66 Health check reports......................67 Viewing logs..........................69 Viewing and clearing the Integrated Management Log (IML)............69 Viewing operating statistics for file serving nodes................69 9 Using the Statistics tool................71 Installing and configuring the Statistics tool................71...
- Page 6 Deleting a network interface...................90 Viewing network interface information..................90 1 1 Migrating to an agile Fusion Manager configuration........91 Backing up the configuration....................91 Performing the migration......................91 Testing failover and failback of the agile Fusion Manager............93 Converting the original management console node to a file serving node hosting the agile Fusion Manager..........................94 12 Upgrading the X9000 software to the 6.1 release........95 Online upgrades for X9000 software 6.0 to 6.1.................95...
- Page 7 Enabling monitoring for the new storage................134 Setting the chassis name of the new capacity block..............134 Removing server blades......................135 Removing capacity blocks......................135 17 Troubleshooting..................136 Collecting information for HP Support with Ibrix Collect.............136 Collecting logs........................136 Deleting the archive file....................137 Downloading the archive file.....................137 Configuring Ibrix Collect....................138 Viewing data collection information..................139...
- Page 8 B X9730 spare parts list ................177 HP IBRIX X9730 Performance Chassis (QZ729A)..............177 HP IBRIX X9730 140 TB MLStorage 2xBL Performance Module (QZ730A)........177 HP IBRIX X9730 210 TB ML Storage 2xBL Performance Module (QZ731A)........178 (QZ732A)...........................178 (QZ733A)...........................179 C X9720 component and cabling diagrams..........180 Base and expansion cabinets....................180...
- Page 9 Rear view of an X9700cx.....................189 Cabling diagrams........................189 Capacity block cabling—Base and expansion cabinets............189 Virtual Connect Flex- 1 0 Ethernet module cabling—Base cabinet..........190 SAS switch cabling—Base cabinet..................191 SAS switch cabling—Expansion cabinet................191 D X9720 spare parts list ................193 X9720 Network Storage System Base (AW548A)..............193 X9700 Expansion Rack (AQ552A)..................193 X9700 Server Chassis (AW549A)...................194 X9700 Blade Server (AW550A).....................194...
- Page 10 Japanese laser notice.......................207 Spanish laser notice......................207 Recycling notices........................208 English recycling notice....................208 Bulgarian recycling notice....................208 Czech recycling notice......................208 Danish recycling notice.....................208 Dutch recycling notice.......................208 Estonian recycling notice....................209 Finnish recycling notice.....................209 French recycling notice.....................209 German recycling notice....................209 Greek recycling notice......................209 Hungarian recycling notice....................209 Italian recycling notice......................210 Latvian recycling notice.....................210 Lithuanian recycling notice....................210...
-
Page 11: Product Description
1 Product description HP X9720 and X9730 Network Storage Systems are a scalable, network-attached storage (NAS) product. The system combines HP X9000 File Serving Software with HP server and storage hardware to create a cluster of file serving nodes. System features... -
Page 12: High Availability And Redundancy
Multiple environments. Operates in both the SAN and DAS environments. High availability. The high-availability software protects servers. Tuning capability. The system can be tuned for large or small-block I/O. Flexible configuration. Segments can be migrated dynamically for rebalancing and data tiering. -
Page 13: Getting Started
Setting up the X9720/X9730 Network Storage System An HP service specialist sets up the system at your site, including the following tasks: Installation steps Before starting the installation, ensure that the product components are in the location where they will be installed. -
Page 14: Logging In To The System
Data tiering. Use this feature to move files to specific tiers based on file attributes. For more information about these file system features, see the HP IBRIX X9000 Network Storage System File System User Guide. Localization support Red Hat Enterprise Linux 5 uses the UTF-8 (8-bit Unicode Transformation Format) encoding for supported locales. -
Page 15: Using The Serial Link On The Onboard Administrator
Log in as normal. NOTE: By default, the first port is connected with the dongle to the front of blade 1 (that is, server 1). If server 1 is down, move the dongle to another blade. Using the serial link on the Onboard Administrator If you are connected to a terminal server, you can log in through the serial link on the Onboard Administrator. - Page 16 http://<management_console_IP>:80/fusion If you are using HTTPS to access the GUI, navigate to the following location, specifying port 443: https://<management_console_IP>:443/fusion In these URLs, <management_console_IP> is the IP address of the Fusion Manager user VIF. The GUI prompts for your user name and password. The default administrative user is ibrix. Enter the password that was assigned to this user when the system was installed.
-
Page 17: Cluster Overview
System Status The System Status section lists the number of cluster events that have occurred in the last 24 hours. There are three types of events: Alerts. Disruptive events that can result in loss of access to file system data. Examples are a segment that is unavailable or a server that cannot be accessed. - Page 18 Services Whether the specified file system services are currently running: One or more tasks are running. No tasks are running. Statistics Historical performance graphs for the following items: Network I/O (MB/s) Disk I/O (MB/s) CPU usage (%) Memory usage (%) On each graph, the X-axis represents time and the Y-axis represents performance.
-
Page 19: Customizing The Gui
NOTE: When you perform an operation on the GUI, a spinning finger is displayed until the operation is complete. However, if you use Windows Remote Desktop to access the GUI, the spinning finger is not displayed. Customizing the GUI For most tables in the GUI, you can specify the columns that you want to display and the sort order of each column. -
Page 20: Using The Cli
Status. Shows the client’s Fusion Manager registration status and mounted file systems, and provides access to the IAD log for troubleshooting. Registration. Registers the client with the Fusion Manager, as described in the HP IBRIX X9000 Network Storage System Installation Guide. -
Page 21: X9000 Software Manpages
You will be prompted to enter the new password. Configuring ports for a firewall IMPORTANT: To avoid unintended consequences, HP recommends that you configure the firewall during scheduled maintenance times. When configuring a firewall, you should be aware of the following: SELinux should be disabled. -
Page 22: Configuring Ntp Servers
Port Description 8008/tcp 9002/tcp 9005/tcp 9008/tcp 9009/tcp 9200/tcp Between file serving nodes and NFS clients (user network) 2049/tcp, 2049/udp 1 1 1/tcp, 1 1 1/udp 875/tcp, 875/udp quota 32803/tcp lockmanager 32769/udp lockmanager 892/tcp, 892/udp mount daemon 662/tcp, 662/udp stat 2020/tcp, 2020/udp stat outgoing 4000:4003/tcp reserved for use by a custom application (CMU) and can be disabled if not used... -
Page 23: Configuring Hp Insight Remote Support On X9000 Systems
You must install HP Insight Remote Support on a separate Windows system termed the Central Management Server (CMS): HP Insight Manager (HP SIM). This software manages HP systems and is the easiest and least expensive way to maximize system uptime and health. - Page 24 To configure the Virtual Connect Manager on an X9720/X9730 system, complete the following steps: From the Onboard Administrator, select OA IP > Interconnet Bays > HP VC Flex-10 > Management Console. On the HP Virtual Connect Manager, open the SNMP Configuration tab.
- Page 25 To configure Phone Home on the GUI, select Cluster Configuration in the upper Navigator and then select Phone Home in the lower Navigator. The Phone Home Setup panel shows the current configuration. Configuring HP Insight Remote Support on X9000 systems...
- Page 26 Click Enable to configure the settings on the Phone Home Settings dialog box. Skip the Software Entitlement ID field; it is not currently used. The time required to enable Phone Home depends on the number of devices in the cluster, with larger clusters requiring more time.
-
Page 27: Configuring Insight Remote Support For Hp Sim 7.1 And Irs 5.7
-c -i 99.2.4.75 -P US -r public -w private -t Admin -n SYS01.US -o Colorado Next, configure Insight Remote Support for the version of HP SIM you are using: HP SIM 7.1 and IRS 5.7. See “Configuring Insight Remote Support for HP SIM 7.1 and IRS 5.7”... - Page 28 HP Systems Insight Manager (SIM) uses the SNMP protocol to discover and identify X9000 systems automatically. On HP SIM, open Options > Discovery > New. Select Discover a group of systems, and then enter the discovery name and the Fusion Manager IP address on the New Discovery dialog box.
-
Page 29: Configuring Insight Remote Support For Hp Sim 6.3 And Irs 5.6
The following example shows discovered devices on HP SIM 7.1. File serving nodes and the OA IP are associated with the Fusion Manager IP address. In HP SIM, select Fusion Manager and open the Systems tab. Then select Associations to view the devices. - Page 30 Enter the read community string on the Credentials > SMTP tab. This string should match the Phone Home read community string. If the strings are not identical, the device will be discovered as “Unknown.” The following example shows discovered devices on HP SIM 6.3. File serving nodes are discovered as ProLiant server. Configuring device Entitlements Configure the CMS software to enable remote support for X9000 systems.
- Page 31 Go to Remote Support Configuration and Services and select the Entitlement tab. Check the devices discovered. NOTE: If the system discovered on HP SIM does not appear on the Entitlement tab, click Synchronize RSE. Select Entitle Checked from the Action List.
-
Page 32: Testing The Insight Remote Support Configuration
Phone Home configuration” (page 32). Fusion Manager IP is discovered as “Unknown” Verify that the read community string entered in HP SIM matches the Phone Home read community string. Also run snmpwalk on the VIF IP and verify the information:... - Page 33 Critical failures occur when discovering X9720 OA The 3GB SAS switches have internal IPs in the range 169.x.x.x, which cannot be reached from HP SIM. These switches will not be monitored; however, other OA components are monitored. Discovered device is reported as unknown on CMS...
-
Page 34: Configuring Virtual Interfaces For Client Access
Fusion Manager configuration, a virtual interface is also created for the cluster network interface to provide failover support for the console. Although the cluster network interface can carry traffic between file serving nodes and clients, HP recommends that you configure one or more user network interfaces for this purpose. -
Page 35: Configuring Nic Failover
Add the VIF: # ibrix_nic –a -n bond0:2 –h node1,node2,node3,node4 Set up a standby server for each VIF: # ibrix_nic –b –H node1/bond0:1,node2/bond0:2 # ibrix_nic –b –H node2/bond0:1,node1/bond0:2 # ibrix_nic –b –H node3/bond0:1,node4/bond0:2 # ibrix_nic –b –H node4/bond0:1,node3/bond0:2 Configuring NIC failover NIC monitoring should be configured on VIFs that will be used by NFS, CIFS, FTP, or HTTP. -
Page 36: Specifying Vifs In The Client Configuration
Specifying VIFs in the client configuration When you configure your clients, you may need to specify the VIF that should be used for client access. NFS/CIFS. Specify the VIF IP address of the servers (for example, bond0:1) to establish connection. You can also configure DNS round robin to ensure NFS or CIFS client-to-server distribution. -
Page 37: Configuring Failover
4 Configuring failover This chapter describes how to configure failover for agile management consoles, file serving nodes, network interfaces, and HBAs. Agile management consoles The agile Fusion Manager maintains the cluster configuration and provides graphical and command-line user interfaces for managing and monitoring the cluster. The agile Fusion Manager is installed on all file serving nodes when the cluster is installed. -
Page 38: Viewing Information About Fusion Managers
The command takes effect immediately. The failed-over Fusion Manager remains in nofmfailover mode until it is moved to passive mode using the following command: ibrix_fm -m passive NOTE: A Fusion Manager cannot be moved from nofmfailover mode to active mode. Viewing information about Fusion Managers To view mode information, use the following command: ibrix_fm –i... -
Page 39: Setting Up Automated Failover
If your cluster includes one or more user network interfaces carrying NFS/CIFS client traffic, HP recommends that you identify standby network interfaces and set up network interface monitoring. If your file serving nodes are connected to storage through HBAs, HP recommends that you set up HBA monitoring. -
Page 40: Turning Automated Failover On And Off
Identifying power sources All power sources must be identified to the configuration database before they can be used. To identify an integrated power source, use the following command: ibrix_powersrc -a -t {ipmi|openipmi|openipmi2|ilo} -h HOSTNAME -I IPADDR -u USERNAME -p PASSWORD For example, to identify an iLO power source at IP address 192.168.3.170 for node ss01: ibrix_powersrc -a -t ilo -h ss01 -I 192.168.3.170 -u Administrator -p password Updating the configuration database with power source changes... -
Page 41: Failing Back A File Serving Node
A failback might not succeed if the time period between the failover and the failback is too short, and the primary server has not fully recovered. HP recommends ensuring that both servers are up and running and then waiting 60 seconds before starting the failback. Use the ibrix_server -l command to verify that the primary server is up and running. - Page 42 To set up a network interface monitor, use the following command: ibrix_nic -m -h MONHOST -A DESTHOST/IFNAME For example, to set up file serving node s2.hp.com to monitor file serving node s1.hp.com over user network interface eth1: ibrix_nic -m -h s2.hp.com -A s1.hp.com/eth1...
-
Page 43: Setting Up Hba Monitoring
For example, to delete the standby that was assigned to interface eth2 on file serving node s1.hp.com: ibrix_nic -b -U s1.hp.com/eth2 Setting up HBA monitoring You can configure High Availability to initiate automated failover upon detection of a failed HBA. -
Page 44: Identifying Standby-Paired Hba Ports
HBA failure. Use the following command: ibrix_hba -m -h HOSTNAME -p PORT For example, to turn on HBA monitoring for port 20.00.12.34.56.78.9a.bc on node s1.hp.com: ibrix_hba -m -h s1.hp.com -p 20.00.12.34.56.78.9a.bc To turn off HBA monitoring for an HBA port, include the -U option:... -
Page 45: Checking The High Availability Configuration
-b argument. To view results only for file serving nodes that failed a check, include the -f argument. ibrix_haconfig -l [-h HOSTLIST] [-f] [-b] For example, to view a summary report for file serving nodes xs01.hp.com and xs02.hp.com: ibrix_haconfig -l -h xs01.hp.com,xs02.hp.com... - Page 46 The -v option produces detailed information about configuration checks that received a Passed result. For example, to view a detailed report for file serving node xs01.hp.com: ibrix_haconfig -i -h xs01.hp.com...
-
Page 47: Configuring Cluster Event Notification
5 Configuring cluster event notification Cluster events There are three categories for cluster events: Alerts. Disruptive events that can result in loss of access to file system data. Warnings. Potentially disruptive conditions where file system access is not lost, but if the situation is not addressed, it can escalate to an alert condition. -
Page 48: Configuring Email Notification Settings
Be sure to specify valid email addresses, especially for the SMTP server. If an address is not valid, the SMTP server will reject the email. The following command configures email settings to use the mail.hp.com SMTP server and turns on notifications: ibrix_event -m on -s mail.hp.com -f FM@hp.com -r MIS@hp.com -t Cluster1 Notification... -
Page 49: Setting Up Snmp Notifications
SMTP Server mail.hp.com From FM@hp.com Reply To MIS@hp.com EVENT LEVEL TYPE DESTINATION ------------------------------------- ----- ----- ----------- asyncrep.completed ALERT EMAIL admin@hp.com asyncrep.failed ALERT EMAIL admin@hp.com Setting up SNMP notifications X9000 software supports SNMP (Simple Network Management Protocol) V1 and V2. Steps for setting up SNMP include:... -
Page 50: Configuring Trapsink Settings
Configuring trapsink settings A trapsink is the host destination where agents send traps, which are asynchronous notifications sent by the agent to the management station. A trapsink is specified either by name or IP address. X9000 software supports multiple trapsinks; you can define any number of trapsinks of any SNMP version, but you can define only one trapsink per host, regardless of the version. -
Page 51: Configuring System Backups
6 Configuring system backups Backing up the Fusion Manager configuration The Fusion Manager configuration is automatically backed up whenever the cluster configuration changes. The backup occurs on the node hosting the active Fusion Manager. The backup file is stored at <ibrixhome>/tmp/fmbackup.zip on that node. The active Fusion Manager notifies the passive Fusion Manager when a new backup file is available. -
Page 52: Configuring Ndmp Parameters On The Cluster
hard quota limit for the directory tree has been exceeded, NDMP cannot create a temporary file and the restore operation fails. Configuring NDMP parameters on the cluster Certain NDMP parameters must be configured to enable communications between the DMA and the NDMP Servers in the cluster. -
Page 53: Starting, Stopping, Or Restarting An Ndmp Server
status of the session (backing up data, restoring data, or idle), the start time, and the IP address used by the DMA. To cancel a session, select that session and click Cancel Session. Canceling a session kills all spawned sessions processes and frees their resources if necessary. To see similar information for completed sessions, select NDMP Backup >... -
Page 54: Ndmp Events
To rescan for devices, use the following command: ibrix_tape –r NDMP events An NDMP Server can generate three types of events: INFO, WARN, and ALERT. These events are displayed on the GUI and can be viewed with the ibrix_event command. INFO events. -
Page 55: Creating Hostgroups For X9000 Clients
7 Creating hostgroups for X9000 clients A hostgroup is a named set of X9000 clients. Hostgroups provide a convenient way to centrally manage clients. You can put different sets of clients into hostgroups and then perform the following operations on all members of the group: Create and delete mountpoints Mount file systems Prefer a network interface... -
Page 56: Adding An X9000 Client To A Hostgroup
-m -g GROUP -h MEMBER For example, to add the specified host to the finance group: ibrix_hostgroup -m -g finance -h cl01.hp.com Adding a domain rule to a hostgroup To configure automatic hostgroup assignments, define a domain rule for hostgroups. A domain rule restricts hostgroup membership to clients on a particular cluster subnet. -
Page 57: Other Hostgroup Operations
Additional hostgroup operations are described in the following locations: Creating or deleting a mountpoint, and mounting or unmounting a file system (see “Creating and mounting file systems” in the HP IBRIX X9000 Network Storage System File System User Guide) Changing host tuning parameters (see “Tuning file serving nodes and X9000 clients”... -
Page 58: Monitoring Cluster Operations
8 Monitoring cluster operations Monitoring the system status The storage monitoring function gathers system status information and generates a monitoring report. The GUI displays status information on the dashboard. This section describes how to the use the CLI to view this information. Monitoring intervals The default monitoring interval is 15 minutes (900 seconds). - Page 59 Select the server component that you want to view from the lower Navigator. The following example shows status and other information for the CPUs in the selected server. The NICs panel shows all NICs on the server, including offline NICs. These NICs are typically unused.
-
Page 60: Monitoring Chassis And Chassis Components
Monitoring chassis and chassis components The front of the chassis includes server bays and the rear of the chassis includes components such as fans, power supplies, Onboard Administrator modules, and interconnect modules (VC modules and SAS switches). The following Onboard Administrator view shows a chassis enclosure on an X9730 system. -
Page 61: Monitoring Storage And Storage Components
Select Vendor Storage from the Navigator to display status and device information for the storage on your system. The Vendor Storage panel lists the HP X9730 CX storage systems included in the system. The Summary panel shows details for the selected X9730 CX. In the summary, the monitoring host is the blade currently monitoring the status of the storage. - Page 62 Select a component from the lower Navigator to see details for the selected storage. Each X9730 CX has a single drive enclosure. That enclosure includes two sub-enclosures, which are shown on the Drive Sub Enclosures Panel. The Drive Sub Enclosure Components panel shows information for the fans, temperature sensors, and SEPs located in the two sub-enclosures.
- Page 63 UUIDs for the first set of components start with 50014380093D3E80, the UUID of the first sub-enclosure listed on the Drive Sub Enclosures panel. Select Fans, Temperature Sensors, or SEPs from the Navigator to see just those components. The Drives panel lists the drives in all of the X9730 CX systems. The Location field shows where the drive is located.
-
Page 64: Monitoring The Status Of File Serving Nodes
The LUN Mapping panel shows the X9000 physical volume associated with each LUN and specifies whether the LUN is a snapshot. Monitoring the status of file serving nodes The dashboard on the GUI displays information about the operational status of file serving nodes, including CPU, I/O, and network performance information. -
Page 65: Monitoring Cluster Events
Events are written to an events table in the configuration database as they are generated. To maintain the size of the file, HP recommends that you periodically remove the oldest events. See “Removing events from the events database table” (page 66). -
Page 66: Removing Events From The Events Database Table
The ibrix_event -l and -i commands can include options that act as filters to return records associated with a specific file system, server, alert level, and start or end time. See the HP IBRIX X9000 Network Storage System CLI Reference Guide for more information. -
Page 67: Health Check Reports
Health check reports The summary report provides an overall health check result for all tested file serving nodes and X9000 clients, followed by individual results. If you include the -b option, the standby servers for all tested file serving nodes are included when the overall result is determined. The results will be one of the following: Passed. - Page 68 ============== Result Type State Module Up time Last Update Network Thread Protocol ------ ------ ------------ ------ --------- ---------------------------- ------------ ------ -------- PASSED Server Up, HBAsDown Loaded 3267210.0 Mon Oct 19 14:24:34 EDT 2009 99.126.39.72 true CPU Information =============== Cpu(System,User,Util,Nice) Load(1,3,15 min) Network(Bps) Disk(Bps) --------------------------...
-
Page 69: Viewing Logs
Fusion Manager PASSED Viewing logs Logs are provided for the Fusion Manager, file serving nodes, and X9000 clients. Contact HP Support for assistance in interpreting log files. You might be asked to tar the logs and email them to HP. - Page 70 ---------Mem------------ HOST MemTotal(MB) MemFree(MB) SwapTotal(MB) SwapFree(MB) lab12-10.hp.com 1034616 703672 2031608 2031360 ---------CPU----------- HOST User System Nice Idle IoWait Irq SoftIrq lab12-10.hp.com ---------NFS v3-------- HOST Null Getattr Setattr Lookup Access Readlink Read Write lab12-10.hp.com HOST Create Mkdir Symlink Mknod Remove Rmdir Rename lab12-10.hp.com...
-
Page 71: Using The Statistics Tool
9 Using the Statistics tool The Statistics tool reports historical performance data for the cluster or for an individual file serving node. You can view data for the network, the operating system, file systems, memory, and block devices. Statistical data is transmitted from each file serving node to the Fusion Manager, which controls processing and report generation. -
Page 72: Upgrading The Statistics Tool From X9000 Software 6.0
Upgrading the Statistics tool from X9000 software 6.0 The statistics history is retained when you upgrade to version 6.1 or later. The Statstool software is upgraded when the X9000 software is upgraded using the ibrix_upgrade and auto_ibrixupgrade scripts. Note the following: If statistics processes were running before the upgrade started, those processes will automatically restart after the upgrade completes successfully. -
Page 73: Generating Reports
The Time View lists the reports in chronological order, and the Table View lists the reports by cluster or server. Click a report to view it. Generating reports To generate a new report, click Request New Report on the X9000 Management Console Historical Reports GUI. -
Page 74: Deleting Reports
To generate a report, enter the necessary specifications and click Submit. The completed report appears in the list of reports on the statistics home page. When generating reports, be aware of the following: A report can be generated only from statistics that have been gathered. For example, if you start the tool at 9:40 a.m. -
Page 75: Changing The Statistics Tool Configuration
If you are adding a new file serving node to the cluster, enable synchronization for the node. “Enabling collection and synchronization” (page 71) for more information. Add the file system to the Statistics tool. Run the following command on the node hosting the active Fusion Manager: /usr/local/ibrix/stats/bin/stmanage loadfm The new configuration is updated automatically on the other nodes in the cluster. -
Page 76: Checking The Status Of Statistics Tool Processes
NOTE: If the old active Fusion Manager is not available (pingable) for more than two days, the historical statistics database is not transferred to the current active Fusion Manager. If configurable parameters were set before the failover, the parameters are retained after the failover. -
Page 77: Log Files
“Controlling Statistics tool processes” (page 76). Installation issues. Check the /tmp/stats-install.log and try to fix the condition, or send the /tmp/stats-install.log to HP Support. Missing reports for file serving nodes. If reports are missing on the Stats tool web page, check the following: ◦... -
Page 78: 10 Maintaining The System
10 Maintaining the system Shutting down the system To shut down the system completely, first shut down the X9000 software, and then power off the hardware. Shutting down the X9000 software Use the following procedure to shut down the X9000 software. Unless noted otherwise, run the commands from the node hosting the active Fusion Manager. -
Page 79: Powering Off The System Hardware
Unmount all file systems on the cluster nodes: ibrix_umount -f <fs_name> To unmount file systems from the GUI, select Filesystems > unmount. Verify that all file systems are unmounted: ibrix_fs -l If a file system fails to unmount on a particular node, continue with this procedure. The file system will be forcibly unmounted during the node shutdown. -
Page 80: Starting Up The System
Starting up the system To start a X9720 system, first power on the hardware components, and then start the X900 Software. Powering on the system hardware To power on the system hardware, complete the following steps: Power on the 9100cx disk capacity block(s). Power on the 9100c controllers. -
Page 81: Performing A Rolling Reboot
/etc/init.d/ibrix_client [start | stop | restart | status] Tuning file serving nodes and X9000 clients The default host tuning settings are adequate for most cluster environments. However, HP Support may recommend that you change certain file serving node or X9000 client tuning settings to improve performance. - Page 82 To tune host parameters on nodes or hostgroups: ibrix_host_tune -S {-h HOSTLIST|-g GROUPLIST} -o OPTIONLIST Contact HP Support to obtain the values for OPTIONLIST. List the options as option=value pairs, separated by commas. To set host tunings on all clients, include the -g clients option.
-
Page 83: Migrating Segments
HOSTNAME1 to HOSTNAME2 and update the source host: ibrix_fs -m -f FSNAME -H HOSTNAME1,HOSTNAME2 [-M] [-F] [-N] For example, to migrate ownership of all segments in file system ifs1 that reside on s1.hp.com to s2.hp.com: ibrix_fs -m -f ifs1 -H s1.hp.com,s2.hp.com... - Page 84 segments in the file system and is transparent to users or applications accessing the file system. When evacuating a segment, you should be aware of the following restrictions: While the evacuation task is running, the system prevents other tasks from running on the file system.
- Page 85 HP IBRIX X9000 Network Storage System CLI Reference Guide. Troubleshooting segment evacuation If segment evacuation fails, HP recommends that you run phase 1 of the ibrix_fsck command in corrective mode on the segment that failed the evacuation. For more information, see “Checking and repairing file systems”...
-
Page 86: Maintaining Networks
HP recommends that the default network be routed through the base User Network interface. For a highly available cluster, HP recommends that you put NFS traffic on a dedicated user network and then set up automated failover for it (see “Setting up automated failover”... -
Page 87: Setting Network Interface Options In The Configuration Database
For example, to set netmask 255.255.0.0 and broadcast address 10.0.0.4 for interface eth3 on file serving node s4.hp.com: ibrix_nic -c -n eth3 -h s4.hp.com -M 255.255.0.0 -B 10.0.0.4 Preferring network interfaces After creating a user network interface for file serving nodes or X9000 clients, you will need to prefer the interface for those nodes and clients. - Page 88 -n -g HOSTGROUP -A DESTHOST/IFNAME The destination host (DESTHOST) cannot be a hostgroup. For example, to prefer network interface eth3 for traffic from all X9000 clients (the clients hostgroup) to file serving node s2.hp.com: ibrix_hostgroup -n -g clients -A s2.hp.com/eth3...
-
Page 89: Unpreferring Network Interfaces
To add a routing table entry, use the following command: ibrix_nic -r -n IFNAME -h HOSTNAME -A -R ROUTE The following command adds a route for virtual interface eth2:232 on file serving node s2.hp.com, sending all traffic through gateway gw.hp.com: Maintaining networks... -
Page 90: Deleting A Network Interface
“Changing the cluster interface” (page 89). To delete a network interface, use the following command: ibrix_nic -d -n IFNAME -h HOSTLIST The following command deletes interface eth3 from file serving nodes s1.hp.com and s2.hp.com: ibrix_nic -d -n eth3 -h s1.hp.com,s2.hp.com Viewing network interface information Executing the ibrix_nic command with no arguments lists all interfaces on all file serving nodes. -
Page 91: 1 Migrating To An Agile Fusion Manager Configuration
/tmp/X9720/ibrix. If this directory no longer exists, download the installation code from the HP support website for your storage system. IMPORTANT: The migration procedure can be used only on clusters running HP X9000 File Serving Software 5.4 or later. Backing up the configuration... - Page 92 For example: [root@x109s1 ~]# ibrix_fm -c 172.16.3.1 -d bond0:1 -n 255.255.248.0 -v cluster -I 172.16.3.100 Command succeeded! The original cluster IP address is now configured to the newly created cluster VIF device (bond0:1). If you created the interface bond1:0 in step 3, now set up the user network VIF, specifying the user VIF IP address and VIF device used in step 3.
-
Page 93: Testing Failover And Failback Of The Agile Fusion Manager
For example: [root@x109s1 ~]# ibrix_fm -f NAME IP ADDRESS ------ ---------- X109s1 172.16.3.100 Command succeeded! Install a passive agile Fusion Manager on a second file serving node. In the command, the -F option forces the overwrite of the new_lvm2_uuid file that was installed with the X9000 software. -
Page 94: Converting The Original Management Console Node To A File Serving Node Hosting The Agile Fusion Manager
On the node hosting the active Fusion Manager, place the Fusion Manager into maintenance mode. This step fails over the active Fusion Manager role to the node currently hosting the passive agile Fusion Manager. <ibrixhome>/bin/ibrix_fm –m maintenance Wait approximately 60 seconds for the failover to complete, and then run the following command on the node that was hosting the passive agile Fusion Manager: <ibrixhome>/bin/ibrix_fm -i The command should report that the agile Fusion Manager is now Active on this node. -
Page 95: 12 Upgrading The X9000 Software To The 6.1 Release
12 Upgrading the X9000 software to the 6.1 release This chapter describes how to upgrade to the latest X9000 File Serving Software release. The Fusion Manager and all file serving nodes must be upgraded to the new release at the same time. Note the following: Upgrades to the X9000 software 6.1 release are supported for systems currently running X9000 software 5.6.x and 6.0.x. -
Page 96: Performing The Upgrade
./auto_online_ibrixupgrade Upgrade Linux X9000 clients. See “Upgrading Linux X9000 clients” (page 99). If you received a new license from HP, install it as described in the “Licensing” chapter in this guide. After the upgrade Complete these steps: Start any Remote Replication, Rebalancer, or data tiering tasks that were stopped before the upgrade. -
Page 97: Offline Upgrades For X9000 Software 5.6.X Or 6.0.X To 6.1
To upgrade a file system, use the upgrade60.sh utility, as described in the HP IBRIX X9000 Network Storage System CLI Reference Guide. Offline upgrades for X9000 software 5.6.x or 6.0.x to 6.1 Preparing for the upgrade To prepare for the upgrade, complete the following steps: Ensure that all nodes are up and running. -
Page 98: Performing The Upgrade
Server, the Fusion Manager is installed in passive mode on that server. Upgrade Linux X9000 clients. See “Upgrading Linux X9000 clients” (page 99). If you received a new license from HP, install it as described in the “Licensing” chapter in this guide. After the upgrade Complete the following steps:... -
Page 99: Upgrading Linux X9000 Clients
-t -S "ignore_writethru=1" The SMB signing feature specifies whether clients must support SMB signing to access CIFS shares. See the HP IBRIX X9000 Network Storage System File System User Guide for more information about this feature. Whenignore_writethru is enabled, X9000 software ignores writethru buffering to improve CIFS write performance on some user applications that request Mount file systems on Linux X9000 clients. -
Page 100: Installing A Minor Kernel Update On Linux Clients
/etc/init.d/ibrix_client status IBRIX Filesystem Drivers loaded IBRIX IAD Server (pid 3208) running... The IAD service should be running, as shown in the previous sample output. If it is not, contact HP Support. Installing a minor kernel update on Linux clients The X9000 client software is upgraded automatically when you install a compatible Linux minor kernel update. - Page 101 When using the utility, you should be aware of the following: The file system must be unmounted. Segments marked as BAD are not upgraded. The upgrade takes place in parallel across all file serving nodes owning segments in the file system, with at least one thread running on each node.
-
Page 102: Troubleshooting Upgrade Issues
The -n option lists needed conversions but does not attempt them. The -v option provides more information. Troubleshooting upgrade issues If the upgrade does not complete successfully, check the following items. For additional assistance, contact HP Support. Automatic upgrade Check the following: If the initial execution of /usr/local/ibrix/setup/upgrade fails, check /usr/local/ibrix/setup/upgrade.log for errors. -
Page 103: Offline Upgrade Fails Because Ilo Firmware Is Out Of Date
Offline upgrade fails because iLO firmware is out of date If the iLO2 firmware is out of date on a node, the auto_ibrixupgrade script will fail. The /usr/ local/ibrix/setup/logs/auto_ibrixupgrade.log reports the failure and describes how to update the firmware. After updating the firmware, run the following command on the node to complete the X9000 software upgrade: /root/ibrix/ibrix/ibrixupgrade -f Node is not registered with the cluster network... -
Page 104: Moving The Fusion Manager Vif To Bond1
Run the following commands: chkconfig ibrix_server off chkconfig ibrix_ndmp off chkconfig ibrix_fusionmanager off Reboot all servers. Run the following commands to move the services back to the on state. The commands do not start the services. chkconfig ibrix_server on chkconfig ibrix_ndmp on chkconfig ibrix_fusionmanager on Unmount the file systems and continue with the upgrade procedure. - Page 105 Reboot the file serving nodes. After you have completed the procedure, if the Fusion Manager is not failing over or the /usr/ local/ibrix/log/Iad.log file reports errors communicating to port 1234 or 9009, contact HP Support for further assistance. Troubleshooting upgrade issues 105...
-
Page 106: 13 Upgrading The X9000 Software To The 5.6 Release
GUI or use the ibrix_health command. To upgrade all nodes in the cluster automatically, complete the following steps: Check the dashboard on the management console GUI to verify that all nodes are up. Obtain the latest release image from the HP kiosk at http://www.software.hp.com/kiosk (you will need your HP-provided login credentials). -
Page 107: Manual Upgrades
The manual upgrade process requires external storage that will be used to save the cluster configuration. Each server must be able to access this media directly, not through a network, as the network configuration is part of the saved configuration. HP recommends that you use a USB stick or DVD. -
Page 108: Performing The Upgrade
Save the <hostname>_cluser_config.tgz file, which is located in /tmp, to the external storage media. Performing the upgrade Complete the following steps on each node: Obtain the latest Quick Restore image from the HP kiosk at http://www.software.hp.com/ kiosk (you will need your HP-provided login credentials). -
Page 109: Troubleshooting Upgrade Issues
For an agile configuration, on all nodes hosting the passive management console, return the management console to passive mode: <ibrixhome>/bin/ibrix_fm -m passive If you received a new license from HP, install it as described in the “Licensing” chapter in this document. Troubleshooting upgrade issues If the upgrade does not complete successfully, check the following items. -
Page 110: Manual Upgrade
Manual upgrade Check the following: If the restore script fails, check /usr/local/ibrix/setup/logs/restore.log for details. If configuration restore fails, look at /usr/local/ibrix/autocfg/logs/appliance.log to determine which feature restore failed. Look at the specific feature log file under /usr/ local/ibrix/setup/logs/ for more detailed information. To retry the copy of configuration, use the command appropriate for your server: ◦... -
Page 111: 14 Upgrading The X9000 Software To The 5.5 Release
14 Upgrading the X9000 software to the 5.5 release This chapter describes how to upgrade to the X9000 File Serving Software 5.5 release. The management console and all file serving nodes must be upgraded to the new release at the same time. -
Page 112: Manual Upgrades
Manual upgrades Upgrade paths There are two manual upgrade paths: a standard upgrade and an agile upgrade. The standard upgrade is used on clusters having a dedicated Management Server machine or blade running the management console software. The agile upgrade is used on clusters having an agile management console configuration, where the management console software is installed in an active/passive configuration on two cluster nodes. - Page 113 IBRIX IAD Server (pid 23368) running... Verify that the ibrix and ipfs services are running: lsmod|grep ibrix ibrix 2323332 0 (unused) lsmod|grep ipfs ipfs1 102592 0 (unused) If either grep command returns empty, contact HP Support. Manual upgrades 1 13...
-
Page 114: Standard Offline Upgrade
The installation is successful when all version indicators match. If you followed all instructions and the version indicators do not match, contact HP Support. Propagate a new segment map for the cluster: <ibrixhome>/bin/ibrix_dbck -I -f FSNAME Verify the health of the cluster: <ibrixhome>/bin/ibrix_health -l... - Page 115 /etc/init.d/ibrix_server status The output should be similar to the following example. If the IAD service is not running on your system, contact HP Support. IBRIX Filesystem Drivers loaded ibrcud is running.. pid 23325 IBRIX IAD Server (pid 23368) running...
-
Page 116: Agile Upgrade For Clusters With An Agile Management Console Configuration
2323332 0 (unused) lsmod|grep ipfs ipfs1 102592 0 (unused) If either grep command returns empty, contact HP Support. From the management console, verify that the new version of X9000 Software FS/IAS has been installed on the file serving nodes: <ibrixhome>/bin/ibrix_version -l –S... - Page 117 On the node hosting the active management console, force a backup of the management console configuration: <ibrixhome>/bin/ibrix_fm -B The output is stored at /usr/local/ibrix/tmp/fmbackup.zip. Be sure to save this file in a location outside of the cluster. On the active management console node, disable automated failover on all file serving nodes: <ibrixhome>/bin/ibrix_server -m -U Verify that automated failover is off: <ibrixhome>/bin/ibrix_server -l...
- Page 118 Change to the installer directory if necessary and run the upgrade: ./ibrixupgrade -f The installer upgrades both the management console software and the file serving node software on this node. Verify the status of the management console: /etc/init.d/ibrix_fusionmanager status The status command confirms whether the correct services are running. Output will be similar to the following: Fusion Manager Daemon (pid 18748) running...
- Page 119 2323332 0 (unused) lsmod|grep ipfs ipfs1 102592 0 (unused) If either grep command returns empty, contact HP Support. From the management console, verify that the new version of X9000 Software FS/IAS has been installed on the file serving node: <ibrixhome>/bin/ibrix_version -l –S...
-
Page 120: Agile Offline Upgrade
The installation is successful when all version indicators match. If you followed all instructions and the version indicators do not match, contact HP Support. Propagate a new segment map for the cluster: <ibrixhome>/bin/ibrix_dbck -I -f FSNAME Verify the health of the cluster: <ibrixhome>/bin/ibrix_health -l... - Page 121 ps –ef | grep likewise Use kill -9 to kill any likewise services that are still running. Unmount all X9000 Software file systems: <ibrixhome>/bin/ibrix_umount -f <fsname> Upgrading the file serving nodes hosting the management console Complete the following steps: On the node hosting the active management console, force a backup of the management console configuration: <ibrixhome>/bin/ibrix_fm -B The output is stored at /usr/local/ibrix/tmp/fmbackup.zip.
- Page 122 2323332 0 (unused) lsmod|grep ipfs ipfs1 102592 0 (unused) If either grep command returns empty, contact HP Support. From the active management console node, verify that the new version of X9000 Software FS/IAS is installed on the file serving nodes: <ibrixhome>/bin/ibrix_version -l –S...
-
Page 123: Troubleshooting Upgrade Issues
If you followed all instructions and the version indicators do not match, contact HP Support. Verify the health of the cluster: <ibrixhome>/bin/ibrix_health -l The output should show Passed / on. Troubleshooting upgrade issues Automatic upgrade fails Check the upgrade.log file to determine the source of the failure. (The log file is located in the installer directory.) If it is not possible to perform the automatic upgrade, continue with the manual... -
Page 124: 15 Licensing
Fax the Password Request Form that came with your License Entitlement Certificate. See the certificate for fax numbers in your area. Call or email the HP Password Center. See the certificate for telephone numbers in your area or email addresses. -
Page 125: 16 Upgrading The System Hardware And Firmware
The X9720/X9730 system is shipped with the correct firmware and drivers. Do not upgrade firmware or drivers unless the upgrade is recommended by HP Support or is part of an X9720/X9730 patch provided on the HP web site. The patch release notes describe how to install the firmware. - Page 126 “Recovering the X9720/X9730 Network Storage System” (page 158) for more information. Set up fail over. For more information, see the HP IBRIX X9000 Network Storage System File System User Guide. Enable high availability (automated failover) by running the following command on server 1: # ibrix_server –m...
-
Page 127: Adding Capacity Blocks On X9720 Systems
Use two people to lift, move, and install the HP X9700c component. Use an appropriate lifting device to lift, move, and install the HP X9700cx component. Always extend only one component at a time. A cabinet could become unstable if more than one component is extended for any reason. -
Page 128: Where To Install The Capacity Blocks
In an expansion cabinet, you must add capacity blocks in the order shown in the following illustration. For example, when adding a fifth capacity block to your HP X9720 Network Storage System, the X9700c 5 component goes in slots U31 through 32 (see callout 4), and the X9700cx 5 goes in slots U1 through U5 (see callout 8). -
Page 129: Installation Procedure
1 X9700c 8 5 X9700cx 8 2 X9700c 7 6 X9700cx 7 3 X9700c 6 7 X9700cx 6 4 X9700c 5 8 X9700cx 5 Installation procedure Add the capacity blocks one at a time, until the system contains the maximum it can hold. The factory pre-provisions the additional capacity blocks with the standard LUN layout and capacity block settings (for example, rebuild priority). - Page 130 Insert the X9700c into the cabinet. Use the thumbscrews on the front of the chassis to secure it to the cabinet. Step 2—Install X9700cx in the cabinet WARNING! Do not remove the disk drives before inserting the X9700cx into the cabinet. The X9700cx is heavy;...
- Page 131 X9700c X9700cx primary I/O module (drawer 2) X9700cx secondary I/O module (drawer 2) X9700cx primary I/O module (drawer 1) X9700cx secondary I/O module (drawer 1) Step 4—Cable the X9700c to SAS switches Using the two 4-meter cables, cable the X9700c to the SAS switch ports in the c-Class Blade Enclosure, as shown in the following illustrations for cabling the base or expansion cabinet.
- Page 132 X9700c 2 X9700c 1 SAS switch ports 1 through 4 (in interconnect bay 3 of the c-Class Blade Enclosure). Ports 2 through 4 are used by additional capacity blocks. Reserved for expansion cabinet use. SAS switch ports 1 through 4 (in interconnect bay 4 of the c-Class Blade Enclosure). Ports 2 through 4 are used by additional capacity blocks.
- Page 133 Step 5—Connect the power cords WARNING! To reduce the risk of electric shock or damage to the equipment: Do not disable the power cord grounding plug. The grounding plug is an important safety feature. Plug the power cord into a grounded (earthed) electrical outlet that is easily accessible at all times.
-
Page 134: Enabling Monitoring For The New Storage
Run the ibrix_fs command to bind the segments and expand (or create) file systems. For more information about creating or extending file systems, see the HP IBRIX X9000 Network Storage System File System User Guide. Enabling monitoring for the new storage The X9720 system starts monitoring capacity blocks when the vendor storage is registered with X000 Software. -
Page 135: Removing Server Blades
6001438006E50B800506070830950007 X9720 Logical Unit CB: XX, LUN: 7: Removing server blades Before permanently removing a server blade, you will need to migrate the server's segments to other servers. See “Removing storage from the cluster” (page 83) for more information. Removing capacity blocks To delete an array: Delete any file systems that use the LUN. -
Page 136: 17 Troubleshooting
Ibrix Collect is a log collection utility that allows you collect relevant information for diagnosis by HP Support when system issues occur. The collection can be triggered manually using the GUI or CLI, or automatically during a system crash. Ibrix Collect gathers the following information:... -
Page 137: Deleting The Archive File
NOTE: HP recommends that you maintain your crash dumps in the /var/crash directory. Ibrix Collect processes the core dumps present in the /var/crash directory (linked to /local/ platform/crash) only. HP also recommends that you monitor this directory and remove unnecessary processed crashes. -
Page 138: Configuring Ibrix Collect
NOTE: You may later be asked to email this final zip file to HP Support. Be aware that the final zip file is not the same as the zip file that you receive in your email. -
Page 139: Viewing Data Collection Information
The X9720 Network Storage System escalate tool produces a report on the state of the system. When you report a problem to HP technical support, you will always be asked for an escalate report, so it saves time if you include the report up front. -
Page 140: Useful Utilities And Processes
It is normal for the escalate command to take a long time (over 20 minutes). When the escalate tool finishes, it generates a report and stores it in a file such as /exds_glory1_escalate.tgz.gz. Copy this file to another system and send it to HP Services. Useful utilities and processes... -
Page 141: Exds_Netdiag Utility
The exds_netdiag utility performs tests on and retrieves data from the networking components in an X9720 Network Storage System. It performs the following functions: Reports failed Ethernet Interconnects (failed as reported by the HP Blade Chassis Onboard Administrator) Reports missing, failed, or degraded site uplinks... -
Page 142: Accessing The Onboard Administrator
The test is run as follows: Copy the contents of /opt/hp/mxso/diags/netperf-2.1.p13 to an x86_64 client host. Copy the test scripts to one client from which you will be running the test. The scripts required are exds_netperf, diags_lib.bash, and nodes_lib.bash from the /opt/hp/mxso/... -
Page 143: Accessing The Oa Through The Serial Port
HP ProLiant Servers Troubleshooting Guide at http://www.hp.com/support/manuals. X9730 controller error messages If a controller does not power up during system boot, contact HP Support and provide the lockup code that appears on POST. POST error messages 143... - Page 144 The following table lists the lockup codes. The first character is the lockup type (C, H, or F). The second character is 1 or 2, depending on whether the controller considers itself to be a MASTER or SLAVE. The last two characters are the code. Lockup code Description Cn01...
- Page 145 Lockup code Description Fn67 SAS: JBOD hotplug not supported Fn68 SAS: target mode resources not allocated Fn69 SAS: too many initiators Fn70 Invalid firmware cloned Hn00 DMA operation failed Hn01 XOR diagnostics failed Hn02 Problem with the DMA hardware Hn10 Remote device, I/O space exceeded maximum Hn1 1 Exceeded total PCI address space...
-
Page 146: X9720 Lun Layout
2x 1 GB LUNs—These were used by the X9100 for membership partitions, and remain in the X9720 for backwards compatibility. Customers may use them as they see fit, but HP does not recommend their use for normal data storage, due to performance limitations. -
Page 147: Failure Indications
Failure indications A failed or halted X9700c controller is indicated in a number of ways as follows: On X9720 systems, the exds_stdiag report could indicate a failed or halted X9700c controller. An email alert. In the GUI, the logical volumes in the affected capacity black show a warning. The amber fault LED on the X9700c controller is flashing. - Page 148 For example, if the seven-segment display shows C1 02, then the fault may lie with one of the primary (top) I/O modules. Unmount all file systems using the GUI. For more information, see the HP IBRIX X9000 Network Storage System File System User Guide.
- Page 149 10. If the fault has not cleared at this stage, there could be a double fault (that is, failure of two I/O modules). Alternatively, one of the SAS cables could be faulty. Contact HP Support to Identifying failed I/O modules on an X9700cx chassis 149...
-
Page 150: Re-Seating An X9700C Controller
Run the exds_escalate command to generate an escalate report for use by HP Support as follows: # exds_escalate 1 1. At this stage, an X9700cx I/O module has been replaced. Change the firmware of the I/O... -
Page 151: Viewing Software Version Numbers
The file system and IAD/FS output fields should show matching version numbers unless you have installed special releases or patches. If the output fields show mismatched version numbers and you do not know of any reason for the mismatch, contact HP Support. A mismatch might affect the operation of your cluster. -
Page 152: Windows X9000 Clients
Automatic. Mode 1 or mode 6 bonding HP recommends the use of 10 Gbps networking and mode 1 bonding with the X9720 system. If 1 Gbps networking must be used, and network bandwidth appears to be a limiting factor even... -
Page 153: Onboard Administrator Is Unresponsive
Err: RPC call to host=wodao6 failed, error=-651, func=IDE_FSYNC_prepacked If you see these messages persistently, contact HP Services as soon as possible. The messages could indicate possible data loss and can cause I/O errors for applications that access X9000 file systems. -
Page 154: Apparent Failure Of Hp P700M
Apparent failure of HP P700m Sometimes when a server is booted, the HP P700m cannot access the SAS fabric. This is more common when a new blade has just been inserted into the blade chassis, but can occur on other occasions. -
Page 155: X9700C Enclosure Front Panel Fault Id Led Is Amber
Power on all enclosures. Wait until all sever-segment displays show "on" then power on all server blades. If the HP P700m still cannot access the fabric, replace it on affected server blades and run exds_stdiag again. X9700c enclosure front panel fault ID LED is amber If the X9700c enclosure fault ID LED is amber, check to see if the power supplies and controllers are amber. -
Page 156: Synchronizing Information On File Serving Nodes And The Configuration Database
To maintain access to a file system, file serving nodes must have current information about the file system. HP recommends that you execute ibrix_health on a regular basis to monitor the health of this information. If the information becomes outdated on a file serving node, execute ibrix_dbck -o to resynchronize the server’s information with the configuration database. - Page 157 ibrix_dbck -o -f FSNAME [-h HOSTLIST] To repair information on all file serving nodes, omit the -h HOSTLIST argument. Synchronizing information on file serving nodes and the configuration database 157...
-
Page 158: 18 Recovering The X9720/X9730 Network Storage System
Restart the blade to boot from the DVD. When the HP Network Storage System screen appears, enter qr to install the software. Use a USB key Copy the ISO to a Linux system. -
Page 159: Recovering An X9720 Or X9730 File Serving Node
Replacing a node requires less time.) IMPORTANT: HP recommends that you update the firmware before continuing with the installation. X9730 systems have been tested with specific firmware recipes. Continuing the installation without upgrading to a supported firmware recipe can result in a defective system. - Page 160 NOTE: If a management console is not located, the following screen appears. Select Enter FM IP and go to step 5. The Verify Hostname dialog box displays a hostname generated by the management console. Enter the correct hostname for this server. The Verify Configuration dialog box shows the configuration for this node.
- Page 161 On the System Date and Time dialog box, enter the system date (day/month/year) and time (24-hour format). Tab to the Time Zone field and press Enter to display a list of time zones. Select your time zone from the list. On the Server Networking Configuration dialog box, configure this server for bond0, the cluster network.
- Page 162 This step applies only to X9730 systems. If you are restoring a blade on an X9720 system, go to step 8. The X9730 blade being restored needs OA/VC information from the chassis. It can obtain this information directly from blade 1, or you can enter the OA/VC credentials manually. The wizard now checks and verifies the following: OA and VC firmware VC configuration...
- Page 163 Storage configuration Networking on the blade On the Join a Cluster – Step 2 dialog box, enter the requested information. NOTE: On the dialog box, Register IP is the Fusion Manager (management console) IP, not the IP you are registering for this blade. The Network Configuration dialog box lists the interfaces configured on the system.
- Page 164 The Configuration Summary dialog box lists the configuration you specified. Select Commit to apply the configuration. 10. Because the hostname you specified was previously registered with the management console, the following message appears. Select Yes to replace the existing server. 164 Recovering the X9720/X9730 Network Storage System...
-
Page 165: Completing The Restore
When the configuration is complete, a message reporting the location of the log files appears: Logs are available at /usr/local/ibrix/autocfg/logs. X9730 configuration logs are available at /var/log/hp/platform/install/ x9730_install.log. Completing the restore Ensure that you have root access to the node. - Page 166 For example: ibrix_nic -m -h titan16 -A titan15/eth2 Configure Insight Remote Support on the node. See “Configuring HP Insight Remote Support on X9000 systems” (page 23). Run ibrix_health -l from the node hosting the active Fusion Manager to verify that no errors are being reported.
-
Page 167: Troubleshooting
Push the original share information from the management console database to the restored node. On the node hosting the active management console, first create a temporary CIFS share: ibrix_cifs -a –f FSNAME –s SHARENAME -p SHAREPATH Then delete the temporary CIFS share: ibrix_cifs -d -s SHARENAME Run the following command to verify that the original share information is on the restored node:... -
Page 168: 19 Support And Other Resources
HP X9720 Network Storage System Controller User Guide (Describes how to install, administer, and troubleshoot the HP X9700c) On the Manuals page, select storage > NAS Systems > Ibrix Storage Systems > HP X9000 Network Storage Systems. Using and maintaining file serving nodes... -
Page 169: Hp Websites
Describes removal and replacement procedures. This document should be used only by persons qualified in servicing of computer equipment. On the Manuals page, click storage > Disk Storage Systems > HP 600 Modular Disk System. HP websites For additional information, see the following HP websites: http://www.hp.com/go/X9000... -
Page 170: 20 Documentation Feedback
20 Documentation feedback HP is committed to providing documentation that meets your needs. To help us improve the documentation, send any errors, suggestions, or comments to Documentation Feedback (docsfeedback@hp.com). Include the document title and part number, version number, or the URL when submitting your feedback. -
Page 171: A X9730 Component And Cabling Diagrams
A X9730 component and cabling diagrams Back view of the main rack Two X9730 CXs are located below the SAS switches; the remaining X9730 CXs are located above the SAS switches. The X9730 CXs are numbered starting from the bottom (for example, X9730 CX 1 is located at the bottom of the rack;... -
Page 172: Back View Of The Expansion Rack
Back view of the expansion rack 1. X9730 CX 8 2. X9730 CX 7 X9730 CX I/O modules and SAS port connectors 1. Secondary I/O module (Drawer 2) 2. SAS port 2 connector 3. SAS port 1 connector 4. Primary I/O module (Drawer 2) 5. -
Page 173: X9730 Cx 1 Connections To The Sas Switches
X9730 CX 1 connections to the SAS switches The connections to the SAS switches are: SAS port 1 connector on the primary I/O module (Drawer 1) to port 1 on the Bay 5 SAS switch SAS port 1 connector on the secondary I/O module (Drawer 1) to port 1 on the Bay 6 SAS switch SAS port 1 connector on the primary I/O module (Drawer2) to port 1 on the Bay 7 SAS switch SAS port 1 connector on the secondary I/O module (Drawer 2) to port 1 on the Bay 8 SAS... -
Page 174: X9730 Cx 2 Connections To The Sas Switches
X9730 CX 2 connections to the SAS switches On Drawer 1: SAS port 1 connector on the primary I/O module (Drawer 1) to port 2 on the Bay 5 SAS switch SAS port 1 connector on the secondary I/O module (Drawer 1) to port 2 on the Bay 6 SAS switch On Drawer 2: SAS port 1 connector on the primary I/O module (Drawer 2) to port 2 on the Bay 7 SAS... -
Page 175: X9730 Cx 3 Connections To The Sas Switches
X9730 CX 3 connections to the SAS switches On Drawer 1: SAS port 1 connector on the primary I/O module (Drawer 1) to port 3 on the Bay 5 SAS switch SAS port 1 connector on the secondary I/O module (Drawer 1) to port 3 on the Bay 6 SAS switch On Drawer 2: SAS port 1 connector on the primary I/O module (Drawer 2) to port 3 on the Bay 7 SAS... -
Page 176: X9730 Cx 7 Connections To The Sas Switches In The Expansion Rack
X9730 CX 7 connections to the SAS switches in the expansion rack On Drawer 1: SAS port 1 connector on the primary I/O module (Drawer 1) to port 7 on the Bay 5 SAS switch SAS port 1 connector on the secondary I/O module (Drawer 1) to port 7 on the Bay 6 SAS switch On Drawer 2: SAS port 1 connector on the primary I/O module (Drawer 2) to port 7 on the Bay 7 SAS... -
Page 177: B X9730 Spare Parts List
SPS-BD, LCD PASS THRU 519348-001 SPS-UPS R/T3KVA 2U DTC HV INTL G2 638842-001 SPS-MODULE ENET BLc VC FLEX 10 688896-001 HP IBRIX X9730 140 TB MLStorage 2xBL Performance Module (QZ730A) Description Spare part number SPS-CA,EXT MINI SAS, 2M 408767-001 SPS-FAN, SYSTEM... -
Page 178: Hp Ibrix X9730 210 Tb Ml Storage 2Xbl Performance Module (Qz731A)
Description Spare part number SPS-HEATSINK VC 624787-001 SPS-DRV HD 2TB 7.2K EVA FATA M6412 FC 637981-001 HP IBRIX X9730 210 TB ML Storage 2xBL Performance Module (QZ731A) Description Spare part number SPS-CA,EXT MINI SAS, 2M 408767-001 SPS-FAN, SYSTEM 413996-001 SPS-PLASTICS/HARDWARE... -
Page 179: (Qz733A)
SPS-DRV, HD 146G SAS 2.5 SP 10K 453138-001 SPS-BD,MEM,MOD,256MB,40B 462974-001 SPS-PROC WSM 2.4 80W E5620 594887-001 SPS-DIMM 4GB PC3 10600R 512MX4 595424-001 SPS-BD PCA HP FBWC 1G CL5 598414-001 SPS-BD SYSTEM I/O G7 605659-001 SPS-BD SMART ARRAY CTRL IDP1 8/8 MEZZ 615360-001 SPS-PLASTICS/HARDWARE MISC 619821-001... -
Page 180: C X9720 Component And Cabling Diagrams
C X9720 component and cabling diagrams Base and expansion cabinets A minimum X9720 Network Storage System base cabinet has from 3 to 16 performance blocks (that is, server blades) and from 1 to 4 capacity blocks. An expansion cabinet can support up to four more capacity blocks, bringing the system to eight capacity blocks. -
Page 181: Back View Of A Base Cabinet With One Capacity Block
Back view of a base cabinet with one capacity block 1. Management switch 2 2. Management switch 1 3. X9700c 1 4. TFT monitor and keyboard 5. c-Class Blade enclosure 6. X9700cx 1 Base and expansion cabinets... -
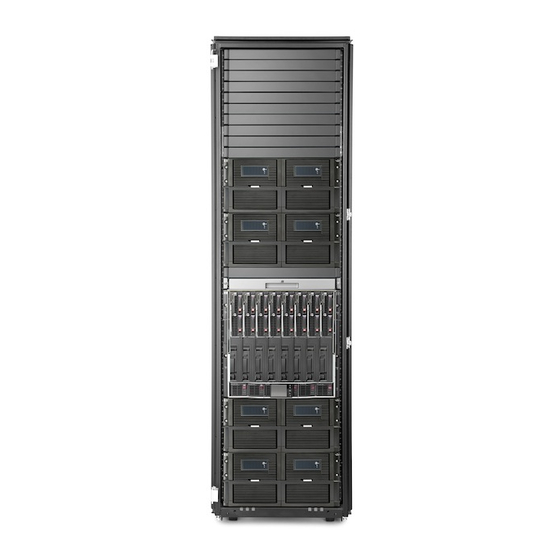
Page 182: Front View Of A Full Base Cabinet
Front view of a full base cabinet 1 X9700c 4 6 X9700cx 3 2 X9700c 3 7 TFT monitor and keyboard 3 X9700c 2 8 c-Class Blade Enclosure 4 X9700c 1 9 X9700cx 2 5 X9700cx 4 10 X9700cx 1 182 X9720 component and cabling diagrams... -
Page 183: Back View Of A Full Base Cabinet
Back view of a full base cabinet 1 Management switch 2 7 X9700cx 4 2 Management switch 1 8 X9700cx 3 3 X9700c 4 9 TFT monitor and keyboard 4 X9700c 3 10 c-Class Blade Enclosure 5 X9700c 2 1 1 X9700cx 2 6 X9700c 1 12 X9700cx 1 Base and expansion cabinets 183... -
Page 184: Front View Of An Expansion Cabinet
Front view of an expansion cabinet The optional X9700 expansion cabinet can contain from one to four capacity blocks. The following diagram shows a front view of an expansion cabinet with four capacity blocks. 1. X9700c 8 5. X9700cx 8 2. -
Page 185: Back View Of An Expansion Cabinet With Four Capacity Blocks
Back view of an expansion cabinet with four capacity blocks 1. X9700c 8 5. X9700cx 8 2. X9700c 7 6. X9700cx 7 3. X9700c 6 7. X9700cx 6 4. X9700c 5 8. X9700cx 5 Performance blocks (c-Class Blade enclosure) A performance block is a special server blade for the X9720. Server blades are numbered according to their bay number in the blade enclosure. -
Page 186: Rear View Of A C-Class Blade Enclosure
Rear view of a c-Class Blade enclosure 1. Interconnect bay 1 (Virtual Connect Flex- 1 0 6. Interconnect bay 6 (reserved for future use) 10 Ethernet Module) 2. Interconnect bay 2 (Virtual Connect Flex- 1 0 7. Interconnect bay 7 (reserved for future use) 10 Ethernet Module) 3. -
Page 187: Capacity Blocks
Ethernet module cabling—Base cabinet” (page 190). If you connect several ports to the same switch in your site network, all ports must use the same media type. In addition, HP recommends you use 10 links. The X9720 Network Storage System uses mode 1 (active/backup) for network bonds. No other bonding mode is supported. -
Page 188: X9700C (Array Controller With 12 Disk Drives)
This component is also known as the HP 600 Modular Disk System. For an explanation of the LEDs and buttons on this component, see the HP 600 Modular Disk System User Guide at http://www.hp.com/support/manuals. Under Storage click Disk Storage Systems, then under Disk Enclosures click HP 600 Modular Disk System. -
Page 189: Front View Of An X9700Cx
Front view of an X9700cx 1. Drawer 1 2. Drawer 2 Rear view of an X9700cx 1. Power supply 5. In SAS port 2. Primary I/O module drawer 2 6. Secondary I/O module drawer 1 3. Primary I/O module drawer 1 7. -
Page 190: Virtual Connect Flex- 1 0 Ethernet Module Cabling-Base Cabinet
X9700c X9700cx primary I/O module (drawer 2) X9700cx secondary I/O module (drawer 2) X9700cx primary I/O module (drawer 1) X9700cx secondary I/O module (drawer 1) Virtual Connect Flex- 1 0 Ethernet module cabling—Base cabinet Site network Onboard Administrator Available uplink port Management switch 2 Bay 5 (reserved for future use) Management switch 1... -
Page 191: Sas Switch Cabling-Base Cabinet
SAS switch cabling—Base cabinet NOTE: Callouts 1 through 3 indicate additional X9700c components. X9700c 4 X9700c 3 X9700c 2 X9700c 1 SAS switch ports 1through 4 (in interconnect bay 3 of the c-Class Blade Enclosure). Ports 2 through 4 are reserved for additional capacity blocks. - Page 192 X9700c 8 SAS switch ports 1 through 4 (in interconnect bay 3 of the c-Class Blade Enclosure). Used by base cabinet. X9700c 7 SAS switch ports 5 through 8 (in interconnect bay 3 of the c-Class Blade Enclosure). X9700c 6 SAS switch ports 1 through 4 (in interconnect bay 4 of the c-Class Blade Enclosure).
-
Page 193: D X9720 Spare Parts List
Spare parts are categorized as follows: Mandatory. Parts for which customer self repair is mandatory. If you ask HP to replace these parts, you will be charged for the travel and labor costs of this service. Optional. Parts for which customer self repair is optional. These parts are also designed for customer self-repair. -
Page 194: X9700 Server Chassis (Aw549A)
451792-001 Optional SPS-BD,BATTERY 462976-001 Mandatory CHARGER,MOD,4/V700HT SPS-BD,MEM,MOD,256MB,40B 462974-001 Mandatory SPS-BD,RAID CNTRL,SAS 484823-001 Optional SPS-DRV,HD, 493083-001 Mandatory 300,SAS,10K,2.5",DP,HP SPS-DIMM,4 501535-001 Mandatory PC3-8500R,128MX8,ROHS SPS-HEATSINK, BD 508955-001 Optional SPS-MISC CABLE KIT 51 1789-001 Mandatory SPS-PLASTICS/HARDWARE, MISC 531223-001 Mandatory 194 X9720 spare parts list... -
Page 195: X9700 82Tb Capacity Block (X9700C And X9700Cx) (Aq551A)
Description Spare part number Customer self repair SPS-BACKPLANE, HDD, SAS 531225-001 Mandatory SPS-CAGE, HDD, W/BEZEL 531228-001 Mandatory X9700 82TB Capacity Block (X9700c and X9700cx) (AQ551A) Note the following: The X9700c midplane is used for communication between controllers. There are 2x backplanes in the X9700c. Description Spare part number Customer self repair... -
Page 196: X9700 164Tb Capacity Block (X9700C And X9700Cx) (Aw598B)
X9700 164TB Capacity Block (X9700c and X9700cx) (AW598B) Note the following: The X9700c midplane is used for communication between controllers. There are 2x backplanes in the X9700c. Description Spare part number Customer self repair SPS-PLASTICS KIT 314455-001 Mandatory SPS-RAIL KIT 383663-001 Mandatory SPS-BD,DIMM,DDR2,MOD,512MB... - Page 197 Description Spare part number Customer self repair SPS-DRV,HD,2 TB,7.2K,DP SAS,3.5” 508010-001 Mandatory M6412C DISK ENCLOSURE 530834-001 SPS-CHASSIS (X9700c) 530929-001 Optional ACCESS PANEL 531224-001 Mandatory X9700 164TB Capacity Block (X9700c and X9700cx) (AW598B) 197...
-
Page 198: E Warnings And Precautions
Use conductive field service tools. Use a portable field service kit with a folding static-dissipating work mat. If you do not have any of the suggested equipment for proper grounding, have an HP-authorized reseller install the part. NOTE: For more information on static electricity or assistance with product installation, contact your HP-authorized reseller. -
Page 199: Equipment Symbols
Equipment symbols If the following symbols are located on equipment, hazardous conditions could exist. WARNING! Any enclosed surface or area of the equipment marked with these symbols indicates the presence of electrical shock hazards. Enclosed area contains no operator serviceable parts. To reduce the risk of injury from electrical shock hazards, do not open this enclosure. -
Page 200: Device Warnings And Precautions
WARNING! To reduce the risk of personal injury or damage to the equipment: Observe local occupational safety requirements and guidelines for heavy equipment handling. Obtain adequate assistance to lift and stabilize the product during installation or removal. Extend the leveling jacks to the floor. Rest the full weight of the rack on the leveling jacks. - Page 201 WARNING! To reduce the risk of personal injury or damage to the equipment, the installation of non-hot-pluggable components should be performed only by individuals who are qualified in servicing computer equipment, knowledgeable about the procedures and precautions, and trained to deal with products capable of producing hazardous energy levels. WARNING! To reduce the risk of personal injury or damage to the equipment, observe local occupational health and safety requirements and guidelines for manually handling material.
-
Page 202: F Regulatory Compliance Notices
The regulatory model number is not the marketing name or model number of the product. Product specific information: HP ________________ Regulatory model number: _____________ FCC and CISPR classification: _____________ These products contain laser components. -
Page 203: Modification
This compliance is indicated by the following conformity marking placed on the product: This marking is valid for non-Telecom products and EU harmonized Telecom products (e.g., Bluetooth). Certificates can be obtained from http://www.hp.com/go/certificates. Hewlett-Packard GmbH, HQ-TRE, Herrenberger Strasse 140, 71034 Boeblingen, Germany Canadian notice (Avis Canadien) 203... -
Page 204: Japanese Notices
Japanese notices Japanese VCCI-A notice Japanese VCCI-B notice Japanese VCCI marking Japanese power cord statement Korean notices Class A equipment Class B equipment 204 Regulatory compliance notices... -
Page 205: Taiwanese Notices
Do not try to open the module enclosure. There are no user-serviceable components inside. Do not operate controls, make adjustments, or perform procedures to the laser device other than those specified herein. Allow only HP Authorized Service technicians to repair the unit. Taiwanese notices 205... -
Page 206: Dutch Laser Notice
The Center for Devices and Radiological Health (CDRH) of the U.S. Food and Drug Administration implemented regulations for laser products on August 2, 1976. These regulations apply to laser products manufactured from August 1, 1976. Compliance is mandatory for products marketed in the United States. -
Page 207: Italian Laser Notice
Italian laser notice Japanese laser notice Spanish laser notice Laser compliance notices 207... -
Page 208: Recycling Notices
Recycling notices English recycling notice Disposal of waste equipment by users in private household in the European Union This symbol means do not dispose of your product with your other household waste. Instead, you should protect human health and the environment by handing over your waste equipment to a designated collection point for the recycling of waste electrical and electronic equipment. -
Page 209: Estonian Recycling Notice
Estonian recycling notice Äravisatavate seadmete likvideerimine Euroopa Liidu eramajapidamistes See märk näitab, et seadet ei tohi visata olmeprügi hulka. Inimeste tervise ja keskkonna säästmise nimel tuleb äravisatav toode tuua elektriliste ja elektrooniliste seadmete käitlemisega egelevasse kogumispunkti. Küsimuste korral pöörduge kohaliku prügikäitlusettevõtte poole. Finnish recycling notice Kotitalousjätteiden hävittäminen Euroopan unionin alueella Tämä... -
Page 210: Italian Recycling Notice
Italian recycling notice Smaltimento di apparecchiature usate da parte di utenti privati nell'Unione Europea Questo simbolo avvisa di non smaltire il prodotto con i normali rifi uti domestici. Rispettare la salute umana e l'ambiente conferendo l'apparecchiatura dismessa a un centro di raccolta designato per il riciclo di apparecchiature elettroniche ed elettriche. -
Page 211: Romanian Recycling Notice
Romanian recycling notice Casarea echipamentului uzat de către utilizatorii casnici din Uniunea Europeană Acest simbol înseamnă să nu se arunce produsul cu alte deşeuri menajere. În schimb, trebuie să protejaţi sănătatea umană şi mediul predând echipamentul uzat la un punct de colectare desemnat pentru reciclarea echipamentelor electrice şi electronice uzate. -
Page 212: Battery Replacement Notices
Battery replacement notices Dutch battery notice French battery notice Regulatory compliance notices... -
Page 213: German Battery Notice
German battery notice Italian battery notice Battery replacement notices... -
Page 214: Japanese Battery Notice
Japanese battery notice Spanish battery notice Regulatory compliance notices... -
Page 215: Glossary
Domain name system. File Transfer Protocol. Global service indicator. High availability. Host bus adapter. Host channel adapter. Hard disk drive. HP X9000 Software Administrative Daemon. Integrated Lights-Out. Initial microcode load. IOPS I/Os per second. IPMI Intelligent Platform Management Interface. JBOD Just a bunch of disks. - Page 216 Transmission Control Protocol/Internet Protocol. User Datagram Protocol. Unit identification. SNMP User Security Model. VACM SNMP View Access Control Model. HP Virtual Connect. Virtual interface. WINS Windows Internet Naming Service. World Wide Name. A unique identifier assigned to a Fibre Channel device. WWNN World wide node name.
-
Page 217: Index
X9720, prefer a user network interface, contacting HP, recover, controller error messages, X9730, remove from cluster, rolling reboot, run health check, Disposal of waste equipment, European Union, start or stop processes,... - Page 218 Linux X9000 clients, upgrade, symbols on equipment, loading rack, warning, HBAs localization, display information, log files, monitor for high availability, collect for HP Support, health check reports, logging in, help LUN layout, X9720, obtaining, High Availability agile Fusion Manager, management console...
- Page 219 GUI password, upgrade, Phone Home, storage, monitor, ports, open, storage, remove from cluster, POST error messages, Subscriber's Choice, HP, power failure, system recovery, symbols on equipment, system recovery, QuickRestoreDVD, system startup after power failure, rack stability technical support...
- Page 220 HP Subscriber's Choice for Business, weight, warning, Windows X9000 clients, upgrade, X9000 clients add to hostgroup, change IP address, identify a user network interface, migrate segments, monitor status,...