Table of Contents
Advertisement
Available languages
Available languages
Quick Links
Download this manual
See also:
Manual
Advertisement
Table of Contents

Related Manuals for Atlantis Land A01-PU3


Summary of Contents for Atlantis Land A01-PU3
- Page 2 For more detailed instructions on configuring and using this device, please refer to the online manual. FRANCAIS Ce produit est couvert par une garantie Atlantis Land de 2 ans. Pour des informations plus détaillées, référez-vous svp au site Web www.atlantis-land.com. DEUTSCH Dieses Produkt ist durch die Atlantis Land 2 Jahre Garantie gedeckt.
-
Page 3: Table Of Contents
ITALIANO 1. Panoramica ......................7 2. Contenuto della confezione ................. 7 3. Caratteristiche tecniche ..................7 4. Requisiti minimi di sistema .................. 8 5. Visione d’insieme ....................8 6. Installazione hardware del dispositivo ..............10 7. Installazione software del dispositivo ..............11 7.1 Windows 7 .................. - Page 4 7. Installation des Pilotes sous Windows ..............31 7.1 Windows XP/2000 ..................31 7.2 Windows Vista ................... 32 7.3 Windows 7 ....................33 7.4 Windows 98SE / ME ................... 33 8. Supprimer les drivers et l’utilitaire ..............34 9. Support ......................36 A01-PU3(v1.2)_GX01 (v1.1 Nov 2009)
- Page 5 Atlantis Land che non si assume responsabilità per qualsiasi errore o inesattezza che possa apparire in questo manuale. Nessuna parte di questa pubblicazione può essere riprodotta o trasmessa in...
- Page 6 Dichiarazione di Conformità Con la presente dichiariamo che questo apparato è conforme alla direttiva 5/99/CE. La conformità del prodotto è data dall’utilizzo delle norme armonizzate: EN 55022 EN 61000-3-2 EN 61000-3-3 EN60950:2004 EN 55024 IEC 61000-4-2 (1995) IEC 61000-4-3 (1995) ...
-
Page 7: Panoramica
1. Panoramica Atlantis Land Web Runner USB è il prodotto ideale per accedere in maniera semplice e funzionale alla rete PSTN. Il Web Runner USB è facile da installare e semplice da configurare, grazie al supporto Hot Plug’n’Play per i sistemi operativi più diffusi. Il supporto del nuovo protocollo V.92 rende il WebRunner USB lo strumento ideale per... -
Page 8: Requisiti Minimi Di Sistema
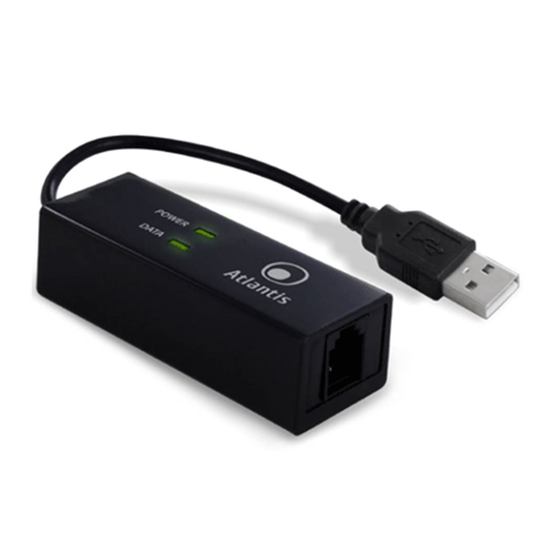
4. Requisiti minimi di sistema Verificare di avere a disposizione tutto il necessario per eseguire l’installazione del WebRunner USB. E’ necessario disporre di: Un PC con un connettore USB libero e controller USB correttamente installato Microsoft Windows 98SE, ME,2000, XP, Vista o 7. ... - Page 9 DATA Spento Nessuna attività Acceso Il modem sta inviando/ricevendo dati Collegare alla porta USB del PC LINE Utilizzare cavo RJ11 fornito connessione alla linea telefonica...
-
Page 10: Installazione Hardware Del Dispositivo
6. Installazione hardware del dispositivo Collegare una estremità del cavo USB nella rispettiva porta USB del PC. A questo punto il Sistema Operativo rileverà un nuovo dispositivo e chiederà come procedere per l’installazione dei driver. Bloccare quindi l’installazione manuale cliccando su Annulla. Passare dunque all’installazione dei driver a seconda del Sistema Operativo utilizzato (si veda il paragrafo seguente). -
Page 11: Installazione Software Del Dispositivo
<CDROM>:\A01- PU3\Driver\<OSVer>\SETUP.EXE. Cliccare “A01-PU3”” per accedere alla pagina relativa al prodotto. Selezionare il sistema operativo utilizzato per avviare il programma di installazione del dispositivo. Per lanciare direttamente i driver/utility, una volta inserito il CD nell’apposito lettore, lanciare il setup (CDRom:\A01- PU3\Driver\Sistema Operativo\setup.exe). -
Page 12: Windows Vista
Compilare i campi richiesti ed infine cliccare su Connetti. In caso di problemi verificare quanto segue: Cliccare su Start -> Pannello di Controllo -> Centro Connessione di rete e Condivisione -> Modifica Impostazione Scheda, evidenziare la Conessione Remota creata e cliccare il tasto destro e scegliere proprietà. Qui verificare nel TAB Generale che il modem sia Conexant USB CX93010 ACF Modem. -
Page 13: Windows 2000
Compilare i campi richiesti ed infine cliccare su Connetti. 7.4 Windows 2000 Cliccare su Start -> Pannello di Controllo -> Reti e connessioni remote. Cliccare su Crea nuova connessione. Selezionare Connessione ad Internet e cliccare su Avanti. Selezionare Imposta connessione manualmente infine Connessione tramite linea telefonica o modem. -
Page 14: Rimozione Del Software
Nella videata che apparirà, verranno visualizzate le risposte che il modem avrà dato (con tutti i relativi comandi AT e le impostazioni della porta seriale cui il WebRunner USB è collegato). Nel caso la videata risulti vuota, oppure il programma di diagnostica non riesca a individuare o dialogare col modem, rimuovere la periferica e ripetere l’installazione da capo. -
Page 15: Supporto Offerto
10. Supporto Offerto Per qualunque altro problema o dubbio sul funzionamento del prodotto, è possibile contattare il servizio di assistenza tecnica Atlantis Land tramite l’apertura di un ticket on-line sul portale http://supporto.atlantis-land.com. Nel caso non fosse possibile l’accesso al portale di supporto, è altresì possibile richiedere assistenza telefonica al numero 02/00632345. - Page 16 Windows™ 98SE/2000/ME/XP/VISTA are trademarks of Microsoft® Corp. Pentium is trademark of Intel. All copyright reserved. The Atlantis Land logo is a registered trademark of Atlantis Land. All other names mentioned mat be trademarks or registered trademarks of their respective owners.
- Page 17 Declaration of Conformity Hereby We declare that this product is in compliance with the essential requirements and other relevant provisions of Directive “Electromagnetic Compatibility” and 99/5/CE within CE Marking Requirememnt. After assessment, the equipment has been found to comply with the following standards: EN 55022 EN 61000-3-2...
-
Page 18: Overview Of Webrunner Usb
1. Overview of WebRunner USB Hassle-free installation for instant fastspeed connection, the WebRunner USB modem delivers unparalleled high speed, reliable performance and guarantees uninterrupted 56K connections. Powered packed with advanced features, it satisfies all your communication and telephony requirements. Installed in seconds, you do not require any external power supply and it offers USB Plug &... -
Page 19: Hardware Requirements
Data Compression V.44/V.42 bis/MNP 5 No external power supply is required Hot Plug and Play 98/98SE/ME/2000/XP/Vista Fax Group 3, Class 1 (14.400 bps) V.80/H.324 P Error Correction V.42/MNP 2-4 4. Hardware Requirements Make sure that you have all you need to install the WebRunner USB. You should have the following: ... -
Page 20: Device Design
5. Device Design Label Status Description POWER No power is supplied to the device Steady light Power is detected DATA No activity Steady light Data is being transmitted/received Used for connecting to the computer LINE Used for connecting to the telephone line via telephone cable... -
Page 21: Hardware Installation
6. Hardware Installation The WebRunner USB Modem is a Plug’n’Play device. You may connect your modem to your computer anytime without having to power down your system. Connect as follow and your Windows will immediately detect the new hardware and prompt for its driver. Connect one end of the telephone extension cable to the LINE jack on Modem and the other end to your Telephone Wall Socket. -
Page 22: Installing Your Modem Driver
D:\ will depends on where the CD-ROM drive is located and <Windows OS> will depend on the Windows OS you are using. Click on “A01-PU3” icon to select WebRunner USB. Select the current OS that you are using on th PC. Follow the install wizard instructions to complete the installation. - Page 23 exclamation mark besides Conexant UCM92 Data Fax RTAM USB Modem, it means that your driver is not installed successfully. Right-click on the device and then uninstall the modem. Restart the system and then install your modem driver again. In order for the Quick Connect and V.44 features to work, your ISP must support the V.92 protocol.
-
Page 24: Uninstalling The Webrunner Usb
For technical questions and support, please contact our help-desk by ticket on http://www.atlantis-land.com/ita/supporto.php. For generic informations, please send an e-mail to info@atlantis-land.com For presales informations, please send an e-mail to prevendite@atlantis-land.com. Atlantis Land Via Pelizza da Volpedo, 59 20092 Cinisello Balsamo (MI) - Italy Tel: +39. 02.00.632.300 Fax: +39. 02.66.016.666 Website: http://www.atlantis-land.com... - Page 25 Copyright Copyright . 2002 est la propriété de cette société. Tous droits réservés. Sont interdites, la reproduction, la transmission, la transcription, la mémorisation dans un système de sauvegarde où la traduction dans une autre langue ou en langage informatique quels qu’ils soient, de la présente publication, sous quelque forme que ce soit ou quel qu’en soit le moyen, électronique, mécanique, magnétique, optique, chimique, manuel ou de tout autre genre, sans avoir obtenu au préalable le consentement de notre entreprise.
- Page 26 Déclaration de Conformité Nous déclarons que cet appareil a été testé et est conforme à la Directive 99/5/CE du Parlement européen et du Conseil concernant les équipements hertziens et les équipements de terminaux de télécommunications et la reconnaissance mutuelle de leur conformité.
-
Page 27: Panorama
1. Panorama Félicitations pour votre choix, ce modem données/fax comporte les innovations les plus récentes du haut débit RTC, des innovations qui rendent la communication plus rapide et plus simple. Le guide de démarrage rapide contient les informations d’installation et d’utilisation du modem pour profiter au maximum de ses fonctionnalités. -
Page 28: Besoins Système
Chip: Conexant™ Connexion par port USB V1.1 (12Mbps) Installation/désinstallation à chaud (hotswap), Hot Plug&Play Fax haute vitesse : envoi et réception jusqu'à 14400 bps Systèmes d’exploitation: Windows 98 / Me / 2000 / XP et Vista ... -
Page 29: Device Design
5. Device Design Label Status Signification POWER Le WebRunner n’est pas actif Allumée Le WebRunner est actif DATA La connexion n’est pas active Allumée Données en cours de transfert Pour la connexion au port USB de l’ordinateur LINE Connexion à la prise téléphonique avec le câble RJ11 fourni... -
Page 30: Installation Hardware
6. Installation Hardware Connectez le câble USB du modem à un port USB de votre ordinateur. Dès que vous connectez le modem au port USB de l’ordinateur, une nouvelle fenêtre apparaîtra. Cliquez sur Annuler. Raccordez le câble téléphonique (fourni) sur votre ligne téléphonique. -
Page 31: Installation Des Pilotes Sous Windows
Insérer le CD dans le lecteur de CDRom, Pour lancer les Pilotes/Utilitaire directement, une fois le CD inséré dans le lecteur CDRom, cliquer sur l'icône setup (CDRom:\A01-PU3\Driver\SO\setup.exe). Suivez maintenant la procédure d’installation jusqu’à la fin puis Il faut créer la connexion Internet. -
Page 32: Windows Vista
Dès que vous connectez le modem au port USB de l’ordinateur, une nouvelle fenêtre apparaîtra (Nouveau matériel détécté). Cliquez sur Annuler. Pour lancer les Pilotes/Utilitaire directement, une fois le CD inséré dans le lecteur CDRom, cliquer sur l'icône setup (CDRom:\A01-PU3\Driver\WinVISTA\setup.exe). Cliquer sur Continuer (dans Un programme a besoin de votre autorisation pour continuer). -
Page 33: Windows 7
USB modem au port USB de l’ordinateur, une nouvelle fenêtre apparaît. Cliquez sur Annuler . Pour lancer les Pilotes/Utilitaire directement, une fois le CD inséré dans le lecteur CDRom, cliquer sur l'icône setup (CDRom:\A01-PU3\Driver\Win98SE\setup.exe ou CDRom:\A01-PU3\Driver\WinME\setup.exe). Suivez maintenant la procédure d’installation jusqu’à la fin. -
Page 34: Supprimer Les Drivers Et L'utilitaire
Win98 : Double-cliquez sur l'icône Poste de travail situé sur le bureau. Ensuite double-cliquez sur Accès réseau à distance. Double-cliquez sur Nouvelle connexion dans la fenêtre Accès réseau à distance. Dans la prochaine fenêtre, dans le champ Entrez un nom pour l'ordinateur appelé, entrez le nom de votre choix. - Page 35 Cliquez sur le bouton Modifier/Supprimer (Désinstaller/Modifier). Le programme d'installation supprimera les pilotes du modem. Cela peut prendre quelques minutes. Débranchez les câbles du modem pour terminer...
-
Page 36: Support
9. Support Pour tous problèmes ou renseignements vous pouvez contacter le service d’assistence web d’Atlantis Land http://www.atlantis-land.com/ita/supporto.php. Pour avoir info vous pouvez contacter info@atlantis-land.com prevendite@atlantis-land.com. Atlantis Land Via Pelizza da Volpedo, 59 20092 Cinisello Balsamo (MI) - Italy Tel: +39. 02.00.632.300 Fax: +39. - Page 37 Via Pelizza da Volpedo, 59 Cinisello Balsamo – MI – Italy info@atlantis-land.com...