Carrier Infinity SYSTXCCITN01-A Owner's Manual
Touch control
Hide thumbs
Also See for Infinity SYSTXCCITN01-A:
- Owner's manual (68 pages) ,
- Installation instructions manual (100 pages)
Table of Contents
Advertisement
Quick Links
SYSTXCCITW01 ---A, SYSTXCCITN01 ---A
& SYSTXCCITC01 ---A
Infinityr Touch Control
Owner's Manual
NOTE: Read the entire instruction manual before starting the installation.
The features and functions outlined in this Owner's Manual reflect Version 13
software. See the Downloads section of www.MyInfinityTouch.Carrier.com for the
latest software release and literature.
US Patents: Carrierr U.S. Pat No. 7,243,004, Carrierr U.S. Pat No. 7,775,452,
pointSETt U.S. Pat No. 7,415,102
Advertisement
Table of Contents

Related Manuals for Carrier Infinity SYSTXCCITN01-A


Summary of Contents for Carrier Infinity SYSTXCCITN01-A
- Page 1 NOTE: Read the entire instruction manual before starting the installation. The features and functions outlined in this Owner’s Manual reflect Version 13 software. See the Downloads section of www.MyInfinityTouch.Carrier.com for the latest software release and literature. US Patents: Carrierr U.S. Pat No. 7,243,004, Carrierr U.S. Pat No. 7,775,452,...
-
Page 3: Table Of Contents
TABLE OF CONTENTS PAGE INTRODUCTION ..........HOME SCREEN . - Page 4 TABLE OF CONTENTS (cont.) PAGE Home Fresh Air Control ........Away Humidity Control .
- Page 5 TABLE OF CONTENTS (cont.) PAGE ENERGY TRACKING ......... TIME / DATE .
- Page 6 TABLE OF CONTENTS (cont.) PAGE WEATHER ..........UTILITY DEMAND EVENT RESPONSE SETUP .
-
Page 7: Introduction
INTRODUCTION CONGRATULATIONS! Your decision to choose the InfinityR Touch Control puts you in a select group of homeowners who understand the value of precise comfort control and appreciate the simplicity of an easy- - to- - use, intuitive, control. Your new Infinity Touch Control offers high quality comfort technology. Please take a few moments to carefully read through this manual. -
Page 8: Wi- - Fi Connectivity
Wi- -Fi Connectivity Status A13258 ® With the SYSTXCCITW01- - A and SYSTXCCITC01- - A Infinity Touch Wi- - Fi models, connectivity status to the home Wi- - Fi network and MyInfinity Server is displayed in the top right hand corner of the Home Screen. When the Infinity Touch control is connected to the home Wi- - Fi network and the MyInfinity Server, the signal strength bars will be displayed in white as depicted in the image above. - Page 9 Connection strength to the home Wi- - Fi network will continue to be displayed by the number of solid bars. If this problem persists, please contact 1- - 800- - Carrier for assistance. Strong Connection Limited Connection...
-
Page 10: Information Buttons
Pressing on the Connectivity Status bars from the Home Screen will allow you to view the Remote Access Status screen. A13262 Information Buttons On the bottom of some screens will be an information icon. By pressing the information icon, a text box will display to show what interactions are available on that particular screen. -
Page 11: Main Screen
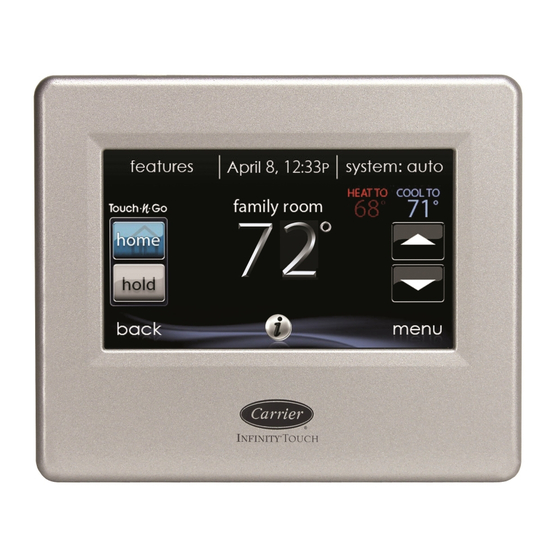
MAIN SCREEN The main screen is where most interactions will take place. Touch anywhere on the Home screen to arrive at the main screen. System Mode Once in the main screen, To access your system mode touch the MODE label located in the upper right of the control. -
Page 12: Adjust Temperature (Temporary Hold)
Set Day and Time To set the day and time for your home screen enter the main screen by touching anywhere on the control. Touch the DAY and TIME label located at the top middle of the screen or access by going through the menu screen (see Pg. 32). To set the HOUR, MINUTE, MONTH, DAY, or YEAR touch the fea- ture you wish to change. -
Page 13: Adjusting Heating
Adjusting Heating To adjust the heating temperature, enter the main screen by touching anywhere on the control. With the system in either AUTO or HEAT mode, use the Up (Y) and Down (B) buttons to set the desired temperature. On the left hand side of the screen, the comfort profile will switch to manual, and the system will be placed in a temporary hold. -
Page 14: Adjusting Comfort Profiles
Adjusting Comfort Profiles (See Comfort Profiles on Pg. 11) To adjust the comfort activity, enter the main screen by touching any- where on the control. ® Touch the activity under the Touch ’N’ Go feature on the left side of the screen;... - Page 15 To return to the scheduled program, touch HOLD, and then touch PER SCHEDULE. NOTE: For Multi- - Zone Applications (Temporary and Permanent Hold options) ® For added convenience in a multi- - zone application, the Touch ’N’ Go feature will also allow you select the desired activity of HOME or AWAY for ALL ZONES.
-
Page 16: Features
Selecting the HOLD UNTIL option will allow you to temporarily override your programmed schedule. Once selected, use the Up (Y) and Down (B) buttons to change the time in 15 minute increments. When the correct time interval is displayed, touch DONE. FEATURES Adjust Fan Speed The Features function of Infinity Touch Control allows you to adjust the fan speed... -
Page 17: Menu Screen
MENU SCREEN Your menu screen offers more features and control for your Infinity Touch Control. Touch the menu button at the bottom right of the main screen. COMFORT PROFILES You will need to set the comfort profiles before you attempt to program your new Infinity Touch Control. - Page 18 A14241 For example to change your HOME comfort profile, touch the HOME icon. Use the Up (Y) and Down (B) buttons to change the fan settings, heating and cooling temperatures. When you are done, press the DONE button on the bottom right. Do the same thing to change the WAKE and SLEEP profiles.
-
Page 19: Home Humidity Control
A14242 Home Comfort Profile Humidity Control Touch WHEN AT HOME to set your humidity settings while the home is occupied to enjoy superior comfort. A14243 If you have a humidifier installed for your system, touch HEATING HUMIDITY to set the desired humidity level within the home. You will have the option to turn ON or OFF your humidifier from this screen. -
Page 20: Home Fresh Air Control
A14244 Once your Humidifier is turned ON, use the Up (Y) and Down (B) buttons to set the desired humidity level between 5- - 45%. Press SAVE when finished, or CANCEL to discard any changes. Next, select your desired humidity level during cooling by touching COOLING HUMIDITY. - Page 21 Home Comfort Profile Fresh Air Control If a ventilator is installed in your home, select the amount of fresh air to circulate during heating mode by touching Heating Fresh Air. NOTE: This option may not be available with the ERVXXNVA ventilator due to its simplified control design.
-
Page 22: Away Humidity Control
If applicable, next select the amount of fresh air to circulate during cool- ing mode by touching COOLING FRESH AIR. Again, you will have the option of choosing among AUTO, MANUAL and OFF. Use the Up (Y) and Down (B) buttons to set the desired ventilator speed level. -
Page 23: Away Fresh Air Control
To set the desired humidity level during cooling, touch COOLING HUMIDITY. Use the Up (Y) and Down (B) buttons to set the maximum dehu- midification level at NONE or between 55- - 65%. Touch YES or NO for the system to over- - cool the conditioned space by up to 3_ F to remove as much humidity out of the air as possible. -
Page 24: Vacation Humidity Control
Press SAVE when finished, or CANCEL to discard any changes. If applicable, select the amount of fresh air to circulate during cooling mode by touching COOLING FRESH AIR. Again, you will have the option of choosing among AUTO, MANUAL and OFF. Use the Up (Y) and Down (B) buttons to set the desired ventilator speed level. -
Page 25: Vacation Fresh Air Control
To set the desired humidity level during cooling, touch COOLING HUMIDITY. Use the Up (Y) and Down (B) buttons to set the maximum dehu- midification level at NONE or between 55- - 65%. Touch YES or NO for the system to over- - cool the conditioned space by up to 3_ F to remove as much humidity out of the air as possible. -
Page 26: Schedules
Use the Up (Y) and Down (B) buttons to set the desired ventilator speed level. Press SAVE when finished, or CANCEL to discard any changes. SCHEDULES Program your Infinity Touch Control by selecting the SCHEDULES icon. You may select to use the guided scheduling feature, view or edit your schedule or upload your schedule from a USB drive. -
Page 27: Guided Scheduling
To change the desired activity touch the ACTIVITY icon then select the desired activity (WAKE, HOME, AWAY or SLEEP buttons).When finished touch SAVE. For Zoned Systems To set a specific room, use the Left (A) and Right (") buttons beside the zone name. If you wish to copy this schedule to a different zone, touch COPY above the zone name. - Page 28 4. The next question will ask if someone is home all day. Simply touch YES or NO to answer this question. If you select NO, the next question will ask what time you leave the home. Use the Up (Y) and Down (B) buttons to set the time you leave. After you have selected the correct time, touch NEXT to continue.
-
Page 29: Upload My Schedule
Infinity Touch Control. To download the MyInfinity application for your computer, sign into the MyInfinity website at www.MyInfinityTouch.Carrier.com. Click on the Downloads tab. Click on the Adobe Air download link and install Adobe Air onto your computer. -
Page 30: Vacation
Once that is complete, safely remove the USB device from the com- puter. Install the USB device into the USB port on the bottom of the Infinity Touch Control. On the Infinity Touch Control, select Schedules from the Menu screen, then select the Upload Schedule from USB Drive option. -
Page 31: Reminders
Use the Up (Y) and Down (B) buttons to set the time and date of when plan to return from your vacation; then touch NEXT. The system won’t allow you to select a vacation end time that would result in a vacation duration of less than one day. -
Page 32: Operating Status
You have the option of choosing a pop- - up reminder for your air filter, humidifier, UV lights, or ventilator pre- - filter. NOTE: This option may not be available with the ERVXXNVA ventilator due to its simplified control design. To enable a reminder, touch YES. -
Page 33: Temperature Control Status
To return to the previous menu, press CANCEL. A12108 Temperature Control Status The Temperature Control Status allows you to take a quick look at the actual temperatures, and temperature set points for each zone in your system. When you are done looking at your zone status, press DONE. The system will indicate which mode is running by showing an arrow, which points to either the heating or cooling set point. -
Page 34: Display
DISPLAY The following display preferences can be adjusted for Infinity Touch Control, Temperature Units (°F or °C), Backlight Levels, Sound Settings and Screen Saver Settings. A14256 Temperature Units Select the desired temperature units, either °F for Fahrenheit, or °C for Celsius and touch SAVE. -
Page 35: Sound Settings
Use the Up (Y) and Down (B) buttons to set/change the brightness of back lighting. Brightness levels include OFF or 1- - 10. NOTE: After 30 seconds of inactivity on the touch screen, the backlight level will be set back to the current selected level which may be OFF. A14258 Sound Settings To allow a buzzer to sound on each touch of the screen, touch ENABLE;... -
Page 36: Screen Saver Settings
Screen Saver Settings To allow a photo to act as a screen saver, touch ENABLE; otherwise, touch DISABLE. A14260 Touch Screen Calibration If you experience any problems with touch position accuracy, Touch Screen Calibration can be performed by following the on- - screen prompts. A14261... -
Page 37: Energy Tracking
ENERGY TRACKING The Infinity Touch Control has the ability to monitor and estimate the energy consumption of certain models of your Infinity System. For systems where energy tracking is not available, the menu icon will be shown in gray color, and this section does not apply. -
Page 38: Time / Date
A12113 TIME / DATE The TIME/DATE icon allows you to set the time and date for the Infinity Touch Control. A14250 Set Time and Date The time and date can either be set manually or can be synchronized with the web server (only for Wi- - Fi enabled units). -
Page 39: Setup Daylight Savings Time
To set the HOUR, MINUTE, MONTH, DAY, or YEAR, touch the feature you wish to change. A14251 Use the Up (Y) and Down (B) buttons to make the appropriate changes. When you have completed all of the settings touch SAVE. Setup Daylight Savings Time You can program your Infinity Touch Control to automatically adjust for daylight saving time. -
Page 40: Setup Time Zone
Setup Time Zone The time zone can be selected by selecting the setup time zone from the menu. Then select the time zone for the location. Time zones for both US and Canada are included. A14217 Enable Time Synchronization ® For systems with Wi- - Fi capability, after setting up the time zone, the time synchronization can then be done. -
Page 41: Service
Your dealer information is easily accessible and may already be pre- - programmed in your Control by your dealer. Select the SERVICE INFORMATION option. Either your dealer’s contact information or the Carrier Service number, 1- - 800- - Carrier, will appear. -
Page 42: Service Reminder Update
A13251 Software Update Carrier will periodically issue software updates for the Infinity Touch control. For the Wi- - Fi models, SYSTXCCITC01- - A and SYSTXCCITW01- - A, updates will download automatically through your Wi- - Fi connection, allowing you to install them at your convenience. -
Page 43: Updating Software Using Usb
Updating Software Using USB When software updates are available, they will be posted to on the downloads page of the MyInfinity website, www.MyInfinityTouch.Carrier.com/Infinity/Downloads. NOTE: You will obtain best results using a USB drive that is 2GB, 4GB or 8GB in size. - Page 44 Highlight the TSTAT folder in the WinZip window by clicking on the folder icon ONCE to highlight the proper folder to be downloaded to the USB drive. Then click on EXTRACT. Choose the USB memory device root directory as the location to extract the folder from the zip file.
-
Page 45: Updating Software Using Wi- -Fi
NOTE: wall control must registered www.MyInfinityTouch.Carrier.com consumer website before updated software can ® be downloaded via the Wi- - Fi and Internet connection. When software updates are available, this reminder message will be displayed on the home screen of the Wi- - Fi models, only. -
Page 46: Model / Serial Numbers
A150194 Selecting YES will initiate the software update process. Your Infinity Touch control will reboot in order to complete the software update process. All of your previously stored information and settings will be maintained. NOTE: Select DETAILS to view the release notes associated with the software to be downloaded. -
Page 47: Photo Upload
A12122 Use the PC application to upload the photo on the control and save it to a standard USB drive. Go to https://www.MyInfinityTouch.Carrier.com and select the Infinity Touch Control and click the downloads tab to download the MyInfinity computer Desktop application for either PC or MAC. -
Page 48: Heatsource (If Applicable)
Touch the upload photo icon on the menu screen on the Infinity Touch Control. Place the USB drive into the USB port on the bottom of the Infinity Touch Control when prompted. The control will automatically upload the photo. Once complete, you will receive a confirmation that your photo is loaded. -
Page 49: Zone Names (If Applicable)
ZONE NAMES (IF APPLICABLE) With the Infinity Touch Control, you have the ability to customize zone names. Select the ZONE NAMES icon from the menu screen. A12156 Touch the zone in which you choose to change the name. Choose between selecting a COMMON NAME or CREATE A CUS- TOM NAME. -
Page 50: Screen Lock
SCREEN LOCK The screen may be locked by selecting the SCREEN LOCK icon from the menu screen. A13246 A message will pop up asking if you want to proceed with the screen lock. Selecting Yes will lock the screen and take you back to the home screen. -
Page 51: Wireless
Point (SYSTXXXGWR01) or any other compatible wireless router can be installed to establish Wi- - Fi connectivity. Please call 1- - 800- - CARRIER for support with Wi- - Fi set- - up and connection to the MyInfinity Server. ®... - Page 52 MyInfinity web server, with, and the availability of, the user’s Internet service provider or mobile device carrier service, or that the ability to remotely access and adjust the settings of the Infinity Touch Control will not be negatively affected by the network- related modifications, upgrades, or similar activity of the user’s...
- Page 53 A13235 On the next screen look for the SSID of the router/access point. After being selected, it will be outlined in faint blue and will be indicated by a checkmark. Then select NEXT. A150175 The selected network will show. Choose an appropriate Wi- - Fi security. Usually auto- - detect will correctly identify the type of security used.
- Page 54 A150191 If a Wi- - Fi security key is shown as on the right hand picture above then select the white bar and enter the security key, then select NEXT. Touch in the security key area, and the keyboard will appear. Use the on screen keyboard to enter the Wi- - Fi security key, then touch NEXT.
- Page 55 After the control has connected to the network, go to www.MyInfinityTouch.Carrier.com to register the unit and begin remote access. This requires the MAC address and serial number of the Infini- ® Touch Wall Control. To find the serial number and MAC address of ®...
- Page 56 A150190 Select the WIRELESS from the menu screen Make sure the Wi- - Fi connection is enabled, by touching ENABLED. Touch SETUP A WI- - FI CONNECTION to begin the process. Next, touch SCAN FOR AVAILABLE ACCESS POINTS. A12115 Select the myHVACxxxxxx connection from the list, then touch NEXT (myHVAC is followed by the last 6 digits of your Wireless Access Point’s MAC address;...
- Page 57 SSID & Security Key A12357 You may have to use the down arrow to scan to the next screen to find “myHVACxxxxxx”. A150175 Use the on screen keyboard to enter the Wi- - Fi security key, then touch NEXT. Touch in the security key area, and the keyboard will appear. The security key can be found on the back of the TP- - LINK Wire- less Access Point.
- Page 58 A12118 After your control has connected to the network, go to www.MyInfinityTouch.Carrier.com to register the unit and begin remote access. This requires the MAC address and serial number of the Infin- ityR Touch Wall Control, NOT the Wireless Access Point. To find the serial number and MAC address of the Infinity Touch Wall Control, click on Menu, Down Arrow, Wireless and View My Infinityr Info.
-
Page 59: Wi- - Fi Diagnostics
screen will provide the information needed on the MyInfinityr website during registration. If you have any issues, please contact your servicing dealer. When the connection to the MyInfinity web server has been established, the status screen will show Connected for both Wi- - Fi and the server. TP- - LINK is a trademark of TP- - LINK Technologies Co., Ltd. -
Page 60: Weather
WEATHER When the Infinity Touch Control is connected to a Wi- - Fir network, use the WEATHER icon to retrieve the weather forecast based your postal code. A150193 To enter your postal code, touch CHANGE CURRENT LOCATION. Next, select your country (United States or Canada). To enter your postal code, touch in the blank area;... -
Page 61: Utility Demand Event Response Setup
UTILITY DEMAND EVENT RESPONSE SETUP This section is only applicable if your utility company is running a demand response or price response program in which you have agreed to participate. Contact your local electrical utility company for information about programs in your area. -
Page 62: Price Response
type of event, the adjustment to the heating and cooling set points, the time the event will end, an accept button, and an override button. Pressing the accept button will accept the adjustments made to the heat- ing and cooling set points. Pressing the override button will change the heating and cooling set points back to their original values prior to the event. -
Page 63: Demand Response
A14264 Demand Response Demand response determines how the heating and cooling set points will be adjusted during a demand response event with two choices - - offsets or absolute temperature. When offsets are selected, the heating and cooling set points are adjusted by the number of degrees selected. -
Page 64: Demand Settings
Demand settings When a demand response is received from the utility company, the heating and cooling set points will be adjusted according to the absolute temperature or offset shown here. If the set point at the time of the event is more favorable (uses less energy) than what you have programmed, the Infinity Touch Control Thermostat will use the more favorable set point for the duration of the event. -
Page 65: Restore Ue Factory Default Settings
Restore UE Factory Default Settings Restore UE (Utility Event) factory default settings will restore all utility event set points and price settings to their original factory default values. A14268... - Page 66 NOTES...
- Page 68 Wi- - Fi is a registered trademark of Wi- - Fi Alliance Corporation. Version 13 Software Release Copyright 2015 Carrier Corp. S 7310 W. Morris St. S Indianapolis, IN 46231 Edition Date: 06/15 997-011290-8-R Catalog No: OMSYSTXCCITW---08...