Table of Contents
Advertisement
Available languages
Available languages
User Manual
Guide de l'utilisateur
SelfSet
Clock Radio with Dual Alarm
™
Radio- réveil SelfSet
avec double alarme
™
EAAC601
Thank you for your purchase of this Electrohome product. Please read this instruction manual carefully
before using product to ensure proper use. Keep this manual in a safe place for future reference.
Merci d'avoir fait l'achat de cet appareil Electrohome. Veuillez lire le présent guide attentivement avant
de faire fonctionner l'appareil pour vous assurer de l'utiliser correctement. Conservez le présent guide
dans un endroit sûr afin de pouvoir vous y référer au besoin.
electrohome.com/support
Advertisement
Chapters
Table of Contents

Related Manuals for Electrohome EAAC601


Summary of Contents for Electrohome EAAC601
- Page 1 ™ EAAC601 Thank you for your purchase of this Electrohome product. Please read this instruction manual carefully before using product to ensure proper use. Keep this manual in a safe place for future reference. Merci d’avoir fait l’achat de cet appareil Electrohome. Veuillez lire le présent guide attentivement avant de faire fonctionner l’appareil pour vous assurer de l’utiliser correctement.
-
Page 2: Important Safety Information
IMPORTANT SAFETY INFORMATION RETAIN THIS MANUAL FOR FUTURE REFERENCE 1. Read these instructions. 2. Keep these instructions. 3. Read all warnings. 4. Follow all instructions. 5. Do not use this product near water. 6. Clean only with a dry cloth. 7. -
Page 3: Table Of Contents
Dimmer .......................... 10 Temperature Settings ....................11 Listening to the Radio ....................11 To Set the Radio Presets ....................11 To Recall the Radio Presets..................12 Projection Unit ......................12 AUX In ..........................12 ELECTROHOME WARRANTY ..............13 ® TROUBLESHOOTING ................15 SPECIFICATIONS ..................15 CARE AND MAINTENANCE ..............16 WARNINGS ....................17... -
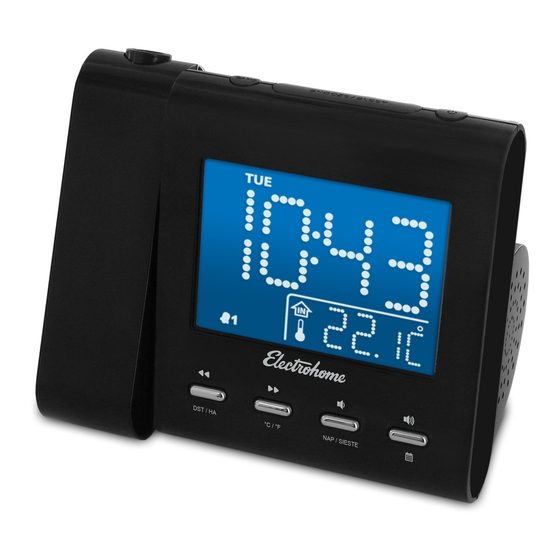
Page 4: Product Information
PRODUCT INFORMATION DST / HA °C / °F NAP / SIESTE TIME ZONE / FUS HOR SET / SNOOZE / SLEEP RÉGL MIN SOM / SOMNO MEM / M+ DIMMER / GRADATEUR AM / FM... - Page 5 1. Month Indicator 16. Volume Down / Nap 2. Daylight Savings Time ‘on’ Indicator 17. Volume Up / Calendar 3. Year Indicator 18. Projection Unit 4. PM Indicator 19. Set / Memory 5. Time Zone Selection ‘on’ Indicator 20. Time Zone / Snooze / Sleep / Dimmer 6.
-
Page 6: Operating Instructions
OPERATING INSTRUCTIONS Connecting Power The SelfSet Clock Radio is equipped with an "auto time set" feature. When ™ power is connected, the clock display will flash '2' which is TIME ZONE 2 (Eastern time) and the default TIME ZONE setting. To select TIME ZONE 2 (Eastern time) as your default time zone: •... -
Page 7: Daylight Saving Time (Dst) / Summer Time
• Batteries must be installed by an adult. • Use only the recommended size and type of battery specified. • Please be sure to follow the correct polarity when installing the battery in the battery compartment. A reversed battery may cause damage to the alarm clock. -
Page 8: Setting The Date & Time
• The timing of Automatic DST/Summer Time employed by the unit (see above) is subjected to variations by region and the law in each country/region. In such a case, cancel the Automatic DST/Summer Time adjustment. • If you live in a country/region that has not introduced Daylight Saving Time/Summer Time, you must cancel Automatic DST/Summer Time adjustment before using the unit. - Page 9 NOTE: When selecting 1-1, you must select a specific day as follows: 1=Monday 5=Friday 2=Tuesday 6=Saturday 3=Wednesday 7=Sunday 4=Thursday 5. Press the buttons to toggle between the ALARM MODE settings then press the button to confirm your selection; if 1-1 is selected, press the buttons to toggle between the days of the week and press the...
-
Page 10: Snooze Function
Snooze Function • When an alarm is sounding, press the button to stop the alarm for 9 minutes. Alarm will resume after 9 minutes. • Pressing the button on the top of the unit will cancel the snooze function; Snooze function will also stop automatically after 30 minutes. Sleep Timer The sleep timer allows you to listen to music for a preset amount of time ranging from 90 minutes to 15 minutes. -
Page 11: Temperature Settings
Temperature Settings The temperature can be displayed in °C or °F. 1. With the radio off, press and hold the button to switch between °C or °F modes. Listening to the Radio 1. Press the button on the top panel to turn the radio 'ON'. 2. -
Page 12: To Recall The Radio Presets
To Recall the Radio Presets 1. Press the button on the front panel to turn the radio ‘ON’. 2. Press the button to select a preset. The current preset number will appear on the display. Press the button again to cycle through all radio presets. -
Page 13: Electrohome Warranty
Electrohome product or the loss of information. The purchaser will be responsible for any removal, reinstallation, transportation and insurance costs incurred. Correction of... - Page 14 NEED HELP? DO NOT RETURN THIS PRODUCT TO THE STORE Please contact an ELECTROHOME customer support representative first regarding any additional information on product features, specifications or assistance with setup. Please contact us via one of the methods below: Support: electrohome.com/support...
-
Page 15: Troubleshooting
TROUBLESHOOTING If you experience a problem with this unit, check the chart below before calling for service. SYMPTOM POSSIBLE CAUSE POSSIBLE SOLUTION GENERAL Power does not come on AC cord not plugged in Insert plug firmly into AC outlet RADIO Power is not on Press power to turn the radio on No sound... -
Page 16: Care And Maintenance
CARE AND MAINTENANCE PRECAUTIONS: 1. Always turn off the unit after use. 2. Keep the unit away from magnetic objects, water or heat sources. 3. Use a clean soft cloth moistened with lukewarm water to clean the cabinet. Never use chemical cleaners that could damage the finish of the unit. -
Page 17: Warnings
WARNINGS WARNING To reduce the risk of fire or electric shock, do not expose this appliance to rain or moisture. CAUTION Use of controls or adjustments or performance of procedures other than those specified may result in hazardous radiation exposure. ATTENTION RISK OF ELECTRIC SHOCK DO NOT OPEN... - Page 18 1. No naked flame sources, such as lighted candles, should be placed on the apparatus. 2. Do not place the product in closed bookcases or racks without proper ventilation. 3. The mains plug is used as the disconnect device, the disconnect device shall remain readily operable. 4.
- Page 19 NOTES...
-
Page 20: Informations Importantes Sur La Sécurité
INFORMATIONS IMPORTANTES SUR LA SÉCURITÉ CONSERVEZ CE GUIDE POUR RÉFÉRENCE FUTURE 1. Lire ces instructions. 2. Conserver ces instructions. 3. Respecter tous les avertissements. 4. Observer toutes les instructions. 5. Ne pas utiliser cet appareil près de l’eau. 6. Utiliser uniquement un chiffon sec pour le nettoyage. 7. - Page 21 Écouter la radio ......................29 Pour régler les stations programmées ..............30 Pour rappeler les stations programmées .............30 Unité de projection ....................31 Entrée AUX ........................31 GARANTIE ELECTROHOME ............... 32 ® DÉPANNAGE ..................... 34 SPECIFICATIONS ..................35 ENTRETIEN ET MAINTENANCE ............35...
-
Page 22: Renseignements Sur Le Produit
RENSEIGNEMENTS SUR LE PRODUIT DST / HA °C / °F NAP / SIESTE TIME ZONE / FUS HOR SET / SNOOZE / SLEEP RÉGL MIN SOM / SOMNO MEM / M+ DIMMER / GRADATEUR AM / FM... - Page 23 1. Indicateur du mois 17. Augmentation du volume / Calendrier 2. Indicateur de l’heure d’été « ON » (activée) 18. Unité de projection 3. Indicateur de l’année 19. Réglage / Mémoire 4. Indicateur p.m. 20. Fuseau horaire / Rappel de sonnerie / Arrêt différé...
-
Page 24: Mode D'emploi
MODE D’EMPLOI Raccordement électrique Le radio-réveil SelfSetMC est doté d’une fonction de “réglage automatique de l’heure”. Lorsque l’alimentation est connectée, l’affichage de l’horloge clignote “2”qui représente le FUSEAU HORAIRE 2 (heure de l’Est) et le réglage du fuseau horaire par défaut. Pour choisir le FUSEAU HORAIRE 2 (heure de l’Est) comme fuseau horaire par défaut: •... -
Page 25: Installation De La Pile
Installation de la pile 1. À l’aide d’un petit tournevis cruciforme, desserrez la vis du couvercle du compartiment de la pile situé au bas de l’appareil. 2. Retirez le couvercle du compartiment de la pile. 3. Retirez la pile et s’en débarrasser en suivant les normes appropriées puis remplacez avec une pile pile lithium-ion plate 3V de modèle CR2032 neuve. -
Page 26: Annulation/Réactivation Automatique De L'ha/L'heure D'été
• L’heure normale commence à 2 h du matin le premier dimanche du mois de novembre. Annulation/réactivation automatique de l’HA/l’heure d’été 1. Pour annuler l’HA/l’heure d’été, appuyez et maintenez le bouton enfoncé pendant 3 secondes alors que la radio est éteinte. 2. - Page 27 1. Appuyez sur les boutons pour augmenter et diminuer l’HEURE; appuyez sur le bouton pour confirmer l’HEURE. Les MINUTES se mettront à clignoter. 2. Appuyez sur les boutons pour augmenter et diminuer les MINUTES; appuyez sur le bouton pour confirmer les MINUTES. Les modes de l’alarme se mettront à...
-
Page 28: Fonction De Rappel De Sonnerie
• Appuyez et maintenez enfoncé les boutons pour passer rapidement à travers les paramètres. • Pour annuler une alarme lorsqu’elle retentit, appuyez sur le bouton • Si une alarme n’est pas annulée, elle retentira pendant 30 minutes, puis s’éteindra automatiquement. Il reprendra à la même heure établie pour l’alarme au prochain jour prévu. -
Page 29: Intensité D'éclairage
2. Appuyez sur le bouton pour faire défiler les heures programmées: 90 min > 80 min > 70 min > 60 min > 50 min > 40 min > 30 min > 20 min > 10 min > OFF (FERMÉ) 3. -
Page 30: Pour Régler Les Stations Programmées
5. Réglez le volume de la radio avec les boutons 6. Appuyez sur le bouton pour éteindre la radio “OFF”. Veuillez vous assurer que l’antenne FM est entièrement déroulée et étendue pour une meilleure réception FM. La fréquence AM utilise une antenne directionnelle interne. -
Page 31: Unité De Projection
Unité de projection L’Unité de projection projettera l’heure ou la température sur un mur ou au plafond d’une pièce sombre (distance maximale est de 0,9 à 2,7 m (3 à 9 pi)). • Pour activer et désactiver l’image projetée (ON/OFF), appuyez sur le bouton •... -
Page 32: Garantie Electrohome
Merci d’avoir choisi un produit électronique grand public Electrohome! Electrohome accorde la garantie expresse suivante à l’acheteur original de cet appareil Electrohome ou à la personne qui l’a reçu en cadeau, pourvu qu’il ait été expédié et vendu ou distribué par Electrohome ou un détaillant Electrohome autorisé dans son emballage original. - Page 33 ELECTROHOME® pour toute information supplémentaire sur les caractéristiques du produit, les spécifications ou pour de l’aide avec l’installation. Veuillez nous contacter par l’une des méthodes ci-dessous: Soutien: electrohome.com/support Clavardage en ligne: electrohome.com Pour plus d’information sur nos produits, visitez electrohome.com...
-
Page 34: Dépannage
DÉPANNAGE Pour tout problème avec cet appareil, consultez le tableau ci-dessous avant d’appeler le service de réparation. SYMPTÔME CAUSE POSSIBLE SOLUTION POSSIBLE GÉNÉRAL Le cordon d'alimentation n'est Insérez fermement la fiche dans L'appareil ne s'allume pas pas branché la prise murale RADIO Appuyez sur POWER pour Elle n’est pas allumée... -
Page 35: Specifications
SPECIFICATIONS Bande de fréquences (AM) 520 - 1710 kHz Bande de fréquences (FM) 87.5 - 108 MHz Source de courant AC 120V ~ 60Hz, 5W Pile de secours DC 3V CR2032 (pile incluse) Échelle de température intérieure 0 à +50 °C ou 32 à 122 °F Les spécifications sont indiquées sous réserve de modifications. -
Page 36: Mises En Garde
MISES EN GARDE MISE EN GARDEA fin de réduire le risque d’incendie ou de décharge électrique, ne pas exposer cet appareil à la pluie ou à l’humidité. AVERTISSEMENT L’utilisation de commandes, de réglages ou l’exécution de procédures autres que ceux spécifiés peut entraîner une exposition à... - Page 37 1. Aucune source de flamme nue, telle que des bougies allumées, ne doit être placée sur l’appareil. 2. Ne pas placer l’appareil dans des bibliothèques ou des supports fermés sans ventilation adéquate. 3. La fiche de secteur est utilisée comme dispositif de déconnexion, le dispositif de déconnexion doit rester facilement accessible.
- Page 38 NOTES...
- Page 39 NOTES...
- Page 40 electrohome.com...