
Related Manuals for Miele DA 6480


Summary of Contents for Miele DA 6480
- Page 1 Operating and Installation Instructions Downdraft Ventilation System DA 6480, DA 6490 DAG 500, DAG 1000 en - US, CA To prevent accidents and appliance damage, read these instructions before installation or use. M.-Nr. 09 045 140...
-
Page 2: Table Of Contents
Contents IMPORTANT SAFETY INSTRUCTIONS....... . . 3 Functional description ..........7 Description of the appliance . -
Page 3: Important Safety Instructions
INJURY TO PERSONS, OBSERVE THE FOLLOWING: a) Use this appliance only in the manner intended by the manufacturer. If you have questions, contact Miele. b) Before servicing or cleaning the appliance, switch power off at the service panel and lock the service disconnecting means to prevent power from being switched on accidentally. - Page 4 IMPORTANT SAFETY INSTRUCTIONS d) Before connecting the appliance to the power supply make sure that the voltage and frequency listed on the data plate correspond with the household electrical supply. This data must correspond to prevent appliance damage. If in doubt consult a qualified electrician.
- Page 5 ,WARNING TO REDUCE THE RISK OF INJURY TO PERSONS IN THE EVENT OF A COOKTOP GREASE FIRE, OBSERVE THE FOLLOWING a) SMOTHER FLAMES with a close fitting lid, cookie sheet, or metal tray then turn off the burner. BE CAREFUL TO PREVENT BURNS. If the flames do not go out immediately, EVACUATE AND CALL THE FIRE DEPARTMENT.
- Page 6 IMPORTANT SAFETY INSTRUCTIONS Installation ,WARNING TO REDUCE THE RISK OF FIRE, ELECTRIC SHOCK, OR INJURY TO PERSONS, OBSERVE THE FOLLOWING: a) Installation work and electrical wiring must be done by qualified persons in accordance with all applicable codes and standards, including fire-rated construction.
-
Page 7: Functional Description
The ventilation system offers two installation options: with the internal DAG 500 exhaust blower (not included) The air is drawn through and cleaned by the grease filters and then directed outside. Functional description with the DAG 1000 external blower (not included) The air is drawn through and cleaned by the grease filters and then directed outside. -
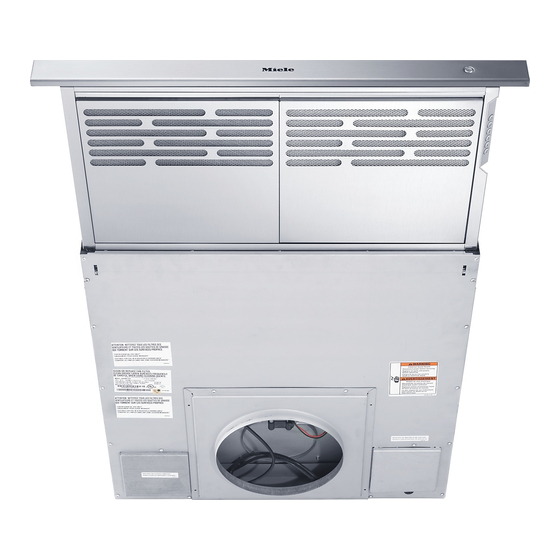
Page 8: Description Of The Appliance
Description of the appliance... - Page 9 On/Off button for the retractable vent and fan Control panel Retractable vent Grease filter Exhaust blower DAG 500 (not included) The exhaust blower can also be installed behind the appliance. Vent collar The vent collar can be installed so that the exhaust vents to either side, downwards, or to the rear.
-
Page 10: Operation
Operation Raising the vent / Turning on the fan ^ Press the On/Off button on the top of the ventilation system. The vent will rise. The fan will start at power level 2. The fan will automatically turn off if it is blocked while rising or retracting. -
Page 11: Temperature Warning
Temperature warning § The ventilation system can become very hot during operation. It can cause burns, particularly when cooking with gas. The ventilation system is equipped with a temperature sensor. The warning light § above the control panel will flash when the temperature of the housing exceeds 113 °F (45°C). -
Page 12: Cleaning And Care
"Cleaning the casing" instructions. Stainless steel Stainless steel surfaces can be cleaned using a non-abrasive stainless steel cleaner. To help prevent resoiling, a conditioner for stainless steel can be applied. Cleaners are available from Miele. -
Page 13: Grease Filters
Special instructions for control buttons The controls may change or become discolored if not cleaned regularly, clean soiled areas immediately. Do not use a stainless steel cleaner on the controls. Grease filters The reusable metal grease filters remove solid particles from the vented kitchen air (grease, dust, etc). - Page 14 Cleaning and Care Cleaning the grease filters ^ By hand: use a scrub brush with a solution of warm water and mild dish soap. Do not use the pure detergent, aggressive all purpose cleaners, oven sprays, abrasive cleaning agents or limescale removers. They could damage the filter.
-
Page 15: After Sales Service
Repairs In the event of a fault which you cannot easily fix yourself, please contact the Miele Technical Service Department. ^ When contacting the Technical Service Department, please have the model and serial number of your appliance available. These can be found on the data plate located on the housing above the connection box. -
Page 17: Installation Instructions
Installation Instructions Read these instructions and the "Important Safety Instructions" before installing this ventilation system. The installation steps are described in the enclosed "Installation Diagram". Leave these instructions with the appliance for the consumer/user. Information is subject to change. Please refer to our website to obtain the most current product specification, technical &... -
Page 19: Caring For The Environment
Disposal of packing material The cardboard box and packing materials protect the appliance during shipping. They have been designed to be biodegradable and recyclable. Please recycle. DANGER Ensure that any plastic wrappings, bags, etc., are disposed of safely and kept out of the reach of babies and young children. -
Page 20: Appliance Dimensions
Appliance dimensions... - Page 21 Must be a minimum of ½" (13 mm). Exhaust duct connection diameters DA 6480, 6490 with internal blower DAG 500:... . 6" C (150 mm) DA 6480, 6490 with external blower DAG 1000: .
- Page 22 Appliance dimensions Cabinet dimensions...
- Page 23 If installing the exhaust ducting to the front, appropriate clearances must be maintained in the cabinet. a) Cooktop overhang b) Minimum width of the cooktop: DA 6480: 28" (711 mm) DA 6490: 34" (864 mm) Appliance dimensions – The specified dimensions minimum cut-out dimensions must be observed.
- Page 24 Appliance dimensions Installation using the DAG 500 internal blower DAG 500 mounted in front of the exhaust system. DAG 500 mounted behind the exhaust system. Note that the blower must be accessible to install the venting ductwork.
- Page 25 Installation using the DAG 1000 external blower connection plate Exhaust air ducting to the front. Appliance dimensions Exhaust air ducting to the rear. Note that the back must be accessible for the installation of the vent duct.
-
Page 26: Installation
Installation The ventilation system is installed directly behind the cooktop. For easiest installation, install the ventilation system first, then the cooktop. The ventilation system must not be installed in an area where there are strong drafts, for instance near windows, doors, etc. Before installation, please read the "Appliance dimensions"... - Page 27 ^ With the assistance of another person, lift the appliance into the prepared cutout. The top mounting brackets should rest on the countertop. ^ Secure the appliance to the countertop with 2 screws. Alternatively, or additionally, the appliance can also be attached underneath the countertop with the angle brackets provided.
- Page 28 Installation ^ Remove the screws from the countertop. ^ Lift the appliance back out of the cabinet. ^ Pre-drill the marked mounting holes on the cabinet floor. ^ Tighten the mounting brackets on the appliance at the marked position. ^ Lay the vent housing on the floor on a blanket or other suitable protection in order to mount the DAG 500 blower or DAG 1000 blower adapter.
- Page 29 Venting direction towards the rear: In this case, the DAG 500 blower box must be modified. ^ Loosen the two screws holding the blower in the box. ^ Take the blower out of the box. ^ Remove the small cover on the rear of the ventilation system.
- Page 30 Installation ^ Plug the connection cable from the ventilation system into the blower motor. ^ Remove the vent collar of the blower box. ^ Close the opening in the blower box with the cover you removed from the rear of the ventilation system housing.
- Page 31 Installing the DAG 500 blower box on the rear The blower box can also be installed on the back of the ventilation system: ^ Remove the large cover on the rear. Mounting is the same as if installing on the front. ^ Mount the blower on the rear the same way as described for mounting on the front.
- Page 32 Installation Preparing the electrical connection ^ Remove the cover of the terminal box. ^ Decide whether you would like the power cable to enter the ventilation system from below or from the rear. Remove the respective knock-out. ^ If the system is connected to an external blower, remove the knock-out for the control cable.
- Page 33 ^ Connect the appliance to the electric power supply. Observe the "Important safety instructions" and "Electrical connection" warnings. ^ Place the cover panel onto the vent and push until it clicks in place. ^ Press the On/Off button on the top of the ventilation system.
-
Page 34: Installation With The Dag 1000 External Blower
Installation Installation with the DAG 1000 external blower If using DAG 1000 external blower, a connection plate much be installed on the ventilation system instead of the blower box. It can be mounted on either on the front or the rear of the appliance. If the connection plate is mounted on the front, the exhaust can only be vented to the front. -
Page 35: Air Extraction
WARNING Danger of toxic fumes. Gas cooking appliances release carbon monoxide that can be harmful or fatal if inhaled. To reduce the risk of fire and to properly exhaust air, the exhaust gases extracted by the ventilation system should be only vented to the outside of the building. -
Page 36: Condensate Trap
Air extraction Never connect a ventilation system to an active chimney, dryer vent, flue, or room venting ductwork. Seek professional advice before connecting the ventilation system to an existing, inactive chimney or vent flue. Important If the ductwork runs through rooms, ceilings, garages, etc. -
Page 37: Electrical Connection
Ensure that power to the appliance is off while installation or repair work is performed. The ventilation system may only be used with Miele DAG 500 or DAG 1000 blowers. ^ Verify that the voltage, load and circuit rating information found on the... - Page 38 Electrical connection Electrical connection if using an external blower If using the external blower, install a connection cable between the ventilation system and the external blower. Please follow the Operating and Installation Instructions for the DAG 1000. ^ Additional housing knock-outs should be used for the external blower housing.
- Page 40 Alteration rights reserved / 4011 M.-Nr. 09 045 140 / 02 INFORMATION IS SUBJECT TO CHANGE. PLEASE REFER TO OUR WEBSITE TO OBTAIN THE MOST CURRENT PRODUCT SPECIFICATIONS, TECHNICAL & WARRANTY INFORMATION.