
Related Manuals for Miele PROFESSIONAL PG 8050I


Summary of Contents for Miele PROFESSIONAL PG 8050I
-
Page 1: Operating Instructions
Operating instructions Professional dishwasher G 8050 / PG 8050i en - CA, US To prevent accidents and machine damage read these instructions before installation or use. M.-Nr. 07 950 142... -
Page 2: Table Of Contents
Contents Safety instructions and warnings ........4 Guide to the machine . - Page 3 Options ............36 Start delay .
-
Page 4: Safety Instructions And Warnings
To avoid the risk of personal injury or damage to the commercial dishwasher, it is important that you carefully read these instructions before use. Keep them in a safe place and pass them on to any future owner. - Page 5 A damaged commercial dishwasher can jeopardize your safety. Immediately shut down the damaged commercial dishwasher and notify Miele Customer Service, an authorized Miele dealer or a qualified technician. Before performing installation and maintenance work or repairs, the commercial dishwasher must be disconnected from the power supply.
- Page 6 For critical applications, where very high processing-quality requirements have to be met, it is strongly recommended that all process-related factors (cleaning agents, water quality, etc.) be discussed in advance with Miele's Application Technology.
- Page 7 Do not stand or sit on the open door, as this could damage the commercial dishwasher or cause it to tip over. Be aware of the potential for injury when utensils with sharp, pointed ends are placed upright, and position them so they cannot cause injury.
- Page 8 Accessories Accessories may only be attached or installed if they have been expressly approved by Miele. If other parts are attached or installed, claims under the warranty and/or product liability become null and void. Whatever the application, only Miele accessories should be connected to this machine.
-
Page 9: Guide To The Machine
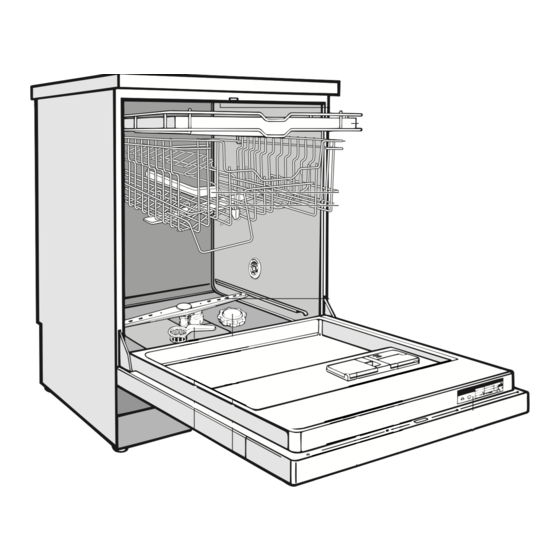
Overview Upper spray arm (not visible) Upper basket Water feed for middle spray arm Middle spray arm Lower spray arm Connection for DOS G 60 Semi module Guide to the machine Four height adjustable feet Triple filter Salt reservoir Dual compartment detergent dispenser Rinse aid reservoir (with dosage selector) -
Page 10: Control Panel G 8050
Guide to the machine Control panel G 8050 On/Off button Maxi program indicator Midi program indicator Mini program indicator Add detergent indicator (only applies to machines fitted with an optional external DOS G60 Semi module) Check water inlet/drain indicator Program sequence indicators Display Start/Stop button Start delay button... -
Page 11: Control Panel Pg 8050I
Control panel PG 8050i On/Off button Normal program indicator Economy program indicator Express program indicator Add detergent indicator (only applies to machines fitted with an optional external DOS G60 Semi module) Check water inlet/drain indicator Program sequence indicators Display Start/Stop button Start delay button Guide to the machine Check spray arm indicator... -
Page 12: Before Using For The First Time
Before using for the first time Before using the machine for the first time you will need: – 2 liters of water, – 2 kg of dishwasher reactivation salt, – detergent for commercial dishwasher, and – rinse aid for household dishwasher. -
Page 13: Opening And Closing The Door
Remove the key before using the dishwasher and keep it in a safe place away from the dishwasher. To prevent children from opening the dishwasher door during operation, use the key to lock the door. -
Page 14: Water Softener
Where the water hardness fluctuates e.g. between 8 - 18 gr/gal (8 - 17 °d German scale) always program the dishwasher to the higher value (17°d in this example). If the water in your area is very soft and consistently lower than 4 gr/gal (4 °d) you do not need to add... - Page 15 German scale 36 - 70 37 - 73 Setting the water softener ^ Turn the dishwasher off with the Value displayed "On/Off" button. ^ Press and hold the "Extra drying" and "Start / Stop" buttons, at the same time turn the dishwasher on with the "On/Off"...
-
Page 16: Filling The Salt Reservoir
Filling the salt reservoir Only special, coarse-grained reactivation salt* should be used in this machine. *Available from Miele. Please see back page for more information. Do not use other types of salt, e.g. table salt, agricultural or gritting salt. These... -
Page 17: Recharge Indicator
After the reservoir has been filled, the water softener is automatically reactivated the next time the dishwasher is run. The salt indicator may still light during this process. It will go out once the salt concentration has reached the correct level. -
Page 18: Rinse Aid
Rinse aid Rinse aid is needed to prevent spotting on dishes and glassware. The rinse aid is filled in the reservoir and the set amount will be automatically dispensed during the final rinse. Inadvertently filling the rinse aid reservoir with powder or liquid detergent will damage the reservoir. -
Page 19: Rinse Aid Indicator
Rinse aid indicator ^ Fill the rinse aid reservoir when the "Rinse aid" indicator comes on. There will be enough rinse aid left for 2 - 3 wash programs. Setting the rinse aid dosage The dosage selector has settings from 1-6. -
Page 20: Use
Loading the machine Removing excess soils ^ Scrape food from dishes before placing them in the dishwasher. Inadequate pre-cleaning can clog the filters and interrupt the wash program. Important – Select baskets and inserts which are appropriate for the application. -
Page 21: Items Not Recommended For Dishwashing
We recommend – When purchasing cookware, glassware and cutlery, make sure they are dishwasher-safe. – Wash particularly delicate glassware by hand. Please note Silverware previously cleaned with a silver polish may still be damp or spotted at the end of a program, where water has not run off smoothly. -
Page 22: Upper Basket
Upper basket Small, lightweight, delicate items such as cups, saucers, glasses, dessert bowls, etc. , should be placed in the upper basket. Shallow pans or casserole dishes can also be placed in the upper basket. Long items such as soup ladles, mixing spoons and long knives should be placed lying down across the front of the upper basket. -
Page 23: Adjusting The Upper Basket
Adjusting the upper basket In order to gain more space for taller pieces of cookware in the bottom or upper basket, the upper basket can be adjusted to three levels with 2 cm between each level. The upper basket can also be set at an angle with one side high and the other side low. -
Page 24: Lower Basket
Lower basket For larger and heavier items such as plates, serving platters, saucepans, bowls, etc. Glasses and small items such as saucers can also be placed in the lower basket. Do not place thin, delicate glassware in the lower basket. Hinged cup rack To make room for tall items, raise the rack upwards. -
Page 25: Lower Basket Inserts
Lower basket inserts Various removable inserts are available for the lower basket to accommodate your special needs. Removing an insert ^ To remove an insert, gently pull upwards on the handle. Inserting an insert ^ Slid the hitches of the inset under the vertical struts of the lower basket. -
Page 26: Adding Detergent
Keep detergent and other cleaning agents out of the reach of children at all times. Keep children away from the dishwasher when the door is open. There could still be detergent residues in the cabinet. - Page 27 The horizontal marks in Compartment II indicate levels of approximately 20, 25 and 30 ml respectively. ^ With the dishwasher door fully open, fill compartment II with 30 ml of powder detergent. ^ Close the cover. The cover will always open at the end of a wash program except in "Pre-wash".
-
Page 28: Turning On
G 8050 PG 8050i Turning on ^ Make sure the spray arms are not blocked. ^ Close the door. ^ Open the water supply, if closed. ^ Press the "On/Off" button. The "Start/Stop" indicator will flash and the indicator next to the last program selected will come on. -
Page 29: Program Sequence Indicators
Selecting options ^ If desired, select the "Start delay" or "Extra drying" options (see "Options"). Starting a program ^ Press the "Start/Stop" button. The program will start. The "Start/Stop" indicator and the indicator next to the last program selected will come on. The sequence indicator for the current program stage reached will also come Do not finish a program prematurely. -
Page 30: At The End Of A Program
The "Start/Stop" indicator will go out. The dishwasher continues to use electricity until turned off using the "On/Off" button. ^ If the dishwasher will not be used for a longer period of time, e.g. while vacationing, close the water supply. Drying fan running time:... -
Page 31: Interrupting A Program
If the door is closed again, the program will continue from the point it was at before the door was opened. Water in the dishwasher may be hot. Danger of scalding! Only open the door if absolutely necessary and exercise extreme caution when doing so. -
Page 32: Program Guide G 8050
Program Guide G 8050 Program For normally soiled loads. Mini For normally soiled items with a higher wash Midi temperature for removing starchy foods. For heavily soiled items. Most of the soiling is Maxi removed in an intensive cold-water pre-rinse. Special program for glasses. - Page 33 12 min. X = Sections included in a program (with temperature/temperature holding time) 1) If a second interim rinse is required, this must be programmed by a Miele ser- vice technician. 2) To alter the rinse aid temperature, see "Programming special functions".
-
Page 34: Program Guide Pg 8050I
Program Guide PG 8050i Program A quick wash program for cleaning lightly soiled Express items. For washing lightly soiled dishes with light fatty Economy residues. For washing normally and heavily soiled dishes Normal with fatty residues. Program for completely washing a full load of normally soiled dishes with the ability to adjust energy and water consumption based on the soil load of the dishes. - Page 35 12 min. X = Sections included in a program (with temperature/temperature holding time) 1) If a second interim rinse is required, this must be programmed by a Miele ser- vice technician. 2) To alter the rinse aid temperature, see "Programming special functions".
-
Page 36: Options
30 minutes and 9 hours 30 minutes, the delay is set in 30 minute increments. For 10 hours or more it is set in one hour increments. ^ Turn the dishwasher on with the "On/Off" button. The "Start/Stop" indicator will flash. ^ Use the program selection buttons %/$ to select the desired program. -
Page 37: Extra Drying
Starting a program before the Start delay period has elapsed ^ Press the "Start/Stop" button for at least one second. The "Start delay" indicator will go out. Note: If the "Extra drying" option had been selected, it must be selected again. ^ Press the "Start/Stop"... -
Page 38: Programming Special Functions
"Start/Stop" indicator must be flashing. To access the DOS programming level ^ Turn the dishwasher off with the "On/Off" button. ^ Press and hold the "Extra drying" and "Start/Stop" buttons, at the same time, turn the dishwasher on with the "On/Off"... -
Page 39: Setting The Dosage
^ Press the "Start/Stop" button twice. The indicator beside the "Start/Stop" button will flash. The programmed dispensing time is stored in memory. ^ Turn the dishwasher off with the "On/Off" button. Value set: Programming special functions Venting the dispensing system ^ Access the DOS programming level. -
Page 40: Special Function 1 Setting The Rinse Temperature
"Start/Stop" indicator must be flashing. Accessing the rinse temperature programming level ^ Turn the dishwasher off with the "On/Off" button. ^ Press and hold the "Extra drying" and "Start/Stop" buttons, at the same time, turn the dishwasher on with the "On/Off"... - Page 41 5 (10 or 11 to 50 or 51 in the display). Programming special functions Saving the settings ^ Press the "Start/Stop" button twice. The indicator beside the button will flash. The programmed setting is now stored in memory. ^ Turn the dishwasher off with the "On/Off" button. Value set:...
-
Page 42: Special Function 2 Increasing The Water Level
The amount of water taken into the machine at each intake can be increased by 20 %. Accessing the programming level ^ Turn the dishwasher off with the "On/Off" button. ^ Press and hold the "Extra drying" and "Start/Stop" buttons, at the same time, turn the dishwasher on with the "On/Off"... - Page 43 5 (10 or 11 to 50 or 51 in the display). Programming special functions Saving the settings ^ Press the "Start/Stop" button twice. The indicator beside the "Start/Stop" button will flash. The programmed setting is now stored in memory. ^ Turn the dishwasher off with the "On/Off" button. Value set:...
-
Page 44: Special Function 3 Display Time Or Temperature
The display can either show the time or temperature. Factory default setting is the time. Accessing the programming level ^ Turn the dishwasher off with the "On/Off" button. ^ Press and hold the "Extra drying" and "Start/Stop" buttons, at the same time, turn the dishwasher on with the "On/Off"... - Page 45 5 (10 or 11 to 50 or 51 in the display). Programming special functions Saving the settings ^ Press the "Start/Stop" button twice. The indicator beside the button will flash. The programmed setting is now stored in memory. ^ Turn the dishwasher off with the "On/Off" button. Value set:...
-
Page 46: Special Function 4 Actual Temperature Display
The actual temperature can be displayed constantly or only during the program blocks "Wash" and "Rinse". Accessing the programming level ^ Turn the dishwasher off with the "On/Off" button. ^ Press and hold the "Extra drying" and "Start/Stop" buttons, at the same time, turn the dishwasher on with the "On/Off"... - Page 47 5 (10 or 11 to 50 or 51 in the display). Programming special functions Saving the settings ^ Press the "Start/Stop" button twice. The indicator beside the button will flash. The programmed setting is now stored in memory. ^ Turn the dishwasher off with the "On/Off" button. Value set:...
-
Page 48: Special Function 5 Setting The Heating Power
85°C, see "Special function 1". The heating power is factory set to 1.3 kW. If the dishwasher is set to a higher heating power (see "Electrical connection"), the heating power must be adjusted in this special function. - Page 49 5 (10 or 11 to 50 or 51 in the display). Programming special functions Saving the settings ^ Press the "Start/Stop" button twice. The indicator beside the button will flash. The programmed setting is now stored in memory. ^ Turn the dishwasher off with the "On/Off" button. Value set:...
-
Page 50: Cleaning And Care
The dishwasher must not be used without all the filters in place. Collection of coarse soil may cause the filters to clog. ^ Check the triple filter regularly (every week). - Page 51 To clean the inside of the filter, the flap must be opened. ^ Pull back the yellow clip. ^ Rinse all parts under running water, using a nylon brush if necessary. ^ Then close the flap so that the catch engages.
-
Page 52: Cleaning The Spray Arms
Sometimes particles get stuck in the spray arm jets. The spray arms should be inspected and cleaned every 4 - 6 months. ^ Turn the dishwasher off. ^ Push the top spray arm upwards to engage the inner ratchet. Then unscrew the spray arm. - Page 53 ^ Clean the door seals regularly with a damp cloth to remove food deposits. ^ When the dishwasher is being loaded, food and drink residue may drip onto the sides of the dishwasher door. These surfaces are outside the wash cabinet and are not accessed by water from the spray arms.
-
Page 54: Cleaning The Water Inlet Filter
This filter is available from your Miele dealer or Miele. Cleaning the filter ^ Disconnect the machine from electricity (unplug it or "trip" the circuit breaker). -
Page 55: Cleaning The Drain Pump And Non-Return Valve
Cleaning the drain pump and non-return valve If the water has not been drained at the end of a program the drain pump or the non-return valve might be blocked. Be careful - glass or bone splinters could cause injury. ^ Take the triple filter out of the wash cabinet (see "Cleaning and care"... -
Page 56: Frequently Asked Questions
Open the water supply fully. Before fixing the problem: – Press the "Start/Stop" button for at least one second. – Turn the dishwasher off. Then: – Clean the water inlet filter, see "Cleaning the water inlet filter". Call the Miele Service Department. - Page 57 – Restart the program. Open the water supply fully. Before fixing the problem: – Press the "Start/Stop" button for at least one second. – Turn the dishwasher off. Then: – Clean the water inlet filter, see "Cleaning the water inlet filter".
- Page 58 – Press the "Start/Stop" If the three horizontal bars appear again at the end of the program, there is a technical fault. – Contact the Miele Service The spray arm is Interrupt the program, hitting an item in the rearrange items blocking the basket.
-
Page 59: Poor Cleaning Results
Poor cleaning results Issue The dishes are not clean. Frequently asked questions Possible fault The dishes were not loaded correctly. The outlet of the water intake pipe for the middle spray arm was covered. An insufficient amount of water reached the middle spray arm. - Page 60 The rinse aid setting may be too low or the rinse aid reservoir is empty. Items were taken out of the dishwasher too soon. Not enough rinse aid was used. The salt reservoir is empty. Replenish reactivation The salt reservoir cap was not properly screwed on.
-
Page 61: Other Faults
Remove the residue. Before fixing the problem: – Press the "Start/Stop" button. – Turn the dishwasher off. Clean the triple filter, see "Cleaning and Care". Clean the drain pump and the non-return valve, see "Cleaning the drain pump and non-return valve". -
Page 62: After Sales Service
After sales service In the event of any faults that you cannot fix yourself, please contact the Miele Service Department. See back cover for contact details. ^ When contacting your Dealer or the Miele Service Department, please quote the model type and number of... -
Page 63: Installation Instructions
Installation Instructions To prevent accidents and machine damage read these instructions before installation or use. -
Page 64: Installation
^ Please refer to the installation diagram supplied with the machine. Leveling the machine ^ The dishwasher needs to stand even. It can be leveled with the four height adjustable feet. Integrated ("i") professional dishwashers:... - Page 65 Adjust if necessary making sure the dishwasher is centered to the adjacent cabinetry. ^ Push the dishwasher in the recess. ^ Open the door. ^ Secure the machine with the brackets to the front edge of the countertop using the supplied screws.
- Page 66 Installation Steam Deflector Depending on the requirements for an undercounter installation, a steam deflector can be ordered from the Miele Technical Service Department. The underside of the countertop is protected from steam damage by this stainless steel plate. Granite and marble countertops...
-
Page 67: Electrical Connection
Danger of overheating! A damaged power cord must only be replaced with a genuine Miele cord by a Miele service technician. The machine must only be operated with the voltage, frequency and... - Page 68 14/3 AWG cord and plug for connection to a standard 120 V, 60 Hz AC power outlet. If available, the dishwasher may be connected to a 208/240V single phase power supply. This will increase the power to the heating elements and shorten the time of selected wash cycle.
-
Page 69: Plumbing
7.25 to 145 psi the "Fill/Drain" indicator may come on and the fault code "F2E" may show in the display. Please contact the Miele Service Department. – The machine is supplied to be connected to a standard cold or hot water supply at a maximum temperature of 60 °C. -
Page 70: Drainage
Hose clamps are supplied for securing it into position. – A longer drain hose (up to 13 ft. [4 m] long) is available from Miele. – The drainage system must not exceed 13 ft. (4 meters). – See the supplied installation... -
Page 71: Technical Data
60 °C min. 0.3 m, max. 1 m max. 4 m approx. 1.7 m approx. 1.4 m Free standing: under 60 Built-in: under 70 Interference suppression Miele & Cie. KG, Carl-Miele-Str. 29 33332 Gütersloh, Germany Technical data... -
Page 72: Help To Protect The Environment
Help to protect the environment Disposal of the packing material The protective packing materials are environmentally safe and can be recycled. Ensure that any plastic wrappings, bags, etc. are disposed of safely and kept out of the reach of children. Danger of suffocation! Disposal of the appliance Appliances contain materials which can... - Page 76 Alteration rights reserved / Publication date: 02/08/2011 M.-Nr. 07 950 142 / 00...