Table of Contents
Advertisement
Advertisement
Table of Contents

Related Manuals for Meade NG


Summary of Contents for Meade NG
- Page 1 Instruction Manual NGC-Series Telescopes NG-Series Telescopes MEADE.COM...
-
Page 3: Table Of Contents
Improperly installed batteries void your Meade warranty. ® The name “Meade” and the Meade logo are trademarks registered with the U.S. Patent Office and in principal coun- tries throughout the world. All rights reserved. -
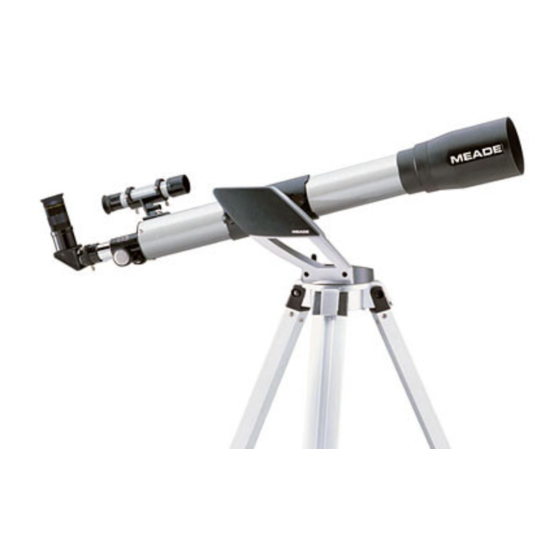
Page 4: Telescope And Features
Your telescope may look different from the one depicted 11. Tripod Nuts, Bolts above. Some differences include: 12. Leg Brace • NG models do not include a control panel (4, Fig. 1) or Supports a battery compartment (18, Fig. 2) 13. Leg Lock (inset) •... - Page 5 Fig. 2: Top view of the NGC base. Fig. 4: Detailed view of the focuser assembly and the viewfinder. Inset: Compass/bubble level (19). 6. Red Dot VF 7. Eyepiece 8. Diagonal Mirror 9. Focuser Drawtube 10. Focus Knobs 18. Battery Compartment 19.
-
Page 6: Telescope And Tripod Features
G. Aux Port: Use this port, along with the optional #506 Astrofinder Software and Cable Connector Kit, to connect to your PC, or to update celestial objects for your control panel from the Meade website (www.meade.com). See , page 19, for more information. - Page 7 See page 12 EASY ALIGNMENT, arrow of the compass and “N” both point in the same direction, the telescope then points North. Use the bubble level to help set the home position. When the bubble is in the cen- ter of the compass, the telescope is level.
-
Page 8: Getting Started
3 cylindrical pins (certain models) How to Assemble Your Telescope Note that although the telescope is unassembled, all of the more difficult or compli- cated sections of the instrument are already factory pre-assembled. To set up the tel- escope, follow this procedure: Identify: Remove from the gift box and identify the telescope’s components,... -
Page 9: Attaching And Aligning The Red Dot Viewfinder
Fig. 2) and attach a 9v battery (user-supplied) to the connector provided in the compartment. 10. Remove dust cap: Pull to remove the dust cap from the end of the telescope. Replace it on the telescope at the end of the observing session. The cap keeps the telescope lens free from dust and foreign particles when it is not in use. -
Page 10: Simple Observations
(Figs. 11a and 11b). The power, or magnification of a telescope is determined by the focal length of the tel- escope and the focal length of the eyepiece being used. To calculate eyepiece power, divide the telescope's focal length by the eyepiece's focal length. -
Page 11: Easy Alignment
However, the alignment star should be easily rec- ognized and be the brightest star in the area of the sky where the telescope is pointing. Look for the star in the viewfinder to see if you can locate it. The viewfinder has a wider field of view than the eyepiece. -
Page 12: Using The Guided Tour
IMPORTANT NOTE: As you observe Saturn, you will notice that the image moves in the eyepiece. This is because the Earth is rotating. You can use the horizontal and ver- tical slow motion con- trols (20, Fig. 2 and F, Fig. -
Page 13: Menus
MENUS... -
Page 14: How To Move Through The Menu Options
Be careful not to shine bright lights if there are other observers in the area. Do not shine a flashlight into the telescope while someone is observing! • Dress warmly. It gets chilly when you’re sitting for prolonged periods, even on warm nights. -
Page 15: Object Menu
Identify is an exciting feature for an observer who wants to scan the night sky and start exploring. Use this feature after the telescope has been properly aligned. Then Also, the optical follow this procedure:... -
Page 16: Glossary Menu
ON and OFF. When ON is displayed, press ENTER to activate the alarm. When the alarm time arrives, the display flashes. Press ENTER to deactivate the alarm. Eyepiece Calc calculates information about an eyepiece for your telescope. • Field of View: Scroll through a list of available eyepieces. When an eyepiece is selected, the field of view is calculated. -
Page 17: Setup Menu
ENTER. This feature is only required in very cold weather. Setup Menu The Setup menu’s primary function is to align the telescope (see page 12 ). However, there are numerous other features available within the Setup menu, including: Date changes the date used by the computer control panel. This function is useful to check events in the past or future. -
Page 18: Optional Accessories
ACCESSORIES OPTIONAL ACCESSORIES A wide assortment of professional Meade accessories is available for the NG-Series and NGC-series telescopes. Consult the Meade General Catalog for complete details of these and other accessories. Eyepieces (1.25" barrel diameter): For higher or lower magnifications with the tele- scopes that accommodate 1.25"... -
Page 19: General Maintenance
Storage and Transport When not in use, store the telescope in a cool, dry place. Do not expose the instru- ment to excessive heat or moisture. It is best to store the telescope in its original box. -
Page 20: Meade Customer Service
In the unlikely event that your telescope requires factory servicing or repairs, write or call the Meade Customer Service Department first, before returning the telescope to the fac- tory, giving full particulars as to the nature of the problem, as well as your name, address, and daytime telephone number. -
Page 21: Appendix A: Advanced Features
Check your local library, computer store, book- store, CD Roms, Internet, or magazines (such as Sky & Telescope or Astronomy), to find coordinates of celestial objects. The objects/coordinates you enter become part of your own permanent database, called "User Objects."... -
Page 22: To Go To A User-Entered Object
To Add a landmark to the database: In this procedure, you will store the location of terrestrial landmarks in memory. Set the telescope in the home position, if necessary. Note for future reference where the telescope is located. Select the "Select Item: Setup" menu. -
Page 23: Appendix B: Entering Time/Date Manually
APPENDIX B: ENTERING TIME/DATE MANUALLY How to manually set the date to March 6, 2005 (NGC Models Only): 1. Press ON/OFF to turn on the control panel. 2. Press the button prompted by the control panel to show that the Sun warning has been read and understood. -
Page 24: Appendix C: Batteries
Replace the internal clock’s battery with a CR2023 lithium battery. This battery is located in the battery compartment. Both batteries are available from Meade, photographic supply houses or any place lithium batteries are sold. Further Study Below is a small sampling of books, magazines, and organizations that you might find helpful. -
Page 25: Basic Astronomy
In the early 17th century, Italian scientist Galileo, using a crude telescope smaller than your NG or NGC, turned it to look towards the sky instead of distant trees and moun- tains. What he saw, and what he realized about what he saw, forever changed the way mankind thought of the universe. - Page 26 The disk of Venus appears white as Sunlight is reflected off the thick cloud cover that completely obscures any surface detail. Mars is about half the diameter of Earth, and appears through the telescope as a tiny reddish-orange disk. It may be possible to see a hint of white at one of the planet’s Polar ice caps.
- Page 28 ONE YEAR from the date of original purchase in the U.S.A. and Canada. Meade will repair or replace a product, or part thereof, found by Meade to be defective, provided the defective part is returned to Meade, freight-prepaid, with proof of purchase.