
Related Manuals for Miele H 387-2 BP KAT


Summary of Contents for Miele H 387-2 BP KAT
-
Page 1: Operating Instructions
Operating instructions Oven H 387-1 BP KAT H 387-2 BP KAT To prevent accidents and machine damage, read these instructions before installation or use. M.-Nr. 05 712 991... -
Page 2: Table Of Contents
Contents IMPORTANT SAFETY INSTRUCTIONS Guide to the oven Accessories ............9 Roasting pan and Anti-splash tray . - Page 3 Contents Guide to the programs Baking Roasting Roasting tips ........... . . 32 Using the roast probe Roasting Recommendations Broiling...
-
Page 4: Important Safety Instructions
IMPORTANT SAFETY INSTRUCTIONS Installation This appliance is intended for Before installation, make sure that residential use only. the voltage and frequency listed on the data plate correspond with the Only use the appliance for its household electrical supply. This data intended purpose. -
Page 5: Oven Use
IMPORTANT SAFETY INSTRUCTIONS Oven use The door gasket is essential for a good seal. Care should be taken WARNING: Ovens can produce not to rub, damage or move the gasket. high temperatures that may cause The door gasket should only be burns. - Page 6 Only use the Miele roast probe supplied with the oven. Contact Miele if you need to purchase a new probe. Remove the roast probe from the oven when not using it. High broiling temperatures could damage...
- Page 7 IMPORTANT SAFETY INSTRUCTIONS Disposal of an old oven General notes Do not use a steam cleaner to When discarding an old oven, clean the oven. Steam could disconnect it from the power penetrate electrical components and supply and cut off the power cord. cause a short circuit.
-
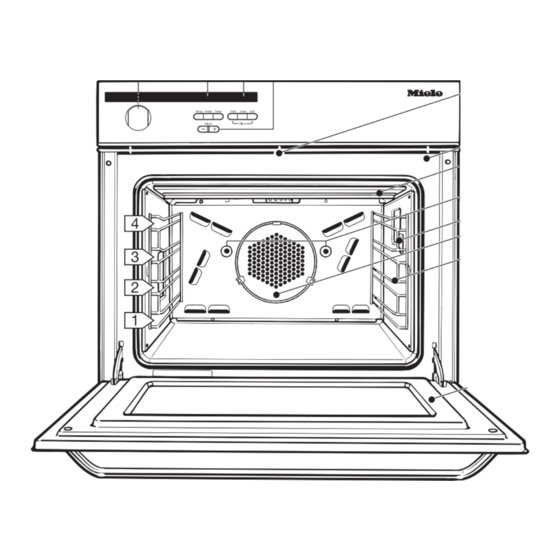
Page 8: Guide To The Oven
Guide to the oven a Program selector g Upper heating element b Oven display and h Rotisserie motors push buttons i Roast probe socket c Clock/Timer display and j Convection fan push buttons k Non-tip, four level runners d "+/–" adjust buttons l Oven door e Self Clean Safety Lock f Door contact switch*... -
Page 9: Accessories
Guide to the oven Accessories Roasting pan and Anti-splash tray Wire rack and baking trays The roasting pan is ideal for catching drippings from meat or poultry roasted or broiled directly on the rack. It can also be used as a baking tray. The oven comes equipped with a wire rack and two baking trays. -
Page 10: Grease Filter
Guide to the oven Grease filter Rotisserie The filter helps to keep the oven fan clean from moisture and grease. The rotisserie evenly broils and adds a When roasting or broiling, insert the finishing touch to items such as stuffed grease filter in front of the fan opening. -
Page 11: Controls
Guide to the oven Controls The oven controls consist of the program selector and push buttons. All temperature and time selections are made by using the "+" or "–" buttons. Advancements can be made slowly, one digit at a time, with short pushes of the button. -
Page 12: Safety Locks
Safety Locks Child Safety Lock Automatic door lock in the Self Clean program After the first minute of the Self Clean program, the door will lock automatically. The lock releases once the cleaning program has ended and the oven temperature has dropped below 530°F/280°C. -
Page 13: Before Using For The First Time
Before using for the first time Heat the oven New ovens may have a slight odor during the first few uses. To eliminate the odor quickly, the oven should be ^ Set the temperature to 480°F (250°C), operated at a high temperature for 2 using the "+"... -
Page 14: Using The Oven
Using the oven a Turn the program selector to the At the end of the cooking time: desired program. A tone sounds for 5 seconds and the "g" symbol flashes. To turn off the tone and the flashing symbol, – press the "Cook" button. –... -
Page 15: Adjusting The Default Temperature
Using the oven Adjusting the default The default temperature of each program, can be adjusted within the temperature range shown below: Convection 90-480°F (30-250°C) Auto Roast 210-440°F (100-230°C) ^ Press the "Temp." button. Top Heat 90-480°F (30-250°C) Surround 90-510°F (30-280°C) Bottom Heat 210-480°F (100-250°C) Defrost... - Page 16 Using the oven The time display can show the time of day or turn the oven on and off automatically. All data input or adjustments are done with the "+" or "–" button. Changes to the start, length, end of cooking time or time of day are made in 1 minute increments.
-
Page 17: Entering The Time Of Day
Using the oven Entering the time of day To conceal the time of day When the appliance is first connected The time of day display can be turned to the power supply, or after a power off to save energy. failure "12:00"... -
Page 18: Programming The Cooking Time
Using the oven Programming the cooking time At the end of cooking With the timer it is possible for the oven – a tone sounds for 5 seconds, to turn off automatically, or be set to – and the ")" symbol flashes. come on and turn off at a later time. -
Page 19: To Program A Cooking Time To End Automatically
Using the oven To program a cooking time to To enter a cooking length and a time for the oven to shut off end automatically ^ Select the desired program. ^ Select the desired program. The oven will begin to heat. ^ Press the "Cook"... -
Page 20: Enter The Start Time And The Length Of Cooking
Using the oven Checking, changing and Enter the start time and the length of cooking canceling times entered ^ Select the desired program. It is possible at any time to review or change the times entered. ^ Press the "Start" button. ^ Press the button for the desired time "0:00"... -
Page 21: To Cancel A Program
Using the oven To cancel a program To change ^ Press the "Start", "Cook" or "End" ^ Turn the program selector to "0". button. During a power failure all The indicator between the "+/–" buttons programming entered will be comes on. deleted. -
Page 22: Entering A Cooking Time
Using the oven Entering a cooking time Checking, changing and deleting a cooking time When a cooking time is entered the oven will turn off automatically at the To check a cooking time end of the elapsed time. ^ Press the "Cook" button. ^ Press the "Cook"... -
Page 23: Rapid Heat
Using the oven Rapid heat To turn off "rapid heat" The rapid heat feature activates the For some dishes it may be desirable to heating elements at maximum power to turn off "rapid heat" (cookies, small heat the oven quickly. With the cakes). -
Page 24: Customizing A Temperature Setting
Using the oven Customizing a temperature setting The default temperature of a program can be changed if you frequently work with temperatures that differ from the factory settings (except "Defrost"). To change the default temperature: ^ Turn the program selector to the program that is to be given a different temperature. -
Page 25: Energy-Conservation Feature
Using the oven Energy-Conservation feature Oven lighting The oven will light when the oven door is opened, and during programming. The light will go out when the door is closed, or 15 seconds after a button has been pushed. The oven lighting can be changed (see "Turning additional features on or off, feature 03"). -
Page 26: Setting The Timer
Setting the timer The timer can be used to time an At the end of the timed period: activity separate from the oven. – a tone sounds for 5 seconds. – the "l" symbol will flash for 1 minute. To set the timer The tone and the flashing symbol can be canceled by pressing the "Timer"... -
Page 27: Guide To The Programs
Guide to the programs... -
Page 28: Baking
Baking Convection When using Convection, several runner levels can be used at the same time. The recommended positions are: 1 tray = 1 runner from the bottom 2 trays = 1 and 3 runners from the bottom 3 trays = 1 and 4 runners from the bottom... - Page 29 Baking Intensive Surround Default temperature ..370°F (190°C) Default temperature ..340°F (170°C) The "Surround" program is a premium The "Intensive" program generates heat conventional baking mode. The oven from the lower heating element. The heats with both the upper and lower oven’s fan gently circulates the heated heating elements without the...
-
Page 30: Top Heat
Baking Top Heat Bottom Heat Default temperature ..370°F (190°C) Default temperature ..370°F (190°C) In the "Top heat" program, food is The "Bottom heat" program works by heated from above. heating food from below. This is similar to the "bake mode"... -
Page 31: Roasting
Roasting Auto Roast Surround Default temperature ..370°F (190°C) Default temperature ..320°F (160°C) "Surround" is a conventional roasting This premium convection program program for traditional recipes. heats the oven to a high temperature to sear the meat, and retain moisture and Use this program for: tenderness. -
Page 32: Roasting Tips
Roasting Roasting in a covered pot L Roasting tips – Always install the grease filter in the When roasting in a covered pot, back of the oven before roasting. increase the recipe temperature by 70°F (20°C). – The larger the cut of meat to be roasted, the lower the temperature Season the meat and place in the pot. -
Page 33: Using The Roast Probe
Using the roast probe The roast probe reliably monitors the Using the roast probe: roasting process. The tip of the probe ^ Prepare the meat as usual, and put it continuously measures the core into the oven (in a pot or on the rack). temperature of the meat or poultry. - Page 34 Using the roast probe To adjust the core temperature: ^ Press the "Probe" button. ^ Change the temperature using the "+" or "–" button. Range of 67°F to 209°F (20°C to 99°C). ^ Insert the short end of the roast probe into the socket on the right side of the oven until it clicks into The oven will start heating when the...
-
Page 35: Using The Roast Probe
Using the roast probe Time remaining display End of roasting When the selected core temperature has been reached: – a tone will sound for 5 seconds, – the "e" (roast probe) symbol will flash. The tone can be canceled by: –... -
Page 36: Roasting Recommendations
Roasting Recommendations Auto Roast Surround Runner Core Temp. Time Temp. Time level Temp. °F (°C) (min) °F (°C) (min) °F (°C) Roast beef 360-390 100-120 420-470 100-120 170-190 2 lbs (1 kg) (180-200) (220-240) (80-85) Steak 380-410 35-45 420-470 35-45 105-150 2 lbs (1 kg) (190-210) -
Page 37: Broiling
Broiling Broil Maxi Broil Default temperature ..460°F (240°C) Default temperature ..460°F (240°C) The entire upper heating element is Only the inner part of the upper heating used for intense heating from above. element is used for a smaller area of This program gives excellent browning intense heat from above. -
Page 38: Using The Roast Probe
Broiling Fan Broil Broiling on the rack Default temperature ..390°F (200°C) ^ Assemble the broil pan, anti-splash Hot air from the upper heating element tray and rack as shown. is distributed over the food by the fan. This enables a lower temperature than ^ Place the food on the rack conventional broiling to be used. -
Page 39: Broiling
Broiling Broiling on the rotisserie ^ Insert the spits into the grill motors at the back of the oven. ^ Secure meat or poultry on the ^ Select a broiling program. skewers. (Poultry legs should be tied together ^ When the oven door is closed, the to prevent them from catching on the spits will rotate. -
Page 40: Broiling Tips
Broiling Broiling tips – To broil thicker pieces of food gradually, sear the meat at a high temperature, then continue broiling at a lower temperature so the food cooks through to the center. – To ensure even cooking, it is best to broil foods of a similar thickness at the same time. -
Page 41: Broiling Chart
Broiling chart Pre-heat for 5 minutes before broiling. Food to be broiled Broil / Maxi Broil Fan Broil 1) Runner Temperature Time Temperature Time from in °F/°C (in min.) in °F/°C (in min.) bottom Thin to medium size Beef steaks 3 or 4 520/275 10-16... -
Page 42: Defrost
Defrost Defrost Defrosting tips – Remove the frozen food from the packaging and place in the roasting pan or into an appropriate dish. – Meat and poultry should be fully thawed before cooking. Do not use the defrosting liquids. – Fish does not need to be fully defrosted before cooking. -
Page 43: Cleaning And Care
Cleaning and care Accessories Before cleaning or servicing the oven, disconnect it from the power Remove all accessories as well as supply by either shutting off the the runners from the oven before power main or manually "tripping" starting the Self Clean program. The the circuit breaker. -
Page 44: Perfectclean
Cleaning and care PerfectClean Clean as soon as possible after each use with a soft sponge and a solution of Allow the oven and any accessories hot water and liquid dish soap. to cool down before cleaning. Stubborn baked on grease may need to Danger of burns! be soaked first to loosen deposits. -
Page 45: Oven Interior
Cleaning and care Oven interior Remove large pieces of debris and The oven interior is coated with an any puddles of grease from the oven extremely smooth dark pyrolytic enamel interior before starting the Self Clean which facilitates cleaning. program. Because of its non-stick properties most debris can be easily removed with Remove all accessories including... - Page 46 Cleaning and care The Self Clean program will interrupt, If the oven interior is extremely – if the program selector is turned to soiled, the Self Clean program will the "0" position, automatically shut off. Remove large pieces of debris and restart the Self –...
-
Page 47: Removing The Oven Door
Cleaning and care Cleaning the oven cavity by hand Removing the oven door ^ Open the door fully. Danger of burns! Allow the oven to cool before cleaning. To make cleaning easier – remove the oven door, – remove the runners, –... -
Page 48: Removing The Runners
Cleaning and care Removing the runners Lowering the upper heating element ^ Remove the runners. ^ Pull on the fastener to release the runner. ^ Pull and turn the fastener on the grill element to release it. ^ Gently lower the grill element. ^ Pull the runner out from the rear of the oven. - Page 49 Cleaning and care Refitting the oven door ^ Hold the door as shown above and carefully put the locked hinges into the guide holes until they engage. Open the door fully. ^ Still supporting the door, flip the locking clamps down. Check that the locking clamps are flipped down when the door is reinstalled after cleaning.
-
Page 50: Changing The Light Bulb
Changing the light bulb ^ Turn off the electrical supply to the oven at the circuit breaker. ^ Take the runners out of the oven. ^ Remove the catalytic liners, if present. ^ Press the lamp back into the sidewall of the oven and reinsert the cover. -
Page 51: Turning Additional Features On Or Off
Turning additional features on or off To turn an additional feature on or off: The additional feature is (* marks the factory setting) ^ Turn the program selector to "0". 01:0* The program and 01:1 Once the ^ Open the oven door fully. temperature can be program and adjusted at any time. -
Page 52: Frequently Asked Questions
Frequently asked questions Installation work and repairs should only be performed by a qualified technician in accordance with all applicable codes and standards. Repairs and other work by unqualified persons could be dangerous and may void the warranty. What if the oven does not heat? Possible fault A program was not selected. - Page 53 Frequently asked questions What if "F" and a number appear in the oven display? "F3": The roast probe is faulty. Remove the probe from its socket and the code will disappear. "F6": The oven has This is a safety feature to protect the oven if it has automatically shut off.
-
Page 54: Frequently Asked Questions
Frequently asked questions What if "F" and a number appear in the oven display? "F15": The Self Clean Turn the program selector to "0" and then to "Light". program was interrupted After 60 seconds the error message will go out, during the heating phase. -
Page 55: After Sales Service
After sales service In the event of a fault which you cannot easily fix yourself, please contact the Miele Technical Service Department U 1-800-999-1360 techserv@mieleusa.com V 1-800-565-6435 service@miele.ca When contacting Technical Service please quote the serial number and model of your oven. This information is visible on the silver data plate along the right side of the oven. -
Page 56: Optional Accessories
Optional accessories The following accessories are available for purchase from your Miele Dealer or Miele. Handle Pizza stone The pizza stone is ideal for baking The handles are used to take the dishes with a crisp bottom like pizza baking trays or the roasting pan in and and bread. -
Page 57: Optional Accessories
Optional accessories Catalytic converter Poultry clamp and Kabob griller A catalytic converter can be built into the cooling system to filter fat particles and reduce food odors. Catalytic liners The catalytic liners can be replaced. The poultry clamp is ideal for roasting When ordering please state the model small birds on the rotisserie. -
Page 59: Installation Instructions
Installation Instructions... -
Page 60: Caring For The Environment
Caring for the environment Disposal of the packing Disposal of an old appliance materials Old appliances may contain materials that can be recycled. Please contact The cardboard box and packing your local recycling authority about the materials protect the appliance during possibility of recycling these materials. -
Page 61: Electrical Connection
Electrical connection Power supply Installation work and repairs should The oven is equipped with a 6 ft./1.8 m only be performed by a qualified flexible power cord consisting of 4 technician in accordance with all wires ready for connection to a applicable codes and standards. -
Page 62: Installing The Oven
The strip can be purchased from Miele. ^ Open the oven door and locate the two mounting screw holes in the oven frame. Mark and drill 6 mm pilot holes. - Page 64 Alteration rights reserved / 1705 M.-Nr. 05 712 991 / 05...