Table of Contents
Advertisement
Quick Links
Advertisement
Table of Contents

Related Manuals for Craftsman 320.10861


Summary of Contents for Craftsman 320.10861
- Page 1 Owner's ManuaW Vlodel No. 320.10861 o SAFETY o ASSEMBLY ,AUTtON. Read, understand and follow o OPERATION !1Safety Rules and Operating Instructions ,' MAINTENANCE 1 this manual before using this product. • ESPAI_iOL ;ears, Roebuck and Co., Hoffman Estates, nL60179 U.S.A.
- Page 2 ....... Page Service Numbers........Back cover FULL ONE YEAR WARRANTY ON CRAFTSMAN CIRCULAR If this product fails due to a defect in material or' workmanship within two years from the date of purchase, RETURN IT TO THE NEAREST SEARS STORE IN CANADA, and Sears will replace it, free of charge.
- Page 3 WARNING: BE SURE to read and understand all instructions, Failure to follow all | instructions listed below may result in electric shock, fire and/or serious personal injury,. H......H..=,., H. = .1..1 .1.1.1 1.1 ..111.. =..Hi=. SAFETY PRECAUTIONS FOR LASER This saw has a built-in laser light°...
- Page 4 SAFETY PRECAUTIONS FOR LASER cont. 6, DO NOT use on surfaces such as sheet steel that have a shiny, reflective surface. The shiny surface could reflect the beam back at the operator. 7. ALWAYS be aware that laser light reflected off of a mirror or any other reflective surfaces...
- Page 5 ELECTRICAL SAFETY cont. 5. If operating the power tool in damp locations is unavoidable, ALWAYS use a Ground Fault Circuit interrupter to supply power to your tool. ALWAYS wear electrician's rubber gloves footwear in damp conditions. 6. DO NOT expose power tools to rain or wet conditions.
- Page 6 PERSONAL SAFETY cont. 3. ALWAYS avoid accidental starting. BE SURE switch is in the "Off" position before plugging in. DO NOT carry tools with your finger on the switch, Carrying tools with your finger on the switch or plugging in tools that have the switch in the "On" position invites accidents.
- Page 7 TOOL USE AND CARE SAFETY cont. ,i,,11 ..WARNING: USEOF ACCESSORIES THATARE NOTRECOMMENDED FORUSE W1T,H THIS TOOL MAY,,CREATE A HAZARDOUS CONDITION_ 8. ALWAYS use only accessories that are recommended for this tool. Accessories that may be suitable for one tool may become hazardous when used on another tooL...
- Page 8 SAFETY RULES FOR CIRCULAR SAWS cont. 7. NEVER hold the piece being cut in your hands or across your legs. It is important to support the work properly in order to minimize body exposure, blade binding, or loss of control. 8.
- Page 9 Ways to Prevent Kickback 1. ALWAYS maintain a firm grip with both hands on the saw and position your body arms to allow you to resist KICKBACK forces. KICKBACK forces can be controlled by the operator, if the proper precautions are taken.
- Page 10 ADDITIONAL RULES FOR SAFE OPERATION WARNING: BE SURE to read and understand all instructions. Failure to follow ..... instructions.., listed below may result in electric shock, fire andlor serious personal injury. 1. Know your power tool. Read operator's manual carefully. Learn the applications limitations,...
- Page 11 ADDITIONAL RULES FOR SAFE OPERATION cont. 9. ALWAYS inspect and remove all nails from lumber before sawing. 10. DO NOT use the too! while tired or under the influence of drugs, alcohol or any medication. 11. SAVE THESE INSTRUCTIONS. Refer to them frequently and use them to instruct others who may use this tool.
- Page 12 UNPACKING Your circular saw has been shipped completely assembled. Inspect the saw carefully to make sure that no breakage or damage has occurred during shipping. If any parts are damaged or missing return the saw to your nearest Sears Store to have it replaced.
- Page 13 MOUNTING THE BLADE TO SAW cont. '10. Replace the "D" inner Fig. 1 washer (See Fig° 1). Bushing 11. Firmly hold down Blade spindle lock button Outer"D" Washer as you replace blade screw and hand tighten it in a clockwise direction Screw Spindle...
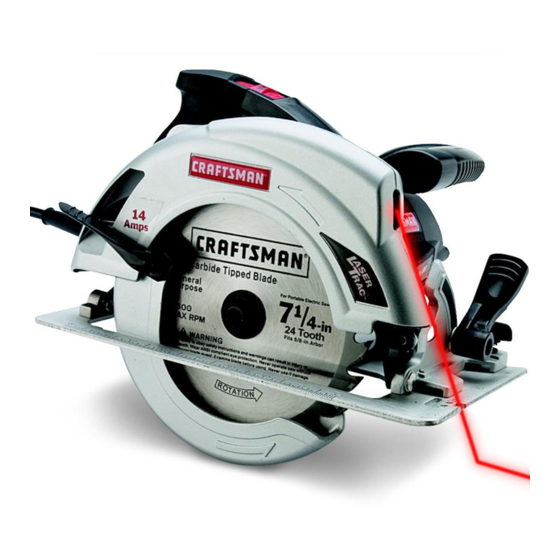
- Page 14 Fig. 2 ght On/Off Button Trigg Asist Handle Rear Handle Light Aperture Blade Guard Upper evel Scale Lower Blade Guard Handle Knob Adjustment Base Lower Blade Gua Blade Trig Depth-Of-Cut Scale Spindle Lock Button ustment Tighten Input 13 Amps Blade Diameter 7 1/4in.
- Page 15 ....i,l-i ..i ,,,,,i,l,i ..i,i ..CAUTION: NOT let familiarity with your saw make you careless. Remember that a careless fraction of a second is sufficient to cause severe injury° ..i ....i i i ..... Before attempting to use any tool, be sure to familiarize yourself...
- Page 16 SAW BLADES All saw blades need to be kept clean, sharp and properly set in order to cut efficiently° Using a dull blade places a heavy toad on the saw and increases the danger of kickback., Keep extra blades on hand, so sharp blades are always available.
- Page 17 KICKBACK Kickback occurs when the blade stalls rapidly and the saw is driven back towards you, Blade stalling is caused by any action which pinches the blade in the wood IMPORTANT: The best guard against kickback is to avoid dangerous practices.
- Page 18 To Lessen the Chance of Kickback: cont. 2. ALWAYS inspect the workpiece for knots or nails BEFORE beginning to cuL NEVER saw into a knot or nail. 3. Make straight cuts. ALWAYS use a straight edge guide when rip cutting This wil! help prevent twisting blade in the cut°...
- Page 19 TO ADJUST BLADE DEPTH 1. Unplug the saw............... WARNING: Failure to unplug the saw could result in accidental starting causing possible serious personal injury. ,i ....n,u ...... 2, Raise depth adjust lever to loosen,, (See Fig, 10), 3.
- Page 20 TO HELP MAINTAIN CONTROL cont....==!===,==,,,= ,,,,,,=,=..immediately° To avoid injury unplug the saw and move the cord to prevent it from hanging up again° WARNUNG: cord hangs workpiece during cut_ re,ease trigger switch it,,, i..iii, ,i ,11, i, ,i,.i, , I, =,,,,i,l,,=...
- Page 21 ..1 ilulr. MAKING CROSS CUTS OR RIP CUTS 1. When making cross or rip cuts, align your iine of cut with the outer blade guide notch on the base of the Fig, 14 saw (See Fig° 14). 2. Since blade thicknesses vary, ALWAYS make a trial cut in U0h:...
- Page 22 TO ADJUST BEVEL SETTING 1. Unplug the saw WARNSNG: Failure to unplug the saw could result in accidental starting causing i possible serious personal injury, 2. Loosen bevel adjustment knob (See Fig, 17) 3. Raise the motor housing end of the saw until you reach the desired angle setting on the bevel scale (See Fig 17),...
- Page 23 TO MAKE POCKET CUTS zero ! Artier setting can result in a loss of contro_ d the saw, possibly ! caus,ng serious in:.ury. 1. Adjust the bevel setting to zero, set the blade to the correct blade depth setting, and use the lower blade guard handle to swing the guard up.
- Page 24 SERVICE i= ..1,,,1 ..n .., ,,,_, ..WARNING: Preventive maintenance performed by unauthorized personnel result in misplacing of internal wires and components, which could cause a serious hazard. WARNING: To avoid accidents, ALWAYS disconnect the tool from the power source BEFORE cleaning or performing...
- Page 25 The following recommended accessories are currently available at your local Sears Store, WARNING: The use of attachments or accessories that are not recommended might be dangerous and could result in serious injury. EXTENSION CORDS Sears offers a large selection of extension cords that help extend your working range.
- Page 26 NOTES...
- Page 27 NOTES...
- Page 28 NOTES...