Cuisinart MG-50 - Meat Grinder Attachment Manual
- Quick reference manual (2 pages) ,
- Instruction and recipe booklet (29 pages) ,
- Instruction and recipe booklet (17 pages)
Advertisement
IMPORTANT SAFEGUARDS
When using electrical appliances, basic safety precautions should always be taken, including the following:
- READ ALL INSTRUCTIONS BEFORE USING.
- Switch off and unplug your Cuisinart® Stand Mixer before fitting or removing the Meat Grinder Attachment, after use and before cleaning.
- Close supervision is necessary when any appliance is used by or near children or individuals with certain disabilities. Cuisinart does not recommend the use of this appliance by children or individuals with certain disabilities.
- NEVER FEED FOOD BY HAND; ALWAYS USE THE PUSHER.
Avoid contact with moving parts and fitted attachments. To reduce the chances of bodily injury and/or damage to the stand mixer or Meat Grinder Attachment, keep hands, clothing, cooking utensils, etc., away from the moving parts during operation. - Do not use fingers to scrape food away from grinding plate while appliance is operating. Injury may result.
- The use of attachments not recommended or sold by Cuisinart may cause fire, electric shock or injury.
- Do not use more than one attachment at a time.
- Do not use the stand mixer or attachment if it is damaged or if the cord is damaged. Have it checked and serviced before resuming use.
- Do not use this attachment for anything other than its intended use.
- Do not use outdoors.
- Warning: The cutter is sharp; handle with care both when using and when cleaning.
- To protect against the risk of electric shock, do not put the base power unit in water or other liquids.
- Do not let cord hang over edge of table or counter.
- Never leave your Meat Grinder Attachment unattended while the stand mixer is running.
- The attachments are intended for use with the basic appliance SM-50.
- Do not operate your appliance in an appliance garage or under a wall cabinet. When storing in an appliance garage always unplug the unit from the electrical outlet. Not doing so could create a risk of fire, especially if the appliance touches the walls of the garage or the door touches the unit as it closes.
SAVE THESE INSTRUCTIONS FOR HOUSEHOLD USE ONLY
Refer to stand mixer manual for stand mixer operating instructions.

Always unplug the Cuisinart® Stand Mixer from outlet when assembling and disassembling.
UNPACKING INSTRUCTIONS
- Place the gift box containing your Cuisinart® Meat Grinder Stand Mixer Attachment on a flat sturdy surface before unpacking.
- Remove the instruction booklet and tray.
- Remove the grinding plates, sausage-making ring, cutter, ring nut and both sausage nozzles. Be careful when removing the grinding plates.
- Lift the corrugated insert that contains the grinder body out of the gift box and remove the grinder body. Remove the pusher/ wrench.
- Unscrew the ring nut and remove the protective cardboard insert from in front of the cutter. Use caution; the blades are sharp. To assemble the meat grinder attachment, follow Assembly Instructions. Replace all packaging materials inside box and save the box for repackaging.

RISK OF FIRE OR ELECTRIC SHOCK
 The lightning flash with arrowhead symbol within an equilateral triangle is intended to alert the user to the presence of uninsulated, dangerous voltage within the product's enclosure that may be of sufficient magnitude to constitute a risk of fire or electric shock to persons.
 The exclamation point within an equilateral triangle is intended to alert the user to the presence of important operating and maintenance (servicing) instructions in the literature accompanying the appliance.
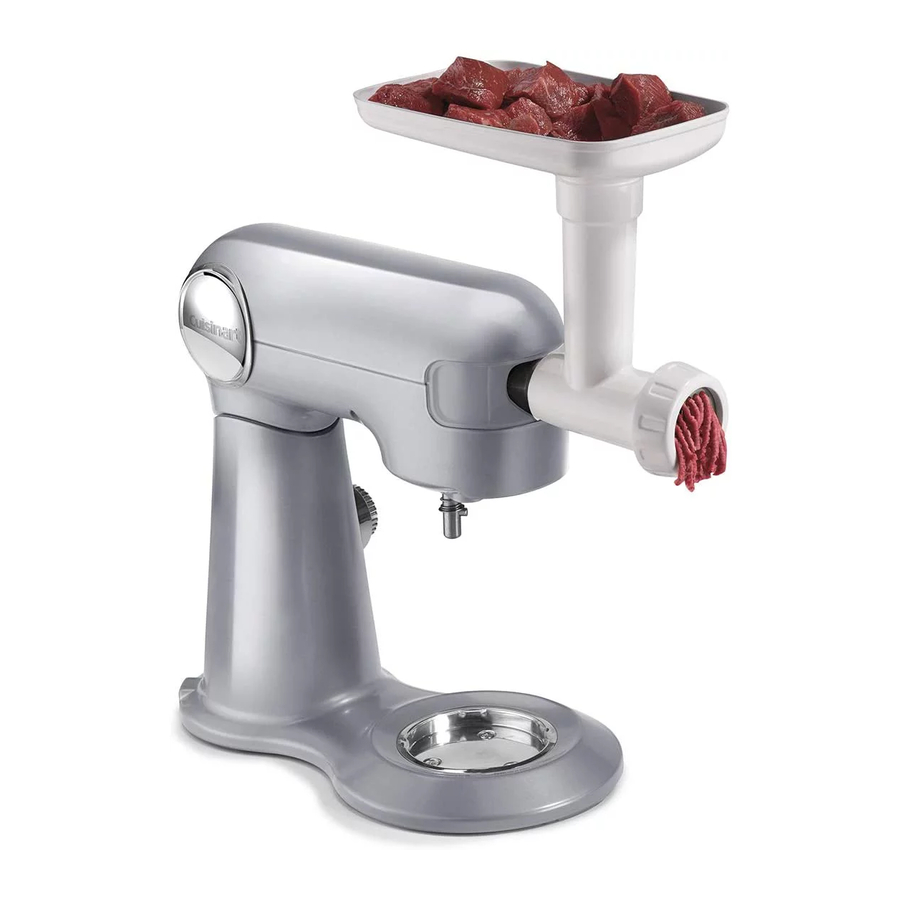
PARTS AND FEATURES

- Grinder Body
- Feed Screw Pin
- Cutter
- Ring Nut
- Wrench
- Tray
- Pusher with Storage
- Pusher Lid
- Sausage-Making Ring
- Large Sausage Nozzle
for thicker sausages
- Small Sausage Nozzle
for thinner sausages - Two Grinding Plates
- Medium, use for grinding raw meat, cooked meats for spreads and breadcrumbs
- Coarse, use for grinding raw or cooked meats, firm vegetables, dried fruits and cheese
Assembling Meat Grinder Attachment
Assemble the meat grinder attachment prior to attaching to the stand mixer.
- Insert the feed screw pin into the open end of the attachment.
![]()
- Place the cutter with the flat side facing out toward you over the feed screw pin (this is an important step or the meat grinder will not work).
![]()
- Place the grinding plate over the cutter on the feed screw pin.

- Screw on the ring nut by turning it clockwise and hand tighten.
When you are finished meat grinding, and if the ring nut is too tight to remove, use the wrench to loosen.


Attaching to stand mixer
- Make sure stand mixer is OFF.
- Gently pull port cover off front of mixer head to remove.
![]()
- Turn the stand mixer attachment knob counterclockwise until outlet opening is unobstructed.
![]()
- Insert the square metal end of the assembled attachment into the opening. If necessary, turn it to the right slightly so the small round knob on the attachment is below the notch on right side of opening, and turn it back and forth slightly until the knob slips into the notch and attachment locks into place.
![]()
- Turn the stand mixer attachment knob clockwise to secure grinder to mixer.
![]()
- Fit the tray onto the top of the meat grinder and put a mixing bowl under the grinder to catch food.
![]()


Operation
- Cut meat into 1-inch cubes, or 1-inch long strips.
- Turn the stand mixer to Speed 3, and drop meat into the grinder, one strip or a handful of cubes at a time.
- Use the pusher to gently move food down and into the grinder. Do not push hard – this could damage your meat grinder.
Note: Very cold meat is good for grinding. Frozen meat should never be processed.
SAUSAGE MAKER
Assembling Sausage Maker Attachment
Assemble the sausage maker attachment prior to attaching to the stand mixer.
- Insert the feed screw pin into the open end of the attachment.
![]()
- Place the sausage-making ring with the notches fitting into the notch openings on the feed meat grinder.

- Place the sausage nozzle onto the ring nut and screw it onto the meat grinder nozzle by turning it clockwise and hand tighten.
When you are finished making your sausages, and if the ring nut is too tight to remove, use the wrench to loosen.


Attaching to Stand Mixer
- Follow steps 1 to 4 under "Attaching to stand mixer".
![]()
- Turn the stand mixer attachment knob clockwise to secure sausage maker to mixer.
![]()
- Fit the tray onto the top of the feed tube. If you are not using casing, place a bowl under nozzle opening to catch sausage.
![]()


Operation
Please see Tips and Hints for best results.
- Slide open end of soaked sausage casing over nozzle. (See Tips and Hints for instructions on soaking sausage casings.)
- Push as much casing as you'll need for the number of sausages you want to make onto the nozzle.
- Tie a knot in the end of the casing and cut off any excess.
- Poke a hole in the casing just before the knot with a cake tester to prevent air pocket from forming.
- Place sausage ingredients on tray and turn stand mixer to Speed 3.
- Hold casing firmly on nozzle as you use pusher to feed ingredients into the sausage maker.
- Continue to hold casing on nozzle, releasing it gradually and pulling it off the nozzle as it fills and forms a coil of sausage in bowl below. Be careful not to overfill.
- Turn mixer off when done, leaving about 12 inches of unfilled casing.
To form Individual Sausages*
- Lay long sausage on flat tray and poke all over with a sharp object, similar in size to a needle or cake tester, to prevent air pockets from forming.
- Twist into sausages – you choose the size – by twisting each "sausage" first forward, then backward, to prevent them from untwisting.
- Pierce any air pockets you see.
- For best results, dry uncovered in refrigerator for about 6 hours, then flip and dry another 6 hours before cooking.
* Please see Tips and Hints for best results.
CLEANING AND MAINTENANCE
- Remove the ring nut manually or with the wrench if it is fastened too tightly.
- Disassemble and wash each part in warm soapy water. Dry all of the parts thoroughly. Do not put any of the metal parts in a dishwasher. Tray, pusher and wrench are top rack dishwasher safe.
- Reassemble.
- Wipe the grinding plates with vegetable oil and wrap each plate with greaseproof paper. This will prevent discoloring/ rusting.
- Store the sausage attachments and grinding plates inside the pusher and attach the lid.
- Any other servicing should be performed by an authorized service representative.
Tips and Hints
A wide variety of meat dishes, homemade sausages, chunky spreads, relishes, and purées are all great ways to use the meat grinder. With your own meat grinder you know exactly what is going into your food. You are able to control the ingredients you use

Documents / ResourcesDownload manual
Here you can download full pdf version of manual, it may contain additional safety instructions, warranty information, FCC rules, etc.
Advertisement
Thank you! Your question has been received!


Need Assistance?
Do you have a question about the MG-50 that isn't answered in the manual? Leave your question here.