
Related Manuals for Siemens Climatix POL871 1/STD Series


Summary of Contents for Siemens Climatix POL871 1/STD Series
- Page 1 Climatix Climatix HMI-TM POL871.x1/STD Basic documentation POL871.x2/STD CB1P3917en_redesigned Smart Infrastructure 2023-06-13...
- Page 2 Siemens Switzerland Ltd. Smart Infrastructure International Headquarters Gubelstrasse 22 CH-6301 Zug Tel. +41 41-724 24 24 Fax +41 41-724 35 22 © 2023 Siemens Switzerland Ltd. www.siemens.com/sbt Subject to change 2 / 38 Siemens Climatix HMI-TM CB1P3917en_redesigned Smart Infrastructure 2023-06-13...
-
Page 3: Table Of Contents
Alarm management .................. 23 Online trend ..................... 25 4.10 Graphical time scheduler ..............26 4.11 Iconic mode ..................... 31 4.12 Firmware update................... 35 Function List ....................37 3 / 38 Siemens Climatix HMI-TM CB1P3917en_redesigned Smart Infrastructure Table of contents 2023-06-13... -
Page 4: Introduction
The Climatix HMI-TM products can only be operated by personnel who have been Operation instructed by Siemens Building Technologies or their delegates and whose attention has been drawn to potential risks. Wiring When wiring the system, high voltage section must be strictly segregated from the... -
Page 5: Purpose And Scope
Supervisory Control and Data Acquisition SELV Safety Extra-Low Voltage Name Explanation Products and Tools Climatix Controller family with common tools SAPRO SAPRO programming tool SCOPE SCOPE commissioning and service tool 5 / 38 Siemens Climatix HMI-TM CB1P3917en_redesigned Smart Infrastructure Introduction 2023-06-13... -
Page 6: Human Machine Interface
Mounting Instructions Climatix HMI-TM CB1M3917en CB1T3917xx CE declaration of conformity POL871.7x A5W00442844A CE declaration of conformity POL871.6x 233006-T-0601_EN Environment product declaration POL871.x1 233006-T-0602_EN Environment product declaration POL871.x2 A5W00346618A Environment product declaration POL871.6x 6 / 38 Siemens Climatix HMI-TM CB1P3917en_redesigned Smart Infrastructure Introduction 2023-06-13... -
Page 7: Product Variants
POL871.x1 POL871.x2 2.5 m customized cable with 1 RJ45 plug 1.5 m Cat-5 Ethernet cable with 2 RJ45 and 1 slim connector (4-wire twisted pair) connectors (8-wire twisted pair) 7 / 38 Siemens Climatix HMI-TM CB1P3917en_redesigned Smart Infrastructure Connections 2023-06-13... -
Page 8: Hmi-Tm Overview
To exit to the upper level of menu or back to previous page To redirect to the page displaying the menu of HMI settings and Local Press and hold* connection * Hold the key for more than 2 seconds. 8 / 38 Siemens Climatix HMI-TM CB1P3917en_redesigned Smart Infrastructure HMI-TM overview 2023-06-13... -
Page 9: Led Indicators
For Latin (English) characters, font sizes of 6*12 pixels and 7*14 pixels (width*height) are supported; For Eastern Asian characters such as Chinese, font sizes of 12*12 and 14*14 pixels (width*height) are supported. Here are the examples: Displaying example 9 / 38 Siemens Climatix HMI-TM CB1P3917en_redesigned Smart Infrastructure HMI-TM overview 2023-06-13... - Page 10 Regarding how to program a title line, refer to Climatix SCOPE online help. 10 / 38 Siemens Climatix HMI-TM CB1P3917en_redesigned Smart Infrastructure HMI-TM overview...
- Page 11 “►”. The Latin characters and Eastern Asian characters are generated by SCOPE. Font size of characters varies with different versions of SCOPE. 11 / 38 Siemens Climatix HMI-TM CB1P3917en_redesigned Smart Infrastructure...
-
Page 12: Functions And Operations
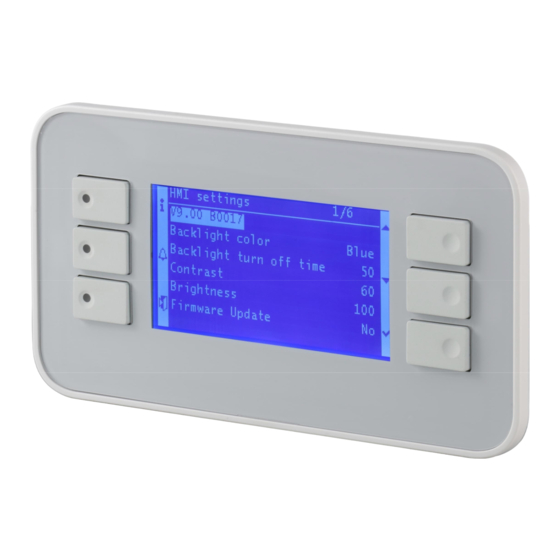
Press and hold key ESC on any page to go to the following page: The HMI settings page supports multi-language. The actual displaying language depends on the certain language selected in the controller. 12 / 38 Siemens Climatix HMI-TM CB1P3917en_redesigned Smart Infrastructure... - Page 13 1. Select Backlight color in the HMI setting page. 2. Press key ENTER to highlight Blue. 3. Press key UP to change the color. 13 / 38 Siemens Climatix HMI-TM CB1P3917en_redesigned Smart Infrastructure Functions and operations 2023-06-13...
- Page 14 Backlight turn off time for value editing. Brightness The brightness of HMI-TM screen can be configured from 0 to 100. Refer to Backlight turn off time for value editing. 14 / 38 Siemens Climatix HMI-TM CB1P3917en_redesigned Smart Infrastructure Functions and operations 2023-06-13...
-
Page 15: Controller Access
If the version of controller BSP is below 7.32, it will redirect to the home page without downloading the objects. Home page may be different according to the actual application. 15 / 38 Siemens Climatix HMI-TM CB1P3917en_redesigned Smart Infrastructure Functions and operations... -
Page 16: Log In
For example 1. Press and hold key ENTER on any page (except the error report pages) with OEM factory user level to activate the log in/off page as follows: 16 / 38 Siemens Climatix HMI-TM CB1P3917en_redesigned Smart Infrastructure Functions and operations... - Page 17 Enter correct 4-digit password and it will go to the target page defined in the HMI template. The corresponding user level will be shown on the upper-right corner. 17 / 38 Siemens Climatix HMI-TM CB1P3917en_redesigned Smart Infrastructure Functions and operations...
- Page 18 Change service password and Change factory password template pages will not be displayed and entered. Press and hold key ENTER on any page (except the error report pages), and the log in/off page will be displayed: 18 / 38 Siemens Climatix HMI-TM CB1P3917en_redesigned Smart Infrastructure...
- Page 19 To change the password of user level, select Change user password and press key ENTER, and the following page will be displayed: If the entered passwords do not match, the following page will be displayed: Then re-enter the password. 19 / 38 Siemens Climatix HMI-TM CB1P3917en_redesigned Smart Infrastructure Functions and operations...
-
Page 20: Log Off
The context helper page is fully programmable and should be pre-defined. For instance, the home page can be defined as the context helper of all HMI-TM pages by application engineer. In this case, key INFO serves as homepage. 20 / 38 Siemens Climatix HMI-TM CB1P3917en_redesigned Smart Infrastructure... -
Page 21: Parameter List
If “null value supported” is selected during the template creation, a separate scale will appear to the right of the ruler. If the separated scale (null value) is selected, the value will become asterisks. 21 / 38 Siemens Climatix HMI-TM CB1P3917en_redesigned Smart Infrastructure... - Page 22 Press key ESC to exit and all the modifications will be cancelled. In-place editing: The value can be directly editable on the parameter list page. Press key ESC to cancel the value input. one value in one line 22 / 38 Siemens Climatix HMI-TM CB1P3917en_redesigned Smart Infrastructure Functions and operations 2023-06-13...
-
Page 23: Alarm Management
[65120] Press key ALARM and the alarm related pages will be displayed by the following order: Alarm list detail → Alarm list → Alarm history → Alarm list/history settings. 23 / 38 Siemens Climatix HMI-TM CB1P3917en_redesigned Smart Infrastructure Functions and operations... - Page 24 To change the sorting methods, select Sort order 1 or Sort order 2 on the Alarm list/-history settings page, and the following page will be displayed: Select one sorting method on this page and press key ENTER to confirm the selection. 24 / 38 Siemens Climatix HMI-TM CB1P3917en_redesigned Smart Infrastructure Functions and operations...
-
Page 25: Online Trend
Press and hold on the online trend page Press To exit from the online trend page Press To increase the time DOWN Press To decrease the time 25 / 38 Siemens Climatix HMI-TM CB1P3917en_redesigned Smart Infrastructure Functions and operations 2023-06-13... -
Page 26: Graphical Time Scheduler
The function of time scheduler enables to display the schedule in graphics. 1. Define the name for time scheduler (e.g. “Enumeration Scheduler” or “Set point Scheduler”) in SCOPE as follows: 26 / 38 Siemens Climatix HMI-TM CB1P3917en_redesigned Smart Infrastructure Functions and operations... - Page 27 To adjust date and time DOWN Press To change the enumeration or set point ENTER Press To confirm the selection INFO Long press (3 sec.) To delete a time scheduler entry 27 / 38 Siemens Climatix HMI-TM CB1P3917en_redesigned Smart Infrastructure Functions and operations 2023-06-13...
- Page 28 4. Press key UP/DOWN to adjust the value on the vertical axis. The value is displayed on the top line. Press key ENTER. 5. Repeat step 3 through 4 until all scheduler entries are set. 28 / 38 Siemens Climatix HMI-TM CB1P3917en_redesigned Smart Infrastructure...
- Page 29 4. Press key UP/DOWN to adjust the value on the vertical axis. The value is displayed on the top line. Press key ENTER. 5. Repeat step 3 through 4 until all scheduler entries are set. 29 / 38 Siemens Climatix HMI-TM CB1P3917en_redesigned Smart Infrastructure...
- Page 30 3. Press key UP/DOWN to select the scheduler point, 4. Long press key INFO and hold 3 seconds to delete the scheduler. It is possible to set maximum 6 scheduler entries. Afterwards an error message appears. 30 / 38 Siemens Climatix HMI-TM CB1P3917en_redesigned Smart Infrastructure Functions and operations...
-
Page 31: Iconic Mode
To go to the sub page defined on Line 6 Monkey Key Press and hold To go to the defined target page of menu INFO & both keys for 5 mode ALARM seconds 31 / 38 Siemens Climatix HMI-TM CB1P3917en_redesigned Smart Infrastructure Functions and operations 2023-06-13... - Page 32 Lines No. 1, 2 and 3 have the same datapoints (e.g. “999.9°C”). Tick features as above picture (e.g. Right Alignment, Use Engineering Unit). Enumerations datapoint in Iconic mode page template should like: 32 / 38 Siemens Climatix HMI-TM CB1P3917en_redesigned Smart Infrastructure...
- Page 33 Create an icon 1. Right click the mouse on Language tab of HMI page and select Edit Icons: 2. The dialog box of Select Code will popup. Select a blank icon and click 33 / 38 Siemens Climatix HMI-TM CB1P3917en_redesigned Smart Infrastructure...
- Page 34 5. Right click the mouse on Language tab and select Select Icons. 6. The dialog box of Character Map popups. Select All Fonts (Private Characters) from the drop-down list of Font. 34 / 38 Siemens Climatix HMI-TM CB1P3917en_redesigned Smart Infrastructure...
-
Page 35: Firmware Update
2. Connect the HMI-TM to the controller. 3. Press and hold key ESC to enter the following page. 4. Select HMI settings and press key ENTER. Then the following page will be displayed: 35 / 38 Siemens Climatix HMI-TM CB1P3917en_redesigned Smart Infrastructure Functions and operations... - Page 36 V9.14B0030 is required as a bridge to upgrade to V10.XXB00YY. Follow Firmware update process as above. Do not unplug the cable or power off the controller during the updating process. 36 / 38 Siemens Climatix HMI-TM CB1P3917en_redesigned Smart Infrastructure...
-
Page 37: Function List
Online trend √ on page 25 Graphical time scheduler √ on page 26 Iconic mode √ on page 31 Firmware update √ on page 35 37 / 38 Siemens Climatix HMI-TM CB1P3917en_redesigned Smart Infrastructure Function List 2023-06-13... - Page 38 Siemens Switzerland Ltd. Building Technologies Group International Headquarters Gubelstrasse 22 CH-6301 Zug Tel. +41 41-724 24 24 Fax +41 41-724 35 22 © 2023 Siemens Switzerland Ltd. www.siemens.com/sbt Subject to change 38 / 38 Siemens Climatix HMI-TM CB1P3917en_redesigned Smart Infrastructure...