
Related Manuals for Panasonic WV-CU161C


Summary of Contents for Panasonic WV-CU161C
-
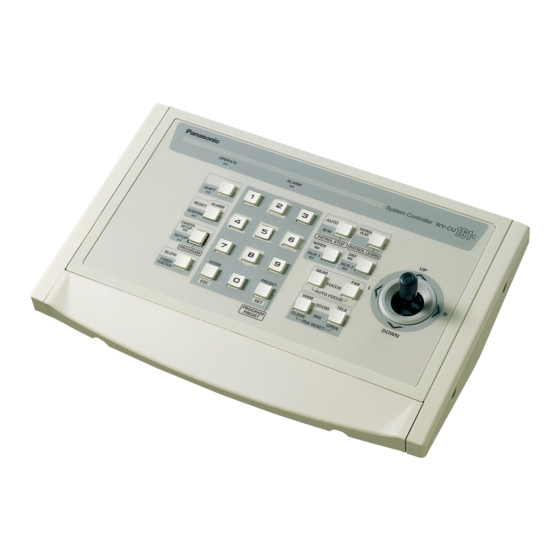
Page 1: System Controller
System Controller Operating Instructions WV-CU161C Model No. Before attempting to connect or operate this product, please read these instructions carefully and save this manual for future use. - Page 2 ENGLISH VERSION Caution: Before attempting to connect or operate this product, please read the label on the bottom. CAUTION RISK OF ELECTRIC SHOCK DO NOT OPEN CAUTION: TO REDUCE THE RISK OF ELECTRIC SHOCK, DO NOT REMOVE COVER (OR BACK). NO USER-SERVICEABLE PARTS INSIDE.
-
Page 3: Important Safety Instructions
IMPORTANT SAFETY INSTRUCTIONS 1) Read these instructions. 2) Keep these instructions. 3) Heed all warnings. 4) Follow all instructions. 5) Do not use this apparatus near water. 6) Clean only with dry cloth. 7) Do not block any ventilation openings. Install in accordance with the manufacturer's instructions. 8) Do not use near any heat sources such as radiators, heat registers, stoves or other apparatus (including amplifiers) that produce heat. -
Page 4: Table Of Contents
IMPORTANT SAFETY INSTRUCTIONS ... 3 FEATURES ... 5 PREFACE ... 5 PRECAUTIONS ... 6 MAJOR OPERATING CONTROLS AND THEIR FUNCTIONS ... 7 Front View ... 7 Rear View ... 9 INSTALLATION ... 10 Mounting in the Rack ... 10 CONNECTION & SETTING ... 11 System Connection ... -
Page 5: Features
• Preset position memories: Up to 64 positions including HOME • Patrol: Learning/Play • Image selection: Color/Black and White • Alarm control: Suspension ON/OFF, Reset Note: The WV-CU161C will not perform audio communications even if an audio board is installed in the connected Receiver. -
Page 6: Precautions
PRECAUTIONS • Refer all work related to the installation of this product to qualified service personnel or system installers. • Do not block the ventilation opening or slots on the cover. Place the appliance at least 5 cm (2 inches) away from the wall to prevent the appliance from heating up. -
Page 7: Major Operating Controls And Their Functions
MAJOR OPERATING CONTROLS AND THEIR FUNCTIONS Front View q Operate Indicator (OPERATE) Lights up while the System Controller power is on. w Alarm Indicator (ALARM) Blinks when an alarm is activated. The blink changes to a steady light when the alarm is automatically reset. - Page 8 t Wiper/Auxiliary 1 Button (WIPER/AUX1) Pressing this button will turn the housing wipers on or off for cameras provided with this function. Pressing this while the SHIFT indicator is lit will turn on or off the AUX1 function controlling accessories that are connect- ed to the camera or the specified receiver.
-
Page 9: Rear View
AC Cord !0 Power Switch (POWER) This switch is used to turn the System Controller power on and off. Down Caution: In the following cases, disconnect the AC... -
Page 10: Installation
INSTALLATION CAUTION • Installation should be performed by qualified service personnel or system installers according to the following instruc- tions. • Disconnect the power cord from the service outlet before installation. Mounting in the Rack 1. Remove the Connector Panel and Bottom Cover from the controller by removing the four screws. -
Page 11: Connection & Setting
CONNECTION & SETTING System Connection Basic Connection The WV-CU161C can be connected with a camera, a Time Lapse VCR and a video monitor as in the typical system configura- tion shown below. ALARM INPUT/OUTPUT (See page 14) Note: Refer to the operating instructions of each system component for connection and operation. - Page 12 Combination Camera Note: Refer to the operating instructions of each system component for connection and operation. Camera Camera Housing Receiver Video Switcher System Controller WV-CU161C System Controller WV-CU OPERATE ALARM CAMERA AUTO PATROL PLAY SHIFT...
- Page 13 AUTO FOCUS PROGRAM HOME PRESET WIDE TELE RESET DOWN CAMERA IRIS FUNCTION CLOSS OPEN IRIS RESET VIDEO OUT PROGRAM PRESET System Controller WV-CU161C RS485 DATA TERM LINE COAX RS485 DATA PORT Public lines DATA PORT Video Monitor Video signal RS-485 signal...
-
Page 14: Connection With A Time Lapse Vcr
0 (0) A < 400 m (1 300 ft) 400 (1 300) A < 700 m (2 300 ft) 700 (2 300) A < 900 m (3 000 ft) ALARM ALARM ALARM ALARM NC: Normally Closed Contact NO: Normally Open Contact Cable compensation parameter in WV-CU161C Setup menu... -
Page 15: Rs-485 Connection
RS-485 Connection Control data is transmitted and received between the con- troller and other peripherals. Use a shielded cable of data communication grade, consisting of two twisted pairs suit- able for RS485. Cable length may be extended up to 1 200 m (4 000 ft). -
Page 16: Switch Setting
Switch Setting There are four switches on the rear of the controller for specifying the terminal definition and data communication conditions. A signal form selection switch (SW1) and a character display mode switch (SW100) are mounted inside the controller. These inner switches do not need to be adjusted when the controller is used with the factory default settings. - Page 17 1. Remove the bottom cover as described above. 2. Remove the two side panels and the bottom panel by removing the twelve screws. The SW100 mounted inside the con- troller can be seen. 0/5V SW100 Side Panel Panasonic Bottom Cover Side Panel Bottom Cover...
- Page 18 3. Set the SW100 to the desired position. The default set- ting is NOR. NOR: White letters are displayed with a black border. REV: Black letters are displayed with a white border. SW100 4. Place the side panels, bottom panel and bottom cover in their previous positions and fasten the screws that were previously removed.
-
Page 19: Setup Menu
1. Check that the camera, monitor and peripherals are correctly and securely connected. 2. Switch all the system components on. The operation indicator of the WV-CU161C lights up, and the picture of the camera appears on the monitor. 3. Press the CAMERA SETUP/SETUP/PROGRAM button for 2 seconds or more while the SHIFT indicator is lit. -
Page 20: Alarm Setup
The SETUP indicator goes off. Note: The new settings are not saved if the WV- CU161C power is turned off before completing the setup. Return to the WV-CU161C SETUP MENU, complete the setup, and then turn the power off to save the new settings. - Page 21 Alarm Buzzer Setting This item lets you select whether or not to sound the alarm buzzer when an alarm is activated. 1. Display the ALARM SETUP menu. 2. Select ALARM BUZZER by moving the joystick up or down. 3. Select ALARM BUZZER ON or OFF by moving the joy- stick to the right or left.
-
Page 22: System Setup
System Setup 1. Display the WV-CU161C SETUP MENU. 2. Select SYSTEM SETUP by moving the joystick up or down. 3. Press the PRESET/SET/PROGRAM PRESET button. The SYSTEM SETUP menu appears on the monitor. SYSTEM SETUP CABLE COMP SWITCH BUZZER ON... - Page 23 6. The text line LOADING blinks on the right while down- loading. The bar graph changing from to P displays the down- loading progress. 7. END appears on the right after downloading has been completed. The progress bar disappears. 8. Editing the DATA TITLE. For further information, refer to Data Title on the next page.
- Page 24 • Check that the right unit address is selected for the combination camera when using the RS-485 mode. The camera cannot be operated if the numbers do not agree. Therefore, preset data cannot be uploaded. • Error Display The following messages appear on the monitor when errors occur during uploading.
-
Page 25: Communication Setup
Communication Setup Note: The COMMUNICATION menu appears when the DATA switch is set to RS-485. COMMUNICATION UNIT ADDRESS 1 BAUD RATE DATA BIT PARITY CHECK NONE STOP BIT WAIT TIME DELAY TIME XON/XOFF Unit Address This item lets you set the unit address assigned to the cam- era for RS-485 communication. -
Page 26: Operating Procedures
OPERATING PROCEDURES CAMERA CONTROL FUNCTIONS Camera control functions are operable. It is necessary to set up the camera before using the cam- era control functions. For further information, refer to the Operating Instructions for the respective combination cam- era (See page 33). You can also set it up from the Camera Setup menu during operating the system. -
Page 27: Operation Of Combination Camera
Operation of Combination Camera It is necessary to set up the combination camera before operating it. For further setup information, refer to the Operating Instructions for the combination camera (See page 30). You can also set it up from the Camera Setup menu during operating the system. - Page 28 Patrol Play The combination camera reproduces a series of pan/tilt movements and lens controls that have been preset before- hand in Patrol Learning. See page 33 to program the camera patrol learning func- tion. 1. Press the PATROL PLAY/PATROL LEARN button. PATROL PLAY PATROL LEARN...
- Page 29 Combination Camera Shortcuts The combination camera is controlled using the hundred shortcuts shown in the table. While the SHIFT indicator is lit, type a number using the numeric buttons, and then press the CAMERA FUNCTION button. [CAM FUNC] in the table below is an abbreviation for the CAMERA FUNCTION button.
-
Page 30: Camera Housing Control
Camera Housing Control Wiper Control The camera housing provided with the wiper is controlled. 1. Press the WIPER/AUX1 button to operate the wiper on the selected camera. WIPER AUX1 The WIPER indicator lights up. 2. Press the WIPER/AUX1 button to cancel the wiper con- trol function. -
Page 31: Alarm Control Functions
ALARM CONTROL FUNCTIONS When the WV-CU161C receives an alarm signal from a camera site, an alarm is activated. The WV-CU161C can handle the following alarms. Camera Site Alarm Coaxial Multiplex Communication: Alarm is multiplexed with video signals from the cam- era. -
Page 32: Camera Setup
2] for the WV-CS854, and [END] for fixed cameras. era, then all future setup operations must be performed with the buttons. If camera setup is started using the System Controller, then all future setup operations must be performed using the same controller. - Page 33 [LEARNING] appears on the monitor. LEARNING Note: Pressing the PROGRAM button alone for 2 sec- onds will change the screen to the WV-CU161C SETUP MENU or camera SETUP MENU. 2. Operate the camera using the following controls so that it traces the routine course that is the most frequently patrolled.
-
Page 34: All Reset
ALL RESET The WV-CU161C System Controller can be reset to the default settings as follows: 1. Turn off the Power Switch. 2. Turn on the Power Switch while simultaneously pressing numeric buttons 2, 4 and 6. HOME 3. Resetting has been completed when all LEDs light up... -
Page 35: Specifications
SPECIFICATIONS Power Source: Power Consumption: Camera Input: Alarm Input: Alarm Recover Input: Video Output: Alarm Output: Alarm Reset Output: Data Input/Output: Lens Control: Pan/Tilt Control: Housing Control: Camera Control: Alarm: Ambient Operating Temperature: Ambient Operating Humidity: Dimensions: Weight: Dimensions and weight are approximate. Specifications are subject to change without notice. - Page 36 Panasonic Security and Digital Imaging Company A Division of Matsushita Electric Corporation of America Executive Office: One Panasonic Way 3E-7, Secaucus, New Jersey 07094 Regional Offices: Northeast: One Panasonic Way, Secaucus, NJ 07094 (201) 348-7303 Southern: 1225 Northbrook Parkway, Suite 1-160, Suwanee, GA 30024 (770) 338-6838...