Table of Contents
Advertisement
Quick Links
Take the time to read through this instruction manual.
Familiarity with installation and operation procedures will help you obtain the best performance from your new
GPS Navigation System.
For your records
Record the serial number, found on the top of the unit, in the spaces designated on the warranty card, and in the space
provided below. Refer to the model and serial numbers whenever you call upon your KENWOOD dealer for information or
service on the product.
Model DNR1008RVS Serial number
US Residence Only
Register your KENWOOD product at www.kenwood.com/usa/
© 2022 JVCKENWOOD Corporation
DNR1008RVS
GPS NAVIGATION SYSTEM
INSTRUCTION MANUAL
• Updated information (the latest Instruction Manual, system updates, new
functions, etc.) is available from
<https://www.kenwood.com/cs/ce/>.
• The Instruction manual is subject to change for modification of
specifications and so forth. Be sure to download the latest edition of the
Instruction manual for reference.
<https://www.kenwood.com/cs/ce/>
Register Online
IM408_ref_K_En_00 (K)
Advertisement
Table of Contents

Related Manuals for Kenwood DNR1008RVS


Summary of Contents for Kenwood DNR1008RVS
- Page 1 Record the serial number, found on the top of the unit, in the spaces designated on the warranty card, and in the space provided below. Refer to the model and serial numbers whenever you call upon your KENWOOD dealer for information or service on the product.
- Page 2 Important Notice on Software JVCKENWOOD Corporation, the original (English) of the license is presented. Ñ EULA Software License on This Product Ñ Software License Agreement The software embedded in this product comprises a number of independent software JVCKENWOOD Corporation (hereinafter called components, each of which is copyrighted by “Licensor”) holds either the copyright to the JVCKENWOOD Corporation or by a third party.
- Page 3 Article 3 (Terms of License) Article 8 (Cancellation of the Agreement) Licensor reserves the right to cancel this 1. In assigning this product, User may not retain agreement forthwith and claim compensation the original copy of the embedded Licensed from User for the damages caused by such Software (including associated literature, cancellation when User: updates and upgrades) and any duplicates...
-
Page 4: Table Of Contents
Contents Before Use USB/SD Precautions ..............6 Connecting a USB device ........29 Safety Precautions Inserting the SD ............29 and Important Information ....... 7 USB/SD Basic Operation.........30 How to read this manual ......... 8 Search Operation ............31 Basic Operations iPod/iPhone Functions of the Buttons on the Front Panel ... 9 Preparation ..............33 Turning on the Unit ..........10 iPod/iPhone Basic Operation .......34... - Page 5 Bluetooth Control Remote control Information for using Bluetooth® devices ..51 Battery Installation ...........86 Register the Bluetooth device ......52 Functions of the Remote control Buttons ..86 Playing the Bluetooth Audio Device ....54 Connection/Installation Using the Hands-Free Unit ........56 Hands-Free Setup .............61 Before Installation ............89 Installing the unit .............92 Other External Components...
-
Page 6: Before Use
See System Setup For best results while pairing with your (P.73). KENWOOD receiver, please be sure to close any • The Radio Broadcast Data System feature unused applications. won’t work in areas where the service is not supported by any broadcasting station. -
Page 7: Safety Precautions And Important Information
The navigation system is designed to provide and follow the instructions in this manual. you with route suggestions. It does not reflect Neither KENWOOD nor Garmin shall be liable for road closures or road conditions, weather problems or accidents resulting from failure to conditions, or other factors that may affect safety observe the instructions in this manual. -
Page 8: How To Read This Manual
Before Use How to read this manual • The screens and panels shown in this manual are examples used to provide a clear explanation of operations. For this reason, they may be different from the actual screens or panels, or some display patterns may be different from the actual ones. -
Page 9: Basic Operations
Basic Operations Basic Operations Functions of the Buttons on the Front Panel Number Name Motion Remote • Receives the remote control signal. Sensor • Displays the HOME screen (P.13). [ ]HOME • Pressing for 1 second turns the power off. •... -
Page 10: Turning On The Unit
Basic Operations Number Name Motion SD card slot • A slot to insert an SD card. • You can play audio/visual files in the card. * • An SD card slot for upgrading the map. For how to upgrade the map, refer to the instruction manual of the navigation system. -
Page 11: Initial Settings
Perform this setup when you use this unit first time. [OEM SETUP] ■ This function requires a commercial adaptor. Set each item as follows. Consult your KENWOOD dealer for details. Touch [Finish]. ■ [Locale] Select the country for the navigation system. The language, the distance unit, and the NOTE gasoline unit are set. -
Page 12: Adjusting The Volume
Basic Operations Adjusting the volume [Time Format] ■ Select the time display format. [12-Hour] (Default)/[24-Hour] You can adjust the volume (0 to 40). Turn the knob clockwise to increase, and ■ [Clock] counter-clockwise to decrease. [NAV-SYNC ](Default): Synchronizes the clock time with navigation GPS data. -
Page 13: Display The Home Screen
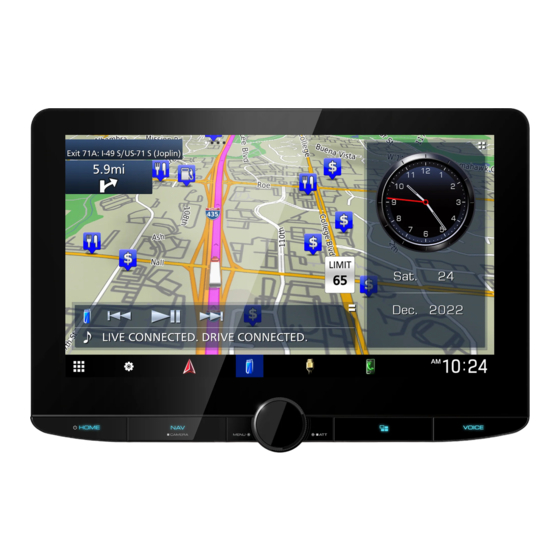
Basic Operations Display the HOME screen NOTE • The speed limit feature is for information only and does not replace your responsibility to abide Press the [ ][HOME] button. by all posted speed limit signs and to use safe driving judgment at all times. •... -
Page 14: Source Selection Screen Description
Basic Operations Select the playback source • Close the popup menu. • Short-cut source icons: The source Press the [ ][HOME] button. changes to the one you have set with h HOME screen appears. a short-cut. For the short-cut setting, refer to Customize Short-cut source Touch [ icons on HOME screen (P.15). - Page 15 Basic Operations Customize Short-cut source icons *1 When connecting as Apple CarPlay or Android Auto, it works as a phone provided in Apple CarPlay or on HOME screen Android Auto. If Apple CarPlay or Android Auto are connected during talking by the Bluetooth device or You can arrange the positions of the source iDatalink phone, the current call will be continued.
-
Page 16: Source Control Screen Description
Basic Operations Source control screen * For right hand drive vehicles, the left and right drawers are swapped. For how to set up the description driving position, see User Interface Setup (P.72). There are some functions which can be performed from most screens. List screen There are some common function keys in the list screens of most sources. -
Page 17: Navigation Operation
Basic Operations Select Transportation Mode. etc. Keys with various functions are displayed here. • : Plays all tracks in the folder containing the current track. • : Jumps to the letter you entered (alphabetical search). • : Moves to the upper hierarchy level. - Page 18 • For more information about your navigation system, download the latest version of the Owner’s Manual from https://manual. Views the Next Turn page or the junction kenwood.com/edition/im408/ view page, when available. Views the Turn List page. Views the Where Am I? page.
- Page 19 Basic Operations For details, see “KENWOOD Traffic Powered By Returns to the Main menu. INRIX” application. Data field. Touch to display a different data field. ■ Updating maps You can purchase updated map data from Vehicle speed. Touch to display a trip information.
- Page 20 Android smartphone in which the “KENWOOD Traffic Powered By INRIX” application is installed to this unit. Preparation • Install the latest version of the KENWOOD Traffic Powered By INRIX application on your iPhone or Android smartphone. – iPhone: Search for "KENWOOD Traffic Powered By INRIX"...
- Page 21 Basic Operations ● Displaying INRIX traffic information 1 While navigating a route, touch [ 2 Touch [Traffic]. ● Displaying parking information 1 While navigating a route, touch [ 2 Touch [Apps]. 3 Touch [Dynamic Parking]. English...
-
Page 22: Widget
Widget Widget Widget Drive Widget Panel You can change the widget. Press the [ ][HOME] button. Press the [[ ][HOME] button. You can change the widget or customize the widget area. Touch the right top corner of the drive widget panel. h The drive widget list appears. -
Page 23: Importing Image Files
See Photo Frame Widget (P.22) and To register an original image (P.72). Drag the drive widget to right or left. Preparation • Install the latest version of the “KENWOOD Portal APP” application on your iPhone or Android smartphone. – iPhone: Search for “KENWOOD Portal APP” in the Apple App Store to find and install the most current version. -
Page 24: Apps
• iPhone 6s activate the Wireless Mirroring function, • iPhone 11 Pro then connect to this unit. • iPhone 11 Select (”DNR1008RVS”) as the network Ñ to use. Connecting an iPhone h When the connection is established, then the same screen displayed on the Wired connection Android smartphone is displayed. - Page 25 APPS Ñ Select an Apple CarPlay device Wireless connection You can select the iPhone registered in [Device If two or more iPhone compatible with Apple List] and use it as the Apple CarPlay device. CarPlay have been registered, select the See Register the Bluetooth device (P.52).
-
Page 26: Android Auto Operation
APPS Ñ Use Siri Android Auto™ Operation You can activate Siri. Android Auto enables you to use the functions Press the [VOICE] button. of your Android smartphone convenient for driving. You can easily make calls, listen to music, and access convenient functions on the Android smartphone while driving. - Page 27 APPS Ñ Ñ Connect Android smartphone Select an Android smartphone If two or more Android smartphones Wired connection have been registered, select the Android smartphone to be used as the Android Auto Connect an Android smartphone via the source. See Switch the connected device USB terminal.
- Page 28 APPS Ñ Using voice control Press the [VOICE] button. Start speaking. NOTE • When you press and hold the [VOICE] button while inputting voice, you can start over from the beginning. To cancel Press the [VOICE] button. Ñ Switch to the Android Auto screen while listening to another source Press the [...
-
Page 29: Usb/Sd
USB/SD USB/SD Connecting a USB device Inserting the SD Connect the USB device with the USB Tilt the panel toward you manually. cable. (P.99) Press the [ ][HOME] button. Insert the SD card into the slot until it Touch [ clicks. -
Page 30: Usb/Sd Basic Operation
USB/SD USB/SD Basic Operation • [ ] : Repeats the current track/folder. Each time you touch the key, repeat modes are switched in the following sequence: Most functions can be controlled from the File repeat ( ), Folder repeat ( ), Repeat source control screen and playback screen. -
Page 31: Search Operation
USB/SD Search Operation Video screen You can search music or video files by the following operations. Touch [1]. Touch [S]. File search area (Video file only) Touch to search for the next/previous file. Select a list type. Key display area (Video file only) Touch to display the control screen. - Page 32 USB/SD Ñ Link search (Audio file only) You can search for a file of the same artist/ album/genre as that in the current track. Touch [Link Search]. Touch the desired tag type. You can select from artists, albums and genres. h The list corresponding to your selection appears.
-
Page 33: Ipod/Iphone
Apple CarPlay by operating the iPhone • Latest compatible list of iPod/iPhone. For details, at functional setup before connecting iPhone. see www.kenwood.com/cs/ce/ipod/. For details of the setup method, contact the • By connecting your iPod/iPhone to this unit with manufacturer of the terminal. -
Page 34: Ipod/Iphone Basic Operation
iPod/iPhone iPod/iPhone Basic Operation Content list • Touch the left side of the screen to display the Content list. Touch again to close the list. NOTE • Displays the playing list. When you touch a • Set the remote controller mode switch to AUD track/file name on the list, playback will start. -
Page 35: Search Operation
iPod/iPhone Ñ Search Operation Link search You can search for a file of the same artist/ You can search music files by the following album/genre/composer as that in the current operations. track. Touch [1]. Touch [Link Search]. Touch [S]. Touch the desired tag type. You can select from artists, albums, genres and composers. -
Page 36: Radio
Radio Radio Radio Basic Operation Operation keys • [E] [F] : Tunes in a station. The method of Most functions can be controlled from the switching frequencies can be changed (see source control screen. Seek mode). To listen to the Radio source, touch [Radio] •... -
Page 37: Memory Operation
Radio Memory Operation Information display • Displays the information on the current station: Ñ Auto memory Frequency Touching [ ] allows you to switch between You can store stations with good reception in Content A, Content B. the memory automatically. Content A: PS name, Radio Text, Title&Artist Touch desired band key. -
Page 38: Selecting Operation
Radio Selecting Operation Traffic Information (FM only) Ñ You can listen to and watch traffic information Preset select automatically when a traffic bulletin starts. You can list and select memorized stations. However, this feature requires a Radio Broadcast Data System that includes TI Touch [ ] on the left side of the screen. -
Page 39: Siriusxm
SiriusXM® SiriusXM® Control screen SiriusXM® Basic Operation Only SiriusXM® brings you more of what you love to listen to, all in one place. Get over 140 channels, including commercial-free music plus the best sports, news, talk, comedy and entertainment. Welcome to the world of satellite radio. - Page 40 SiriusXM® For SXV200 or SXV100 * Information display Turns the Traffic & Weather Jump function • Displays the information on the current on or off. channel: Channel Name • (White) : Function on. P#: Preset number • (Purple) : Playing. #CH: Channel number •...
-
Page 41: Storing Channels In Preset Memory
SiriusXM® Storing Channels in Preset Direct search Memory You can tune in a channel directly. You can store the current channel in memory. Touch [ ] on the right side of the screen. Touch [Direct Channel]. Tune in the channel you wish to store in the memory. -
Page 42: Category/Channel Search
SiriusXM® Category/Channel search Replay You can specify the desired category and You can replay the last 60 minutes of the select a channel. program from the current channel. Touch [1]. Touch [Replay] on the function panel. Select a category. ■ [E] [F] Press to skip to the previous/next track. -
Page 43: Tunemix
SiriusXM® TuneScan™ To return to live music/content Touch [ ] on the right side of the screen. TuneScan™ is a feature that plays samples from the starts of multiple buffered songs Touch [Live]. from each of the SmartFavorites channels that predominantly play music selections. -
Page 44: Traffic & Weather Now
SiriusXM® Traffic & Weather Now™ Content Alerts Traffic & Weather Now™ allows you to access When a broadcast program related to the the latest report whenever you want to hear registered artist, song or team starts, an Alert it. First select your city in the set up menu. See Content List screen appears to allow you to Select a City for Traffic &... -
Page 45: Sportsflash
SiriusXM® SportsFlash™ SiriusXM SETUP SportsFlash™ will notify you when a big play Touch [ ] on the right side of the screen. happens during a game with one of your Touch [SETUP]. favorite sports teams. Choose to tune in and hear the play unfold like it was live. - Page 46 SiriusXM® Ñ Ñ Parental code Parental Control You can set a SiriusXM parental code for Parental Control is a feature that provides the Parental Control. user with the ability to prevent unauthorized access to mature content and user selected Touch [Parental Code] on the SiriusXM channels.
- Page 47 SiriusXM® Touch each channel in the list and set to NOTE ON or OFF. • Touch [All-Channels] to display all channels. • To delete the parental lock channel setting, touch [Disable All] and then touch [YES] on the confirmation screen. Touch each channel on the list and set to ON or OFF.
- Page 48 SiriusXM® Touch each content list item you want to To select a Team check or uncheck. Get alerted when your favorite sports team is playing on another SiriusXM channel with GameAlert™ Touch [My Games]. NOTE • You can select (þ) up to 60 artists or songs. Touch the desired league in the list.
- Page 49 SiriusXM® Ñ SportsFlash™ setup Touch [ ] twice. Activating SportsFlash Touch [SportsFlash] on the SiriusXM SETUP screen. h SportsFlash is turned on or off. Default is “ON”. Selecting SportsFlash Beep Touch [SportsFlash Beep] on the SiriusXM SETUP screen. ■ [Edit] h SportsFlash Beep is turned on or off.
- Page 50 SiriusXM® Ñ Selecting Featured Bands Touch [Done]. Update Messages You can set whether to be notified when the featured seasonal theme is updated. Touch [Featured Bands Update Messages] on the SiriusXM SETUP screen. Featured Bands Update Messages is turned on or off. Ñ...
-
Page 51: Bluetooth Control
Bluetooth Control Bluetooth Control Ñ Using the Bluetooth function allows you to use About the smartphone/cell- various functions such as listening to the audio phone and Bluetooth audio file and making/receiving a call. device Information for using This unit conforms to the following Bluetooth specifications: Bluetooth®... -
Page 52: Register The Bluetooth Device
[VOICE] button displays h SETUP Menu screen appears. Bluetooth pairing waiting dialog. Touch [Connections & AV]. Search for the unit (”DNR1008RVS”) from your smartphone/cell-phone. Complete steps 7 to 9 within 30 seconds. Operate your smartphone/cell-phone according to the displayed messages. - Page 53 Bluetooth Control Touch [Yes]. NOTE When data transmission and connection • If the icon is lighted, it means that the unit will have completed, the Bluetooth connection use that device. icon appears on the screen. • You can confirm the connection status of Bluetooth, Apple CarPlay or Android Auto as NOTE follows.
-
Page 54: Playing The Bluetooth Audio Device
Bluetooth Control Set each profile as follows. NOTE • The following devices are not deleted. – Wired Apple CarPlay device which is not paired – Connected Android Auto device Touch [Delete]. h Confirmation message appears. Touch [Yes]. h All the selected device(s) is deleted. [TEL (HFP) 1], [TEL (HFP) 2] ■... - Page 55 • : Device used normally. Bluetooth audio devices can be switched easily • : Device used for KENWOOD Music Mix to play music. See KENWOOD Music Mix (P.55). Touch [ ] (White/dark blue background) on the left of the name of the device to be played.
-
Page 56: Using The Hands-Free Unit
Bluetooth Control Using the Hands-Free Unit NOTE • If a connected Bluetooth audio device is operated You can use the telephone function by to play music, connections are switched. connecting the Bluetooth telephone to this • When a Bluetooth source is switched to another unit. - Page 57 Bluetooth Control Select a dialing method. Call using call records Touch [ Select the phone number from the list. • [ ]: Call using call records • [ ]: Call using the phonebook • [ ]: Call using the preset number •...
- Page 58 Bluetooth Control Select the phone number from the list. Call by entering a phone number Touch [ Enter a phone number with number keys. NOTE • You can sort the phone numbers in the list by last name or first name. For details, see Hands-Free Setup (P.61).
- Page 59 Bluetooth Control Ñ Ñ Receive a call Operations during a call Touch [ ] to answer a phone call or ] to reject an incoming call. ● Adjust the volume of your voice 1) Touch [Speech Quality]. 2) Touch [T] or [U] for [Microphone Level]. NOTE •...
- Page 60 Bluetooth Control Ñ Phone number preset ● Call-waiting When you receive a new call while talking on You can register frequently used phone the phone, you can answer the newly received numbers in this unit. call by touching [ ]. The current call is put on hold.
-
Page 61: Hands-Free Setup
Bluetooth Control Ñ Phonebook transfer Hands-Free Setup You can transfer phonebook data from your You can make various settings for the Hands- Bluetooth smartphone using PBAP. Free function. Touch [ Press the [ ][HOME] button. Touch [ Touch [ ]. Touch [SETUP]. - Page 62 Bluetooth Control [Auto Response]* ■ Set the automatic response time to pick-up an incoming call. [OFF ](Default): Turns off the Automatic response function. [1]/[5]/[10]/[15]/[20]/[25]/[30]: Sets the ringing time (second). [Auto Pairing] ■ When set to “ON”, the Apple Auto Pairing function is turned on to automatically register the iPod touch or iPhone connected to this unit.
-
Page 63: Other External Components
Other External Components Other External Components View Camera Camera off Touch to exit the camera screen. Switching the Guideline * NOTE Touching each time turns on or off the • To connect a camera, see Connecting the guideline. camera (P.101). •... - Page 64 Other External Components Ñ To set up the camera [Rear Camera Message] * ■ [Always display] (Default): Always displays assignment settings the caution message on the rear camera interruption screen. Touch [Camera Assignment Settings] in [Clear after 5 seconds]: Displays the the Camera setting menu.
-
Page 65: Use Dashboard Camera
Other External Components Adjusting the position of the selected *1 Except the [REAR VIEW CAMERA] setting mark. screen. *2 The [REAR VIEW CAMERA] setting screen only. *3 The [REAR VIEW CAMERA] and [FRONT VIEW CAMERA / DASH CAM] setting screens only. *4 The [FRONT VIEW CAMERA / DASH CAM] and [3rd VIEW CAMERA] setting screens only. -
Page 66: External Audio/Video Players (Av-In)
Other External Components Ñ Ñ Display the dashboard camera Added function screen Display the map while playing the recorded file Press the [MENU]/[ATT] button. h Popup menu appears. Play the recorded file. See the instruction manual of the Touch [Camera]. Dashboard Camera. -
Page 67: Hdmi Source
Other External Components HDMI source • Displays information about the Parking Distance Sensor of the vehicle. • Displays the control screen of the Connect your smartphone to the HDMI accessories in the vehicle. input terminal. (P.98) * These iDatalink features are displayed as the widget on the Home screen. -
Page 68: Setup
Setup Setup Press the [ ][HOME] button. ■ [Backlight]/[Contrast]/[Black]/ [Brightness]/[Color]/[Tint] Touch [ ]. Adjust each setting. Touch [SETUP]. ■ [Aspect] Select a screen mode. [Full]: Changes the aspect ratio of video and displays video fully on the screen. [Normal]: Displays video at the ratio of 4:3. [Auto]: USB device and SD card: Displays video fully (vertically or horizontally) with no... - Page 69 Setup [Device List] [iPod Bluetooth Connection] ■ ■ See Select the method of making Select the connected device to be used. (P.53) connections for outputting sound from the iPod source (P.33). [Device Name] ■ If you select [ON] for [Bluetooth], you can [AV-IN Interface] ■...
-
Page 70: Display & Button Setup
Setup Ñ Change the device name for Input the device name. bluetooth Touch [Device Name] in the Connections & AV setting menu. h Change Device Name screen appears. Touch and hold [ Input the device name. Touch [Enter]. Display & Button Setup Press the [ ][HOME] button. - Page 71 Setup To register an original color [Button Illumination Color] ■ You can set the button illumination color. You can register your original color. (P.71) Touch [User] on the Button Illumination [Wallpaper Customize] ■ Color screen. You can change the wallpaper image or color.
-
Page 72: User Interface Setup
[Dyn.] (Default): Displays information when the sensor detects obstacles. To register an original image [OFF]: Cancels this function. With “KENWOOD Portal APP” application This can be set when the iDatalink installed on your iPhone or Android (commercially available) is connected. -
Page 73: System Setup
Setup System Setup * If you select [Advanced] for Language Select Mode, the following screen appears. You can setup system parameters. Press the [ ][HOME] button. Touch [ ]. Touch [SETUP]. h SETUP Menu screen appears. Touch [System]. h System setting menu appears. [GUI Language Select] ■... -
Page 74: Controlling Audio
Controlling Audio Controlling Audio You can adjust various settings such as audio 3-way speaker system setup balance or subwoofer level. Select the appropriate crossover network Press the [ ][HOME] button. mode for the speaker system used (2-way or Touch [ ]. 3-way speaker system). -
Page 75: Speaker / X'over Setup
Controlling Audio Touch the speaker (1) you wish to adjust NOTE and set each parameter (2) as follows. • When the 3-way speaker system is selected, the following functions are disabled. – Front focus of Listening Position / DTA – Fader for Controlling General Audio –... -
Page 76: Equalizer Control
Controlling Audio Equalizer Control When Speaker network is set to 3-way: You can adjust equalizer by selecting the optimized setting for each category. Press the [ ][HOME] button. Touch [ ]. Touch [Audio]. h Audio screen appears. ■ [Speaker] Touch [EQ / SW Level]. You can select a speaker type and its size to get the best sound effects. -
Page 77: Listening Position / Dta
Controlling Audio Ñ Save the EQ curve Listening Position / DTA Adjust the EQ curve. Listening Position / DTA allows you to improve the sound field depending on the position of Touch [Memory]. the seat you sit. Listening Position / DTA allows you to set Select where to save. - Page 78 Controlling Audio Ñ Front Focus Position DTA control You can fine-adjust your listening position. You can focus the imaginary sound image on the front of the selected seat. Touch [Adjust]. Touch [Front Focus] in the Position / DTA Touch [Delay]. screen.
-
Page 79: Fader / Balance / Zone Control
Controlling Audio Fader / Balance / Zone Control [Size of the Virtual Sound Field] ■ Adjust the size of sound image to meet your taste. If the sound image is shifted from the Press the [ ][HOME] button. front, move it back by [Sound Image LR (Front)] or [Sound Image LR (Rear)]. - Page 80 Controlling Audio Ñ Zone Control NOTE You can select different sources for front and • When the rear source is switched, the audio source that is output at the AV OUTPUT terminal rear positions in the vehicle. is also switched to the same source. Touch [Dual Zone] on the FAD / BAL / •...
-
Page 81: Volume Offset
Controlling Audio Volume Offset Set each parameter as follows. Finely adjust the volume of the current source to minimize the difference in volume between different sources. Press the [ ][HOME] button. Touch [ ]. Touch [Audio]. h Audio screen appears. [Bass Boost] ■... -
Page 82: Parametric Equalizer
Controlling Audio Parametric Equalizer About Adjustments If there are unpleasant peaks, you can slide the peaking filter to the left or right and search In addition to the conventional Graphic the frequencies by ear. Studio engineers use Equalizer, this unit has a parametric equalizer, this method to make adjustments quickly and which allows you more precise adjustments. - Page 83 Controlling Audio ● High-Pass Filter ● Peaking Filter Passes signals with frequencies higher than The frequencies in the vicinity of a certain a certain frequency (fc: cutoff frequency) frequency (f0: center frequency) are and attenuates signals with frequencies boosted or attenuated. Use this in the lower than the cutoff frequency.
- Page 84 Controlling Audio Ñ Adjust the Parametric Equalizer EQ point (blue/yellow): EQ points that are not currently being adjusted. Preparation Curve (orange): EQ curve of the speaker currently being adjusted. • Correct the value in “Listening Position” and “Front Focus” before adjusting the parametric equalizer. Curve (blue): Overall EQ curve.
-
Page 85: Audio Setup Memory
Controlling Audio Audio Setup memory When you have finished adjustments, save the results as a preset, and check the effects by switching presets or turning Audio Control settings can be memorized. the Parametric EQ [ON] and [OFF]. The memorized settings can be recalled at any time. -
Page 86: Remote Control
Remote control Remote control This unit can be operated using the remote Functions of the Remote control KCA-RCDV340 (optional accessory). control Buttons # CAUTION Ñ Switch the operation mode • Put the remote control in a place where it will not move during braking or other operations. - Page 87 Remote control Ñ Ñ Direct search mode Basic Operation Using the remote control, you can jump directly to the desired channel by entering the number corresponding to the content. NOTE • This operation cannot be performed for the USB device and iPod. Press the [DIRECT] button several times until the desired content appears.
- Page 88 Remote control Mode Function Name switch CLEAR − Not used. Switches to the direct search mode. (P.87). DIRECT − AUDIO − Not used. RETURN − Not used. SUBTITLE − Not used. − When a call comes in, answers the call. ANGLE −...
-
Page 89: Connection/Installation
Connection/Installation Connection/Installation This section is for the professional installer. • Do not use your own screws. Use only the screws provided. If you use the wrong screws, For safety’s sake, leave wiring and mounting to you could damage the unit. professionals. - Page 90 Connection/Installation ● Forward and Lateral Fields of Vision • This unit has the cooling fan to decrease the internal temperature. Do not mount the unit • To determine driver’s forward and lateral fields in a place where the cooling fan of the unit is of vision under normal conditions, place a blocked.
- Page 91 Connection/Installation Ñ Installation procedure 1) To prevent a short circuit, remove the key from the ignition and disconnect the ¤ (5.0 m) terminal of the battery. 2) Remove the vehicle parts for installing the unit and connecting wires to terminal. 3) Make the proper input and output wire connections for each unit.
-
Page 92: Installing The Unit
Connection/Installation Installing the unit Ñ Confirm the installing position of the display unit ● Vehicles cannot be installed It may be possible to install if it can avoid the following by adjustment for slider position and display height. Lever operations are interfered A hazard switch is hidden from a The display unit hits a panel on the such as shift lever, wiper lever,... - Page 93 Connection/Installation Ñ Positioning the slider in Install the bracket for forward position (accessory 0) each side so that its forward projections are aligned with the slots on the main unit. Remove the four screws from the bottom of the main unit. Projection Screw Projection...
- Page 94 Connection/Installation Ñ Ñ Adjusting the display height GPS antenna GPS antenna is installed inside of the car. It Remove the four flat head screws from should be installed as horizontally as possible both sides. to allow easy reception of the GPS satellite signals.
- Page 95 Connection/Installation Ñ Microphone unit Install the main unit to the vehicle. 1) Check the installation position of the Reinstall the removed parts such as a microphone (accessory 3). panel on the vehicle. 2) Clean the installation surface. 3) Remove the separator of the microphone Panel on the (accessory 3), and stick the microphone to vehicle...
- Page 96 Connection/Installation Attach the protective cover (accessory =) to coupling part, and then fix it with two binding head screws (accessory ~). NOTE • If the protective cover (accessory =) is not attached, this unit will not turn on. Even if the unit is turned on, the power may be turned off halfway.
- Page 97 Connection/Installation Ñ Connecting wires to terminals Fuse (15A) Speaker impedance: 4-8 Ω White To front left speaker White/Black Gray To front right speaker Gray/Black Green To rear left speaker Green/Black Connect to the vehicle’s Accessory 1 parking brake detection switch harness.
- Page 98 Connection/Installation Ñ Ñ 3-way speaker system setup Connecting the system and external components Subwoofer Preout Mid Range Preout Tweeter Preout When connecting to an external amplifier, connect its ground wire to the car’s chassis to avoid damaging the unit. Preout RCA Cable (Sold separately) Power amplifier...
- Page 99 Connection/Installation Ñ Connecting a USB device HDMI input Use HDMI cable. When you connect the cable to HDMI terminal, Accessory 2 (1 m) remove the fixture. After connecting the cable, put the fixture again. USB device Fixture HDMI connector USB terminal W: 20.6 mm or less H: 10.0 mm or less D: 29.2 mm or less...
- Page 100 Connection/Installation Ñ Ñ Securing the USB extension Connecting an Android cable smartphone Android smartphone Secure the USB extension cable with insulating tape or the like so that its connectors are not USB cable disconnected. Accessory 2 (1 m) Ñ Connecting an iPod/iPhone USB terminal KCA-iP103 (0.8 m) Lightning Digital AV...
- Page 101 Connection/Installation Ñ Connecting the camera Optional accessory Sold separately Left side view camera and Up to 3 cameras of Dashboard camera, Front Right side view camera view camera, Left side view camera and Right Front view camera side view camera can be connected. For [4] [6] more information, see To set up the camera assignment settings (P.64).
-
Page 102: Troubleshooting
Troubleshooting Troubleshooting Ñ Others Problems and Solutions The Touch Sensor Tone doesn’t sound. If any trouble occurs, first check the following The preout jack is being used. table for possible problems. † The Touch Sensor Tone cannot be output from the preout jack. -
Page 103: Error Messages
† Turn the power off and on again. If the “Starting tuner failed. ” message does not disappear, contact † Wire or insulate the speaker cord as appropriate and turn the power off and on again. your nearest KENWOOD dealer. Hot Error Ñ SiriusXM When the internal temperature of this unit rises to 60°C... - Page 104 Troubleshooting Ñ Apple CarPlay The GPS antenna must be connected to use Apple CarPlay wirelessly. Please verify the proper connections or plug in by USB to use Apple CarPlay. The GPS antenna is not connected when the Apple CarPlay is started by connecting wirelessly or when the iPhone compatible with wireless Apple CarPlay is registered in [Device List].
-
Page 105: Appendix
Appendix Appendix Playable Media and Files You can play various kinds of media and files on this unit. Ñ About files The following audio and video files are supported. ■ Playable Audio files Format Bit rate Sampling frequency Bit count AAC-LC (.m4a) MPEG-2/MPEG-4 AAC LC 8 –... - Page 106 Appendix ■ Limitation on structure of file and folder USB device/SD Maximum number of folder layers Maximum number of files (per folder) Maximum number of folders (per folder) 9999 Maximum number of folders (per device) Unlimited • You can enter a folder name and file name with 255 or fewer single-byte characters. •...
-
Page 107: Specifications
Appendix Specifications Audio Decoder : MP3 / WMA / AAC / WAV / FLAC / DSD / Vorbis Video Decoder ■ Monitor section : MPEG-1 / MPEG-2 / MPEG-4 / WMV / H.264 / MKV Picture Size : 10.1 inches (diagonal) wide ■... - Page 108 Appendix ■ HDMI section ■ FM tuner section HDMI Frequency Range (step) : Type-A : 87.9 MHz – 107.9 MHz (200 kHz) Input Resolution Usable Sensitivity (S/N : 30 dB) • VGA (640x480p @59.94Hz/60Hz) : 7.3 dBf (0.7 μV/75 Ω) •...
- Page 109 Appendix ■ Audio section Maximum Power Output (Front & Rear) : 50 W × 4 Typical Power Output (Front & Rear) Full Bandwidth Power (at less than 1% THD) : 22 W × 4 Output frequency band : 20 – 88,000 Hz Preout Level (V) : 4 V/ 10 kΩ...
-
Page 110: About This Unit
Appendix About this Unit • Wi-Fi® is a registered trademark of Wi-Fi Alliance®. • The Wi-Fi CERTIFIED™ Logo is a certification mark of Wi-Fi Alliance®. ■ Copyrights • Copyright© 2022 Techpoint, Inc. All rights reserved. • The Bluetooth® word mark and logos are registered trademarks owned by Bluetooth SIG, Inc. - Page 111 Appendix VIDEO IN COMPLIANCE WITH THE VC-1 STANDARD nor the names of its contributors may be used to (“VC-1 VIDEO”) AND/OR ( ii ) DECODE VC-1 VIDEO endorse or promote products derived from this THAT WAS ENCODED BY A CONSUMER ENGAGED software without specific prior written permission.
- Page 112 Products: GPS NAVIGATION SYSTEM – Connect the equipment into an outlet on a Model Name: DNR1008RVS circuit different from that to which the receiver Responsible Party: JVCKENWOOD USA is connected. CORPORATION – Consult the dealer or an experienced radio/TV 4001 Worsham Avenue, technician for help.
- Page 113 Appendix ■ Información acerca de la eliminación ■ Informação sobre a eliminação de de equipos eléctricos y electrónicos pilhas al final de la vida útil (aplicable a los Este produto não deve ser eliminado como lixo doméstico geral. Devolva a pilha usada ao revendedor países que hayan adoptado sistemas ou entidade autorizada para que a mesma seja independientes de recogida de...
- Page 114 The product with the Hi-Res Audio logo is conformed to Hi-Res Audio standard defined by Japan Audio Society. The logo is used under license from Japan Audio Society.