
Related Manuals for Toro 79324


Summary of Contents for Toro 79324
- Page 1 Form No. 3359-984 Rev B 42in and 50in Twin Bagger for TimeCutter ® Z4000 and Z5000 Series Riding Mower Model No. 79324—Serial No. 280000001 and Up Register at www.Toro.com. Original Instructions (EN)
-
Page 2: Table Of Contents
1 Installing the Weight .......... 5 additional information, contact an Authorized Service 2 Installing the Bagger Frame........ 6 Dealer or Toro Customer Service and have the model 3 Assembling the Bagger Top........ 6 and serial numbers of your product ready. Figure 1 4 Installing the Bagger Top ........ -
Page 3: Safety
Safety Debris, such as leaves, grass, or brush can catch fire. A fire in the engine area can cause personal injury and property damage. Engines can become hot when they are • Keep the engine and muffler area free of operating. -
Page 4: Setup
Setup Loose Parts Use the chart below to verify that all parts have been shipped. Procedure Description Qty. Weight U-pin Clevis pin Install the weight. Washer Hair pin Bagger Quick Attach Bracket Clevis pin (5/16 x 2-1/4 inch) Hair pin Install the bagger frame. -
Page 5: Installing The Weight
Installing the Weight Parts needed for this procedure: Weight U-pin Clevis pin Washer Hair pin Procedure The bagger changes the weight distribution of the machine. Operating the machine without the front weights may cause an unstable condition which could result in a loss of control. Figure 3 Ensure the front weights are properly installed 1. -
Page 6: Installing The Bagger Frame
G005664 Installing the Bagger Frame Parts needed for this procedure: Bagger Quick Attach Bracket Clevis pin (5/16 x 2-1/4 inch) Hair pin Washer Procedure 1. At the back of the machine, install the bagger frame to the square slot in the frame. Figure 5 2. -
Page 7: Installing The Bagger Top
Installing the Bagger Top Parts needed for this procedure: Bagger Grass Bag Procedure 1. Install the bagger top to the bagger frame. Rotate the bagger top to align the key holes in the bagger top brackets with the keys in the posts on the bagger frame (Figure 7). -
Page 8: Installing The Chute On 42 Inch Decks
2. Lift the bagger top and install the bags by sliding the bag frame hooks onto the retaining brackets (Figure 8). Installing the Chute On 42 Inch Decks Parts needed for this procedure: Baffle cutoff Chute for 42 inch decks Procedure Use this procedure when installing the Twin Bagger Kit on machines with 42 inch decks. - Page 9 4. Angle the metal tab at the front of the chute into the slot in the bracket welded to the mower deck just in front of the cutoff (Figure 11). G005670 Figure 12 1. Chute 42 inch decks 4. Retaining hook 2.
-
Page 10: Installing The Chute On 50 Inch Decks
4. Angle the metal tab at the front of the chute into the slot in the bracket welded to the mower deck just in front of the cutout (Figure 14). Installing the Chute on 50 inch Decks Parts needed for this procedure: Baffle cutoff Clip assembly (50 in decks only) Lock nut (5/16 inch) -
Page 11: Installing The Discharge Tube
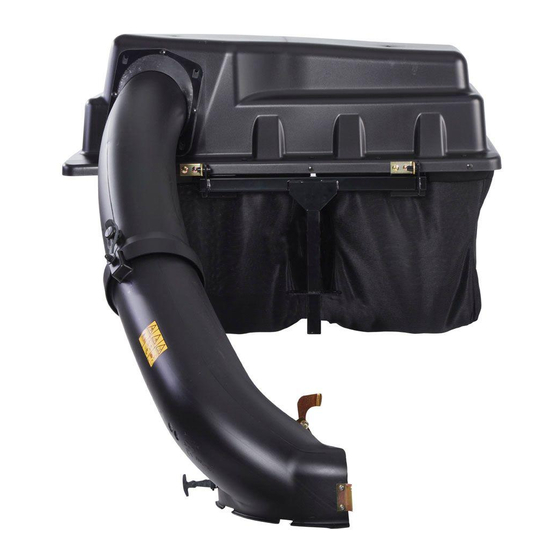
6. On the top of the chute, engage the hook shaped latch around pivot rod of the deflector assembly as shown in Figure 15. Installing the Discharge Tube Parts needed for this procedure: Discharge tube Procedure 1. Slide the curved end of the discharge tube into the opening in the bagger top (Figure 17). -
Page 12: Operation
Operation 5. Install the bags by sliding the bag frame hooks onto the retaining brackets (Figure 19). Note: Determine the left and right sides of the machine from the normal operating position. To avoid personal injury, follow these procedures: • Become familiar with all operating and safety instructions in the Operator’s Manual for the mower before using this attachment. -
Page 13: Removing The Bagger
Removing the Bagger reduce the load on the engine and reduces the chance of plugging the chute and discharge tube. Bagging Speed Failing to remove the front bagger weights Most often you will bag with the mower throttle in and operating the machine without the bagger the Fast position and drive at a normal ground speed. - Page 14 Signs of Plugging As you are bagging, a small amount of grass clippings normally blow out the front of the mower. An excessive amount of clippings blowing out indicates that the bags are full or the system is plugged.
-
Page 15: Maintenance
Maintenance Note: Determine the left and right sides of the machine from the normal operating position. Recommended Maintenance Schedule(s) Maintenance Service Maintenance Procedure Interval • Inspect the bagger After the first 10 hours • Clean the bagger Before each use or daily •... -
Page 16: Inspecting The Mower Blades
Storage You or bystanders could be severely injured by Storing the Bagger Attachment flying debris or thrown objects that may pass through torn, worn, or deteriorated grass bags. 1. Clean the bagger attachment; refer to Cleaning the Bagger Attachment. • Frequently check the grass bags for holes, rips, wear, and other deterioration. - Page 17 Notes:...
- Page 18 Notes:...
- Page 19 Notes:...
- Page 20 (Dealer) to obtain guarantee policies for your country, province, or state. If for any reason you are dissatised with your Distributor’s service or have difculty obtaining guarantee information, contact the Toro importer. If all other remedies fail, you may contact us at Toro Warranty Company.