Sony MEX-DV2000 Operating Instructions Manual
Multi disc player
Hide thumbs
Also See for MEX-DV2000:
- Installation/connections (2 pages) ,
- Operating instructions manual (192 pages) ,
- Service manual (92 pages)

Related Manuals for Sony MEX-DV2000


Summary of Contents for Sony MEX-DV2000
- Page 1 3-099-738-33 (1) Multi Disc Player Operating Instructions Manual de instrucciones MEX-DV2000 © 2007 Sony Corporation...
- Page 2 On safety Warning • Comply with the traffic laws in your country. • For your safety, the monitor connected to the To prevent fire or shock hazard, do not FRONT VIDEO OUT turns off automatically expose the unit to rain or moisture. when the parking brake is not applied.
- Page 3 Welcome ! t page 35 Thank you for purchasing this Sony Multi Disc Creates a virtual center speaker and simulates Player. Before operating this unit, read this multi-channel sound field without a center manual thoroughly and retain it for future speaker.
- Page 4 Table of Contents Playable discs and symbols used in this Adjusting the picture quality manual ....... . 6 —...
- Page 5 Settings For installation and connections, see the supplied installation/connections manual. Visual setup ......39 Basic operation of visual setup .
- Page 6 Playable discs and symbols used in this manual This unit can play various video/audio discs. The following chart helps you to check if a disc is supported by this unit, as well as what functions are available for a given disc type. Disc symbol in manual Disc format Disc logo...
-
Page 7: Region Code
The following chart shows the supported compression formats, their file types, and the disc types on which those files can be stored. Available functions differ depending on the format, regardless of disc type. The format symbols below appear next to the description of functions available for that format. Format symbol in manual File type Storable disc type... -
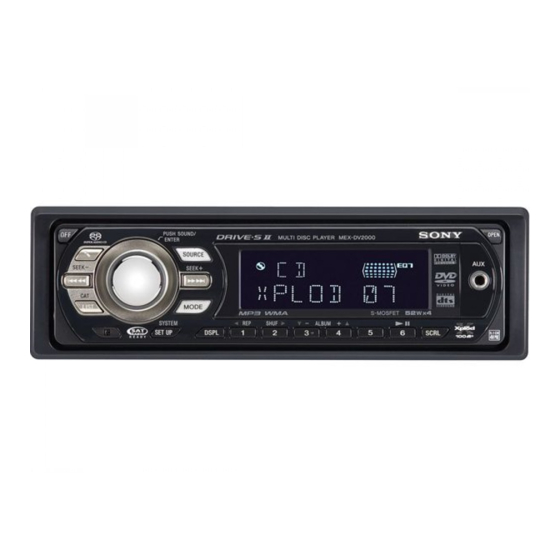
Page 8: Location And Function Of Controls
MODE SYSTEM SHUF ALBUM SETUP DSPL SCRL MEX-DV2000 Front panel removed RESET C Volume control dial/SOUND/ENTER Refer to the pages listed for details. Instructions in this manual generally describe the button 12, 25, 31, 32, 34, 35, 37, 38, controls on the card remote commander. You can... - Page 9 F AUX input jack 47 P RESET button 12 To connect a portable audio device. Q Z (eject) button 15, 16 G OPEN button 13, 14, 15, 16 To eject the disc. H LIST button 32 R Disc slot 14, 16 To list up.* To insert the disc.
-
Page 10: Card Remote Commander Rm-X163
Card remote commander RM-X163 AUDIO SUBTITLE ANGLE CLEAR TOP MENU MENU SYSTEM SETUP VISUAL SETUP LIST DSPL ENTER SOUND PICTURE PLII MODE C CLEAR button 27, 30 Refer to the pages listed for details. Remove the insulation film before use (page 13). To delete an entered number. - Page 11 G PICTURE EQ button 26 Q </M/m/, (Cursor)/ENTER buttons To select the picture quality. To move the cursor and apply a setting. H u (Play/Pause) button 14, 15, 16, 17, R PLII (Pro Logic II) button 30 To select a Dolby Pro Logic II mode. To start/pause playback.
-
Page 12: Monitor
Performing initial setup Getting Started Installing the unit and an SOURCE optional monitor Firstly, install and connect the unit and an optional monitor. This unit can be operated using the displays that appear on the unit and/or the optional monitor. Volume control dial Note that this manual includes instructions concerning displays on both unit and/or optional... -
Page 13: Commander
Rotate the volume control dial to Press (OPEN) while the unit is off. select your listening position, then The front panel is flipped down. press it. Slide the front panel to the right, then Select “FRONT L” if your listening position gently pull out the left end of the front is front left, or select “FRONT R”... -
Page 14: Playing Video Discs
Basic Operations Playing video discs Depending on the disc, some operations may be different or restricted. Refer to the operating instructions supplied with your disc. OPEN Number buttons </M/m/, ENTER b/B/V/v Turn on your monitor, then select the input source on your monitor corresponding to this unit. - Page 15 To eject the disc Press (OPEN) on the main unit. Press Z (rear of front panel). Close the front panel. About the DVD menu A DVD is divided into several sections, which make up a picture or music feature. These sections are called “titles.”...
-
Page 16: Playing Audio Discs
Playing audio discs Depending on the disc, some operations may be different or restricted. Refer to the operating instructions supplied with your disc. OPEN Press (OPEN) on the main unit. Insert the disc (label side up). Close the front panel. Playback starts automatically. - Page 17 Other playback operations </M/m/, .m/M> ALBUM .m/M> Press pause/resume play after pause skip a track .m (<)/M> (,) and hold .m/M> reverse/fast-forward track Main unit: (3) (ALBUM –)/(4) (ALBUM +) skip an album* Remote: M/m Main unit: and hold (3) (ALBUM –)/(4) (ALBUM +) skip albums continuously* Remote: and hold M/m * When an MP3/WMA is played.
-
Page 18: Listening To The Radio
Listening to the radio SOURCE .m/M> MODE SEEK MODE Press (SOURCE) repeatedly until “TUNER” appears. Press (MODE) repeatedly until the desired band (FM1, FM2, FM3, AM1 or AM2) appears. A Radio band/Function B Frequency Perform tuning. To tune automatically Press (SEEK) –/ Scanning stops when the unit receives a station. -
Page 19: Sound
2 Enjoying 2-channel sources in Enjoying Surround Sound multi-channel sound Creating an ideal field for x For VCD/CD/MP3/AUX playback or radio reception multi-channel sound 1 Activate Dolby Pro Logic mode. A procedure example to create an ideal field for t page 30 multi-channel (5.1-channel) sound is introduced 2 Activate CSO if a center speaker is not in this section. -
Page 20: Divx ® Video Playback
® DivX video playback Advanced Operations — Discs ® DivX is a video file compression technology, This chapter consists of the following sections. developed by DivX, Inc. This product is an ® • Video-specific operations* official DivX Certified product and can play all ®... -
Page 21: Playback Control
Using play mode menu Using PBC functions — Playback control Number buttons Number buttons VISUAL </M/m/, SETUP ENTER ENTER You can use the play mode menu on this unit to control playback or configure playback settings. The PBC menu assists your operation To show the play mode menu, press interactively while a PBC compatible VCD is (VISUAL SETUP) during playback. - Page 22 E.g., when playing a DVD IMAGE 30 B C D To select an image to display. 12 ( 67 ) PLAY 018 ( 034 ) DVDVIDEO FILE 30 T 1:35:55 To select a video file to play. 1:ENGLISH 1:ENGLISH 2:FRENCH TIME 30 3:SPANISH To check the elapsed playback time;...
-
Page 23: Viewing Time/Text Information Of The Disc
JPEG playback Viewing time/text information • Album number/Total • Image number/Total of the disc DivX playback • Album (folder) number/Total • File number/Total • T **:** Elapsed playback time of the current file Checking text information The text information (album name, image name, etc.) of JPEG/DivX files can be checked. -
Page 24: Configuring Audio Settings
During playback, press (AUDIO) Configuring audio settings repeatedly until the desired audio channel appears. E.g., when playing an MP3 Audio channel AUDIO TRACK NAME SYSTEM VISUAL ALBUM NAME 0003/1000 L SETUP SETUP ARTIST NAME 003:17 SHUF ENTER Note You may not be able to change the audio setting depending on the disc. -
Page 25: Dvd Level
The program format name and channel numbers Magnifying pictures appear as follow. Example: Dolby Digital 5.1 ch Rear component × 2 DOLBY DIGITAL 3 / 2 . 1 Front component × 2 + LFE component × 1 Center component × 1 VISUAL </M/m/, SETUP... -
Page 26: Picture Eq
When set to “LIGHT ON”/“AUTO” (with Adjusting the picture quality light on) — Picture EQ NIGHT: Darkens the monitor to not distract your driving at night. MIDNIGHT: Darkens the monitor more than the “NIGHT” setting. THEATER: Brightens the monitor; suitable when you want to enjoy a bright monitor at night. -
Page 27: Locking Discs — Parental Control
Press the number buttons to enter Locking discs — Parental your password, then press (ENTER). The confirmation display appears. control To confirm, press the number buttons to reenter your password, then press (ENTER). * Excluding DVD-R/DVD-R DL/DVD-RW in VR mode. The setting is complete. -
Page 28: Repeat And Shuffle Play
Press M/m to select “STANDARD,” Repeat and shuffle play then press (ENTER). The options appear. PARENTAL CONTROL LEVEL : STANDARD : OTHERSt SHUF Press M/m to select the desired area to During playback, press (1) (REP) or apply its movie ratings, then press (2) (SHUF) on the main unit (ENTER). -
Page 29: Direct Search Play
Press M/m to select the desired option, The shuffle options and switching order of each then press (ENTER). disc/format are indicated below. Repeat or shuffle play starts. Disc/format Options Press (VISUAL SETUP) to hide the play mode menu. TITLE: Plays chapters in Note current title in random order. -
Page 30: Pro Logic Ii
Setting from the play mode menu Press the number buttons to enter an item number or time code. For example, to locate 2 hours, 10 minutes, and 20 seconds, just enter “21020.” Search items differs depending on the disc/ To clear numbers already input, press format as follows. -
Page 31: Enjoying Karaoke
Notes Notes • This function is unavailable for discs in Dolby Digital • Some karaoke DVDs/VCDs/CDs may have the (other than 2-channel) or DTS format. instruments on one channel and vocals on the other • The Pro Logic mode is deactivated in the karaoke channel, and may ask you to select a channel (Left, mode. -
Page 32: List
Selecting a file type Listing up tracks/images/video files — LIST If the disc contains multiple file types, only the selected file type (audio/video/image) can be played. The playback priority order of file type is initially set to audio, video, then image (e.g., if the disc contains video files and image files, only video files are played). -
Page 33: Selecting A Playback Layer
E Track number/Total The options for “SUPER AUDIO CD LAYER” F Elapsed playback time (visual setup) and “DISC.LAYER” (system G Current play mode setup) are indicated below. H Operation assist messages MULTI (visual setup)/MLT (system setup): Plays the multi-channel area in the Super Audio CD You can select a track to play using a list (page 32). -
Page 34: Selecting The Sound Quality
To hide the system setup display, press Advanced Operations — Radio (SYSTEM SETUP). Note Storing and receiving stations For Super Audio CDs consisting of only a Super Audio CD layer, that layer is played regardless of setting. The setting in visual setup will switch the setting in Number system setup automatically, and vice versa. -
Page 35: Sound
SOUND During playback/reception, press (SOUND) repeatedly until the desired setting item appears on the main unit. X-DSP, Sony’s new sound engine, creates an ideal in-car sound field with digital signal processing. X-DSP contains the following features: CSO (Center Speaker Organizer), Intelligent Time Alignment, and EQ7. -
Page 36: Optimizing Sound For The Listening Position Intelligent Time Alignment
Press M/m to select the desired option, Optimizing sound for the listening then press (ENTER). position — Intelligent Time The setting is complete. Alignment Note Intelligent Time Alignment is deactivated while the The unit can change the localization of sound by karaoke mode (page 31) is activated, or “SUPER delaying the sound output from each speaker to AUDIO CD MODE”/“SA-CD MOD”... -
Page 37: Eq7 Tune
By the system setup menu Customizing the equalizer curve Press (SYSTEM SETUP) while the unit is — EQ7 Tune off. “CUSTOM” of EQ7 allows you to make your The system setup item appears on the main own equalizer settings. You can adjust the level unit. -
Page 38: Speaker Configuration And Volume Setup
Adjust the volume of each speaker. Speaker configuration and To adjust the level, press M/m. The level is adjustable in single steps, volume setup between –6 and +6. To switch the speaker, press </,. The speaker switches as follows: FL (Front Left) t C* (Center) t FR (Front Right) t SR (Rear Right) t SL (Rear Left) t SW* (Subwoofer). -
Page 39: Basic Operation Of Visual Setup
E.g., when setting the aspect ratio to “4:3 PAN Settings SCAN.” Press (VISUAL SETUP) while the unit is Various settings are configurable from the off. following two setup menus. The visual setup menu appears. • Visual setup menu (page 39) Allows configuration of visual-related items LANGUAGE SETUP (by the monitor). -
Page 40: Soundtrack
Language setup for display or soundtrack Select (LANGUAGE SETUP), then select the desired item and option below, using M/m and (ENTER). For details on this procedure, see “Basic operation of visual setup” on page 39. Item Purpose MENU To change the disc’s menu language. AUDIO To change the soundtrack language. -
Page 41: Custom Setup
Custom setup Select (CUSTOM SETUP), then select the desired item and option below, using M/m and (ENTER). For details on this procedure, see “Basic operation of visual setup” on page 39. Follow the page reference for details. “z” indicates the default setting. Item Option Purpose... -
Page 42: Audio Setup
Audio setup (AUDIO SETUP), then select the desired item and option below, using M/m and (ENTER). Select For details on this procedure, see “Basic operation of visual setup” on page 39. Follow the page reference for details. “z” indicates the default setting. Item Option Purpose... -
Page 43: Resetting All Settings
System setup Resetting all settings The system setup menu includes the following All settings (excluding parental control setting) categories. in visual setup can be reset. (RESET), then “YES” using M/m and Select • SET: General settings (page 44) (ENTER). • DSPL: Display settings (page 45) For details on this procedure, see “Basic •... - Page 44 Follow the page reference for details. “z” indicates the default setting. SET (Setup) Item Option Purpose Unit status CLOCK ADJ (Clock Adjust) – – (page 47) BEEP ON (z) To activate the operation Any status. sound. To deactivate the operation sound.
- Page 45 DSPL (Display) Item Option Purpose Unit status B.OUT (Black Out) To turn off the illumination. (Latin American model only) To bring the light back on, Turns off the illumination press any button on the automatically for any source main unit. (When activated, Any status.
- Page 46 SOUND Item Option Purpose Unit status EQ7 TUNE (page 37) – – HPF (High Pass Filter) OFF (z) To not cut out the Selects the front/rear speaker frequency. During cut-off frequency. playback*/ 80HZ, 120HZ To select the frequency. radio reception. LPF (Low Pass Filter) 120HZ (z), To select the frequency.
-
Page 47: Setting The Clock
Setting the clock Using Optional Equipment Auxiliary audio equipment SYSTEM SETUP DSPL </M/m/, SYSTEM ENTER SETUP ENTER The clock uses a 12-hour indication. Press (SYSTEM SETUP). By connecting an optional portable audio device The system setup item appears on the main to the AUX input jack (stereo mini jack) on the unit. -
Page 48: Cd Changer
Adjusting the volume level Selecting the changer Be sure to adjust the volume for each connected 1 Press (SRC) repeatedly until “CDC” appears. audio device before playback. 2 Press (MODE) repeatedly until the desired Note changer appears. The input level may be high if the sound distortion of AUX input occurs. -
Page 49: Rotary Commander Rm-X4S
Changing the operative direction Rotary commander RM-X4S The operative direction of the controls is factory- set as shown below. Attaching the label To increase Attach the indication label depending on how you mount the rotary commander. To decrease If you need to mount the rotary commander on the right hand side of the steering column, you D S P L SO U N D... -
Page 50: Precautions
• Before playing, clean the discs Additional Information with a commercially available cleaning cloth. Wipe each disc Precautions from the center out. Do not use solvents such as benzine, thinner, commercially available • If your car has been parked in direct sunlight, cleaners, or antistatic spray allow the unit to cool off before operating it. -
Page 51: Files
Notes on Multi Session CDs/Multi About MP3 files Border DVDs This unit can play Multi Session CDs/Multi Border • MP3, which stands for MPEG-1 Audio Layer-3, is DVDs under the following conditions. Note that the a music file compression format standard. It session must be closed and the disc must be compresses audio CD data to approximately 1/10 finalized. -
Page 52: Maintenance
If the fuse blows, protection collar. check the power connection and replace the fuse. If the fuse blows again after replacement, there may be an internal malfunction. In such a case, Fuse (10A) consult your nearest Sony dealer. -
Page 53: Specifications
Remove the unit. Tuning range: 1 Insert both release keys simultaneously Asian model: until they click. 531 – 1,602 kHz (at 9 kHz step) Latin American model: 530 – 1,710 kHz (at 10 kHz step) Hook facing Antenna (aerial) terminal: inwards. -
Page 54: Copyrights
Note This unit cannot be connected to a digital preamplifier the ignition off. This is not a malfunction. or an equalizer which is Sony BUS system compatible. Design and specifications are subject to change General without notice. - Page 55 Picture The disc does not play back. • Defective or dirty disc. There is no picture/picture noise occurs. • The disc is not applicable. • A connection has not been made correctly. • The DVD is not applicable due to the region code. •...
-
Page 56: Error Displays/Messages
Check the connection. If the error indication Set “LOCAL ON” (page 45). remains on in the display, consult your nearest t Tuning does not stop at a station: Sony dealer. Set “MONO ON” (page 45). READ • The broadcast signal is too weak. -
Page 57: Glossary
If these solutions do not help improve the situation, consult your nearest Sony dealer. A disc that contains up to 8 hours of moving If you take the unit to be repaired because of disc pictures even though its diameter is the same as a playback trouble, bring the disc that was used at the time the problem began. - Page 58 Super Audio CD Super Audio CD is a new high-quality audio disc standard where music is recorded in the DSD (Direct Stream Digital) format (conventional CDs are recorded in the PCM format). The DSD format, using a sampling frequency 64 times higher than that of a conventional CD, and with 1-bit quantization, achieves both a wide frequency range and a wide dynamic range across the audible...
-
Page 59: Language Code/Area Code List
Language code/area code list Language code list The language spellings conform to the ISO 639: 1988 (E/F) standard. Code Language Code Language Code Language Code Language 1027 Afar 1183 Irish 1347 Maori 1507 Samoan 1028 Abkhazian 1186 Scots Gaelic 1349 Macedonian 1508 Shona... -
Page 60: Index
Index Numerics 16:9 40 Demonstration (DEMO) 45 Language code 59 2000MP3 3 Dimmer (DIM) 45 Language setup 2000WMA 3 Direct search play 29 (LANGUAGE SETUP) 40 4:3 LETTER BOX 40 Discs 6 Layer 4:3 PAN SCAN 40 Display setup (SUPER AUDIO CD LAYER, 5.1-channel output (DISPLAY SETUP) 40 DISC.LAYER) 33, 42, 46... - Page 61 Setup menu System setup 43 Visual setup 39 Shuffle play (SHUF) 28, 48 Slide show interval (SLIDE SHOW TIME) 41 Soundtrack language (AUDIO) 24, 40 Speaker Setup (SP SETUP) 12, 38 Subtitle language (SUBTITLE) 15, 40 Subwoofer (SW) 35 Super Audio CD Layer (SUPER AUDIO CD LAYER, DISC.LAYER)
- Page 62 Seguridad Advertencia • Respete las leyes de tráfico de su país. • Por razones de seguridad, el monitor conectado Para evitar el riesgo de incendio o a FRONT VIDEO OUT (Salida frontal de electrocución, no exponga la unidad a la video) se apaga automáticamente cuando no se lluvia ni a la humedad.
-
Page 63: Dvd-R
37 Gracias por adquirir este reproductor multidiscos Crea un altavoz central virtual y simula un Sony. Antes de operar esta unidad, lea el manual campo de sonido multicanal sin un altavoz detenidamente y guárdelo para consultarlo en el central. -
Page 64: Procedimientos Iniciales
Tabla de contenido Discos que se pueden reproducir y símbolos Ampliación de imágenes ....25 usados en este manual ....6 Ajuste de la calidad de la imagen Ubicación y funcionamiento de los —... - Page 65 Ajuste del sonido Información complementaria Ajuste de las características del sonido Precauciones ......53 — SOUND ......37 Notas sobre los discos .
-
Page 66: Dvd-Rw
Discos que se pueden reproducir y símbolos usados en este manual Esta unidad puede reproducir distintos tipos de discos de video y audio. En la tabla a continuación puede comprobar qué discos son compatibles con esta unidad, además de conocer las funciones disponibles para cada tipo de disco. Símbolo del disco Formato del disco Logotipo del disco... -
Page 67: Cd-Rom
El cuadro siguiente muestra los formatos de compresión admitidos, sus tipos de archivo y los tipos de disco en los que se pueden grabar. Las funciones disponibles varían en función del formato, independientemente del tipo de disco. Los símbolos de formato a continuación se muestran junto a una descripción de las funciones disponibles para ese formato. -
Page 68: Unidad Principal
LIST MODE SYSTEM SHUF ALBUM SETUP DSPL SCRL MEX-DV2000 Panel frontal extraído RESET B Botón m (Micrófono) 32 Consulte las páginas indicadas para obtener información detallada. Permite activar el modo karaoke. Las instrucciones que se incluyen en este manual describen en general los controles del control C Selector del control de volumen/ remoto de tarjeta. - Page 69 E Visualizador N Botones numéricos Disco: (1): b REP 14, 15, 29, 52 F Toma de entrada AUX 50 (2): SHUF B 14, 15, 29, 52 Permite conectar un dispositivo de audio (3)/(4): ALBUM –/+ (V/v) 14, 15, 17, portátil. 20, 51 Para omitir un álbum o carpeta o mover G Botón OPEN 13, 14, 15, 16...
- Page 70 Control remoto de tarjeta RM-X163 AUDIO SUBTITLE ANGLE CLEAR TOP MENU MENU SYSTEM SETUP VISUAL SETUP LIST DSPL ENTER SOUND PICTURE PLII MODE B Botones numéricos 14, 15, 21, 22, 28, Consulte las páginas indicadas para obtener información detallada. 30, 31, 36 Antes de usarlo, retire la película aislante Disco: (página 13).
- Page 71 D Botón SYSTEM SETUP 25, 35, 36, 39, (ANGLE): 15 Permite modificar el ángulo de 40, 46, 50, 51 visualización. Permite abrir el menú de configuración del (TOP MENU): 15 sistema. Permite abrir el menú principal de un DVD. E Botón LIST 33 (MENU): 15 Permite mostrar una lista.* Permite abrir el menú...
- Page 72 Realización del ajuste inicial Procedimientos iniciales Instalación de la unidad y de un SOURCE monitor opcional Para comenzar, instale y conecte la unidad y el monitor opcional. Esta unidad se puede manejar con los elementos Selector de control de volumen de la pantalla que aparecen en la unidad o a través del monitor opcional.
- Page 73 Alarma de precaución Si gira el interruptor de encendido hasta la posición OFF sin haber extraído el panel frontal, la alarma de precaución sonará durante unos segundos. La alarma sonará únicamente si se utiliza el amplificador integrado. Gire el selector de control de volumen para seleccionar su posición de Presione (OPEN) mientras la unidad escucha y, a continuación, presiónelo.
- Page 74 Operaciones básicas Reproducción de discos de video Dependiendo del disco, es posible que algunas operaciones sean diferentes o estén prohibidas. Consulte manual de instrucciones suministrado con el disco. OPEN Botones numéricos </M/m/, ENTER b/B/V/v Encienda el monitor y seleccione la fuente de entrada del monitor que corresponda a esta unidad.
- Page 75 Para expulsar el disco Presione (OPEN) en la unidad principal. Presione Z (en la parte posterior del panel frontal). Cierre el panel frontal. Acerca del menú DVD Un DVD se divide en varias secciones que, juntas, componen una película o pieza musical. Estas secciones se llaman “títulos”.
- Page 76 Reproducción de discos de audio Dependiendo del disco, es posible que algunas operaciones sean diferentes o estén prohibidas. Consulte manual de instrucciones suministrado con el disco. OPEN Presione (OPEN) en la unidad principal. Inserte el disco (con la etiqueta hacia arriba).
- Page 77 Otras operaciones de reproducción </M/m/, .m/M> ALBUM .m/M> Para Presione pausar/reanudar la reproducción después de una pausa .m (<)/M> (,) omitir una pista retroceder o avanzar rápidamente la mantenga presionado .m/M> reproducción de una pista Unidad principal: (3) (ALBUM –)/(4) (ALBUM +) omitir un álbum* Control remoto: M/m Unidad principal: mantenga presionado (3) (ALBUM –)/...
-
Page 78: Escucha De La Radio
Escucha de la radio SOURCE .m/M> MODE SEEK MODE Presione (SOURCE) varias veces hasta que aparezca “TUNER”. Presione (MODE) varias veces hasta que aparezca la banda deseada (FM1, FM2, FM3, AM1 o AM2). A Banda de radio o función B Frecuencia Procedimiento para sintonizar una emisora. - Page 79 2 Escucha de fuentes de 2 canales Escucha del sonido envolvente en sonido multicanal Creación de un campo ideal x Para la reproducción de VCD/CD/MP3/ AUX o la recepción de la radio para sonido multicanal 1 Active el modo Dolby Pro Logic. En esta sección se presenta un ejemplo de t página 31 procedimiento para crear un campo ideal para un...
- Page 80 Es posible controlar la reproducción de archivos Operaciones avanzadas — Discos DivX del mismo modo que la de otros discos de video (página 14), así como algunas de las En este capítulo se incluyen las siguientes funciones de control de la reproducción de audio. secciones.
- Page 81 Uso de las funciones PBC Uso del menú del modo de — Control de la reproducción reproducción Botones Botones numéricos numéricos VISUAL </M/m/, SETUP ENTER ENTER El menú del modo de reproducción de esta El menú PBC le asiste con las operaciones en unidad permite controlar la reproducción o forma interactiva cuando se reproduce un VCD configurar las opciones de reproducción.
- Page 82 A Elementos del menú del modo de FILE 30 reproducción Si desea obtener información adicional, Permite seleccionar un archivo de video que consulte “Lista de los elementos del menú del desee reproducir. modo de reproducción” en la página 22. B DVD: número del título/total VCD: número de la pista/total* TIME 30 JPEG: número del álbum/total...
- Page 83 Reproducción de VCD Visualización de la información (Sólo durante la reproducción de la versión 1.0/1.1, o la versión 2.0 sin la función PBC.) de tiempo y texto del disco • T **:** Tiempo de reproducción transcurrido de la pista actual •...
- Page 84 Reproducción de DivX Procedimiento para cambiar el canal • Nombre del álbum (carpeta) (si se muestra el de audio número de álbum (carpeta)) • Nombre del archivo (si se muestra el número del archivo) Al reproducir un VCD/CD/MP3/WMA, se puede seleccionar que el sonido del canal derecho o izquierdo se escuche a través de los altavoces Configuración de los ajustes de...
- Page 85 Presione M/m para seleccionar Durante la reproducción, presione (SYSTEM SETUP). (AUDIO). El elemento de configuración del sistema Aparecerá el formato de programa. aparece en la unidad principal. Formato de audio actual* Presione M/m para seleccionar “DVD-LVL” y, a continuación, presione 12 ( 67 ) PLAY (ENTER).
- Page 86 Presione M/m para seleccionar Durante la reproducción, presione (PICTURE EQ) varias veces hasta que (CENTER ZOOM) y, a aparezca la opción deseada. continuación, presione (ENTER). Aparecerá la opción actual. DAYTIME 12 ( 67 ) PLAY 018 ( 034 ) DVDVIDEO T 1:35:55 Las opciones varían en función del ajuste en la configuración visual (página 44).
- Page 87 Personalización de la calidad de la Bloqueo de discos imagen — control de bloqueo La opción “CUSTOM” le permite configurar sus propios ajustes de calidad de la imagen a través de los tonos de la imagen. Es posible guardar * Excluidos los discos DVD-R, DVD-R DL y DVD-RW ajustes para las opciones “LIGHT OFF y ”...
- Page 88 Presione M/m para seleccionar Presione M/m para seleccionar “ON t” y, a continuación, presione “PARENTAL CONTROL” y, a (ENTER). continuación, presione (ENTER). Aparecerá la pantalla de ajuste de contraseña. Se muestran las opciones. Presione M/m para seleccionar “PLAYER t” y, a continuación, PARENTAL CONTROL presione (ENTER).
- Page 89 Las opciones de reproducción aleatoria o de Reproducción repetida y modificación del orden de reproducción de cada disco o formato se indican a continuación. aleatoria Disco/ Opciones formato TITLE: reproduce los capítulos del título actual en orden aleatorio. DISC: reproduce las pistas del disco actual en orden aleatorio.
- Page 90 Presione M/m para seleccionar Ajuste desde el menú del modo de reproducción y, a continuación, presione (ENTER). 12 ( 67 ) PLAY Los elementos de búsqueda varían según el disco 018 ( 034 ) DVDVIDEO o el formato de la siguiente manera. T 1:35:55 Disco/ Elementos...
- Page 91 Presione M/m para seleccionar el MUSIC: proporciona un espacio de sonido elemento deseado y, a continuación, amplio y profundo a las grabaciones de audio en presione (ENTER). estéreo. MOVIE: proporciona una direccionalidad del campo de sonido mejorada que alcanza la calidad - - ( 67 ) PLAY de sonido de 5.1 canales discretos a los...
- Page 92 Ajuste del eco Antes de empezar, conecte un micrófono a la toma de entrada MIC de la unidad. 1 Con el modo karaoke activado, presione (SOUND) varias veces hasta que aparezca Durante la reproducción, presione m “MIC ECHO” en la unidad principal. varias veces hasta que aparezca la opción deseada.
- Page 93 Durante la reproducción, presione Presione M/m para seleccionar el tipo (LIST). de archivo del que desea generar una Aparece una lista con las pistas, imágenes o lista y, a continuación, presione (ENTER). archivos de video en el disco, álbum* o carpeta* actual.
- Page 94 Este ajuste se puede configurar desde el menú de Configuración de los ajustes de configuración visual (página 41) y desde el menú de configuración del sistema (página 46). reproducción para Super Audio Las opciones de “SUPER AUDIO CD LAYER” (configuración visual) y “DISC.LAYER” (configuración del sistema) se indican a continuación.
- Page 95 Mediante el menú de configuración Selección de la calidad de sonido del sistema Con esta unidad es posible seleccionar distintas Con la unidad apagada, presione frecuencias de muestreo para cambiar la calidad (SYSTEM SETUP). de sonido para la reproducción de discos Super Se muestra el elemento de configuración del Audio CD.
-
Page 96: Almacenamiento Manual
Almacenamiento manual Funcionamiento avanzado — Radio Mientras se recibe la emisora que Almacenamiento y recepción desea almacenar, mantenga de emisoras presionado un botón numérico (de (1) a (6)) hasta que aparezca “MEM” en la unidad principal. Se muestra una indicación del botón Botones numérico en la unidad principal. - Page 97 ENTER configuración deseado en la unidad SOUND principal. X-DSP, el nuevo motor de sonido de Sony crea un campo de sonido ideal dentro del automóvil con procesamiento de señales digital. X-DSP contiene la siguientes funciones: CSO Presione </, para ajustar el nivel o (Organizador del altavoz central), Alineación de...
- Page 98 A través del menú de configuración Optimización del sonido para la visual posición de escucha — Alineación Con la unidad apagada, presione de tiempo inteligente (VISUAL SETUP). La unidad puede cambiar la localización del Se muestra el menú de configuración visual. sonido demorando la salida de sonido de cada Presione M/m para seleccionar altavoz para adecuarse a su posición de escucha y...
- Page 99 Presione M/m para seleccionar “POS Calibración precisa de la posición TUNE” y, a continuación, presione de escucha — Sintonización (ENTER). Alineación de tiempo inteligente Ajuste la distancia entre su posición de escucha y cada altavoz. Puede calibrar con precisión su posición de Para ajustar la distancia, presione M/m.
- Page 100 Ajuste del nivel de las distintas Con la unidad apagada, presione (SYSTEM SETUP). frecuencias. Para ajustar el nivel, presione M/m. El elemento de configuración del sistema El nivel se puede ajustar en pasos individuales aparece en la unidad principal. entre –8 y +8. Presione M/m para seleccionar “SP SETUP”...
- Page 101 Por ejemplo, si se desea definir una relación de Configuración aspecto de “4:3 PAN SCAN”. Con la unidad apagada, presione Los siguientes dos menús de configuración (VISUAL SETUP). incluyen varios ajustes que se pueden modificar. Se muestra el menú de configuración visual. •...
-
Page 102: Ajuste De La Pantalla
Ajuste del idioma para la pantalla o pista de sonido Seleccione (LANGUAGE SETUP) y, a continuación, seleccione el elemento que desee y una de las opciones que figuran a continuación, mediante M/m y (ENTER). Si desea obtener más información sobre este procedimiento, consulte “Operación básica de la configuración visual” en la página 41. Elemento Utilidad MENU... -
Page 103: Ajuste Personalizado
Ajuste personalizado Seleccione (CUSTOM SETUP) y, a continuación, seleccione el elemento deseado y la opción que figura a continuación, mediante M/m y (ENTER). Si desea obtener más información sobre este procedimiento, consulte “Operación básica de la configuración visual” en la página 41. Para ver información detallada, consulte la referencia de la página. -
Page 104: Ajuste De Audio
PICTURE EQ (página 26) AUTO (z) Permite cambiar automáticamente las opciones de uso nocturno/uso diurno en función de si la luz está Permite seleccionar la opción de encendida o apagada. (Sólo está ajuste que desea que se muestre en disponible si el cable de control de el menú... - Page 105 AUDIO DRC STANDARD (z) Permite seleccionar el ajuste Permite mayor claridad en el estándar. sonido si el volumen es bajo. Sólo WIDE RANGE Produce la sensación de estar en para discos DVD compatibles con una actuación en directo. Audio DRC (Control de gama dinámica).
- Page 106 Los elementos del menú se pueden ajustar Configuración del sistema mediante el procedimiento siguiente. Por ejemplo, si desea configurar la demostración El menú de configuración del sistema incluye las siguientes categorías. Con la unidad apagada, presione (SYSTEM SETUP). • SET: ajustes generales (página 47) El elemento de configuración del sistema •...
- Page 107 Para ver información detallada, consulte la referencia de la página. “z” indica que es el ajuste predeterminado. SET (Configuración) Estado de la Elemento Opción Utilidad unidad CLOCK ADJ (Ajuste del – – reloj) (página 50) BEEP ON (z) Permite activar el sonido de Cualquier estado.
- Page 108 M.DSPL (Desplazamiento de SA (z) Permite mostrar patrones indicaciones) en movimiento y el Con esta opción se selecciona analizador de espectros. Durante la el modo de desplazamiento de Permite mostrar patrones reproducción/ indicaciones. en movimiento. recepción de la radio. Permite desactivar el desplazamiento de indicaciones.
- Page 109 SOUND (Sonido) Estado de la Elemento Opción Utilidad unidad EQ7 TUNE (página 39) – – HPF (Filtro de paso alto) OFF (z) Esta opción anula el corte Permite seleccionar la de la frecuencia. frecuencia de corte de los Durante la 80HZ, 120HZ Permite seleccionar la altavoces frontales o...
-
Page 110: Ajuste Del Reloj
Ajuste del reloj Uso de equipo opcional Equipo auxiliar de audio SYSTEM SETUP DSPL </M/m/, SYSTEM ENTER SETUP ENTER El reloj utiliza un sistema de 12 horas. Presione (SYSTEM SETUP). Si conecta un dispositivo de audio portátil El elemento de configuración del sistema opcional a la toma de entrada AUX (minitoma aparece en la unidad principal. - Page 111 Procedimiento para ajustar el nivel Selección del cambiador de volumen 1 Presione (SRC) varias veces hasta que Asegúrese de ajustar el volumen de cada aparezca “CDC”. dispositivo de audio conectado antes de iniciar la 2 Presione (MODE) varias veces hasta que reproducción.
- Page 112 Reproducción repetida y aleatoria • Control PRESET/DISC Funciona igual que M/m en el control remoto de tarjeta o como (3)/(4) (ALBUM –/+) en la unidad principal (presionar y girar). • Control VOL (volumen) Funciona igual que (VOL) +/– en el control remoto de tarjeta o el selector de control de volumen de la unidad principal (girar).
-
Page 113: Notas Sobre Los Discos
• Antes de reproducir discos, Información complementaria límpielos con un paño de limpieza disponible en el Precauciones mercado. Hágalo desde el centro hacia los bordes. No utilice disolventes como • Si estaciona el automóvil bajo la luz directa del bencina, diluyentes, productos sol, deje que la unidad se enfríe antes de usarla. -
Page 114: Acerca De Los Archivos Mp
Notas sobre la finalización de los Discos de música codificados con discos tecnologías de protección de los derechos de autor Los siguientes tipos de discos se deben finalizar antes de poder reproducirse en esta unidad. Este producto se diseñó para reproducir discos que •... -
Page 115: Acerca De Los Archivos Wma
DivX, Inc. vuelve a fundirse después de sustituirlo, es posible que exista alguna falla de funcionamiento Fusible (10 A) interno. En tal caso, póngase en contacto con el distribuidor Sony más cercano. continúa en la página siguiente t... - Page 116 Limpieza de los conectores Extraiga la unidad. Es posible que la unidad no funcione correctamente 1 Inserte las dos llaves de liberación si los conectores entre ésta y el panel frontal están simultáneamente hasta oír un clic. sucios. Con el fin de evitarlo, extraiga el panel frontal (página 13) y limpie los conectores con un El gancho bastoncillo de algodón.
- Page 117 Nota Esta unidad no puede conectarse a un Generales preamplificador digital ni a un ecualizador que sea compatible con el sistema BUS de Sony. Salidas: Terminales de salida de video (frontal/posterior) El diseño y las especificaciones están sujetos a Terminales de salida de audio (frontal/posterior) cambios sin previo aviso.
- Page 118 Generales Derechos de autor La unidad no recibe alimentación. Este producto incluye tecnología de protección • Revise la conexión. Si todo está en orden, compruebe de los derechos de autor protegida por patentes el fusible. de los EE. UU. y otros derechos de propiedad •...
- Page 119 Imagen Operación de discos No hay imagen o la imagen produce un ruido. No es posible insertar el disco. • No se ha realizado correctamente la conexión. • Ya hay un disco insertado. • Verifique la conexión al equipo enchufado y ajuste el •...
- Page 120 Revise la conexión. Si el indicador de error monoaural. permanece en pantalla, póngase en contacto con el t Ajuste “MONO OFF” (página 48). distribuidor Sony más cercano. READ La unidad está leyendo toda la información de archivos o álbumes (carpetas) del disco.
- Page 121 óptima separación entre canales, ya que Si estas soluciones no ayudan a mejorar la situación, todos los datos de canal se graban por separado, póngase en contacto con el distribuidor Sony más siendo mínimo el deterioro gracias a que el cercano.
- Page 122 Super Audio CD Disco que contiene hasta 8 horas de imágenes en El Super Audio CD es un nuevo estándar de alta movimiento, aunque su diámetro es igual que el de calidad de discos de audio en el que la música se un CD.
- Page 123 Lista de códigos de idiomas y códigos de área Lista de códigos de idiomas La ortografía de los idiomas cumple la norma ISO 639: 1988 (E/F). Código Idioma Código Idioma Código Idioma Código Idioma 1027 Afar 1183 Irish 1347 Maori 1507 Samoan 1028...
- Page 124 Índice Numérico 16:9 42 Capa Filtro de paso alto (HPF) 49 2000MP3 3 (SUPER AUDIO CD LAYER, Filtro de paso bajo (LPF) 49 2000WMA 3 DISC.LAYER) 34, 44, 49 Fondo de pantalla 4:3 LETTER BOX 42 Capítulo (CHAPTER) 30 (WALLPAPER) 42 4:3 PAN SCAN 42 Carpeta (ALBUM) 30 Formato de programa 24...
- Page 125 Nivel de DVD (DVD-LVL) Tipo de monitor 25, 49 (MONITOR TYPE) 42 Nivel del componente auxiliar Título (TITLE) 30 (AUX-LVL) 49, 51 NTSC 47 Volumen Altavoz 37, 40 Organizador del altavoz Eco 32 central (CSO) 37 Micrófono 32 Unidad principal 8 PAL 47 Picture EQ WMA 7, 55...
- Page 126 关于安全 警告 • 请遵守贵国或地区的交通法规。 • 为了您的安全,如果未实施停车制动,则连 为防止火灾或电击,请勿将本机放在雨水所 接在 FRONT VIDEO OUT 的监视器将自动关 及或潮湿的地方。 闭。 切勿打开机壳,以免触电。维修只可由合格的 专业技术人员进行。 防止意外事故 图像及卡拉 OK 功能只有当您停车后并设定 注意 了停车制动才可使用。 与此产品配合使用光学仪器会增加眼睛受伤 如果在视频播放或者卡拉 OK 模式中汽车开 的危险。该 CD/DVD 播放机使用的激光光束对 始起动,在显示下列警告后,来自 FRONT 眼睛有害,因此不要试图拆开机壳。 VIDEO OUT 的图像将自动消失。 维修只可由合格的专业技术人员进行。 当汽车处于行驶状态时,连接到 REAR VIDEO OUT 的监视器启用。 屏幕上的图像关闭,卡拉...
- Page 127 鸣谢惠顾! t 第 36 页 感谢您惠购 Sony 多媒体播放机。在操作本机 通过延迟从各扬声器输出的声音来改变声音 之前,请详细阅读本说明书并妥善保管以备 的位置,无论您坐在车中的哪个位置,都使 将来参考。 您感觉身处声场的中央。 特点 详细说明,请参阅页面参考。 t 第 35,37 页 DVD, VCD, Super Audio CD, CD 播放 7 条预设均衡曲线,可通过调谐 7 个不同的 t 第 6 页 波段进一步定制。 与多种光盘格式兼容。 t 第 26 页...
- Page 128 目录 可播放光盘及在本说明书中使用的 直接搜索播放 ......29 光盘符号 ......6 2 声道音源的多声道输出 控制器位置和功能 ..... 8 — Pro Logic II ......30 主机 ....... 8 享用卡拉 OK ......31 卡片式遥控器 RM-X163 ....10 列出轨迹 / 图像 / 视频文件 — LIST ..32 选择轨迹 / 图像 / 视频文件 ..32 开始使用...
- Page 129 使用选购设备 辅助音频设备 ......46 CD 换碟机 ......47 旋转式控制器 RM-X4S ....48 附加信息 使用前注意事项 .......49 光盘注意事项 ......49 ® MP3/WMA/JPEG/DivX 文件的 播放顺序 ......50 关于 MP3 文件 ......50 关于 WMA 文件 ......50 关于 JPEG 文件 .....50 ® 关于 DivX 文件 ....50 保养 .........51 取出本机 ......51 规格...
- Page 130 可播放光盘及在本说明书中使用的光盘符号 本机可播放各种视频 / 音频光盘。 下表可帮助您查看本机是否支持某种光盘,以及对于某种光盘而言有哪些可用功能。 说明书中的光盘符号 光盘格式 光碟标志 DVD VIDEO DVD-R* DVD-R DL* (视频模式 /VR 模式) DVD-RW* (视频模式 /VR 模式) DVD+R* DVD+R DL* DVD+RW* 视频 CD (版本 :1.0/1.1/2.0) Super Audio CD 音频 CD CD-ROM* CD-R* CD-RW* *1 还可保存音频文件。详见第 7 页。 *2 还可保存视频...
- Page 131 下表列出了支持的压缩格式,文件类型以及可保存这些文件的光盘类型。 可用功能视格式而异,与光盘类型无关。下面的格式符号出现在该格式可用功能的说明旁。 说明书中的格式符号 文件类型 可存储光盘类型 MP3 音频文件 DATA DVD DVD-ROM DATA CD WMA 音频文件 DVD-R DVD-R DL CD-ROM DVD-RW CD-R JPEG 图像文件 DVD+R CD-RW DVD+R DL DVD+RW ® DivX 视频文件 提示 关于压缩格式的详细信息,请参阅第 50 页。 不支持的光盘 下列光盘无法在本机上播放。 • 8 cm 光盘 •...
- Page 132 OPEN ENTER SOURCE SEEK SEEK LIST MODE SYSTEM SHUF ALBUM SETUP DSPL SCRL MEX-DV2000 拆下前面板 RESET C 音量控制拨盘 /SOUND/ENTER 按钮 12, 详细说明,请参阅列出页。 本使用说明书主要描述了卡片式遥控器上的 25,31,32,34,35,37,38,43,46,47 控制键。如果主机上的控制键和卡片式遥控 调节音量 / 调节设定 (旋转);打开声音 器上的控制键名称相同或相似,您也可以使 菜单 / 应用设定 (按) 。 用主机上的控制键。 D SOURCE 按钮 12,13,18,34,47 A OFF 按钮...
- Page 133 F AUX 输入插孔 46 P RESET 按钮 12 连接便携式音频设备。 Q Z (退出)按钮 15,16 G OPEN 按钮 13,14,15,16 退出光盘。 H LIST 按钮 32 R 光盘槽 14,16 显示列表。 * 插入光盘。 *1 在播放 Super Audio CD/CD/MP3/WMA/JPEG/DivX 时。 I 卡片式遥控器接收器 *2 操作因光盘而异 (第 15,17 页) 。 *3 连接了...
- Page 134 卡片式遥控器 RM-X163 AUDIO SUBTITLE ANGLE CLEAR TOP MENU MENU SYSTEM SETUP VISUAL SETUP LIST DSPL ENTER SOUND PICTURE PLII MODE C CLEAR 按钮 27,30 详细说明,请参阅列出页。 使用前抽出绝缘薄膜 (第 13 页) 。 删除输入的数字。 A OFF 按钮 12,14,16,21 D SYSTEM SETUP 按钮 25,33,34,37, 关闭电源...
- Page 135 G PICTURE EQ 按钮 26 Q </M/m/, (光标)/ENTER 按钮 选择图像质量。 移动光标和应用设定。 H u (播放 / 暂停)按钮 14,15,16, R PLII (Pro Logic II)按钮 30 17,20 选择 Dolby Pro Logic II 模式。 开始 / 暂停播放。 S m (麦克风)按钮 31 I .m/M> 按钮 15,17,18,20 激活卡拉...
- Page 136 执行初始设定 开始使用 安装设备和选购监视器 SOURCE 首先,安装并连接设备和选购监视器。 本机可通过使用设备和 /或选购监视器上显示 的画面进行操作。 请注意, 该说明书包括关于本机和 / 或选购监 视器中显示画面的说明。 音量控制拨盘 装置 选购监视器 重设本机后,会出现初始扬声器设定的显示。 必须按照以下步骤进行正确设定,从而欣赏 本机的各种声音功能。 若要跳过初始设定,按 (OFF)/(SOURCE), 或插入一张光盘。 注意 如果没有执行任何操作达 30 秒钟,初始设定显示自动 消失。 设定过程中,如果没有执行任何操作达 15 秒钟,则设 定被取消。 在初始设定显示中,按音量控制拨盘。 详细信息,请参阅附送的安装 / 连接说明书。 注意 必须安全安装选购监视器,安装位置不得阻碍驾驶员的 视线。 重设本机 转动音量控制拨盘设定中置扬声器的连接 状态,然后按下拨盘。...
- Page 137 转动音量控制拨盘选择您的聆听位置,然 在设备关闭时按 (OPEN)。 后按下拨盘。 前面板向下弹出。 如果您的聆听位置在左前,选择 向右滑动前面板,然后轻轻拉出前面板的 “FRONT L” ,如果在右前,则选择 左端。 “FRONT R” 。 设定完成后,出现时钟显示。 此设定可以在设定或声音菜单中进行进一步 配置。 关于设定扬声器连接状态的详细说明,请参 阅第 38 页上的 “扬声器配置和音量设定” 。 关于设定聆听位置的详细说明,请参阅第 36 页上的 “最优化聆听位置的声音 — 智能时 间校正” 。 注意 注意 如果您在没有连接中置扬声器的情况下设定 “C ON”, • 切勿摔落或猛按前面板及显示窗。 则不输出唱声,如果您在没有连接超低音扬声器的情况 • 切勿使前面板受热 / 高温或受潮。避免将前面板遗留 下设定...
- Page 138 基本操作 播放视频光盘 视光盘而定,有些操作可能不相同或受到限制。 请参阅随光碟提供的操作说明。 OPEN 数字按钮 </M/m/, ENTER b/B/V/v 开启监视器,然后在您的监视器上选择符合 本机的输入源。 按主机上的 (OPEN)。 插入光盘 (标签面朝上) 。 关上前面板。 播放自动开始。 如果播放没有自动启动,按 u。 如果显示 DVD 菜单,按 (1)(b)/(2)(B)/(3)(V)/(4)(v) 以移动光标, 然后按 (6)(u) 确认。 在卡片式遥控器上按 </M/m/,/ 数字按钮以移动光标,然后按 (ENTER) 确认。 停止播放 按 (OFF)。...
- Page 139 退出光盘 按主机上的 (OPEN)。 按 Z (前面板背面) 。 关上前面板。 关于 DVD 菜单 一张 DVD 分为几个部分,组成了图像或者音乐功能。这些部分称为 “标题” 。在播放包括若干 标题的 DVD 时, 可使用 DVD 的顶部菜单选择所需的标题。 对于选择字幕 / 声音语言等项目的 DVD, 使用 DVD 菜单选择这些项目。 其他播放操作 AUDIO 数字按钮 SUBTITLE ANGLE MENU TOP MENU </M/m/, ENTER .m/M> b/B/V/v .m/M>...
- Page 140 播放音频光盘 视光盘而定,有些操作可能不相同或受到限制。 请参阅随光碟提供的操作说明。 OPEN 按主机上的 (OPEN)。 插入光盘 (标签面朝上) 。 关上前面板。 播放自动开始。 如果播放没有自动启动,按 u。 停止播放 按 (OFF)。 退出光盘 按主机上的 (OPEN)。 按 Z (前面板背面) 。 关上前面板。...
- Page 141 其他播放操作 </M/m/, .m/M> ALBUM .m/M> 功能 请按 暂停 / 暂停后恢复播放 跳过轨迹 .m (<)/M> (,) 后退 / 快进轨迹 并按住 .m/M> 跳过专辑 * 主机:(3) (ALBUM -)/(4) (ALBUM +) 遥控器:M/m 连续跳过专辑 * 主机:并按住 (3) (ALBUM -)/(4) (ALBUM +) 遥控器:并按住 M/m * 播放 MP3/WMA 时。...
- Page 142 收听无线电 SOURCE .m/M> MODE SEEK MODE 反复按 (SOURCE),直至出现 “TUNER” 。 反复按 (MODE),直至出现想要的波段 (FM1,FM2,FM3,AM1 或 AM2) 。 A 无线电波段 / 功能 B 频率 进行调谐。 自动调谐 按 (SEEK) -/+。 当本机接收到一个电台时,扫描即停止。如此反复操作直至接收到所要的电台。 手动调谐 按住 (SEEK) -/+ 以找到近似频率,然后反复按 (SEEK) -/+ 精确调整到所需频率。 提示 关于无线电功能的详细说明,请参阅第 34 页上的 “高级操作 — 无线电” 。 用卡片式遥控器操作...
- Page 143 2 以多声道声音欣赏 2 声道音源 欣赏环绕声 x 对于 VCD/CD/MP3/AUX 播放或无线电接收 创造多声道声音的理想声场 1 启动 Dolby Pro Logic 模式。 t 第 30 页 本节将介绍创造出多声道(5.1 声道)声音的 理想声场的步骤示例。详细说明,请参阅页面 2 如果没有连接中置扬声器, 则启动 CSO。 参考。 t 第 35 页 1 准备工作 3 欣赏多声道音源 设定扬声器配置。 x 对于播放多声道格式 (Dolby Digital、 设定中置扬声器和超低音扬声器的连接状...
- Page 144 ® DivX 视频播放 高级操作 — 光盘 ® DivX 是一种由 DivX,Inc. 开发的视频文件 本章包括下列小节。 ® 压缩技术。该产品为官方 DivX Certified ® • 视频专用操作 * 产品,可播放所有版本的 DivX 视频 (包括 ® ® t 第 20 至 28 页 DivX 6) ,具有 DivX 媒体文件的标准播 放功能。 • 视频 */ 音频通用操作 t 第...
- Page 145 使用 PBC 功能 — 播放控制 使用播放模式菜单 数字按钮 数字按钮 VISUAL </M/m/, SETUP ENTER ENTER 可使用本机的播放模式菜单控制播放或者配 在播放 PBC 兼容 VCD 时,PBC 菜单可以帮助您 置播放设定。 进行交互式操作。 若要显示播放模式菜单,在播放过程中按 开始播放兼容 PBC 的 VCD。 (VISUAL SETUP)。 出现 PBC 菜单。 若要隐藏,再按一次 (VISUAL SETUP)。 按数字按钮选择想要的项目,然后按 注意 (ENTER)。 • 在音频光盘播放过程中, (VISUAL SETUP) 无效。 按照菜单的指示进行交互操作。...
- Page 146 例如:播放 DVD 时 IMAGE 30 B C D 选择显示的图像。 12 ( 67 ) PLAY 018 ( 034 ) DVDVIDEO FILE 30 T 1:35:55 选择要播放的视频文件。 1:ENGLISH 1:ENGLISH 2:FRENCH TIME 30 3:SPANISH 查看已播放时间;输入时间代码。 SUBTITLE Select : ENTER AUDIO 15,24 更改音频语言 / 格式 / 声道;检查程序格 A 播放模式菜单项目...
- Page 147 JPEG 播放 查看光盘的时间 / 文本信息 • 专辑编号 / 总数 • 图像编号 / 总数 DivX 播放 • 专辑 (文件夹)编号 / 总数 • 文件编号 / 总数 • T **:** 当前文件的已播放时间 查看文本信息 DSPL 可查看 JPEG/DivX 文件的文本信息 (专辑名 称、图像名称等等) 。 专辑 / 图像 / 文件夹 / 文件编号 037(325) 查看时间信息...
- Page 148 在播放过程中,反复按 (AUDIO) 直至出现 配置音频设定 所需要的音频声道。 例如:播放 MP3 时 音频声道 AUDIO TRACK NAME ALBUM NAME 0003/1000 L SYSTEM VISUAL ARTIST NAME 003:17 SHUF SETUP SETUP ENTER 注意 视光盘而定,您可能无法改变音频设定。 提示 您也可以在播放模式菜单中选择 “AUDIO”来更改视频 光盘的设定 (第 21 页) 。 更改音频语言 / 格式 查看节目格式 对于 DVD,如果光盘以多语言轨迹录制,则可 改变语言。对于...
- Page 149 如下出现节目格式名称和声道号数。 放大图像 例如:Dolby Digital 5.1 ch 后置分量 × 2 DOLBY DIGITAL 3 / 2 . 1 前置分量 × 2 + LFE 分量 × 1 中置分量 × 1 VISUAL </M/m/, 若要隐藏播放模式菜单,按 SETUP ENTER (VISUAL SETUP)。 调整音频输出电平 — DVD 电平 音频输出电平视录制的格式而异。若要减少 光盘和音源间的音量电平差异,您可以根据 您可以放大图像。...
- Page 150 设定为“LIGHT ON”/“AUTO” (照明打开)时 调整图像质量 — 图像 EQ NIGHT:监视器变暗,以免在夜晚分散您驾 车的注意力。 MIDNIGHT:使监视器比 “NIGHT”设定更 暗。 THEATER:使监视器变亮;适合于您想在夜 晚观看明亮的监视器。 提示 VISUAL </M/m/, 您也可以通过选择播放模式菜单中的“PICTURE EQ”改 SETUP ENTER 变图像质量 (第 21 页) 。 PICTURE EQ 自定义图像质量 “CUSTOM”选项通过调整图像色调自定义图像 质量设定。可存储 “LIGHT OFF”和 “LIGHT 您可以选择适合汽车内部亮度的图像质量。 ON”设定的调整。 在播放过程中,反复按 (PICTURE EQ) 直 在播放过程中,按...
- Page 151 按数字按钮输入您的密码,然后按 锁定光盘 — 视听者控制 (ENTER)。 出现确认显示。 若要 确 认,按 数 字按 钮 再 次 输入 您 的 密 * 在 VR 模式中不包括 DVD-R/DVD-R DL/DVD-RW。 码,然后按 (ENTER)。 设定完成。 若要删除输入的数字,按 (CLEAR)。 数字按钮 要返回至先前的显示,按 O。 若要隐藏图像设定菜单,按 VISUAL (VISUAL SETUP)。 CLEAR SETUP ENTER 关闭视听者控制功能 在上面的步骤...
- Page 152 按 M/m 选择想要的地区, 以使用该地区电 重复和随机播放 影评定等级,然后按 (ENTER)。 区域选择完毕。 在选择 “OTHERS t”时,使用数字按钮 输入从第 57 页上“区域代码列表”中选择 的地区代码。 按 M/m 选择 “LEVEL” , 然后按 (ENTER)。 出现选项。 PARENTAL CONTROL LEVEL : SHUF STANDARD : NC17 播放过程中,反复按主机上的 (1) (REP) 或 (2) (SHUF) ,直至出现所需选项。 PG13 数字越小,限制等级越严格。 按...
- Page 153 每个光盘 / 格式的随机选项以及切换顺序如下 按 M/m 选择想要的选项,然后按 所示。 (ENTER)。 开始重复或者随机播放。 光盘 / 格式 选项 按 (VISUAL SETUP) 隐藏播放模式菜单。 注意 TITLE:以随机顺序播放当前 退出正在播放的光盘时,所选择的播放模式就将取消。 标题中的章节。 直接搜索播放 DISC:以随机顺序播放当前 光盘中的轨迹。 ALBUM:以随机顺序播放当前 专辑 (文件夹)中的轨迹 / 数字按钮 图像 / 视频文件。 VISUAL CLEAR SETUP ENTER *1 只有在播放版本 1.0/1.1 VCD 或者版本 2.0 VCD (无...
- Page 154 在播放模式菜单中设定 2 声道音源的多声道输出 — Pro Logic II 如下所示,搜索项目视光盘 / 格式而异。 光盘 / 格式 项目 TITLE 从所选择的标题开始播放。 CHAPTER 从所选择的章节开始播放。 TIME 从输入时间代码确定的点开 PLII 始播放。 TRACK 从所选择的轨迹开始播放。 Dolby Pro Logic II 可从 2 声道音源产生 5 个 ALBUM 全带宽输出的声道。这是使用一种先进的、高 从所选择的专辑开始播放。 纯度的矩阵环绕解码器,不添加任何新声音 IMAGE 或音色而选取原始录音的空间特性,从而产 生这种效果。 从所选择的图像开始播放。...
- Page 155 调整麦克风音量 享用卡拉 OK 1 在激活卡拉 OK 模式时,反复按主机上的 (SOUND),直至主机上出现 “MIC VOL” 。 </, 2 按 </, 调整音量电平。 音量电平可单级调整,调整范围 0 至 20。 SOUND 3 秒钟后,设定完成,显示返回正常播放模 式。 调整回声 可将麦克风 (不附送)连接本机,将本机设 1 在激活卡拉 OK 模式时,反复按主机上的 定为卡拉 OK 模式,开始使用卡拉 OK(跟随光 (SOUND),直至主机上出现“MIC ECHO” 。 盘唱歌) 。 卡拉...
- Page 156 选择文件类型 列出轨迹 / 图像 / 视频文件 — LIST 如果光盘包含多种文件类型,则只有选择的 文件类型(音频 / 视频 / 图像)可以播放。文 件的优先播放顺序最初设定为音频、视频,然 后是图像 (例如,如果光盘中只有视频和图 像文件,则只播放视频文件) 。您可以在显示 列表中选择文件类型,然后选择要播放的文 件。 ENTER LIST 在播放过程中按 (LIST)。 按 M/m 选择要列出的文件类型,然后按 (ENTER)。 若要列出 MP3 和 WMA 文件,选择“LIST UP AUDIO FILES” 。 若要列出 DivX 文件, 选择 “LIST UP VIDEO 选择轨迹...
- Page 157 E 曲目编号 / 总数 MULTI (图像设定)/MLT (系统设定) :播放 F 已播放时间 Super Audio CD 层中的多声道区。 G 当前播放模式 2CH:在 Super Audio CD 层中播放 2 声道(立 H 操作帮助消息 体声)区。 CD:播放 CD 层。 提示 可使用列表选择要播放的轨迹 (第 32 页) 。 使用图像设定菜单 在设备关闭时按 (VISUAL SETUP)。 为 Super Audio CD 配置播放 出现图像设定菜单。...
- Page 158 选择声音质量 高级操作 — 无线电 通过改变采样频率,本机可更改 Super Audio 存储和接收电台 CD 播放的声音质量。 可从图像设定菜单 (第 39 页)和系统设定菜 单 (第 43 页)中配置该设定。 数字按钮 “SUPER AUDIO CD MODE” (图像设定)和 “SA-CD MOD” (系统设定)的选项如下所示。 HQ:以 176.4 kHz 输出 (高质量声音) 。 SYSTEM STD:以 44.1 kHz 输出(标准 CD 质量声音) 。 SETUP ENTER 使用图像设定菜单...
- Page 159 VISUAL SETUP SYSTEM </, SETUP </M/m/, ENTER SOUND SOUND X-DSP 是 Sony 的新声音引擎,可创造出经数 可根据您的喜好调整声音特性。 字讯号处理的理想的车内声场。X-DSP 含有以 下功能:CSO (中置扬声器管理器)、智能时 在播放 / 接收过程中, 反复按 (SOUND) 直 间校正和 EQ7。 至主机上出现所需要的设定项目。 创造虚拟中置扬声器 — CSO 若要尽情享受环绕声,拥有 5 个扬声器 (前 置左 / 右,后置左 / 右,中置)和 1 个超低音...
- Page 160 提示 最优化聆听位置的声音 — 智能时间 声音设定中的设定将自动切换图像设定中的设定,反之 亦然。 校正 本机可通过延迟从各扬声器输出的声音来改 精确校准聆听位置 — 智能时间校正 变声音的位置以适合您所在位置,并模拟自 调谐 然的声场,使您无论坐在车中的哪个位置,都 感觉身处声场的中央。 您 可 以 精确 校 准 从 各 扬 声 器 到 您 的聆 听 位 可从声音菜单 (第 35 页)和图像设定菜单 置,以便声音延迟能更正确地传给听者。 (第 39 页)中配置该设定。 可从图像设定菜单 (第 39 页)和系统设定菜 “POS”...
- Page 161 使用系统设定菜单 自定义均衡曲线 — EQ7 调谐 在设备关闭时,按 (SYSTEM SETUP)。 EQ7 的“CUSTOM”可让您进行自己的均衡器设 主机上显示系统设定项目。 定。您可以调整 7 个不同波段的电平:62 Hz, 按 M/m 选择 “POS TUNE” ,然后按 157 Hz,396 Hz,1 kHz,2.5 kHz,6.3 kHz, (ENTER)。 和 16 kHz。 设定您的聆听位置与各扬声器之间的距 在播放 / 接收过程中按 (SYSTEM SETUP)。 离。 主机上显示系统设定项目。 若要调整距离,按 M/m。 按...
- Page 162 调整各扬声器的音量。 扬声器配置和音量设定 要调节电平,按 M/m。 电平可单级调整,调整范围 -6 至 +6。 若要切换扬声器,按 </,。 扬声器如下所示切换:FL (前置左) t C* (中置) t FR (前置右) t SR (后置右) t SL (后置左) t SW* (超低音扬声器) 。 SYSTEM * 仅当连接并在步骤 3 中设定为打开时出现。 </M/m/, SETUP ENTER 按 (ENTER)。 设定完成。 注意 如果您在没有连接中置扬声器的情况下设定...
- Page 163 例如:将纵横比设定为 “4:3 PAN SCAN”时。 设定 在设备关闭时按 (VISUAL SETUP)。 出现图像设定菜单。 从下面两种设定菜单中可配置各种设定。 • 图像设定菜单 (第 39 页) LANGUAGE SETUP 允许配置与图像相关的项目 (使用监视 MENU : ENGLISH 器) 。 AUDIO : ENGLISH SUBTITLE : ENGLISH • 系统设定菜单 (第 43 页) 允许配置与系统相关的项目 (使用主机) 。 图像设定 图像设定菜单包括以下类别。 按M/m选择...
- Page 164 显示或音轨的语言设定 选择 (LANGUAGE SETUP) ,然后使用 M/m 和 (ENTER) 选择下面的所需项目和选项。关于该 步骤的详细说明,请参阅第 39 页上的 “图像设定的基本操作” 。 项目 作用 MENU 更改光盘菜单语言。 AUDIO 更改音轨语言。 SUBTITLE 更改光盘上录制的字幕语言。 显示设定 选择 (DISPLAY SETUP) , 然后使用 M/m 和 (ENTER) 选择下面的所需项目和选项。 关于该步 骤的详细说明,请参阅第 39 页上的 “图像设定的基本操作” 。 “ z”表示默认设定。 项目...
- Page 165 自定义设定 选择 (CUSTOM SETUP) ,然后使用 M/m 和 (ENTER) 选择下面的所需项目和选项。关于该步 骤的详细说明,请参阅第 39 页上的 “图像设定的基本操作” 。 详细说明,请参阅页面参考。 “z”表示默认设定。 项目 选项 作用 PARENTAL CONTROL (第 27 页) OFF t (z) 关闭视听者控制功能。 ON t 激活视听者控制功能。 设定播放限制,使本机不播放不 适合的光盘或场面。 PLAYER t 设定限制标准和限制等级。 设定新的 4 位数密码。 PASSWORD t DivX VOD Done 关闭显示。...
- Page 166 音频设定 选择 (AUDIO SETUP) , 然后使用 M/m 和 (ENTER) 选择下面的所需项目和选项。 关于该步骤 的详细说明,请参阅第 39 页上的 “图像设定的基本操作” 。 详细说明,请参阅页面参考。 “z”表示默认设定。 项目 选项 作用 SUPER AUDIO CD MODE (第 34 页) HQ (z) 使用高质量声音。 使用标准质量声音。 为 Super Audio CD 播放选择声 音质量。 SUPER AUDIO CD LAYER (第33页) MULTI (z) 在...
- Page 167 系统设定 重设所有设定 系统设定菜单包括以下类别。 图像设定中的所有设定 (不包括视听者控制 设定)均可重设。 • SET:一般设定 (第 44 页) 选择 (RESET) ,然后选择 “YES” ,使用 • DSPL:显示设定 (第 44 页) M/m 和 (ENTER)。 • R/M:接收模式设定 (第 45 页) 关于该步骤的详细说明,请参阅第 39 页上的 • SOUND:声音设定 (第 45 页) “图像设定的基本操作” 。 注意 系统设定的基本操作...
- Page 168 详细说明,请参阅页面参考。 “z”表示默认设定。 SET (设定) 项目 选项 作用 设备状态 CLOCK ADJ (时钟调整) (第 46 页) 任何状态。 BEEP ON (z) 打开操作声音。 关闭操作声音。 COLOR SYS (彩色制式) PAL (z:亚洲 设定为 PAL。 机型) 更改电视机的彩色制式。 设备关闭。 NTSC (z:拉丁 设定为 NTSC。 美洲机型) RM (旋转式控制器) NORM (z) 使用出厂设定位置。 改变旋转式控制器的操作方...
- Page 169 R/M (接收模式) 项目 选项 作用 设备状态 LOCAL (本地搜索模式) 只调入信号较强的电台。 在无线电接收过 程中。 OFF (z) 调谐正常接收。 MONO (单声道模式) 以单声道收听立体声广 选择单声道接收模式以改善 播。 在 FM 接收过程 信号较差的 FM 接收。 中。 OFF (z) 以立体声方式收听立体声 广播。 BTM (最佳调谐记忆) 在无线电接收过 (第 34 页) 程中。 SOUND (声音) 项目 选项...
- Page 170 设定时钟 使用选购设备 辅助音频设备 SYSTEM SETUP DSPL </M/m/, SYSTEM ENTER SETUP ENTER 时钟采用 12 小时制显示。 按 (SYSTEM SETUP)。 将选购的便携式音频设备连接至本机上的 AUX 主机上显示系统设定项目。 输入插孔(立体声迷你插孔) ,然后只需选择 按 M/m 选择 “CLOCK ADJ” ,然后按 音源,您即可在小汽车扬声器上收听。对于本 (ENTER)。 机和便携式音频设备间的区别,可调整音量。 小时指示闪烁。 连接便携式音频设备 1 关闭便携式音频设备。 2 调低本机上的音量。 3 连接至本机。 按 M/m 设定小时和分钟。 若要移动数字指示,则按...
- Page 171 调整音量电平 用主机操作 按 (SOURCE),而不是 (SRC)。 必须在播放之前调整每个连接的音频设备的 音量。 跳过乐曲集和光盘 注意 如果发生 AUX 输入的声音失真,输入电平可能较高。 1 在播放过程中按 M/m。 通过频谱分析仪的偏转查看输入电平。若要显示频谱 分析仪,将 “M.DSPL”设定为 “SA” (第 44 页) 。如 跳过 按 M/m 果频谱分析仪显示峰值,调低输入电平。 专辑 并释放 (按住片刻) 。 1 调低本机上的音量。 连续跳过专辑 第一次释放后的 2 秒钟内。 2 反复按 (SRC) 直至主机上出现 “AUX” 。 出现...
- Page 172 改变操作方向 旋转式控制器 RM-X4S 控制器操作方向的工厂设定如下图所示。 调高 贴标签 视您安装旋转式控制器的方式,贴指示标签。 调低 若需要将旋转式控制器安装在汽车驾驶杆的 右侧,您可以将控制器的操作方向反置。 D S P L SO U N D M O D E M O D E 1 推 VOL 控制器时,按住 (SOUND)。 S O U N D D SP L 控制器位置 旋转式控制器上与卡片式遥控器或主机上的...
- Page 173 DVD 和 VCD 播放操作的注意事项 附加信息 有些 DVD 和 VCD 的播放操作方法可能受到软件制 作者的特别规定。由于本机是根据软件制作者设 使用前注意事项 计的光盘内容播放 DVD 和 VCD 的,所以一些播放 功能可能无效。此外,请参阅 DVD 或 VCD 随附的 使用说明书。 • 倘若您的汽车停在直射阳光下,则在操作前必 须先使本机充分冷却。 • 本机工作时,电动天线将自动伸出。 关于 DATA CD 和 DATA DVD 的注意事项 • 某些 DATA CD/DATA DVD(视用于录制的设备或 湿气凝结...
- Page 174 • 在录制 MP3/WMA/JPEG/DivX 时: 关于 WMA 文件 只播放含有所选文件类型 (音频 / 视频 / 图 像) * 的区段 (如果其他区段中有 CD-DA 或 • WMA 表示 Windows Media Audio,为一项音乐 其他数据,则被跳过) 。 文件压缩格式标准。 此格式将音频 CD 数据压缩 到原大小的 1/22* 左右。 * 关于如何选择文件类型的详细说明,请参阅第 32 页。 • WMA 标记为 63 个字符数。 •...
- Page 175 • 安装电池时,必须保证极性正确。 • 切勿用金属镊子夹电池,否则可能会引起短路。 取出本机。 1 将两把开锁钥匙同时插入,直至听到喀 嗒声。 更换保险丝 更换保险丝时, 必须确保所使 用的保险丝与原保险丝的额 定安培数相同。 如果保险丝烧 挂钩朝里。 断, 请检查电源连接并更换保 险丝。 如果保险丝更换后又被 烧断,则可能是内部故障。此 时,请向附近的 Sony 经销商 咨询。 保险丝 (10A) 清洁连接器 2 拉出开锁钥匙,使设备脱离原位。 如果本机与前面板之前的连接器不干净,则本机 可能会运作不正常。为防止这种情况发生,请拆 卸前面板(第 13 页) ,然后用棉签清洁连接器。 切勿施加太大的力量。否则,可能会损坏连接 器。 3 将本机从安装位置滑出。 主机 前面板的背部...
- Page 176 1 kHz 时谐波失真:0.5 % (立体声) , DivX、DivX Certified 和相关标识均为 DivX, 0.3 % (单声道) Inc. 商标,使用时应获得许可。 分离度:1 kHz 时 35 dB 频率响应: 30 - 15000 Hz 注意 本机不能连接至与 Sony BUS 系统兼容的数字前置放大 器或均衡器。 调谐范围: 亚洲机型: 设计和规格若有变更,恕不另行通知。 531 - 1602 kHz (以 9 kHz 为一级) 拉丁美洲机型:...
- Page 177 内存内容已被消除。 版权 • 已按过 RESET 按钮。 t 再将设定存入内存中。 本产品采用版权保护技术,该技术已取得美 • 电源导线或电池已断开连接。 国专利权及其他知识产权保护。使用此版权 • 电源导线未被正确连接。 保护技术时,必须获得 Macrovision 的许可, 储存的电台及正确时间被消除。 只有获得 Macrovision 的允许, 才能用于家庭 保险丝已熔断。 及其他限制性观赏。禁止逆向设计或拆解本 切换点火开关位置时产生噪音。 机。 导线与汽车附件电源连接器未正确匹配。 显示从显示窗口消失或不出现在显示窗口中。 • 调光器设定为 “DIM ON” (第 44 页) 。 • 如果按住 (OFF),则显示消失。 t 按住设备上的 (OFF),直至出现显示。 •...
- Page 178 声音 光盘未从起始处开始播放。 恢复播放或者多光盘恢复播放 (第 41 页)已生 没有声音 / 跳音 / 声音爆裂。 效。 • 未进行正确连接。 某些功能无法执行。 • 请检查至所连接装置之间的连接,将设备的输入 视光盘而定,您可能无法进行某些操作,如停止、 选择器设定至与本机相应的音源。 搜索、或重复 / 随机播放。详细说明,请参阅随 • 光盘有缺陷或脏了。 光盘随附的说明书。 • 安装不正确。 t 以小于 45°的角度将设备安装在汽车坚固位 无法改变音轨 / 字幕语言或角度。 置。 • 请使用 DVD 菜单,以代替在卡片式遥控器上的直 • MP3 文件采样率不是 16,22.05,24,32,44.1, 接选择按钮...
- Page 179 • 按 Z 取出光盘。 Please press RESET. FAILURE 由于某些原因,本机无法操作。 扬声器 / 放大器连接不正确。 t 按 RESET 按钮 (第 12 页) 。 t 请参阅提供的安装 / 连接说明书进行连接检查。 如果这些解答仍无法助您改善情况,请向您附近 LOAD 的 Sony 经销商咨询。 换碟机正在装入光盘。 如果因为光盘播放故障而将本机送修,请带好出 t 请等待至装载完成。 现问题时所使用的光盘。 L. SEEK +/- 在自动调谐时,本地搜索模式为开启状态。 NO DISC 光盘未插入 CD 换碟机。...
- Page 180 DVD+RW 术语表 DVD+RW (plus RW)是一种可录制和可重写的光 碟。 DVD+RW 使用的录制格式与 DVD VIDEO 格式相 当。 标题 视频软件中 DVD、电影等最长的图像或音乐部 轨迹 分,或音频软件的整个文件夹。 VIDEO CD,CD,Super Audio CD,或 MP3/WMA 上 的一段图像或音乐。一个专辑包括几个轨迹(仅 场面 限 MP3/WMA) 。 在具有 PBC(播放控制)功能的 VIDEO CD 上,菜 单画面、移动图像和静止图像分为多个部分,称 基于电影的软件,基于视频的软件 作 “场面” 。 DVD 可以分为基于电影或基于视频的软件。基于 ®...
- Page 181 语言代码 / 区域代码列表 语言代码列表 语言拼写符合 ISO 639:1988 (E/F)标准。 代码 语言 代码 语言 代码 语言 代码 语言 1027 Afar 1183 Irish 1347 Maori 1507 Samoan 1028 Abkhazian 1186 Scots Gaelic 1349 Macedonian 1508 Shona 1032 Afrikaans 1194 Galician 1350 Malayalam 1509 Somali 1039 Amharic...
- Page 182 索引 数字 16:9 40 放大 (CENTER ZOOM) 25 PAL 44 2000MP3 3 辅助电平 (AUX-LVL) 45, 47 Pro Logic II 2000WMA 3 辅助音频设备 46 (PROLOGIC II) 30, 42 4:3 LETTER BOX 40 平衡 (BAL) 35 4:3 PAN SCAN 40 5.1 声道输出 高通滤波器...
- Page 183 演示 (DEMO) 44 扬声器设定 (SP SETUP)12, 38 音轨语言 (AUDIO) 24, 40 音量 回声 31 麦克风 31 扬声器 35, 38 主机 8 音量衰减 (FAD) 35 音频 DRC (AUDIO DRC) 42 音频设定 (AUDIO SETUP) 42 音频 (AUDIO) 格式 24 声道 24 语言 24, 40 语言代码...
- Page 184 Sony Corporation Printed in Thailand...