Table of Contents
Advertisement
Advertisement
Table of Contents

Related Manuals for Miele KM 5670


Summary of Contents for Miele KM 5670
- Page 1 Operating and Installation instructions Ceramic cooktops KM 5670 KM 5673 en - AU, NZ To avoid the risk of accidents or damage to the appliance it is essential to read these instructions before it is installed or used for the first time.
-
Page 2: Table Of Contents
KM 5670........ - Page 3 Contents Safety features ........... 31 Safety lock .
-
Page 4: Description Of The Appliance
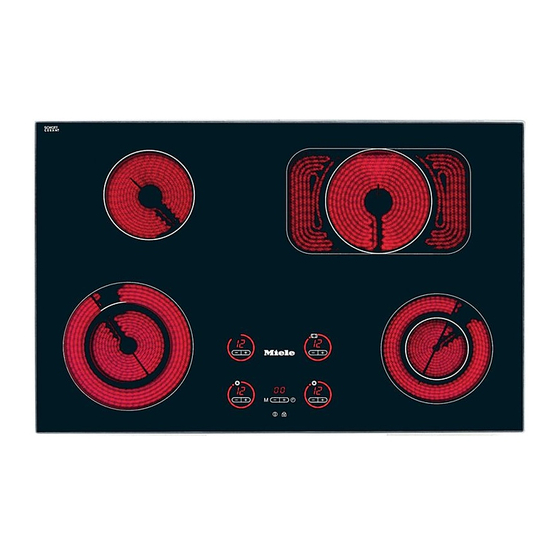
Description of the appliance KM 5670 Cooktop Cooking zones Double circle zones Single circle zone Bräterzone Control panel Sensor controls f Power setting g Switching on an extended area h Switching on the timer, switching between functions and selecting a... - Page 5 Description of the appliance KM 5673 Cooktop Cooking zones Double circle zones Single circle zones Extended cooking zone Control panel Sensor controls f Power setting g Switching on second heating circuit. h Switching on the timer, switching between functions and selecting a cooking zone j Safety lock k Setting a time /...
-
Page 6: Cooking Zones Display
Description of the appliance Cooking zones display n Display: = Cooking zone ready for use 1 bis 12 = Power setting = Residual heat = Fault (see "Safety switch-off") = Auto heat-up when the power setting range has been extended P0 usw. -
Page 7: Timer/Memory Display
Display for Time/Memory programme 00 bis 99 = Time P1 bis P5 = Memory programme t Memory programme indicator lamp Cooking zones Cooking KM 5670 KM 5673 zone C in cm C in cm Rating in watts Rating in watts... -
Page 8: Warning And Safety Instructions
Warning and Safety instructions Correct application This appliance complies with all This appliance is intended for relevant local and national safety domestic use for the preparation of requirements. Improper use of the food only. appliance can, however, present a Any other usage is at the owner's risk risk of both personal injury and and could be dangerous. - Page 9 Warning and Safety instructions Safety with children Keep all pans out of reach of children. Turn pan handles inwards Use the safety lock to prevent away from the edge of the cooktop. children operating the appliance or Danger of burning or scalding. Special altering the settings.
- Page 10 Otherwise the guarantee is invalidated. appliance. Consult a qualified Faulty components must only be electrician if in any doubt. replaced by genuine Miele original spare parts. The manufacturer can only For safety reasons, this appliance may only be used after it has been built...
- Page 11 H 05 VV-F being switched off. There is a danger of (pvc insulated), available from the Miele burning until the residual heat Spare Parts Department. indicators go out.
- Page 12 Warning and Safety instructions For added protection, it is advisable Do not heat up unopened tins of to use heat-resistant pot holders or food on the cooktop, as pressure will gloves when using the appliance. Do build up in the tin, causing it to not let them get damp or wet, as this explode.
- Page 13 Warning and Safety instructions Do not allow either solid or liquid If a domestic animal gets onto the sugar, or pieces of plastic or aluminium cooktop, a sensor switch could be foil to get onto the cooking zones when touched and a cooking zone switched they are hot.
-
Page 14: Caring For The Environment
Caring for the environment Disposal of the packing Disposal of your old appliance material or machine The transport and protective packing Electrical and electronic appliances / has been selected from materials which machines often contain materials are environmentally friendly for disposal which, if handled or disposed of and can normally be recycled. -
Page 15: Before Using For The First Time
Before using for the first time Please stick the extra data plate for the On cooktops with bevelled glass appliance supplied with this edges, a small gap may be visible documentation in the space provided in between the cooktop and the the "After sales service"... -
Page 16: Recalibration Of The Sensor Controls
F. The cooking zone display If this does not solve the problem rear right and the Timer/Memory please call the Miele Customer Contact display will show numbers. Center. If this is the case, recalibration will have... -
Page 17: How The Cooking Zones Work
How the cooking zones work Single circle cooking zones have one Single circle zone heating element, whilst double circle (vario) cooking zones and extended zones have two. Depending on the model, the heating elements may be separated by an isolating ring. Each cooking zone has overheating protection (a temperature limiter), which stops the ceramic surface from... -
Page 18: Use
Sensor controls Switching on This cooktop is equipped with The cooktop must be switched on electronic sensor controls which react before any of the zones can be used. to finger contact. Do not leave the appliance To operate a cooking zone touch the unattended whilst it is being used. -
Page 19: Settings
Settings Cooking process Settings* Standard Extended factory settings settings** (12 settings) (23 settings) Melting butter, chocolate etc. 1 - 2 1 - 2. Dissolving gelatine Preparing yoghurt Thickening sauces containing egg yolk and butter 1 - 3 1 - 3. Warming small quantities of food/liquid Keeping warm food which sticks easily Cooking rice... -
Page 20: Cooking With Auto Heat-Up
Cooking with Auto heat-up Continued cooking Heat-up time When Auto heat-up has been activated, setting* in minutes and the cooking zone switches on seconds (approx.) automatically at the highest setting and 0 : 30 then switches to the continued cooking 1 : 15 setting selected. -
Page 21: Cooking Without Auto Heat-Up
Cooking without Auto heat-up How to activate Auto heat-up ^ Switch the cooking zone on using the Proceed as follows: - sensor. Touch the - sensor until the ^ Switch the cooking zone on using the required power setting shows in the display e.g. -
Page 22: Switching On An Extended Area
Switching on an extended area A short bar will appear in the top left of the light ring to indicate that the outer Depending on the model of cooktop, circle/extended cooking zone has been the outer circle of a double circle zone switched on (see arrow). -
Page 23: Switching Off And Residual Heat Indicators
Switching off and residual heat The lines of the residual heat indicator go out one after another as the cooking indicators zones cool down. The last horizontal line only goes out when the cooking To switch off a cooking zone: zone is safe to touch. -
Page 24: Pans
– Pans made from any material can be cause scuffs and scratches. used on a ceramic cooktop. However, Miele recommends to – Check that the diameter of the pan refrain from using cookware with an base is wide enough for the cooking... -
Page 25: Tips On Saving Energy
Tips on saving energy – Use as little water as possible to cook with, and reduce the power – Use a pan lid whenever possible to setting once the water has come to minimise heat loss. the boil or the oil is hot enough to fry –... -
Page 26: Timer And Memory Function
Timer and Memory function Introduction Setting the minute minder The cooktop is fitted with: The minute minder can be used with - Minute minder (Timer function) the cooktop switched on or off. It works - Automatic switch-off for the cooking like a manual kitchen timer. -
Page 27: Switching A Cooking Zone Off Automatically
Timer and Memory function Switching a cooking zone off If more than one switch-off time is programmed, the shortest time automatically remaining will show in the display, and You can set a time at the end of which the indicator lamp for that particular a given cooking zone will switch off cooking zone will flash. -
Page 28: Memory Function
Timer and Memory function Memory function Recording a Memory programme The settings used on a particular The maximum recording time is 99 cooking zone from switching on right minutes with a maximum of 10 changes through to switching off can be in power level. - Page 29 Timer and Memory function Using a Memory programme Checking the steps of a Memory programme The same pan must be used in order to ^ Switch the cooktop on. obtain the same cooking result as when the programme was recorded. The ^ Press the M sensor.
-
Page 30: Combi Mode
Timer and Memory function Combi mode You can check the functions and remaining times which are counting The minute minder, automatic switch-off down in the background by touching and Memory functions can all be used the m sensor until at the same time. - the indicator lamp required flashes If you wish to use the minute minder at (Memory function or automatic... -
Page 31: Safety Features
Safety features Safety lock To activate the safety lock: ^ Touch the safety lock sensor $ until Keep children away from the cooktop for their own safety. the relevant indicator lamp comes on. Your appliance is equipped with a The indicator lamp will go out after a safety lock to prevent the cooktop and short while. -
Page 32: Stop And Go
Safety features Stop and Go To deactivate Stop and Go: ^ Touch the $ sensor until the indicator Your appliance has a Stop and Go feature which, when activated, reduces lamp goes out. the power of all switched-on cooking The cooking zones will now run at the zones to setting 1. -
Page 33: Safety Switch-Off
Safety features Safety switch-off Safety switch-off if the sensors are covered Safety switch-off with an over-long Your cooktop will switch off cooking time automatically if one or several of the sensors remain covered for longer than Your cooktop is fitted with a safety switch-off feature in case you forget to 10 seconds, for example, by finger switch it off yourself. -
Page 34: Overheating Protection
Safety features Overheating protection Overheating can be caused by: Each cooking zone is equipped with – switching on a cooking zone without overheating protection. An internal a pan on it. temperature limiter switches off the – heating up an empty pan. heating elements in the cooking zone –... -
Page 35: Cleaning And Care
Cleaning and care For Miele branded cleaning and The appliance should be cleaned after conditioning products see "Optional each use. Allow the cooktop to cool accessories". down before cleaning. Wipe all coarse soiling off using a Do not use a steam cleaner to clean damp cloth. - Page 36 If you are unsure about a particular cooktop cleaner. product or need further advice please contact your nearest Miele Customer Contact Centre. See back page for address.
-
Page 37: Programming
Programming You can change the standard settings To store the new settings in memory, touch the cooktop ON/OFF sensor s of your cooktop (see chart). until the displays go out. ^ With the cooktop switched off, touch If you do not wish to store the settings the cooktop ON/OFF sensor s and in memory, touch the safety lock sensor the safety lock sensor $ at the same... - Page 38 Programming Programme* Status** Setting Demonstration mode Demonstration mode on and factory default Demonstration mode off settings Factory default settings reinstated Keypad tone when a sensor is touched Audible tone for the Timer Tone for 10 seconds Tone for 4 minutes One finger locking using $ Safety lock Three finger locking using $ and +...
- Page 39 Front left and front right Front left and back middle (KM 5673) Front left and back middle (KM 5673) Front left and back right (KM 5670) Front right and back right (KM 5670) 10 Switch on all extended areas P 10...
- Page 40 Programming Programme* Status** Setting 14 Timer starting value 01 or 99 The most recently set time (see "Timer default setting") 15 Timer functions Minute minder only Auto switch-off only Minute minder and Auto switch-off 16 Power setting range 12 power settings (1, 2, 3 ...
-
Page 41: Problem Solving Guide
– switch off at the mains, or – withdraw the mains fuse. Reset the trip switch in the mains fuse box, and switch the appliance back on. If it still will not switch on, contact a qualified electrician or the Miele Customer Contact Centre. - Page 42 If this does not solve the problem, highest setting and then turn down to a please call the Miele Customer Contact lower setting manually later on. Centre..an F appears in the display for the ...
-
Page 43: To Test The Power Level
To test the power level ^ Take a note of the diameter and You can test the power level of a cooking zone as follows. A certain wattage of the cooking zone to be quantity of water is brought to the boil tested (see "Guide to the appliance - in a pan, and the time taken to do this is Cooking zones"). - Page 44 To test the power level C cooking zone Rating in watts for Quantity of water Duration 230 V in litres in minutes in cm (approx.) 12.0 700 / 750 13.0 14.5 1000 / 1100 14.5 1350 17.0 1500 18.0 1250 11.0 18.0 1700 / 1800...
-
Page 45: Optional Accessories
Miele branded cleaning and conditioning products are available for your appliance. These can be ordered via the internet at www.miele-shop.com (depending on country) or from your Miele Spare Parts Department (see back cover). Ceramic and stainless steel cooktop cleaner 250 ml... -
Page 46: After Sales Service, Data Plate
After sales service, data plate The address of the nearest Miele Customer Contact Centre is given on the back page. The voltage and rated load are given on the data plate. Please quote these data, together with the model description and serial number when contacting the Miele Customer Contact Centre. -
Page 47: Installation
Installation Safety instructions for After installing the cooktop, ensure that the connection cable cannot come installation into contact with the underside of the appliance. Make sure that there is no Fit the wall units and rangehood mechanical obstruction, such as a before fitting the cooktop to avoid drawer, which could damage it. -
Page 48: Safety Clearances
Installation Safety clearances Side / rear clearances to the cooktop Ideally the cooktop should be installed Safety clearance above the cooktop with plenty of space on either side. There may be a wall at the rear and a tall unit or wall at one side. On the other side, however, no unit or divider should stand higher than the cooktop (see illustrations). - Page 49 Installation Before installing the appliance check If the clearance between the periphery that the location provides the required of any electric burner and clearances from combustible material - the side wall is less than 300 mm and if necessary provide protection to - the rear wall is less than 200 mm, adjacent surfaces as required by the walls must be protected with a non...
-
Page 50: Building-In Dimensions
Installation Building-in dimensions KM 5670 a Spring clamps b Building-in depth c Front d Building-in depth for mains connection cable e Mains connection cable, L = 1440 mm... - Page 51 Installation KM 5673 a Spring clamps b Building-in depth c Front d Building-in depth for mains connection cable e Mains connection cable, L = 1440 mm...
-
Page 52: Preparing The Worktop
Installation Preparing the worktop If during installation the corners of ^ Make the worktop cut-out following the frame are not flush with the the dimensions applicable. worktop surface, the corner radius Remember to maintain a minimum (ß R4) can be carefully scribed to fit. safety distance from the back wall, as well as from any tall unit or side wall to the right or left of the cooktop. -
Page 53: Fixing The Spring Clamps
Installation Fixing the spring clamps Wooden Worktops Granite and marble worktops ^ Position the spring clamps a, and ^ Position the spring clamps secure using double-sided tape f. (supplied) a in the positions shown (see "Building-in dimensions") so that they are flush with the top edge of the cut-out, and secure with the 3.5 x 25 mm screws supplied. -
Page 54: Installing The Cooktop
Installation Installing the cooktop Wooden worktops ^ Feed the cooktop connection cable down through the cut-out. ^ Lightly position the cooktop on the spring clamps a. ^ Using both hands, press down evenly on the sides of the cooktop until it clicks into position. When doing this make sure that the seal under the cooktop sits flush with the worktop on all sides. -
Page 55: Sealant
Installation Sealant Tiled worktop The grouting a and the shaded area Do not use any sealant unless undermeath the cooktop frame must be expressly instructed to do so. The smooth and even so that the frame sits sealing strip under the edge of the top evenly and the sealing strip underneath part of the cooktop provides a sufficient the top part of the cooktop provides a... -
Page 56: Electrical Connection
Installation Electrical connection Test marks Electrical safety, C-Tick Mark All electrical work should be carried Electrically suppressed according to out by a suitably qualified and AS/NZS 1044 competent person, in strict accordance with national and local Important safety regulations. The appliance is supplied for connection to an a.c. -
Page 57: Connection Diagram
Installation Connection diagram Warning This appliance must only be connected to a 230 V or 240 V supply using the connection cable supplied in the accessory pack. Connection must be made in accordance with the connection diagram. The earth lead must be connected. - Page 60 Alteration rights reserved / 5108 M.-Nr. 06 766 000 / 03...