Dell Networking S3100 Series Getting Started Manual
Hide thumbs
Also See for Networking S3100 Series:
- Installation manual (45 pages) ,
- Getting started manual (27 pages)

Related Manuals for Dell Networking S3100 Series


Summary of Contents for Dell Networking S3100 Series
- Page 1 Dell Networking S3100 Series Getting Started Guide Regulatory Model: S3100...
-
Page 2: Notes, Cautions, And Warnings
WARNING: A WARNING indicates a potential for property damage, personal injury, or death. Copyright © 2015 Dell Inc. All rights reserved. This product is protected by U.S. and international copyright and intellectual property laws. Dell and the Dell logo are trademarks of Dell Inc. -
Page 3: About This Guide
• The Dell Configuration Guide for the S3100 Series describes software configuration. • The Dell Command Line Reference Guide for the S3100 Series provides command line interface (CLI) information. • The Dell Networking S3100 Series Release Notes provide information about upgrading the S3100 series. -
Page 4: Product Description
S3100 Series Hardware Overview This section contains basic information about the S3100 series, including descriptions of features, I/O and PSU sides, power supplies, fans, and light emitting diode (LED) status. Product Description The S3100 series is a low-cost wireless closet switch/router product for copper connections to 1G endpoints with Power over Ethernet plus (PoE+) capability on 1G access ports. - Page 5 Hot-swappable fan tray. • Standard 1U chassis high. NOTE: Dell-qualified SFP+ transceivers are sold separately. S3124 Platform I/O Side The S3124 platform input/output (I/O) side (shown in the following illustration) contains twenty-four 1G copper switch ports. The I/O side also contains a console port, management port, serial bus port, reset button, two 10G SFP+ ports, and two 1G SFP combo ports.
- Page 6 The S3124 PSU side (shown in the following illustration) includes the power supplies, fan tray, and stacking ports. Figure 2. S3124 PSU Side View PSU 1. Module slot. Fan tray. Mini-SAS stacking ports. PSU 2. NOTE: The S3124 platform does not support stacking with Dell Networking OS 9.8(2.0). S3100 Series Hardware Overview...
- Page 7 S3124F Platform I/O Side The S3124F platform I/O side (shown in the following illustration) contains twenty-four 1G fiber switch ports. The I/O side also contains a console port, management port, serial bus port, reset button, two 10G SFP+ ports, and two 1G copper combo ports. Figure 3.
- Page 8 Fan tray. Mini-SAS stacking ports. PSU 2. NOTE: The S3124 platform does not support stacking with Dell Networking OS 9.8(2.0). S3124P Platform I/O Side The S3124P platform I/O side (shown in the following illustration) contains twenty-four 1G copper switch ports that include PoE+ function. The I/O side also contains a console port, management port, serial bus port, reset button, two 10G SFP+ ports, and two 1G SFP combo ports.
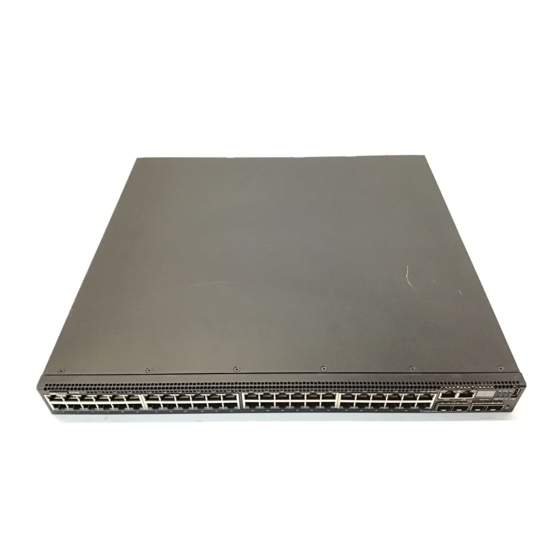
- Page 9 S3124P Platform PSU Side The S3124P PSU side (shown in the following illustration) includes the power supplies, fan tray, and stacking ports. Figure 6. S3124P PSU Side View PSU 1. Module slot. Fan tray. Mini-SAS stacking ports. PSU 2. S3148P Platform I/O Side The S3124P platform I/O side (shown in the following illustration) contains forty-eight 1G copper switch ports that include PoE+ function.
-
Page 10: Reset Button
Reset button. Two 10G SFP+ ports. Two 1G SFP combo ports. Forty-eight 1G copper switch ports including PoE+ function. S3148P Platform PSU Side The S3148P PSU side (shown in the following illustration) includes the power supplies, fan tray, and stacking ports. Figure 8. -
Page 11: Plug-In Modules
CAUTION: To prevent electrical shock, ensure that the system is grounded properly. If you do not ground your equipment correctly, excessive emissions may result. To ensure that the power cables meet your local electrical requirements, use a qualified electrician. The S3124 and S3124F platforms include the following PSU options: •... -
Page 12: Led Status Information
You can also view status information through the command line interface (CLI) show commands and with the simple network management protocol (SNMP). For more information about these options, see the Dell Command Line Reference Guide for the S3100 Series and the Dell Configuration Guide for the S3100 Series. - Page 13 Gigabit Ethernet (10/100/1000BASE-T) RJ-45 port LNK. Gigabit Ethernet (10/100/1000BASE-T) RJ-45 port ACT. Console port LNK. Management port LNK. Management port ACT. Stack number. Temperature. PSU 1. System Status. 10. Fan. 11. PSU 2. 12. M (Master). 13. SFP+ (10G) port ACT. 14.
- Page 14 Feature Detailed Description PSU 1 and 2 • Off — power failure or no power. • Solid green — normal operation. • Blinking green — locator function is enabled. • Solid green — normal operation. The CLI prompt is available. System status •...
- Page 15 Figure 12. S3124F I/O Side LEDs Gigabit Ethernet (100BASEFX/1000BASE-X) SFP port LNK. Gigabit Ethernet (100BASEFX/1000BASE-X) SFP port ACT. Console port LNK. Management port LNK. Management port ACT. Stack number. Temperature. PSU 1. System Status. 10. Fan. 11. PSU 2. 12. M (Master). 13.
- Page 16 Feature Detailed Description ACT (Data transmission): • Blinking green — activity. • Off — no activity. LNK (Link speed): Console port • Off — no link. • Solid green — link. LNK (Link speed): Management port • Off — no link. •...
- Page 17 Feature Detailed Description LNK (Link speed): Combo SFP (1G) port • Off — no link. • Solid green — link on 1000 Mbps speed. • Solid amber — link on 100 Mbps speed. ACT (Data transmission): • Off — no link. •...
- Page 18 13. SFP+ (10G) port ACT. 14. SFP+ (10G) port LNK. 15. Combo SFP (1G) port ACT. 16. Combo SFP (1G) port LNK. Table 3. S3124P I/O Side LED Descriptions Feature Detailed Description LNK (Link speed): Gigabit Ethernet (10/100/1000BASE-T) RJ-45 port •...
- Page 19 Feature Detailed Description • Off — switch is in Slave mode. LNK (Link speed): SFP+ (10G) port • Off — no link. • Solid green — link on 10 G speed. • Solid amber — link on 1 G speed. ACT (Data transmission): •...
- Page 20 Management port LNK. Management port ACT. Stack number. Temperature. PSU 1. System Status. 10. Fan. 11. PSU 2. 12. M (Master). 13. SFP+ (10G) port ACT. 14. SFP+ (10G) port LNK. 15. Combo SFP (1G) port ACT. 16. Combo SFP (1G) port LNK. Table 4.
- Page 21 Feature Detailed Description • Blinking green — locator function is enabled. • Solid green — normal operation. The CLI prompt is available. System status • Blinking green — boot-up in progress. • Solid red — critical system error. • Blinking red — noncritical system error (fan fail, power supply fail).
- Page 22 Figure 15. SFP+ Module SFP+ module port 1: LNK. SFP+ module port 1: ACT. SFP+ module port 2: LNK. SFP+ module port 2: ACT. Table 5. SFP+ Module LEDs Feature Detailed Description LNK (Link speed): SFP+ (module) port 1 • Off —...
- Page 23 Figure 16. 10GBase-T Module 10GBase-T module port 1: LNK. 10GBase-T module port 1: ACT. 10GBase-T module port 2: LNK. 10GBase-T module port 2: ACT. Table 6. 10GBase-T Module LEDs Feature Detailed Description • Off — no link. Link/SPD LED (left bi-color LED) •...
- Page 24 Figure 17. Stacking Port LEDs Stack port 1: ACT. Stack port 1: LNK. Stack port 2: ACT. Stack port 2: LNK. Table 7. Stacking Port LEDs Feature Detailed Description • Off — no link. Link LED (single color LED) • Solid green —...
- Page 25 Figure 18. Power Supply LED Table 8. Power Supply LED Feature Detailed Description • Off — no power. Handle LED • Solid green — normal operation. • Solid red — power failure. Orderable S3100 Components The S3100 series has the following orderable components: •...
-
Page 26: Installation
One S3100 series switch. • One RJ-45 to DB-9 female cable. • One Dell ReadyRails™ kit for rack installation, two mounting brackets, bolts, and cage nuts. • One set of self-adhesive rubber pads for free-standing installation (four pads are included). •... -
Page 27: Installing A Fan Tray
Remove the PSU slot cover from the PSU side of switch. You can select either of the two PSU slots, however, if you are using a single PSU, Dell Networking recommends using power supply 1 (PSU1) as the blank plate slot. -
Page 28: Installing A Plug-In Module (Optional)
After a module is recognized, its configuration is stored locally on the switch as the switch default. The module configuration appears in the running configuration for informational purposes. For more information, see the Dell Configuration Guide for the S3100 Series. Install Rack or Cabinet Hardware You may either place the switch on the rack shelf or mount the switch directly into a 19"... -
Page 29: Installing The Dell Readyrails System
• Do not mount the equipment with the PSU side facing in the downward position. Installing the Dell ReadyRails System The ReadyRails rack mounting system is provided to easily configure your rack for system installation. You can install the ReadyRails system using the 1U tool-less method or one of three possible 1U tooled methods (two-post flush mount, two-post center mount, or four-post threaded). -
Page 30: Configuring A Two-Post Flush-Mount
Figure 21. 1U Tool-Less Configuration Configuring a Two-Post Flush-Mount To install your switch using a two-post flush-mount configuration, follow these steps. For this configuration, remove the castings from the front side of each ReadyRails assembly. See item 1 in the following illustration. To remove the two screws from each front flange ear (on the switch side of the rail) and remove each casting, use a Torx driver. -
Page 31: Configuring A Two-Post Center-Mount
Figure 22. Installing the Switch using a Two-Post Flush-Mount Configuration Configuring a Two-Post Center-Mount To install your switch in a two-post center-mount configuration, follow these steps. Slide the plunger bracket rearward until it clicks into place and secure the bracket to the front post flange with two user-supplied screws. -
Page 32: Configuring A Four-Post Thread
Figure 23. Installing the Switch in a Two-Post Center-Mount Configuration Configuring a Four-Post Thread To install your switch in a four-post thread configuration, follow these steps. For this configuration, remove the flange ear castings from each end of the ReadyRails assemblies. To remove the two screws from each flange ear and remove each casting, use a Torx driver. -
Page 33: Installing A 1U Front-Rack
Figure 24. Four-Post Threaded Configuration Installing a 1U Two-Post You can install the switch in 1U two-post (flush and center) configurations. Slide the system into the rails in the same manner as the four-post configurations. Installing a 1U Front-Rack To install the switch in a 1U front-rack configuration, configure the rails that are attached to the system. Attach the switch rails (inner chassis members) to the switch. - Page 34 Figure 25. Attaching the Switch Rails After you have installed both switch rails, line them up on the previously mounted ReadyRails and slide the switch in until it is flush with the front of the rack. About three inches before you fully insert your switch, the rail locking feature engages to keep the switch from inadvertently sliding out of the rack and falling.
-
Page 35: Connecting The Stacking Ports (Optional)
S3124P or S3148P platforms, you cannot combine different platforms into one stack. The S3124 and S3124F platforms do not support stacking with Dell Networking OS 9.8(2.0). Dell recommends installing the switches connected in a ring topology. Assemble and cable the stack of switches before powering up and configuring it. - Page 36 NOTE: You can (optionally) use the CLI to assign the master unit role, or select a different stack member as the standby unit, based on priority or MAC address. For more information, see the Dell Configuration Guide for the S3100 Series or the Dell Command Line Reference Guide for the S3100 Series.
- Page 37 Powering Up To connect the chassis to the applicable power source, use the appropriate power cord. The system is powered up as soon as the power cord is connected between the system and the power source. CAUTION: Always disconnect the power cable before you service the power supply slots. Installation...
-
Page 38: S3100 Series Technical Specifications
S3100 Series Technical Specifications Operate the product at an ambient temperature not higher than 40°C. CAUTION: Lithium Battery Caution: There is a danger of explosion if the battery is incorrectly replaced. Replace only with same or equivalent type. Dispose of the batteries according to the manufacturer's instructions. -
Page 39: Power Requirements
Power Requirements Parameter Specifications Power supply 100–240 VAC 50/60 Hz. Maximum current 24 port — 0.40 watts @40.41 watts/100vac, 0.20 watts @40.41 watts/200vac. draw per system (excluding PoE 48 port — 0.63 watts @62.71 watts/100vac, 0.32 watts @62.71 watts/200vac. power) Maximum power 63 Watts. -
Page 40: Installing The Software
Navigating CLI Modes The Dell Networking OS prompt changes to indicate the CLI mode. Move linearly through the command modes, except for the end command that takes you directly to EXEC Privilege mode, and the exit command that moves you up one command mode level. -
Page 41: Default Configuration
Signal Default Configuration A version of Dell Networking OS is pre-loaded onto the system; however, the system is not configured when you power up for the first time (except for the default host name, which is Dell). You must configure the system using the CLI. - Page 42 Configuring a Host Name The host name appears in the prompt. The default host name is Dell. Host names must start with a letter, end with a letter or digit, and must have characters, letters, digits, and hyphens in the string.
-
Page 43: Configuring The Management Route
(DES)-encryption method. • enable secret — stores the password in the running/startup configuration using a stronger, MD5- encryption method. Dell Networking recommends using the enable secret password. • Create a password to access EXEC Privilege mode. CONFIGURATION mode enable [password | secret] [level level] [encryption-type] password... -
Page 44: Creating A Port-Based Vlan
Creating a Port-based VLAN The default VLAN (VLAN 1) is part of the system startup configuration and does not require configuration. To configure a port-based VLAN, create the VLAN and then add physical interfaces or port channel (LAG) interfaces to the VLAN. •... -
Page 45: Connect The System To The Network
untagged interface This command is available only in VLAN interfaces. To view which interfaces are tagged or untagged and to view which VLAN the interfaces belong, use the show vlan command. To view just the interfaces that are in Layer 2 mode, use the show interfaces switchport command in EXEC Privilege mode or EXEC mode.