Table of Contents
Advertisement
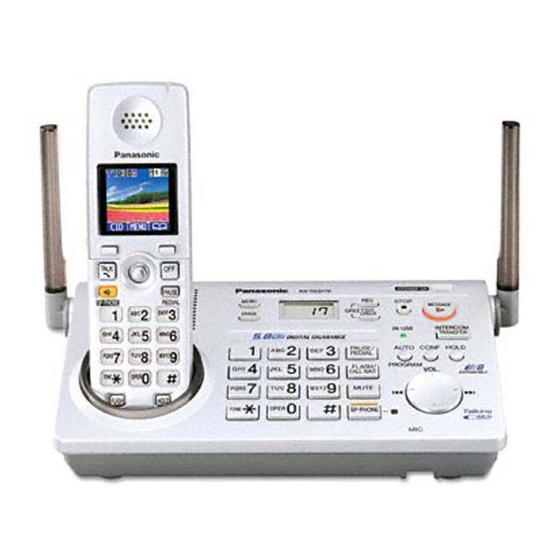
Model shown is KX-TG5771.
This unit is compatible with Caller ID. To use this feature, you must subscribe to
the appropriate service offered by your telephone service provider.
Charge the handset battery for 7 hours before initial use.
Please read these Operating Instructions before using the unit and save for
future reference.
For assistance, visit our website:
http://www.panasonic.com/phonehelp for customers in the U.S.A. or Puerto
Rico.
Operating Instructions
5.8 GHz Expandable Digital Cordless
Model No.
Model No.
5.8 GHz Expandable Digital Cordless
Answering System with Two Handsets
Model No.
Answering System
KX-TG5771
KX-TG5776
KX-TG5777
Advertisement
Table of Contents

Related Manuals for Panasonic KX-TG577


Summary of Contents for Panasonic KX-TG577
-
Page 1: Operating Instructions
Charge the handset battery for 7 hours before initial use. Please read these Operating Instructions before using the unit and save for future reference. For assistance, visit our website: http://www.panasonic.com/phonehelp for customers in the U.S.A. or Puerto Rico. Operating Instructions 5.8 GHz Expandable Digital Cordless... -
Page 2: Table Of Contents
......53 For assistance, please visit http://www.panasonic.com/phonehelp Listening to messages using the handset . -
Page 3: Introduction
Introduction Introduction Thank you for purchasing a Panasonic cordless telephone. We recommend keeping a record of the following information for future reference. Serial No. Date of purchase (found on the bottom of the base unit) Name and address of dealer Attach your purchase receipt here. -
Page 4: About These Operating Instructions
L References in these operating instructions to “a charger” or “other handsets” are for accessory handset users and KX-TG5777 users only. See “Expanding your phone system” on page 6. KX-TG5771 Monochrome display handset KX-TG5777 For assistance, please visit http://www.panasonic.com/phonehelp KX-TG5776 Color display handset 2 color display handsets... - Page 5 The handset navigator key can be used to navigate through menus and to select items shown on the display, by pressing {^}, {V}, {<}, or {>}. {<} For assistance, please visit http://www.panasonic.com/phonehelp Color display model: KX-TGA571 (included with KX-TG5776/ KX-TG5777) 1 Using the soft keys The handset features 2 soft keys and joystick (middle soft key).
-
Page 6: Expanding Your Phone System
USB adaptor. Trademark L Skype is a registered brand or trademark of Skype technology in the United States and/ or other countries. For assistance, please visit http://www.panasonic.com/phonehelp 5.8 GHz expandable digital cordless camera KX-TGA573 (For camera monitoring... - Page 7 Utility software. If you have not installed the GIGARANGE USB Utility software, refer to the included “Installation Guide for GIGARANGE USB Utility” for details. *3 Requires the 5.8 GHz expandable cordless camera KX-TGA573. For assistance, please visit http://www.panasonic.com/phonehelp KX-TGA570 Same handset supplied...
-
Page 8: Accessory Information
*1 The handset cover comes attached to the handset. *2 Both of the USB cables function well. *3 Allows you to install the GIGARANGE USB Utility software on a compatible computer. For assistance, please visit http://www.panasonic.com/phonehelp Quantity Order number KX-TG5771 KX-TG5776 KX-TG5777... - Page 9 Wall-mounting adaptor for base unit T-adaptor Note: L You can expand your phone system by registering additional compatible Panasonic units (page 6). Sales and support information L To order additional/replacement accessories, call 1-800-332-5368. L TTY users (hearing or speech impaired users) can call 1-866-605-1277.
-
Page 10: Important Safety Instructions
10. Never push any objects through slots in the product. This may result in the For assistance, please visit http://www.panasonic.com/phonehelp risk of fire or electric shock. Never spill any liquid on the product. 11. To reduce the risk of electric shock, do not disassemble the product. - Page 11 These conditions can cause fire or electric shock. Confirm that smoke has stopped emitting and contact the Panasonic Call Center at 1-800-211-PANA (1-800-211- 7262). Medical L Consult the manufacturer of any...
-
Page 12: For Best Performance
Introduction For best performance Base unit location/avoiding noise The base unit and other compatible Panasonic units use radio waves to communicate with each other. For maximum distance and noise-free operation, we recommend the following: L Placing the product away from electrical appliances. -
Page 13: Preparation
Connect the telephone line cord until it clicks into the base unit (A) and telephone line jack (B). Connect the AC adaptor cord by pressing the plug firmly (C). L Use only the included Panasonic AC adaptor PQLV207. Note: L The AC adaptor must remain connected at all times. -
Page 14: Setting Up The Handset
Preparation Setting up the handset Connecting the charger (KX-TG5777 only) L Use only the included Panasonic AC adaptor PQLV207. (120 V AC, 60 Hz) Bottom of the charger Fasten the AC adaptor cord to prevent it from being disconnected. Note: L The AC adaptor must remain connected at all times. -
Page 15: Battery Charge
Base unit L Model shown is KX-TG5771. Charger (KX-TG5777 only) For assistance, please visit http://www.panasonic.com/phonehelp Note: L If you want to use the handset immediately, charge the battery for at least 15 minutes. - Page 16 In this case, place the handset on the base unit or charger and let charge for 7 hours. For assistance, please visit http://www.panasonic.com/phonehelp Wall mounting for charger (KX-TG5777 only) Drive the screws (not included) into the wall using the wall mount template as a guide.
-
Page 17: Controls
F {STOP} G {ANSWER ON} H {MESSAGE} I Antenna J Speaker K Charge contacts L {*} (TONE) For assistance, please visit http://www.panasonic.com/phonehelp L M N M {PAUSE} {REDIAL} N {FLASH} {CALL WAIT} O {MUTE} P {SP-PHONE} (Speakerphone) SP-PHONE indicator Q MIC (Microphone) R Navigator key ({^} {V} {<} {>}) - Page 18 Preparation Monochrome display model: KX-TGA570 (included with KX-TG5771) Handset For assistance, please visit http://www.panasonic.com/phonehelp A Speaker B Soft keys C Headset jack/Audio jack D {C} (TALK) E Navigator key ({^} {V} {<} {>}) F {s} (SP-PHONE) G {*} (TONE) H {FLASH} {CALL WAIT}...
- Page 19 Color display model: KX-TGA571 (included with KX-TG5776/KX-TG5777) Handset For assistance, please visit http://www.panasonic.com/phonehelp A Speaker B Soft keys C Headset jack/Audio jack D {C} (TALK) E Joystick L {^} {V}: Push the joystick up or down. L {<} {>}: Push the joystick left or right.
-
Page 20: Displays
Handset number: displayed when paging, or being paged (example shown here: handset 1). Paging all handsets Base unit is in programming mode. For assistance, please visit http://www.panasonic.com/phonehelp Handset display items Displayed Meaning item --:-- The date and time need to be set. - Page 21 Phonebook Set date & time Initial setting Customer support L Each menu icon on the left changes to the one on the right when selected. For assistance, please visit http://www.panasonic.com/phonehelp Color display models: KX-TG5776/KX-TG5777/KX-TGA571 Menu icon Menu/feature Answering device Ringer setting Display setting Set date &...
-
Page 22: Symbols Used In These Operating Instructions
{^} {V} Handset: {<} {>} Base unit: {^} {V} {<} {>} For assistance, please visit http://www.panasonic.com/phonehelp Meaning The words in the brackets indicate button names/ soft key names on the handset and base unit. Proceed to the next operation. The words in quotations indicate the menu on the display. -
Page 23: Setting The Unit Before Use
{MENU} (middle soft key) i {#}{1}{2}{0} Select the desired setting. i {SAVE} i {OFF} For assistance, please visit http://www.panasonic.com/phonehelp Date and time Set the correct date and time. When you play back a message from the answering system (page 53), the unit announces the day and time it was recorded. -
Page 24: Making/Answering Calls
L To switch to the receiver, press {C}. Adjusting the receiver/speaker volume Press {^} or {V} repeatedly while talking. For assistance, please visit http://www.panasonic.com/phonehelp Making a call using the redial list The last 10 phone numbers dialed are stored in the redial list. -
Page 25: Answering Calls
Adjusting the speaker volume Press {^} or {V} repeatedly while talking. Redialing the last number dialed {SP-PHONE} i {REDIAL} For assistance, please visit http://www.panasonic.com/phonehelp Making/Answering Calls Answering calls When a call is being received, the ringer indicator on the handset and the IN USE indicator on the base unit flash rapidly. -
Page 26: Useful Features During A Call
– the caller hangs up before you answer the call. – another person answers the call using another phone connected to the same line. For assistance, please visit http://www.panasonic.com/phonehelp Useful features during a call HOLD button This feature allows you to put an outside call on hold. - Page 27 Call Waiting tone. Please contact your telephone service provider for details and availability of this service in your area. For assistance, please visit http://www.panasonic.com/phonehelp Making/Answering Calls Press {CALL WAIT} to answer the 2nd call after the tone.
- Page 28 Note for handset and base unit: L A maximum of 4 parties (including 1 outside party) can join a conversation using 3 extensions. For assistance, please visit http://www.panasonic.com/phonehelp Call privacy Call privacy allows you to prevent other users from joining your conversations with outside callers.
-
Page 29: Handset Phonebook
L If you do not need to assign the ringer ID and light-up ID, go to step 11. “Set Ringer ID” i {SELECT} Select the desired item. For assistance, please visit http://www.panasonic.com/phonehelp Turns the ringer ID off. No Ringer Press {SELECT}, then go to step 9. - Page 30 (page 47). {SELECT} Select the desired ringer ID (page 36). i {OK} For assistance, please visit http://www.panasonic.com/phonehelp “Set Light-up ID” i {SELECT} Select the desired light-up ID (page 36). i {OK} “Set Picture ID” i {SELECT} Select the desired item.
- Page 31 Press {<} or {>} to move the cursor to the character or number you want to erase, then press {CLEAR}. Enter the appropriate character or number. For assistance, please visit http://www.panasonic.com/phonehelp Note: L Press and hold {CLEAR} to erase all characters or numbers.
- Page 32 ID. i {SELECT} i Select the desired light-up ID. {OK} *2 To turn the light-up ID off, select “No Light-upID”. For assistance, please visit http://www.panasonic.com/phonehelp To change the picture ID (Color display models only: KX-TG5776/ KX-TG5777/ KX-TGA571) {SAVE} i {OFF}...
-
Page 33: Chain Dial
Copying handset phonebook items You can copy one or all of the phonebook items from the handset to the phonebook of a compatible Panasonic handset (KX- TGA570/KX-TGA571/KX-TGA572). Important: L Ringer ID and light-up ID for phonebook items are not copied. -
Page 34: Base Unit Speed Dialer
L We recommend you make a note of which phone numbers are stored in which dial keys. For assistance, please visit http://www.panasonic.com/phonehelp PAUSE button (for PBX/long distance service users) A pause is sometimes required when making calls using a PBX or long distance service. -
Page 35: Caller Id Service
You can view the number of missed calls by pressing {CID} (left soft key). For assistance, please visit http://www.panasonic.com/phonehelp Caller ID Service Note: L If you press {CID}, then press {OFF} without viewing all missed calls in the caller list, “Missed call”... - Page 36 When a call is received from a caller stored in the handset phonebook, the assigned indicator color flashes after Caller ID information is displayed. For assistance, please visit http://www.panasonic.com/phonehelp Picture ID (Color display models only) Important: L Only KX-TG5776, KX-TG5777, and KX- TGA571 support this feature.
-
Page 37: Caller List
1 Local phone number Example: 321-5555 2 Area code – Local phone number Example: 555-321-5555 For assistance, please visit http://www.panasonic.com/phonehelp Caller ID Service 3 1 – Area code – Local phone number Example: 1-555-321-5555 Caller ID number auto edit... - Page 38 32. Erasing selected caller information {CID} (left soft key) Select the desired item. {ERASE} i “Yes” i {SELECT} i {OFF} Erasing all caller information {CID} (left soft key) {ERASE} i “Yes” i {SELECT} For assistance, please visit http://www.panasonic.com/phonehelp...
-
Page 39: Programming
Then press {^} or {V} to select “Ringer volume”. i {SELECT} Press {^} or {V} to select the desired setting. L This step may vary depending on the feature being programmed. {SAVE} i {OFF} For assistance, please visit http://www.panasonic.com/phonehelp Programming... - Page 40 *1 If you program these settings using one of the handsets, you do not need to program the same item using another handset. Main menu Answering device Ringer setting Phonebook Set date & time For assistance, please visit http://www.panasonic.com/phonehelp Sub-menu 1 To play new To play all To erase all Settings Ringer volume...
- Page 41 Main menu Initial setting Customer support For assistance, please visit http://www.panasonic.com/phonehelp Sub-menu 1 Auto Intercom Talking CallerID Caller ID edit LCD contrast Key tone Auto talk Set base unit Set tel line Registration Set date & time Change language Handset name –...
- Page 42 *1 If you program these settings using one of the handsets, you do not need to program the same item using another handset. Main menu Answering device Ringer setting Display setting Set date & time For assistance, please visit http://www.panasonic.com/phonehelp Sub-menu 1 To play new To play all To erase all Settings Ringer volume...
- Page 43 Main menu Initial setting Customer support For assistance, please visit http://www.panasonic.com/phonehelp Sub-menu 1 Auto Intercom Talking CallerID Caller ID edit Key tone Auto talk Set base unit Set tel line Registration Set date & time Change language Handset name –...
- Page 44 Custom ring (Customized ringer tone for handset) Customer support Date and time Deregistration Handset name HS registration (Handset registration) For assistance, please visit http://www.panasonic.com/phonehelp Feature Setting code code {1}: On {0}: <Off> {2}{0}{0} {1}: On(Ringer On) {2}{7}{3} {2}: On(Ringer Off) {0}: <Off>...
- Page 45 (Handset) Talking CallerID (Base unit) Time adjustment (Caller ID subscribers only) To erase all (Erasing all messages) For assistance, please visit http://www.panasonic.com/phonehelp Feature Setting code code {1}: <On> {0}: Off {1}{6}{5} {1}–{6}: Level 1–6 <3> {1}{4}{5} {1}: On {0}: <Off>...
- Page 46 Appearance (Display color) Memory status Wallpaper *1 If “System setting” column is checked, you do not need to program the same item using another handset. For assistance, please visit http://www.panasonic.com/phonehelp Feature Setting code code {3}{2}{4} {3}{2}{3} {1}: <On> {0}: Off...
-
Page 47: Customizing Handset Ringer Tone And Display
2 melodies are already stored at the time of purchase. Select the desired item. i {SAVE} i {OFF} For assistance, please visit http://www.panasonic.com/phonehelp Programming Note: L If you subscribe to a distinctive ring service (such as IDENTA-RING), select a tone (tone 1 to 3) for the handset ringer tone. - Page 48 “Save” i {SELECT} Enter the desired name (max. 14 characters; page 31). {SAVE} i {OFF} Disconnect the audio cable from the handset. For assistance, please visit http://www.panasonic.com/phonehelp Note: L Monochrome display models (KX- TG5771/KX-TGA570): The total recording time is about 90 seconds.
-
Page 49: Changing The Handset Name
ID (page 36), the ringer ID assignment is canceled, and the handset ringer tone (page 47) is used instead of that song. For assistance, please visit http://www.panasonic.com/phonehelp Programming Changing the handset name Each handset can be given a customized name (“Bob”, “Kitchen”, etc.), this is useful... - Page 50 {SAVE} i {OFF} Note: L The preset patterns “Wallpaper1” and “Wallpaper2” in this product are used For assistance, please visit http://www.panasonic.com/phonehelp with permission of © 2005 Digital Archive Japan, Inc. L The preset pattern “Wallpaper3” in this product is used with permission of ©...
- Page 51 (default) is used instead of that melody. L If the erased melody was assigned to certain callers as ringer ID (page 36), the For assistance, please visit http://www.panasonic.com/phonehelp Programming ringer ID assignment is canceled, and the handset ringer tone (page 47) is used instead of that song.
-
Page 52: Answering System
{ANSWER ON} button lights. L When the answering system is turned off, the {ANSWER ON} button turns off. For assistance, please visit http://www.panasonic.com/phonehelp Screening calls While a caller is leaving a message, you can listen to the call through the base unit and handset speakers. -
Page 53: Listening To Messages Using The Base
L If you changed the caller’s recording time to “Greeting only” to listen to its prerecorded message, remember to reset your original setting (page 58). For assistance, please visit http://www.panasonic.com/phonehelp Answering System Listening to messages using the base unit When new messages have been recorded, the {MESSAGE} button on the base unit flashes. -
Page 54: Listening To Messages Using The Handset
L To switch to the receiver, press {C}. Adjusting the receiver/speaker volume Press {^} or {V} repeatedly while listening to a message. For assistance, please visit http://www.panasonic.com/phonehelp Calling back (Caller ID subscribers only) If Caller ID information was received for the call, you can call the caller back while listening to the message. -
Page 55: Voice Memo
“Yes” i {SELECT} Erasing all messages {MENU} (middle soft key) i {#}{3}{2}{5} “Yes” i {SELECT} For assistance, please visit http://www.panasonic.com/phonehelp Answering System Voice memo Recording a voice memo You can use the base unit to leave a voice memo (voice message) for yourself or someone else (max. -
Page 56: Remote Operation
Note: L You can ignore the voice guidance and control the unit using remote commands (page 56). For assistance, please visit http://www.panasonic.com/phonehelp Voice guidance During remote operation, the unit’s voice guidance prompts you to press {1} to perform a specific operation, or press {2} to listen to more available operations. -
Page 57: Answering System Settings
Call your phone number. When the answering system picks up, press {*} to skip the greeting message and record your message after the beep. For assistance, please visit http://www.panasonic.com/phonehelp Answering System Answering system settings Remote code A remote code must be entered when operating the answering system remotely. -
Page 58: Caller's Recording Time
Mail service so that the answering system can answer the call first. To do so, consult your telephone service provider. For assistance, please visit http://www.panasonic.com/phonehelp Caller’s recording time You can change the maximum message recording time allotted to each caller. -
Page 59: Message Alert
(page 15). The indicator slowly flashes blue until you listen to all new messages. For assistance, please visit http://www.panasonic.com/phonehelp Answering System Call screening This feature allows you to monitor a message from the base unit and handset speakers when the answering system is recording the message. -
Page 60: Voice Mail Service
L If your Voice Mail service uses Voice Mail tones and the message is over 3 For assistance, please visit http://www.panasonic.com/phonehelp minutes long, the handset may not indicate new messages. Voice Mail (VM) tone detection Your telephone service provider sends special signals (sometimes called “Voice... -
Page 61: Multi-Unit Operation
L If a cordless camera (KX-TGA573) is registered to the base unit, its extension number is not displayed on the monochrome display models (KX- TG5771/KX-TGA570). For assistance, please visit http://www.panasonic.com/phonehelp Multi-unit Operation Base unit {INTERCOM} To page a specified handset, enter its extension number ({1} –... - Page 62 Handset When you are paged by the base unit or another handset, speak into the microphone. For assistance, please visit http://www.panasonic.com/phonehelp L To switch to the receiver, press {C}. To end the intercom, press {OFF}. Note: L Auto intercom cannot be used when: –...
-
Page 63: Transferring Calls
L If the paged party does not answer, press {INTERCOM} to return to the outside call. To complete the transfer, press {SP- PHONE}. For assistance, please visit http://www.panasonic.com/phonehelp Multi-unit Operation L The outside call is being routed to the handset. Answering transferred calls Handset Press {C} to answer the page. -
Page 64: Conference Calls
L To put the outside call on hold, press {HOLD}. To resume the conference, press {CONF}. For assistance, please visit http://www.panasonic.com/phonehelp Note for handset and base unit: L One more extension can join a conference call. To join the conference call using the handset, press {C}. -
Page 65: Registering A Handset
Start from step 2. Deregistering a handset Handset {MENU} (middle soft key) i {#}{1}{3}{1} {3}{3}{5} i {OK} For assistance, please visit http://www.panasonic.com/phonehelp Multi-unit Operation Deregistering other devices The base unit can cancel the registration of a registered device (KX-TGA573/KX- TGA575, page 6). -
Page 66: Useful Information
1-866-605-1277. Headset (optional) Connecting a headset to the handset allows hands-free phone conversations. We recommend using the Panasonic headset noted on page 9. L Headset shown is KX-TCA86. L Handset shown is KX-TGA570. For assistance, please visit http://www.panasonic.com/phonehelp... -
Page 67: Error Messages
Invalid. Please register to the base unit No items stored For assistance, please visit http://www.panasonic.com/phonehelp Cause/solution L The called handset or base unit is in use. L Privacy mode is on for the call you tried to join (page 28). -
Page 68: Memory Full
Phonebook Memory full Please lift up and try again. For assistance, please visit http://www.panasonic.com/phonehelp Cause/solution L The handset has lost communication with the base unit. Move closer to the base unit, and try again. L Confirm that the base unit’s AC adaptor is plugged in. -
Page 69: Troubleshooting
3 continues to flash, or 4 is displayed. The handset display is blank. For assistance, please visit http://www.panasonic.com/phonehelp Cause/solution L Make sure the battery is installed correctly and fully charged (page 14). L Check the connections (page 13). L Unplug the base unit’s AC adaptor to reset the unit. - Page 70 I cannot page the handset or base unit. I cannot turn the clarity booster on. For assistance, please visit http://www.panasonic.com/phonehelp Cause/solution L The handset and base unit could not communicate for some reason, such as interference from other electrical appliances. Perform the following: –...
- Page 71 The caller list/incoming phone numbers are not edited automatically. For assistance, please visit http://www.panasonic.com/phonehelp Cause/solution L You have not subscribed to Caller ID service. Contact your telephone service provider to subscribe. L If your unit is connected to any additional telephone...
- Page 72 The message indicator on the handset slowly flashes blue. For assistance, please visit http://www.panasonic.com/phonehelp Cause/solution L The phone number you dialed might have an incorrectly edited pattern (for example, the long distance “1” or the area code is missing). Edit the phone number with another pattern (page 37).
-
Page 73: Fcc And Other Information
US:AAAEQ##TXXXX. The digits represented by ## are the REN without a For assistance, please visit http://www.panasonic.com/phonehelp Useful Information decimal point (e.g., 03 is a REN of 0.3). If this equipment causes harm to the... - Page 74 (1) This device may not cause harmful interference, and (2) this device must accept any interference received, including interference that may cause undesired operation. For assistance, please visit http://www.panasonic.com/phonehelp Privacy of communications may not be ensured when using this phone. CAUTION: Any changes or modifications not...
- Page 75 The product must not be collocated or operated in conjunction with any other antenna or transmitter. Responsible party: Panasonic Corporation of North America One Panasonic Way, Secaucus, New Jersey 07094 Phone number: 1-800-211-PANA (1-800- 211-7262)
-
Page 76: Specifications
L Design and specifications are subject to change without notice. L The illustrations in these instructions may vary slightly from the actual product. For assistance, please visit http://www.panasonic.com/phonehelp 5 °C – 40 °C (41 °F – 104 °F) 5.76 GHz – 5.84 GHz Approx. -
Page 77: Warranty
Panasonic Services Company Customer Servicenter 4900 George McVay Drive Suite B Door #12 McAllen, TX 78503 For assistance in Puerto Rico call Panasonic Puerto Rico, Inc. (787)-750-4300 or fax (787)-768-2910. For Limited Warranty service for headsets if a headset is included with this product please call Panasonic Call Center at 1-800-211-PANA (1-800-211-7262). - Page 78 Consumer Affairs Department at the addresses listed for the warrantor. PARTS AND SERVICE, WHICH ARE NOT COVERED BY THIS LIMITED WARRANTY, ARE YOUR RESPONSIBILITY. For assistance, please visit http://www.panasonic.com/phonehelp...
-
Page 79: Customer Services
Monday-Friday 9 am-9 pm; Saturday-Sunday 10 am-7 pm, EST. TTY users (hearing or speech impaired users) can call 1-877-833-8855. Accessory Purchases Purchase Parts, Accessories and Instruction Books online for all Panasonic Products by visiting our Web Site at: http://www.pasc.panasonic.com or, send your request by E-mail to: npcparts@us.panasonic.com... -
Page 80: Index
Conference calls: 64 Connections: 13, 14 Custom ring: 47 Customer support: 44 D Date and time: 23 Deregistration: 65, 67 For assistance, please visit http://www.panasonic.com/phonehelp Dialing mode: 23 Display Contrast: 45 Language: 23 E Error messages: 67 F Flash: 27... - Page 81 Voice Mail service: 58, 60 Volume Base unit ringer: 26 Base unit speaker: 25 Handset receiver: 24 Handset ringer: 45 Handset speaker: 24 W Wall-mounting Base unit: 9, 66 Charger: 16 Wallpaper: 50 Warranty: 77 For assistance, please visit http://www.panasonic.com/phonehelp Index...
- Page 82 Notes For assistance, please visit http://www.panasonic.com/phonehelp...
- Page 83 Notes For assistance, please visit http://www.panasonic.com/phonehelp...
- Page 84 L Send the unit to Panasonic Services Company Customer Servicenter, prepaid and adequately insured. L Do not send your unit to Panasonic Consumer Electronics Company listed below or to executive or regional sales offices. These locations do not repair consumer products.