Kenwood DNX893S Quick Start Manual
Hide thumbs
Also See for DNX893S:
- Instruction manual (127 pages) ,
- Quick start manual (190 pages) ,
- Instruction manual (22 pages)
Table of Contents
Advertisement
Available languages
Available languages
DNX893S
DNX773S
DNX693S
DNX573S
DNX7160BTS
DNX5160BTS
GPS NAVIGATION SYSTEM
Quick Start Guide
SISTEMA DE NAVEGACIÓN GPS
Guía de inicio rápido
• You can update the system by connecting a USB device containing an update file.
For updating the system, visit <http://www.kenwood.com/cs/ce/>.
• Puede actualizar el sistema conectando un dispositivo USB que incluya un archivo de actualización.
Para actualizar el sistema, visite <http://www.kenwood.com/cs/ce/>.
Take the time to read through this instruction manual.
Familiarity with installation and operation procedures will help you obtain the best performance from your new GPS Navigation System.
For your records
Record the serial number, found on the back of the unit, in the spaces designated on the warranty card, and in the space provided below. Refer to the model and serial
numbers whenever you call upon your KENWOOD dealer for information or service on the product.
Model DNX893S/ DNX773S/ DNX693S/ DNX573S/ DNX7160BTS/ DNX5160BTS Serial number
US Residents Only
Register your KENWOOD product at www.kenwoodusa.com
© 2016 JVC KENWOOD Corporation
Register Online
B5K-0218-00 b (KN/RN)
Advertisement
Chapters
Table of Contents

Related Manuals for Kenwood DNX893S


Summary of Contents for Kenwood DNX893S
-
Page 1: Quick Start Guide
Record the serial number, found on the back of the unit, in the spaces designated on the warranty card, and in the space provided below. Refer to the model and serial numbers whenever you call upon your KENWOOD dealer for information or service on the product. -
Page 2: Table Of Contents
How to Use the Navigation System ............10 • When you purchase optional accessories, check with DVD/ VCD ................11 your KENWOOD dealer to make sure that they work with To refer to Instruction manual, a PC loaded with Microsoft® Playing a disc......................11 your model and in your area. - Page 3 When removing the product from the box or installing it, KENWOOD dealer. the front panel may be positioned at the angle shown in (Fig. 1). This is due to the characteristics of mechanism the Ñ...
-
Page 4: Safety Precautions And Important Information
Failure to avoid the following potentially hazardous it should be used with the engine running whenever in this manual. Neither KENWOOD nor Garmin shall be liable situations may result in injury or property damage. possible. Using the navigation system for a long time... -
Page 5: Initial Settings
2) Set each item and touch [ OEM SETUP (North America Sales area only) This function requires a commercial adaptor. Consult your KENWOOD dealer for details. DEMO Set the demonstration mode. Default is “ON”. 1) Touch [DEMO] and set ON or OFF. -
Page 6: Basics
Front Panel • Pressing for 1 second turns the power off. • When the power off, turns the power on. DNX893S/ DNX773S/ DNX7160BTS • Switch the APP (CarPlay/ Android Auto/ Mirroring) source. • Pressing for 1 second displays the Voice Recognition screen. -
Page 7: How To Insert An Sd Card/ Microsd Card
Basics 7 Volume knob How to insert an SD Card/ microSD DNX6 DNX5 • Turning adjusts volume up or down. Card Hold the microSD card with the label side • Displays the popup menu screen. facing right and the notched section down, and •... -
Page 8: Operating With The Home Screen
Basics Operating with the HOME Screen Ñ Selecting the playback source on the HOME Ñ Customizing Short-cut buttons on HOME screen screen Most functions can be performed from the HOME screen. You can arrange the position of the source icons as you like. - Page 9 Basics 4 [<] [>] : The Secondary screen changes every time you Ñ Flick scrolling : Displays the view camera. touch it. : Displays the SETUP Menu screen. You can scroll the list screen by flicking the screen up/ • Indicators: Displays the current source condition and : Displays the Audio Control Menu screen.
-
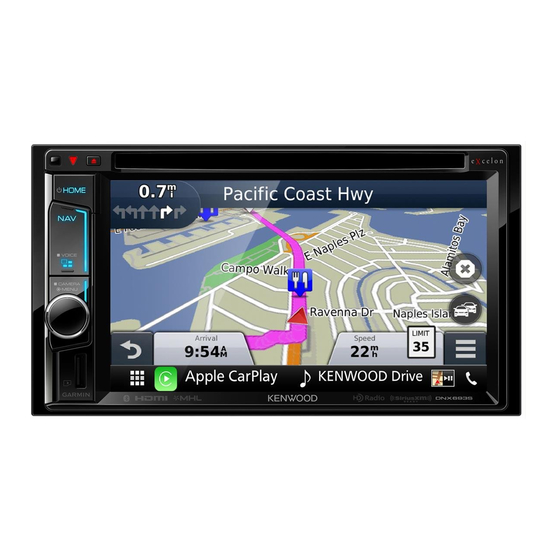
Page 10: Navigation
Adding a stop 1 GPS satellite strength. at all times. Garmin and JVC KENWOOD will not be 1) While navigating a route, touch [ ] and then touch 2 Finds a destination. -
Page 11: Dvd/ Vcd
• Traffic service is not available in some areas or countries. Updating the software center for details. • Garmin and JVC KENWOOD are not responsible for the To update the navigation system software, you must accuracy or timeliness of the traffic information. -
Page 12: Playback Operations
DVD/ VCD Playback operations Ñ Function panel Video menu operations Touch on the left side of the screen. Ñ Video screen Touch on the left side of the screen. Touch [MENU CTRL]. Perform desired operation as follows. Stops playing. 1 Searches the next/previous content. <<... -
Page 13: Discs/ Usb/ Ipod/ Sd/ App
Discs/ USB/ iPod/ SD/ APP Discs/ USB/ iPod/ SD/ APP To listen music and watch video with Lightning Preparation Set each item as follows. connector device – Lightning Digital AV Adapter ✎ NOTE – KCA-HD100 • For details about connecting Android. (P.29) –... -
Page 14: How To Play Music
• To insert CD or DVD, refer to “Inserting a disc” (P.11). Touch on the left side of the screen. You can play audio files from music CD, disc media, USB Ñ SD card/ microSD card (DNX893S/ DNX773S/ storage device, SD Card and iPod. DNX693S/ DNX573S) ✎... -
Page 15: Apple Carplay
Discs/ USB/ iPod/ SD/ APP Ñ List search Apple CarPlay Ñ Operation buttons and available Apps on the 1) Touch on the right side of the screen. The content list of home screen of CarPlay CarPlay is a smarter, safer way to use your iPhone in the car. the media being played is displayed. -
Page 16: Android Auto
Discs/ USB/ iPod/ SD/ APP Android Auto™ Ñ Operation buttons and available Apps on the Mirroring Operation Android Auto screen Android Auto enables you to use functions of your Android You can listen to music or watch video from the Mirroring You can perform the operations of the Apps of the device convenient for driving. -
Page 17: Radio/ Hd Radio™ Tuner/ Siriusxm
Ñ Auto memory 1) Touch on the left side of the screen. 1) Touch [AM] or [FM] to select the band. (DNX893S/ DNX773S/ DNX693S/ DNX573S) 2) Touch on the left side of the screen to display the 1) Press the <HOME> button. -
Page 18: Siriusxm® Basic Operation
Radio/ HD Radio™ Tuner/ SiriusXM® SiriusXM® Basic Operation Ñ Function panel Ñ Category/Channel search 1) Touch on the left side of the screen. 1) Touch [1]. 1) Press the <HOME> button. 2) Select a category, and then select a channel. 2) Touch [ 3) Touch [SiriusXM]. -
Page 19: Radio Basic Operation
Radio/ HD Radio™ Tuner/ SiriusXM® ✎ Radio Basic Operation Ñ Function panel NOTE • For other operations, see SiriusXM® Basic Operation 1) Touch on the left side of the screen. (DNX7160BTS/ DNX5160BTS) (P.54) in the Instruction Manual. 1) Press the <HOME> button. 2) Touch [ 3) Touch [Radio]. -
Page 20: Bluetooth Smartphone
Bluetooth smartphone Bluetooth smartphone You can use your Bluetooth smartphone when paired to free connection with the unit. When the data transmission and connection have this unit. completed, the Bluetooth connection icon appears on the screen. Register your smartphone to the Receive a phone call unit Touch [Û]. -
Page 21: Make A Phone Call
Bluetooth smartphone Call by voice • Microphone Level: Adjust the microphone Speech See the table below for each operation method. Quality volume You can make a voice call using the voice recognition • Echo Cancel Level: Adjusts the level of echo function of the cell-phone. -
Page 22: Controlling Audio
Controlling Audio Controlling Audio Equalizer Control Ñ Recall the EQ curve Press the <MENU> button/ DNX8 DNX7 DNX6 Volume knob. 1) Touch [Preset Select]. DNX5 Touch [Equalizer] on the Audio screen. 2) Select EQ curve. Touch [Audio]. Touch the screen and set the Graphic Equalizer Audio screen appears. -
Page 23: Installation
DNX893S only and off with the ignition key. If you connect the ignition wire DNX893S, DNX7160BTS, DNX693S, DNX5160BTS only to a power source with a constant voltage supply, such as with DNX773S, DNX573S only battery wires, the battery may be drained. -
Page 24: Installing The Unit
1) Cut out accessory 5 as illustrated. unit is unstable, it may malfunction (eg, the sound may skip). Cutting line Installing the unit Ñ Trim plate (DNX893S, DNX7160BTS, DNX693S, Ñ Non-Japanese cars (DNX893S, DNX7160BTS, DNX5160BTS) DNX693S, DNX5160BTS) 1) Attach accessory 9 to the unit. - Page 25 Installation Ñ GPS antenna Ñ Microphone unit Ñ Removing the trim plate (DNX893S, DNX7160BTS, DNX693S, DNX5160BTS) GPS antenna is installed inside of the car. It should be 1) Check the installation position of the microphone installed as horizontally as possible to allow easy reception (accessory 3).
- Page 26 Installation Ñ Removing the unit (DNX893S, DNX7160BTS, Ñ Connecting the system and external components DNX693S, DNX5160BTS) 5 Accessory =: Steering remote harness Visual Output (Yellow) 1) Remove the trim plate by referring to step 1 in “Removing (DNX7160BTS/ DNX5160BTS only) the trim plate”.
- Page 27 Installation Ñ Connecting wires to terminals Fuse (15A) Speaker impedance: 4-8 Ω White To front left speaker White/Black Connect to the vehicle’s parking Gray brake detection switch harness. To front right speaker Gray/Black Green To rear left speaker Green/Black PRK SW Purple To rear right speaker Purple/Black...
- Page 28 Installation Ñ Connecting a USB device Ñ Connecting an iPod/iPhone Lightning connector 30-pin connector DNX893S/ DNX7160BTS/ DNX693S/ DNX5160BTS iPod iPod/iPhone KCA-iP102 (0.8m) USB terminal (1 m) KCA-iP103 (0.8m) USB device DNX773S/ DNX573S iPod/iPhone terminal (1 m) USB device Lightning Digital AV...
-
Page 29: About This Unit
Bluetooth SIG, Inc. and any use of such marks by (with MHL) trademarks of HDMI Licensing LLC in the United States and JVC KENWOOD Corporation is under license. Other KCA-MH100 (1.8 m) other countries. trademarks and trade names are those of their respective •... - Page 30 About this Unit A CONSUMER ENGAGED IN A PERSONAL AND NON- FOR A PARTICULAR PURPOSE ARE DISCLAIMED. IN NO STRICT LIABILITY, OR TORT (INCLUDING NEGLIGENCE OR COMMERCIAL ACTIVITY AND/OR WAS OBTAINED FROM EVENT SHALL THE FOUNDATION OR CONTRIBUTORS BE OTHERWISE) ARISING IN ANY WAY OUT OF THE USE OF THIS A VIDEO PROVIDER LICENSED BY MPEG LA TO PROVIDE LIABLE FOR ANY DIRECT, INDIRECT, INCIDENTAL, SPECIAL, SOFTWARE, EVEN IF ADVISED OF THE POSSIBILITY OF SUCH...
- Page 31 C 8M bps : D MP3, AAC • For the cell-phones verified for compatibility, access the • MPEG-4 (.mp4, .avi) following URL: http://www.kenwood.com/cs/ce/bt/. A Advanced Simple Profile : B 1920 × 1080 (30 fps) : Ñ Playable Audio files C 8M bps : D MP3, AAC A Bit rate : B Sampling frequency : C Bit count •...
-
Page 32: Antes De La Utilización
• Cuando compre accesorios opcionales, pregunte a El manual de instrucciones está sujeto a cambios por Apple CarPlay ....................... 45 su distribuidor KENWOOD si dichos accesorios son modificaciones de las especificaciones, etc. Asegúrese de Android Auto™ ....................46 compatibles con su modelo y en su región. - Page 33 Si el panel después de un tiempo, consulte con su distribuidor frontal está muy sucio, límpielo con un paño humedecido KENWOOD. con un limpiador neutro y, a continuación, límpielo de nuevo con un paño suave y seco.
-
Page 34: Precauciones De Seguridad E Información Importante
ON o en ACC. No obstante, producir un mal funcionamiento o daños en el mismo. Tenga a manejar el sistema de navegación KENWOOD y siga las para conservar la batería, debe utilizarse con el motor en también en cuenta que la unidad puede ser dañada por... -
Page 35: Ajustes Iniciales
OEM SETUP (Solo en la zona de ventas de Norteamérica) Esta función requiere un adaptador que se encuentre disponible comercialmente. Consulte a su distribuidor KENWOOD para obtener más detalles. Modo Demo Configure el modo de demostración. La opción predeterminada es “ON”. -
Page 36: Información Básica
• Podrá reproducir el archivo de audio/vídeo en la 2 R, S (Volumen) • Si la unidad está apagada, la enciende. tarjeta. * (Solamente para DNX893S, DNX773S) 5 NAV • Ajusta el volumen. Si continua presionando, el • Una ranura para tarjetas SD para actualizar el mapa. -
Page 37: Cómo Insertar Una Tarjeta Sd / Microsd
Información básica 7 Rueda de volumen Cómo insertar una tarjeta SD / DNX6 DNX5 • Si se gira, se sube o baja el volumen. microSD Sujete la tarjeta microSD con la etiqueta hacia • Muestra la pantalla de menú emergente. la derecha y la sección ranurada hacia abajo, e •... -
Page 38: Operación Con La Pantalla Inicio
Información básica Operación con la pantalla INICIO Ñ Selección de la fuente de reproducción en la Toque el icono de la fuente para cambiar la pantalla INICIO pantalla de reproducción. La mayoría de las funciones pueden ejecutarse desde la Ñ Personalización de los botones de acceso pantalla INICIO. -
Page 39: Funciones Habituales
Información básica Funciones habituales Ñ Descripciones de la pantalla de control de Ñ Pantalla de lista fuente Existen teclas de funciones comunes en las pantallas de Ñ Menú emergente listas de la mayoría de las fuentes. Existen funciones que pueden ejecutarse desde la mayoría de las pantallas. -
Page 40: Navegación
4 Utilizar Apps como ecoRoute y Help (ayuda). 1) Mientras navega por una ruta, pulse [ ] y a JVC KENWOOD no se responsabilizan de ninguna multa ni continuación [Where To?]. 5 Ajustar la configuración. denuncia de tráfico que pueda recibir por no respetar todas 2) Búsqueda de una parada adicional. -
Page 41: Dvd/Vcd
KENWOOD o consultar al centro de servicio técnico Podrá adquirir suscripciones de tráfico para las regiones • Garmin y JVC KENWOOD no se responsabilizan de la de KENWOOD para más detalles. o países. Visite www.garmin.com/kenwood para exactitud o la temporización de la información del 1) Vaya a www.garmin.com/kenwood. -
Page 42: Operaciones De Reproducción
DVD/VCD Operaciones de reproducción Ñ Panel de funciones Operaciones del menú de vídeo Toque el lado izquierdo de la pantalla. Ñ Pantalla de vídeo Toque el lado izquierdo de la pantalla. Toque [MENU CTRL]. Realice la operación deseada del modo que se indica a continuación. -
Page 43: Discos/Usb/Ipod/Sd/App
Discos/USB/iPod/SD/APP Discos/USB/iPod/SD/APP Para escuchar música y ver vídeos con un Preparativos Ajuste cada elemento del modo siguiente. dispositivo con conector Lightning – Adaptador Lightning Digital AV ✎ NOTA – KCA-HD100 • Para más información sobre cómo conectar un Android. – KCA-iP103 (P.59) –... -
Page 44: Cómo Reproducir Música
DVD, consulte “Introducción de un disco” (P.41). discos de datos, dispositivos de almacenamiento USB, Ñ Tarjeta SD/Tarjeta microSD tarjetas SD y iPod. (DNX893S/DNX773S/DNX693S/DNX573S) ✎ NOTA • Para más información sobre cómo introducir tarjetas • Para más detalles sobre formatos compatibles, formatos SD o microSD, consulte “Cómo insertar una tarjeta SD /... -
Page 45: Apple Carplay
Discos/USB/iPod/SD/APP Ñ Búsqueda en la lista ✎ 5) Conecte el iPhone usando KCA-iP103. (P.58) NOTA Al conectar un iPhone compatible con CarPlay al 1) Toque el lado derecho de la pantalla. Se muestra la lista • Para obtener más información sobre las funciones de búsqueda, consulte Operaciones de búsqueda (P.36) terminal del iPod, se desconectará... -
Page 46: Android Auto
Discos/USB/iPod/SD/APP Android Auto™ Ñ Botones de operación y aplicaciones disponibles Operación mirroring en la pantalla Android Auto Android Auto le permite usar las opciones de su dispositivo Puede escuchar música o ver vídeos desde la operación Podrá realizar las operaciones de las aplicaciones del Android de forma cómoda para la conducción. -
Page 47: Radio/Hd Radio™ Tuner/Siriusxm
1) Pulse en [AM] o en [FM] para seleccionar la frecuencia. sintonizador HD Radio recibe una emisora analógica, está apagada. 2) Toque el lado izquierdo de la pantalla para visualizar el (DNX893S/ DNX773S/ DNX693S/ DNX573S) panel de funciones. Ñ Panel de funciones 3) Toque [AME]. -
Page 48: Funcionamiento Básico De Siriusxm
Radio/HD Radio™ Tuner/SiriusXM® Funcionamiento básico de Ñ Panel de funciones Ñ Búsqueda de categoría/canal 1) Toque [ 1 ]. 1) Toque el lado izquierdo de la pantalla. SiriusXM® 2) Seleccione una categoría y, a continuación, seleccione 1) Pulse el botón <HOME>. un canal. -
Page 49: Funcionamiento Básico De La Radio
Radio/HD Radio™ Tuner/SiriusXM® 2) Toque [ 1 ]. Funcionamiento básico de la radio Ñ Panel de funciones 3) Seleccione el programa deseado. 1) Toque el lado izquierdo de la pantalla. (DNX7160BTS/ DNX5160BTS) 1) Pulse el botón <HOME>. 2) Toque [ 3) Toque [Radio]. -
Page 50: Teléfono Inteligente Con Bluetooth
Teléfono inteligente con Bluetooth Teléfono inteligente con Bluetooth Seleccione el número del sistema de manos Puede utilizar su teléfono inteligente con Bluetooth Algunos teléfonos inteligentes podrían solicitar permiso cuando esté emparejado a esta unidad. libres a conectar. para acceder a los datos. La transmisión de datos comenzará... -
Page 51: Realización De Una Llamada Telefónica
Teléfono inteligente con Bluetooth Llamar usando el número preseleccionado Cambia la salida de voz entre el teléfono móvil y Seleccione el dispositivo a usar. el altavoz. 1) Toque [ • Nivel de micrófono: Ajuste el volumen del Ajuste 2) Toque el nombre o número de teléfono. vocal micrófono Call by voice... -
Page 52: Control Del Audio
Control del audio Control del audio Nivel de SW Control del ecualizador Pulse el botón <MENU> / DNX8 DNX7 DNX6 mando del volumen. Ajusta el volumen del subwoofer. DNX5 Toque [Ecualizador] en la pantalla Audio. Toque [Audio]. Toque la pantalla y ajuste a su gusto el Ñ... -
Page 53: Instalación
Ventilador de refrigeración • Si el encendido de su automóvil no está provisto de la DNX893S, DNX7160BTS, DNX693S, DNX5160BTS solamente • No presione con fuerza la superficie del panel al instalar la posición ACC, conecte los cables de encendido a una fuente DNX773S, DNX573S solamente unidad en el vehículo. -
Page 54: Instalación De La Unidad
(por ejemplo, el Línea de corte sonido puede interrumpirse). Instalación de la unidad Ñ Placa de montaje (DNX893S, DNX7160BTS, Ñ Coches no japoneses (DNX893S, DNX7160BTS, DNX693S, DNX5160BTS) DNX693S, DNX5160BTS) 1) Conecte el accesorio 9 a la unidad. - Page 55 Instalación Ñ Antena GPS Ñ Unidad de micrófono Ñ Retirar la placa de montaje (DNX893S, DNX7160BTS, DNX693S, DNX5160BTS) La antena GPS está instalada dentro del vehículo. Debe 1) Compruebe la posición de instalación del micrófono instalarse lo más horizontalmente posible para permitir (accesorio 3).
- Page 56 Instalación Ñ Desmontaje de la unidad (DNX893S, Ñ Conexión del sistema y de los componentes externos DNX7160BTS, DNX693S, DNX5160BTS) 5 Accesorio =: Mazo de cables remoto del volante Salida de vídeo (amarilla) 1) Retire el marco según las indicaciones del paso 1 de (DNX7160BTS/DNX5160BTS solamente) “Retirar el marco”.
- Page 57 Instalación Ñ Conectar los cables a los terminales Fusible (15 A) Impedancia del altavoz: 4-8 Ω Blanco Al altavoz delantero Realice la conexión en el arnés izquierdo Blanco/Negro del interruptor de detección del freno de aparcamiento del Gris vehículo. Al altavoz delantero derecho Gris/negro Verde Al altavoz trasero izquierdo...
- Page 58 Instalación Ñ Conexión a un dispositivo USB Ñ Conexión a un iPod/iPhone Conector Lightning Conector de 30 clavijas DNX893S/ DNX7160BTS/ DNX693S/ DNX5160BTS iPod iPod/iPhone Terminal USB (1 m) KCA-iP102 (0,8 m) KCA-iP103 (0,8 m) Dispositivo USB DNX773S/ DNX573S Terminal iPod/iPhone...
-
Page 59: Acerca De Esta Unidad
Bluetooth SIG, Inc. y cualquier uso de dichas Android (con MHL) Interface, and the HDMI logo are trademarks or registed marcas por JVC KENWOOD Corporation está sujeto a los KCA-MH100 (1,8 m) trademarks of HDMI Licensing LLC in the United States and términos de licencia. - Page 60 Acerca de esta unidad DECODING MPEG-4 VIDEO THAT WAS ENCODED BY IMPLIED WARRANTIES OF MERCHANTABILITY AND FITNESS ON ANY THEORY OF LIABILITY, WHETHER IN CONTRACT, A CONSUMER ENGAGED IN A PERSONAL AND NON- FOR A PARTICULAR PURPOSE ARE DISCLAIMED. IN NO STRICT LIABILITY, OR TORT (INCLUDING NEGLIGENCE OR COMMERCIAL ACTIVITY AND/OR WAS OBTAINED FROM EVENT SHALL THE FOUNDATION OR CONTRIBUTORS BE...
- Page 61 • Si su teléfono móvil es de un tipo compatible, acceda a la • H.264/MPEG-4 AVC (.mp4, .m4v, .avi, .flv, .f4v) siguiente URL: http://www.kenwood.com/cs/ce/bt/. A Perfil de base, Perfil principal: B 1280 × 720 (30 fps): Ñ Archivos de audio reproducibles...
- Page 62 Ñ IC (Industry Canada) Notice DNX893S/ DNX773S/ DNX693S/ DNX573S: Ñ FCC WARNING This device complies with Industry Canada licence-exempt JVC KENWOOD Corporation This equipment may generate or use radio frequency energy. RSS standard(s). 2967-3, ISHIKAWA-MACHI, Changes or modifications to this equipment may cause...
- Page 63 Ñ CALIFORNIA, USA Ñ Para cumplimiento de la COFETEL: DNX7160BTS/ DNX5160BTS: This product contains a CR Coin Cell Lithium Battery which “La operación de este equipo esta sujeta a las siguientes dos Ñ The marking of products using lasers contains condiciones: Perchlorate Material –...