Table of Contents
Advertisement
Advertisement
Table of Contents

Related Manuals for Panasonic WJ-HDE400


Summary of Contents for Panasonic WJ-HDE400
-
Page 1: Installation Guide
Installation Guide Extension Unit WJ-HDE400 Model No. WJ-HDE400/G Before attempting to connect or operate this product, please read these instructions carefully and save this manual for future use. The model number is abbreviated in some descriptions in this manual. - Page 2 DO NOT OPEN If you lose the fuse cover the plug must not be used until a replacement cover is obtained. A replacement fuse cover can be purchased from your local Panasonic Dealer. CAUTION: TO REDUCE THE RISK OF ELECTRIC SHOCK, IF THE FITTED MOULDED PLUG IS UNSUITABLE FOR THE DO NOT REMOVE COVER (OR BACK).
-
Page 3: Limitation Of Liability
THIRD PARTY'S RIGHT. (S). Disclaimer of warranty IN NO EVENT SHALL Panasonic System Networks Co., Ltd. (5) ANY PROBLEM, CONSEQUENTIAL INCONVENIENCE, BE LIABLE TO ANY PARTY OR ANY PERSON, EXCEPT FOR OR LOSS OR DAMAGE, ARISING OUT OF THE SYSTEM REPLACEMENT OR REASONABLE MAINTENANCE OF THE COMBINED BY THE DEVICES OF THIRD PARTY;... -
Page 4: Important Safety Instructions
Important safety instructions 1) Read these instructions. 2) Keep these instructions. 3) Heed all warnings. 4) Follow all instructions. 5) Do not use this apparatus near water. 6) Clean only with dry cloth. 7) Do not block any ventilation openings. Install in accordance with the manufacturer's instructions. 8) Do not install near any heat sources such as radiators, heat registers, stoves, or other apparatus (including amplifiers) that pro- duce heat. -
Page 5: Table Of Contents
Contents Limitation of liability ..................................Disclaimer of warranty ................................... Important safety instructions ................................Preface ......................................Features ......................................HDD fault-tolerance system ..............................Easy replacement of HDDs ..............................About the user manuals ................................. Precautions ....................................Precautions for installation ................................Major operating controls and their functions ............................ 9 ■... -
Page 6: Preface
Preface The WJ-HDE400 is the extension unit for the recorder (such as Network Disk Recorder WJ-ND400K), which is sold separately. The number of extension units that are connectable varies depending on the models* of the recorders to be used. Refer to the man- uals provided with the recorder. -
Page 7: Precautions
Precautions Do not operate this product beyond its specified tem- When this product has not been used for a certain peri- perature, humidity, or power source ratings. od, turn on the power (approximately once a week), and Use this product at temperatures between 5 °C to 45 °C perform recording/playback to prevent interferences {41 °F to 113 °F} and where the humidity is between 5 % to with functions. -
Page 8: Precautions For Installation
Precautions for installation Use this product for indoor use only. Avoid placing receptacles that contain liquids such as water near this product. Avoid the following locations for installation. If liquid spills onto this product, it may cause fire or an electric • Places exposed to direct sunlight shock. -
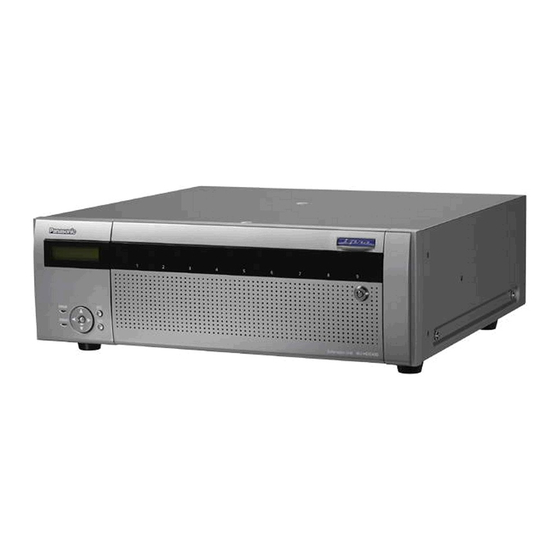
Page 9: Major Operating Controls And Their Functions
Major operating controls and their functions ■ Front view q LCD Indicates the status of the extension unit (error status, etc.) Note: or the name of the functions available using the buttons on Basically, each indicator will indicate the status of the the front panel of the extension unit. - Page 10 e Key hole Use the provided key to open/close the front cover. Keep the key in a safe place. Lock the front cover: Insert, push and turn the key to the left. Unlock the front cover: Insert, push and turn the key to the right.
-
Page 11: Inside The
■ Inside the front cover q HDD units Lights red: Indicates that the respective hard disk drive is Only the hard disk drive encased in the dedicated hard faulty (which can be recovered by replacing the hard disk drive). disk drive canister (HDD units) can be installed in the extension unit. -
Page 12: Rear View
■ Rear view ● Power cord plug brace q External input connector (EXT IN) Use this connector to connect to the recorder using the Brace the power cord plug. provided connection cable. w Signal ground terminal (SIGNAL GND) Fix the power cord plug firmly with the power cord Connect this terminal with the SIGNAL GND terminals of plug brace. -
Page 13: Cable Clamp
● Cable clamp Note: Fix the connection cable using the provided cable clamp as • Overhead view follows. (1) Knob Attach the cable clamp fixing belt to the fixing hole on the rear, and pass the cable through the holder part of the cable clamp. Pull the cable clamp fixing belt to confirm that the fixing belt is attached firmly. -
Page 14: Operations Flow
Operations flow The operation flow of the extension unit is as follows. Install the extension unit in the rack. (Page 15) Rack mounting Go to step 2 when not installing in the rack. Connect the extension unit to the recorder. (Page 17) Connections Turn on the power of the extension unit. -
Page 15: Install The Extension Unit In A Rack
Install the extension unit in a rack Install the extension unit in an EIA standard 19-inch rack Place the provided rack mounting brackets on both (Depth: 550 mm or more). sides of the extension unit and fix them with the rack mounting bracket fixing screw (x6). -
Page 16: Position In The Rack
■ Position in the rack When connecting multiple extension units to a recorder, make sure you consider the length of the provided connection cable (1 m {39.4"}). It is recommended to install the recorder in the center of the rack. The following is an example of a connection with Network Disk Recorder WJ-ND400K. -
Page 17: Connections
Connections Up to 5 extension units can be connected to a single network disk recorder. The number of extension units that are connectable var- ies depending on the models of the recorders to be used. Refer to the manuals provided with the recorder. Connect the extension unit and the recorder using the provided connection cable (1 m {39.4"}). -
Page 18: Turn On/Off The Power Of The Extension Unit
(checking the system and hard disk drives) will start. Turn off the power of the network disk recorder after con- • The "WJ-HDE400" indication will be displayed on the firming that all the HDD access indicators are off. The LCD at startup. OPERATE indicator on the network disk recorder will go • When the system check is complete, operational... -
Page 19: Operations Using The Buttons On The Front Panel
Operations using the buttons on the front panel ■ Operational mode display • In the RAID 6 mode One of the "1DOWN", "2DOWN" and "3DOWN" indica- (standby display) tions (corresponding to the failure) will be displayed and will start blinking. The current operational mode and the internal temperature will The respective HDD access indicator(s) will also light or be displayed on the LCD. -
Page 20: Reset The Settings To The Default
■ Reset the settings to the default To reset the settings of the extension unit to the default, do the following. Important: • When the settings are reset to the default, it may become impossible to access data on the hard disk drives since the disk configuration settings are invalidated. Start reset- ting the settings after confirming that all data on the hard disk drives can be deleted. -
Page 21: Hdd Unit
■ HDD Unit (1) Put the cushion between the front cover and HDD canister. To install a hard disk drive in the extension unit, it is necessary to assemble an HDD unit (encase the hard disk drive in the HDD canister). The HDD unit is designed to easily install/remove the hard disk drive in/from the extension unit. - Page 22 Fix both sides of the hard disk drive with the dedicat- ed HDD canister using the 4 provided screws for HDD canister installation. Tightening torque for the screws: 0.49 N·m (5 kgf·cm) (use a low-torque powered screwdriver or a torque screwdriver) HDD fixing screw HDD fixing screw Fix the bottom of the hard disk drive with the HDD...
-
Page 23: Handle The Hard Disk Drives
■ Handle the hard disk drives The HDD units can be easily installed/removed in/from the HDD slots inside the front cover. Contact your dealer about purchasing, installing, and replacing the hard disk drives. Important: • Hard disk drives are precise devices. Note the following when handling them. • They are vulnerable to vibration. Handle them with care. • Before touching a hard disk drive, release static electricity from your body using an anti-static grounding strap, etc. Even after releasing static electricity, hold the side of the hard disk drive when carrying it. -
Page 24: Install The Hdd Units
● Install the HDD units • When the inserted hard disk drive is formatted, it will be recognized as the hard disk drive for playback use only. In It is possible to install the HDD units without stopping the this case, the HDD status indicator will blink green. To use operation. -
Page 25: Install (Link) All The Hdd Units In The Extension Unit At The Same Time
● Install (link) all the HDD units in the Move the underscore mark below "YES" using the extension unit at the same time arrow button (left or right), and then press the [SET] button. It is possible to make all the HDD units in the extension unit available (make them linked) at the same time. -
Page 26: Remove The Hdd Units
• Total capacity of the hard disk drive Press the arrow button (up or down) repeatedly until • Available (remaining) capacity of the hard disk drive the "Link EXT" indication is displayed. • Hour meter • Operational mode of the hard disk drive • Time and date range of the images recorded on the hard disk drive. * When using a recorder (not a network disk recorder), refer to the manuals provided with the recorder for how to operate. - Page 27 Move the underscore mark below "YES" using the Remove the HDD units from the extension unit. arrow button (left or right), and then press the [SET] (1) Hold down the removal knob on the HDD unit. button. (2) Pull the lever up. (3) Pull the HDD unit out from the HDD slot.
-
Page 28: Remove All The Hdd Units In The Extension Unit At The Same Time
● Remove all the HDD units in the Select the extension unit (EXT#) to be removed using extension unit at the same time the arrow button (up or down), and then press the [SET] button. It is possible to remove (link off) all the HDD units in the exten- sion unit. -
Page 29: Determine The Operational Mode
Close the front cover and lock it by pushing and turning the key to the left. Keep the key in a safe place. Determine the operational mode using the [RAID] switch. S: Single mode (Default) R5: RAID 5 mode Check the disk information. R6: RAID 6 mode The following can be checked on the "Disk information"... -
Page 30: Data Recovery (In The Raid 5/Raid 6 Mode)
■ Data recovery (in the RAID 5/RAID 6 mode) If a hard disk drive failure occurs in the RAID 5 or RAID 6 mode, the error display will appear as shown in the following table. In the RAID 5 mode, it is possible to read data on the other hard disk drives and recover data even when a single hard disk drive becomes faulty (1DOWN). -
Page 31: Replacement Of A Faulty Hard Disk Drive In The Raid Mode
● Replacement of a faulty hard disk Insert a new HDD unit into the HDD slot respective to drive in the RAID mode the HDD access indicator. Lift the lever on the HDD unit while holding down the In the RAID 5 mode, it is possible to read data on the other removal knob, and then insert the HDD unit all the way into hard disk drives and recover data even when a single hard disk the HDD slot. -
Page 32: Troubleshooting
Troubleshooting Check the following before requesting repair. Contact a dealer if a problem cannot be solved even after checking and trying the solu- tion or if a problem is not described below, or when having a problem with installations. Problem Check item/Remedy Ref. - Page 33 Problem Check item/Remedy Ref. page Make sure that the HDD unit is inserted all the way into the HDD slot. Was another HDD unit inserted to the HDD slot before completing the The hard disk drive is not rec- recognition process of the other HDD unit? ognized.
- Page 34 Problem Check item/Remedy Ref. page Make sure that recovery of data in the RAID 5/RAID 6 mode is not being The HDD status indicator processed. lights orange and red alter- nately even when no record- ing or playback is being per- formed.
-
Page 35: Specifications
Specifications • General Power source: NTSC model: 120 V AC, 60 Hz PAL model: 220 V AC to 240 V AC, 50 Hz Power consumption: 130 W Ambient operating temperature: 5 °C to 45 °C {41 °F to 113 °F} Ambient operating humidity: 5 % to 90 % (non condensing) Maximum operating altitude:... - Page 36 For customer support, call 1.800.528.6747 Importer's name and address to follow EU rules: Three Panasonic Way, Secaucus, New Jersey 07094 U.S.A. Panasonic Testing Centre Panasonic Canada Inc. Panasonic Marketing Europe GmbH 5770 Ambler Drive, Mississauga, Ontario, L4W 2T3 Canada Winsbergring 15, 22525 Hamburg F.R.Germany...