Table of Contents
Advertisement
Owner's Manual & Safety Instructions
Save This Manual
operating, inspection, maintenance and cleaning procedures. Write the product's serial number in the
back of the manual near the assembly diagram (or month and year of purchase if product has no number).
Keep this manual and the receipt in a safe and dry place for future reference.
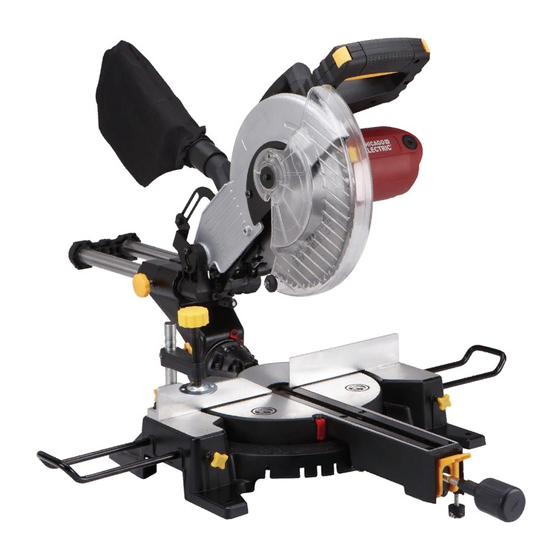
10" SLIDING COMPOUND
MITER SAW
WITH LASER GUIDE SYSTEM
Email our technical support at: productsupport@harborfreight.com
REV 14i
When unpacking, make sure that the product is intact
and undamaged. If any parts are missing or broken,
please call 1-888-866-5797 as soon as possible.
©
Copyright
2013 by Harbor Freight Tools
No portion of this manual or any artwork contained herein may be reproduced in
any shape or form without the express written consent of Harbor Freight Tools.
Diagrams within this manual may not be drawn proportionally. Due to continuing
improvements, actual product may differ slightly from the product described herein.
Tools required for assembly and service may not be included.
Keep this manual for the safety warnings and precautions, assembly,
Note: Blade sold separately.
Visit our website at: http://www.harborfreight.com
®
. All rights reserved.
Read this material before using this product.
Failure to do so can result in serious injury.
SAVE THIS MANUAL.
Advertisement
Table of Contents

Related Manuals for Chicago Electric 61971


Summary of Contents for Chicago Electric 61971
- Page 1 Owner’s Manual & Safety Instructions Save This Manual Keep this manual for the safety warnings and precautions, assembly, operating, inspection, maintenance and cleaning procedures. Write the product’s serial number in the back of the manual near the assembly diagram (or month and year of purchase if product has no number). Keep this manual and the receipt in a safe and dry place for future reference.
-
Page 2: Table Of Contents
4. DON’T USE IN DANGEROUS ENVIRONMENT. to do a job for which it was not designed. Don’t use power tools in damp or wet locations, or expose them to rain. Keep work area well lighted. Page 2 For technical questions, please call 1-888-866-5797. Item 61971... - Page 3 It’s safer than using your hand and it frees both hands to operate tool. 21. NEVER LEAVE TOOL RUNNING UNATTENDED. TURN POWER OFF. Don’t leave tool until it comes to a complete stop. Item 61971 For technical questions, please call 1-888-866-5797. Page 3...
-
Page 4: Miter Saw Safety Warnings
3. Do not operate saw without guards in place. 7. Disconnect power before changing 4. Do not perform any operation freehand. blade or servicing. Page 4 For technical questions, please call 1-888-866-5797. Item 61971... - Page 5 It must be understood by the operator that common sense and caution are factors which cannot be built into this product, but must be supplied by the operator. Item 61971 For technical questions, please call 1-888-866-5797. Page 5...
-
Page 6: Vibration Safety
Risk of Fire. Alternating Current Do not cover ventilation ducts. Keep flammable objects away. WARNING marking concerning Amperes Risk of Electric Shock. Properly connect power cord to appropriate outlet. SAVE THESE INSTRUCTIONS. Page 6 For technical questions, please call 1-888-866-5797. Item 61971... -
Page 7: Specifications
Manufacture Date: ___________, ______ AVOID EXPOSURE Laser light is emitted from this opening. List of Contents Description Compound Sliding Miter Saw Carbon Brush Set Table Extensions Dust Collection Bag Hex Key Item 61971 For technical questions, please call 1-888-866-5797. Page 7... -
Page 8: Setup
Use the four bolt holes provided in the Base to mount the Miter Saw to a stable support before use. Mounting hardware not included. Functions Dust Bag Blade Guard Dust Outlet Spindle Lock Blade Laser Switch Head Lockdown Table Bevel Lock Lever Page 8 For technical questions, please call 1-888-866-5797. Item 61971... - Page 9 Loosen this to allow the cutting head to slide. Note: Additional functions are explained Align pin with Align pin with elsewhere in the manual. deep groove shallow groove to lock cutting head. to unlock cutting head. Item 61971 For technical questions, please call 1-888-866-5797. Page 9...
- Page 10 8. Move the Blade Guard back into place. WARNING! Make sure the Blade Guard operates smoothly and properly protects Head from the Blade before using the saw. Lockdown Figure B Page 10 For technical questions, please call 1-888-866-5797. Item 61971...
-
Page 11: Adjusting The Miter Angle
4. Make a sample cut in a piece of scrap to Bevel Lock confirm that the bevel angle is correct. Lever If it is not, correct the angle before cutting. Figure D Item 61971 For technical questions, please call 1-888-866-5797. Page 11... -
Page 12: Using The Depth Stop
1. Open the Battery Box Cover to expose the Batteries. 2. Remove the old Batteries. 3. Install two AAA batteries matching polarity with markings on compartment. Laser Switch 4. Close the Battery Box Cover. Battery Box Figure F Page 12 For technical questions, please call 1-888-866-5797. Item 61971... -
Page 13: General Operating Instructions
6. Press the Laser Switch to ON (I). store the tool indoors out of children’s reach. Note: If the laser guide line does not line up with the cut line, reposition workpiece before making the cut. Item 61971 For technical questions, please call 1-888-866-5797. Page 13... -
Page 14: Operation
Repeat the process until the Fence is adjusted accurately. 5. Once the Fence is accurately adjusted, tighten the bolts firmly in place. Recheck one last time, then proceed to work. Page 14 For technical questions, please call 1-888-866-5797. Item 61971... -
Page 15: Calibrating The Bevel Angle
45º left. 4. Ensure that the left side of the Blade clears the Kerf Board. 5. Tighten the four screws holding the Kerf Board in place. Item 61971 For technical questions, please call 1-888-866-5797. Page 15... -
Page 16: Troubleshooting
2. Check condition of material and check or inappropriate blade compatibility of blade to material. is being used. Follow all safety precautions whenever diagnosing or servicing the tool. Disconnect power supply before service. Page 16 For technical questions, please call 1-888-866-5797. Item 61971... -
Page 17: Parts List And Diagram
Hex Key Angle Adjusting Spring M8 x 16 Spindle Bolt (LH thread) Ø10 Flat Washer Ø8 Flat Washer M10 Lock Nut Outer Flange Bevel Lock Lever Blade (sold separately) – Item 61971 For technical questions, please call 1-888-866-5797. Page 17... - Page 18 Note: If product has no serial number, record month and year of purchase instead. Note: Some parts are listed and shown for illustration purposes only, and are not available individually as replacement parts. Page 18 For technical questions, please call 1-888-866-5797. Item 61971...
-
Page 19: Assembly Diagram
Assembly Diagram Item 61971 For technical questions, please call 1-888-866-5797. Page 19... -
Page 20: Warranty
Limited 90 Day Warranty Harbor Freight Tools Co. makes every effort to assure that its products meet high quality and durability standards, and warrants to the original purchaser that this product is free from defects in materials and workmanship for the period of 90 days from the date of purchase.