Ricoh D5500 Operating Instructions Manual
Interactive whiteboard
Hide thumbs
Also See for D5500:
- Operating instructions manual (224 pages) ,
- Read this first manual (48 pages) ,
- User manual (48 pages)

Related Manuals for Ricoh D5500


Summary of Contents for Ricoh D5500
- Page 1 Operating Instructions For safe and correct use, be sure to read the Safety Information in Read This First before using the machine.
-
Page 3: Table Of Contents
TABLE OF CONTENTS Introduction................................. 7 How to Read This Manual..........................8 Symbols................................8 Disclaimer................................8 Notes................................8 1. Machine Overview and Viewing the Screen Things You Can Do with This Machine......................9 Viewing the Screen............................13 A Screen Page and a Captured Page......................14 Main Operation Panel Icons...........................15 Page Operation Panel Icons........................... - Page 4 Printing Pages..............................42 Viewing the Screen Used to Specify the Printing Conditions..............42 Operating a Screen Page..........................44 Capturing the Screen Page......................... 44 Operating a Captured Page........................... 45 Turning Pages...............................45 Adding and Deleting a Page........................46 Changing the Display Magnification......................48 Changing the Display Magnification Using Your Fingers................
- Page 5 Checking the Status during a Remote Whiteboard Session..............84 Checking the Communication Status during a Remote Whiteboard Session......... 84 6. Using the Web Page to View a Shared Screen or Download Files Accessing the Web Page..........................87 Things You Can Do on the Web Page....................... 88 Participating in a Remote Whiteboard Session and Viewing a Shared Screen.........
- Page 6 Icons on the Desktop..........................115 Opening General Settings..........................117 General Settings Icons..........................117 Opening Administrator Settings........................118 Administrator Settings Icons........................119 Adjusting Touch Sensor Positions......................... 122 Configuring Network Settings........................123 Network Settings Window........................123 Setting the Date and Time..........................125 Configuring Region and Language Settings....................126 Region and Language Window.......................126 Adding or Deleting Your Remote License....................
- Page 7 Updating the System Via a Network....................... 148 Updating the System Using a USB Memory Device................150 Changing the System Settings........................151 System Settings Window.......................... 151 Changing the Print Settings........................... 154 Print Settings Window..........................154 Exporting and Importing Configuration Settings..................156 Exporting Configuration Settings......................156 Importing Configuration Settings......................157 Restoring the Factory Default Settings......................159 10.
- Page 8 11. Appendix Maintenance..............................181 Inserting a Battery into the Pen......................... 181 Replacing the Pen Nib..........................183 Replacing the Pen Bottom......................... 184 Cleaning the Display..........................185 Adjusting the Display.............................187 Adjusting the Image Quality of the Display.....................187 Adjusting the Position or Size of a Subwindow..................188 Changing the Menu Settings........................
-
Page 9: Introduction
Introduction This manual contains detailed instructions and notes on the operation and use of this machine. For your safety and benefit, read this manual carefully before using the machine. Keep this manual in a handy place for quick reference. -
Page 10: How To Read This Manual
How to Read This Manual Symbols This manual uses the following symbols: Indicates points to pay attention to when using the machine. Indicates supplementary explanations of the machine’s functions, and instructions on resolving user errors. Indicates the names of keys on the machine's display or control panels. Indicates instructions in book form. -
Page 11: Machine Overview And Viewing The Screen
1. Machine Overview and Viewing the Screen This chapter provides an overview of Interactive Whiteboard D5500. It also explains how to view the screen and use the machine to perform basic operations. Things You Can Do with This Machine You can use the machine in a variety of ways to fit your needs. - Page 12 1. Machine Overview and Viewing the Screen Save pages You can combine all the pages within a single PDF file. This file can be saved to a USB memory device or sent by e-mail. You also can temporarily save the page you are currently using to the machine memory.
- Page 13 Things You Can Do with This Machine Use a video conferencing device or projector You can display an image from a video conferencing device or use a projector to project the screen of the machine. See page 61 "Connecting Devices to Input and Output Terminals for Use with the Display".
- Page 14 1. Machine Overview and Viewing the Screen Display the screen of a computer connected via a network You can use IWB Remote Desktop Software to display the screen of a computer connected via a network. You can also operate the computer from the machine.
-
Page 15: Viewing The Screen
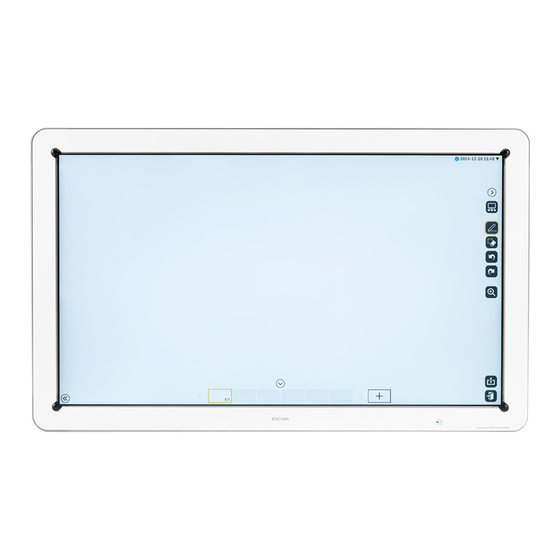
Viewing the Screen Viewing the Screen DEC013 1. Information display area This area displays the following information: • Date and time This area displays the current date and time. The date and time can be changed in Administrator Settings. For details about how to change the date and time, see page 125 "Setting the Date and Time". -
Page 16: A Screen Page And A Captured Page
1. Machine Overview and Viewing the Screen 3. Page operation panel The icons and thumbnails in this area are used to switch and edit pages. For details about the icons displayed in this area, see page 17 "Page Operation Panel Icons". The page operation panel can be shown or hidden with , the Show and Hide icons. -
Page 17: Main Operation Panel Icons
Main Operation Panel Icons Main Operation Panel Icons Icon Description Reference • Used to host a remote whiteboard See page 71 "Sharing the session. Screen". Share • Used to participate in the hosted remote whiteboard session. Used to operate a computer screen See page 97 "Using IWB displayed on the screen of the machine. - Page 18 1. Machine Overview and Viewing the Screen Icon Description Reference Used to print pages. See page 42 "Printing Pages". Print Used to put the machine into standby mode. See page 34 "Saving Pages You can temporarily save the page when Temporarily on the Machine".
-
Page 19: Page Operation Panel Icons
Page Operation Panel Icons Page Operation Panel Icons DAB011 1. Page Copy icon Adds a page by making a copy of the currently displayed captured page. For details about how to make a copy, see page 46 "Adding and Deleting a Page". 2. -
Page 20: Operating The Screen
1. Machine Overview and Viewing the Screen Operating the Screen Use the pen dedicated for this machine to operate the screen. You can also operate the screen with your fingers. • When using the machine for an extended period of time, make sure to take breaks to prevent eye strain. - Page 21 Operating the Screen CUE189 Drawing strokes , the Pen icon, is selected when the machine starts up. A stroke is the series of motions from when the pen nib touches the screen until it is released. The stroke written follows the movement of the pen.
-
Page 22: Operating The Screen Using Your Fingers
1. Machine Overview and Viewing the Screen The touch keyboard is automatically displayed when you touch any of the following input fields: Input field Location Display Name , the Save and e-mail icon - [Manual Entry] tab Email Address , the Save and e-mail icon - [Manual Entry] tab IP Address , the Share icon - [Join] - [Manual Entry] tab It may take about two seconds or so to display the touch keyboard after touching an input field. -
Page 23: Using The Machine As A Whiteboard
2. Using the Machine as a Whiteboard This chapter explains how to write characters or figures by hand on the machine, and how to edit or delete written information. This chapter also explains how to save and print written information. Writing Strokes •... - Page 24 2. Using the Machine as a Whiteboard DAB035 1. Stroke colors Changes the color of written strokes. 2. Stroke colors (semi-transparent) Changes the color of written strokes to a semi-transparent color. 3. Thickness of the stroke Changes the thickness of the written strokes. 4.
-
Page 25: Selecting And Editing Strokes
Selecting and Editing Strokes Selecting and Editing Strokes You can select and edit written strokes, such as by enlarging or moving the strokes. Touch , the Select and Delete icon. Touch , the Select icon. DEC030 Enclose a stroke with the pen nib to select the stroke. CUE062 Touch [Select All] to select all strokes on the page. - Page 26 2. Using the Machine as a Whiteboard CUE063 Enlarging or reducing strokes Place the pen nib on the corner or the center of a side, and then drag the pen nib so that the stroke can be enlarged or reduced to the size you want. CUE064 You can also delete the selected strokes.
-
Page 27: Deleting Strokes
Deleting Strokes Deleting Strokes Deleting a Portion of a Stroke When you touch a portion of a stroke, the portion is deleted. Touch , the Select and Delete icon. Touch , the Partially Delete icon. DAB037 Move the pen over the stroke. DAB030 Only the portions of the stroke touched by the pen nib are deleted. -
Page 28: Deleting Individual Strokes
2. Using the Machine as a Whiteboard Deleting Individual Strokes Deleting using the pen bottom Move the pen bottom across a stroke to erase it. CUE191 Deleting using the pen nib Touch , the Select and Delete icon. Touch , the Eraser icon. DAB109... -
Page 29: Selecting And Deleting Multiple Strokes
Deleting Strokes Move the pen nib across a stroke to erase it. CUE192 Selecting and Deleting Multiple Strokes Touch , the Select and Delete icon. Circle a stroke with the pen nib to select the stroke. DAB031 Touch anywhere in the selected area with the pen bottom. DAB032... -
Page 30: Deleting All Strokes
2. Using the Machine as a Whiteboard Deleting All Strokes You can erase all strokes on the screen. Touch , the Select and Delete icon. Touch [Erase All]. Touch [Delete]. -
Page 31: Undoing Operations
Undoing Operations Undoing Operations You can undo an operation in which a stroke is written, edited, or deleted. You can also redo operations that were undone. • When participating in a remote whiteboard session, you can only undo or redo the strokes written, edited, or deleted on your machine. -
Page 32: Redo
2. Using the Machine as a Whiteboard Redo Touch , the Redo icon. DAB013 You can redo up to 100 undone operations. -
Page 33: Writing Markers
Writing Markers Writing Markers A marker is a semi-transparent, thick line written with your finger. The written marker automatically disappears a few seconds after it is written. A marker is used to indicate an important portion of written information or a displayed image to which you want to draw attention. -
Page 34: Saving Pages
2. Using the Machine as a Whiteboard Saving Pages Pages can be saved in a shared folder or to a USB memory device. They can also be saved temporarily on the machine. All pages are saved as a single PDF file, as shown below. Item Specifications iwb-date-time.pdf... - Page 35 Saving Pages Touch [Save]. DEC031 Specify the folder in which you want to save the file. Touch [Save]. Viewing the screen used to specify the folder in which you want to save the file The following window is used to specify the folder in which you want to save the file: DEC032 1.
-
Page 36: Saving Pages Temporarily On The Machine
2. Using the Machine as a Whiteboard • USB Memory Saves the pages to the root directory of the USB memory device connected to the machine. • Temporary Save Folder Temporarily saves the pages to the machine. For details about how to save pages to the machine, see page 34 "Saving Pages Temporarily on the Machine". - Page 37 Saving Pages Touch [Save]. DEC031 Touch "Temporary Save Folder". DEC033...
- Page 38 2. Using the Machine as a Whiteboard Enter the meeting code. Any number can be specified for the "meeting code". The meeting code is used to do the following: • Import a temporarily saved file and resume from the last item of information you wrote •...
-
Page 39: Saving And Sending Pages By E-Mail
Saving and Sending Pages by E-mail Saving and Sending Pages by E-mail You can save pages and send them by e-mail as an attachment. All the pages are combined within a single PDF file and attached to the e-mail. • To send e-mail, it is necessary to configure the network and SMTP Server settings. For details about how to configure the Network Settings, see page 123 "Configuring Network Settings". -
Page 40: Using Mail To Print
2. Using the Machine as a Whiteboard • The file sent by e-mail is saved temporarily. Using Mail to Print By selecting the Mail to Print check box on the screen for specifying a destination, you can send the page to a multifunction printer equipped with the Mail to Print function for printing. The pages are printed under the following conditions: •... -
Page 41: Viewing The Screen Used To Specify A Destination E-Mail Address
Saving and Sending Pages by E-mail Viewing the Screen Used to Specify a Destination E-mail Address [Select from Email Address Book] tab DAB047 1. Email Address Book Lists the e-mail addresses registered in Email Address Book. Select the e-mail address of the destination to which you want to send the pages. - Page 42 2. Using the Machine as a Whiteboard [Manual Entry] tab DAB049 1. Display Name Enter the name of the e-mail address. The touch keyboard appears when you touch the input field. 2. Email Address Enter the e-mail address of the destination. The touch keyboard appears when you touch the input field. 3.
- Page 43 Saving and Sending Pages by E-mail Destination Email Address DAB051 1. Destination Email Address list Lists the e-mail addresses specified in the [Select from Email Address Book] or [Manual Entry] tab. Up to 30 e-mail addresses can be specified. When you touch a specified e-mail address, the address is deleted from the [Destination Email Address] list.
-
Page 44: Printing Pages
• Use a printing device that supports Universal Print Driver. For details about models that support Universal Print Driver, see the driver download page on the Ricoh home page. Viewing the Screen Used to Specify the Printing Conditions... - Page 45 Printing Pages 3. Print Range Selects the page you want to print. 4. Copies Specifies the number of copies you want to print. When two or more copies are selected, the pages are collated and the specified number of copies are printed. 5.
-
Page 46: Operating A Screen Page
2. Using the Machine as a Whiteboard Operating a Screen Page If you touch the Screen Page icon while a captured page is being displayed, the screen changes to display a screen page. DAB054 Capturing the Screen Page You can capture a screen or image displayed on the screen page. The captured screen or image is added to the page list. -
Page 47: Operating A Captured Page
Operating a Captured Page Operating a Captured Page The thumbnail of the added page is displayed in the page list. To display a captured page, touch the thumbnail of that page. CUE161 You can use your fingers to switch between captured pages. For details about how to use your fingers to switch between captured pages, see page 45 "Turning Pages". -
Page 48: Adding And Deleting A Page
2. Using the Machine as a Whiteboard Adding and Deleting a Page To add or delete pages, use the corresponding icons on the page operation panel. • If there are already 100 captured pages, , the New Page icon, or , the Page Copy icon, cannot be used. - Page 49 Operating a Captured Page Touch , the Page Copy icon. DAB020 A copy of the selected page is added immediately after the displayed page. The added page appears on the screen. Deleting a captured page You can delete a captured page while it is displayed. Display the page you want to delete.
-
Page 50: Changing The Display Magnification
2. Using the Machine as a Whiteboard Changing the Display Magnification There are two methods for changing the display magnification of a displayed page or moving the display area of an enlarged page. The first is to use your fingers, and the second is to use the pen. The result of the operation you perform is applied to all the devices sharing the remote whiteboard. -
Page 51: Changing The Display Magnification With The Pen
Changing the Display Magnification Moving a displayed area Touch the screen with two fingers, and while maintaining the same distance between them, move them up or down, or left or right. CUE151 The display area moves with the movement of your fingers. •... - Page 52 2. Using the Machine as a Whiteboard 2. Display area 3. Display magnification (%) Touch the display magnification. DEC021 To move the display area, touch and press down on the display area with the pen nib. While pressing down with the pen, drag it across the area. CUE174 •...
-
Page 53: Displaying A File Or Images From An Image Output Device And Writing Information
3. Displaying a File or Images from an Image Output Device and Writing Information This chapter explains how to display an image from an image output device or a file. Importing a File and Writing Information You can import and display a PDF or PowerPoint file on the screen and write information on it. You can also import a file saved by this machine, and add new strokes or edit existing strokes. -
Page 54: Importing A File
3. Displaying a File or Images from an Image Output Device and Writing Information • An imported PowerPoint file is saved as a PDF file. Importing a File When importing from a shared folder Before importing a file from a shared folder, register the folder. For details about how to register a shared folder, see page 141 "Managing a Shared Folder List". - Page 55 Importing a File and Writing Information • The selected PDF file can only be imported if its first page meets the page size condition. If the second or subsequent page of a PDF file does not meet the page size condition, only the preceding pages will be imported.
-
Page 56: Importing A Temporarily Saved File
3. Displaying a File or Images from an Image Output Device and Writing Information Displays the temporarily saved files. For details about how to import a temporarily saved file, see page 54 "Importing a Temporarily Saved File". • Shared Folder Displays the files in a shared folder registered to the machine. - Page 57 Importing a File and Writing Information Touch [Import]. DEC034 Touch "Temporary Save Folder". DEC036...
- Page 58 3. Displaying a File or Images from an Image Output Device and Writing Information Enter the meeting code. Touch [OK]. The saved files which correspond to the entered meeting code are listed. Select the file you want to import. Touch [Import]. Importing a temporarily saved file when the machine starts up You can import a temporarily saved file when the machine starts up or exits standby mode.
- Page 59 Importing a File and Writing Information Enter the meeting code. Touch [OK]. The saved files which correspond to the entered meeting code are listed. Select the file you want to import. Touch [Import].
-
Page 60: Displaying An Image From A Computer And Writing Information
3. Displaying a File or Images from an Image Output Device and Writing Information Displaying an Image from a Computer and Writing Information You can display the screen of a computer or tablet, or an image from an image output device, such as a document camera. - Page 61 Displaying an Image from a Computer and Writing Information Connect the computer to VGA Input or DisplayPort Input on the side of the display. CUE171 Switch the video output on the computer to display the computer screen on the whiteboard. To switch between image outputs on the computer, press the appropriate function key while holding down the [Fn] key.
-
Page 62: Switching The Display Screen
3. Displaying a File or Images from an Image Output Device and Writing Information Switching the Display Screen When you connect a device to VGA Input or DisplayPort Input, images from the connected device are displayed on the screen page. The screen automatically switches to the screen page when the device is connected to one of the ports. -
Page 63: Connecting Devices To Input And Output Terminals For Use With The Display
4. Connecting Devices to Input and Output Terminals for Use with the Display This chapter explains how to connect a video conferencing device to an input terminal and display images from the connected device. It also explains how to connect a projector to an output terminal and project the screen. - Page 64 4. Connecting Devices to Input and Output Terminals for Use with the Display Terminal Devices Connection method DisplayPort Input • Computer See page 58 "Displaying an Image from a Computer and Writing • Tablet Information". • Document camera VGA Input 2 Video conferencing device See page 63 "Displaying Images from a Video Conferencing Device".
-
Page 65: Displaying Images From A Video Conferencing Device
Displaying Images from a Video Conferencing Device Displaying Images from a Video Conferencing Device You can connect a video conferencing device and use the machine while displaying images from the connected device. DEC024 The video conferencing device is connected as follows: Turn off the video conferencing device. -
Page 66: Writing Information While Displaying Images From The Video Conferencing Device
4. Connecting Devices to Input and Output Terminals for Use with the Display • A displayed image from the video conferencing device will not be saved or printed. A displayed image from the video conferencing device cannot be recorded as a captured page. •... -
Page 67: Sharing A Screen During A Video Conference
Displaying Images from a Video Conferencing Device If the main operation panel is hidden by the subwindow, touch , the Move Main Operation Panel icon, and move the panel. You can move the displayed subwindow. For details about how to move the subwindow, see page 187 "Adjusting the Display". -
Page 68: Video Conferencing With The Whiteboard
4. Connecting Devices to Input and Output Terminals for Use with the Display If the main operation panel is hidden by the subwindow, touch , the Move Main Operation Panel icon, and move the panel. You can move the displayed subwindow. For details about how to move the subwindow, see page 187 "Adjusting the Display". - Page 69 Displaying Images from a Video Conferencing Device • The machine will automatically adjust the display area of a video conferencing device image when it is expanded to full screen. For details about how to adjust the display position, see page 187 "Adjusting the Display".
-
Page 70: Using A Projector To Project A Screen
We recommend connecting the projector to a digital terminal such as DVI or HDMI. A Ricoh projector which supports full-HD is recommended for use with the machine. Note that the machine does not support some Ricoh projector models. Supported models are as follows: •... - Page 71 Using a Projector to Project a Screen Use the display cable to connect a projector to DVI Output of the controller unit. DAB024 Use the projector to project the screen. For details about how to use a projector to project screens, see the corresponding manual that comes with the projector.
- Page 72 4. Connecting Devices to Input and Output Terminals for Use with the Display...
-
Page 73: Sharing The Screen
5. Sharing the Screen This chapter explains how to share screens with other devices connected via a network or accessed from a web browser. Overview of Remote Whiteboard You can share a screen with multiple devices connected via a network and perform operations on the shared screen. -
Page 74: Possible Combinations Of Hosting Modes And Participating Devices
5. Sharing the Screen • File saving and temporarily saving • Page printing • E-mail sending When you close or leave remote whiteboard, all pages are deleted. • Host session in a compatible mode In compatible mode, you can use the following devices and software to participate in a remote whiteboard. - Page 75 Overview of Remote Whiteboard Normal hosting (system Participating remote whiteboards running version 1.3.0.0 or Compatible mode later) System running version 1.3.0.0 or later System running version 1.1.27.0 or × earlier Projector with interactive functionality × Interactive Whiteboard Remote Viewer × Type 1 Web browser •...
-
Page 76: Opening A Remote Whiteboard Session
5. Sharing the Screen Opening a Remote Whiteboard Session • When opening a remote whiteboard session, depending on the participating devices, it may be necessary to open the session in compatible mode. For details about the possible combinations of hosting modes and participating devices, see page 72 "Possible Combinations of Hosting Modes and Participating Devices". -
Page 77: Opening A Remote Whiteboard Session In Compatible Mode
Opening a Remote Whiteboard Session DEC038 • If the "Open with passcode" check box is selected, set the passcode to open the session. • If the "Limit participating whiteboard's functions" check box is selected, the participating whiteboards cannot save files, print pages, or send e-mail during the session. •... - Page 78 5. Sharing the Screen Touch [Open]. DAB066 Touch "Options". DEC037 Select "Open in compatible mode". DEC039 Specify other conditions as needed. • If the "Open with passcode" check box is selected, set the passcode to open the session.
-
Page 79: Closing A Remote Whiteboard Session
Opening a Remote Whiteboard Session • If you select "Create image of all pages and distribute", the pages being used will be converted to images and displayed on the participating whiteboards. You cannot edit the strokes on the pages converted to images. •... - Page 80 5. Sharing the Screen Touch [Close Remote Whiteboard]. DAB072 When compatible mode is active, touch [Close]. When you exit compatible mode, the page displayed immediately before joining the remote whiteboard session is loaded as an image. Touch [Close].
-
Page 81: Participating In A Remote Whiteboard Session
Participating in a Remote Whiteboard Session Participating in a Remote Whiteboard Session • When you join a remote whiteboard session, all the pages that existed prior to joining the session are deleted and the contents of the host whiteboard are imported. Touch [Join] of , the Share icon. -
Page 82: Specifying The Remote Whiteboard Session To Join
5. Sharing the Screen • During a remote whiteboard session, the screen sharing status is displayed in the submenu of the Share icon. For details about how to view the submenu, see page 84 "Checking the Status during a Remote Whiteboard Session". Specifying the Remote Whiteboard Session to Join The following window is used to specify the remote whiteboard session you want to join: [Select from Contact List] tab... - Page 83 Participating in a Remote Whiteboard Session [Manual Entry] tab DAB078 1. Manual Entry Enter the IP address, host name, or fully qualified domain name of the host whiteboard. The touch keyboard appears when you touch the input field. 2. [Enter] Adds the entered IP address of the host whiteboard to the IP Address field.
-
Page 84: Leaving A Remote Whiteboard Session
5. Sharing the Screen [IP Address] DAB080 Lists the IP address specified in the [Select from Contact List] tab or [Manual Entry] tab. • When you touch [Join], the window closes and the machine connects to the host whiteboard. If there is a passcode set for the specified host whiteboard, enter the passcode. •... - Page 85 Participating in a Remote Whiteboard Session Touch [Leave Remote Whiteboard]. DAB082 If you are participating in a remote whiteboard session while compatible mode is active, touch [Leave]. When you exit compatible mode, the page displayed immediately before joining the remote whiteboard session is loaded as an image. Touch [Leave].
-
Page 86: Checking The Remote Whiteboard Status
5. Sharing the Screen Checking the Remote Whiteboard Status Checking the Status during a Remote Whiteboard Session When you touch , the Share icon, during a remote whiteboard session, the following submenu appears. The submenu indicates the status of the remote whiteboard. DAB084 1. - Page 87 Checking the Remote Whiteboard Status Icon of Icon compatible Communication status Communication speed mode Excellent 1.5 Mbps or more There is no problem viewing or operating Antenna 4 the shared whiteboard. Green Good 512 kbps–1.5 Mbps There is no problem viewing or operating Antenna 3 Blue the shared whiteboard.
- Page 88 5. Sharing the Screen...
-
Page 89: Using The Web Page To View A Shared Screen Or Download Files
6. Using the Web Page to View a Shared Screen or Download Files This chapter explains how to use a computer to access the Web page for the machine. It also explains how to view a remote whiteboard and download IWB Remote Desktop Software or temporarily saved files. -
Page 90: Things You Can Do On The Web Page
6. Using the Web Page to View a Shared Screen or Download Files • Up to 20 web browsers can access the machine at the same time. • You cannot access the Web page if the machine is in standby mode or the power is off. Things You Can Do on the Web Page View a remote whiteboard For details about how to view a remote whiteboard, see page 89 "Participating in a Remote... -
Page 91: Participating In A Remote Whiteboard Session And Viewing A Shared Screen
Participating in a Remote Whiteboard Session and Viewing a Shared Screen Participating in a Remote Whiteboard Session and Viewing a Shared Screen • To share a screen, you need to configure the network settings and add your Remote License. For details about how to configure the network settings, see page 123 "Configuring Network Settings". - Page 92 6. Using the Web Page to View a Shared Screen or Download Files • Close the web browser to quit viewing the remote whiteboard. • If the host whiteboard closes the remote whiteboard session, viewing automatically ends. • You can change the display magnification by using the zoom-in and zoom-out function of your web browser.
-
Page 93: Downloading Temporarily Saved Files
Downloading Temporarily Saved Files Downloading Temporarily Saved Files • To download a temporarily saved file, the meeting code entered when saving the file is required. For more details about the meeting code, see page 34 "Saving Pages Temporarily on the Machine". - Page 94 6. Using the Web Page to View a Shared Screen or Download Files Click [Download] for the file you want to download. DAB090 Rename the file, if necessary, and then click [Save]. • If you do not know the meeting code that was entered when the file was saved, you can find the meeting code on the Web page screen for managing temporarily saved files.
-
Page 95: Downloading Iwb Remote Desktop Software
Downloading IWB Remote Desktop Software Downloading IWB Remote Desktop Software Use your computer to access the Web page for the machine. For details about how to access the Web page, see page 87 "Accessing the Web Page". Click [Download Software] on the Web page. Click [Download]. -
Page 96: Managing All Temporarily Saved Files
6. Using the Web Page to View a Shared Screen or Download Files Managing All Temporarily Saved Files • For security reasons, make sure to change the initial administrator password. If you do not change the password, a message is displayed each time you open Administrator Settings. Use your computer to access the Web page for the machine. -
Page 97: Viewing The Temporarily Saved File Management Screen
Managing All Temporarily Saved Files Viewing the Temporarily Saved File Management Screen DAB096 1. Free Space Indicates the amount of free space and the maximum storage capacity of the space for temporarily saved files. 2. Number of Temporarily Saved Files Indicates the number of temporarily saved files and the maximum number of files that can be temporarily saved. - Page 98 6. Using the Web Page to View a Shared Screen or Download Files...
-
Page 99: Using Iwb Remote Desktop Software To Perform Operations On A Computer Screen
7. Using IWB Remote Desktop Software to Perform Operations on a Computer Screen This chapter explains how to install and use IWB Remote Desktop Software. The examples given in this manual are for Windows 7 unless otherwise noted. IWB Remote Desktop Software Overview After you install IWB Remote Desktop Software on your computer, you can display a computer screen via a network. -
Page 100: Installing And Uninstalling Iwb Remote Desktop Software
7. Using IWB Remote Desktop Software to Perform Operations on a Computer Screen Installing and Uninstalling IWB Remote Desktop Software The following operating environment is required to install IWB Remote Desktop Software on a computer: Item Specifications Operating system • Windows 8/Pro/Enterprise (32 bit/64 bit) •... -
Page 101: Uninstalling Iwb Remote Desktop Software
Installing and Uninstalling IWB Remote Desktop Software If .NET Framework 4 is not installed on your computer, click [Install]. If .NET Framework 4 has already been installed, the message [Install] does not appear. Proceed to the next step. Click [Next]. The software license agreement appears in the [License Agreement] dialog box. -
Page 102: Starting Iwb Remote Desktop Software
If you are using a computer that is running Windows 8, right-click where tiles are not displayed on the Start screen, and then click [All apps]. Select [Ricoh], and then click [IWB Remote Desktop Software]. If you are using a computer that is running Windows 8, proceed to the next step. -
Page 103: Closing Iwb Remote Desktop Software
Starting IWB Remote Desktop Software Change auto disconnection settings as needed. DEC041 • To disable auto disconnection while the machine is connected to a computer, clear the "Auto Disconnect" check box. • To enable auto disconnection while the machine is connected to a computer, open the pull- down menu, and then select the length of time the auto disconnect message is displayed. -
Page 104: Performing Operations On The Displayed Computer Screen
7. Using IWB Remote Desktop Software to Perform Operations on a Computer Screen Performing Operations on the Displayed Computer Screen You can perform operations on the displayed computer screen that is connected via a network. • When auto disconnection setting is enabled, the auto disconnect message is displayed at specified intervals. -
Page 105: Using Remote Viewer To Participate In A Remote Whiteboard Session
8. Using Remote Viewer to Participate in a Remote Whiteboard Session This chapter describes how to use Remote Viewer (Interactive Whiteboard Remote Viewer Type 1) to participate in a remote whiteboard session. Installing and Uninstalling Remote Viewer • Remote Viewer can participate in a session opened in compatible mode or by a machine running system version 1.1.27.0 or earlier. -
Page 106: Installing Remote Viewer On A Computer
• Log on to the computer as a user with administrator privileges to uninstall the software. On the [Start] menu, select [Control Panel]. Select [Programs and Features]. Click [Uninstall a program]. Select "RICOH Interactive Whiteboard Remote Viewer Type 1" and click [Uninstall]. Confirm the messages and click [OK]. -
Page 107: Starting Remote Viewer
When Remote Viewer starts up, the Remote Viewer screen is displayed in full screen. Click the [Start] menu on the computer to display the screen. From [All Programs], select [Ricoh], [Interactive Whiteboard Remote Viewer]. Click [Interactive Whiteboard Remote Viewer]. Viewing the Remote Viewer Screen 2012.11.01 22:08:37... - Page 108 8. Using Remote Viewer to Participate in a Remote Whiteboard Session 3. Launcher Switches between the Remote Viewer screen and the desktop. When you start Remote Viewer for the first time, the launcher appears at the upper left side of the screen. The display position of the launcher can be changed.
-
Page 109: Managing Remote Viewer
You can check the Remote Viewer settings by displaying the General Settings screen. Click the [Start] menu on the computer to display the screen. From [All Programs], select [Ricoh], [Interactive Whiteboard Remote Viewer]. Click [Settings]. The General Settings screen for Remote Viewer appears. The following icons are displayed on the General Settings screen: •... -
Page 110: Changing The Display Magnification Of Remote Viewer
8. Using Remote Viewer to Participate in a Remote Whiteboard Session Changing the Display Magnification of Remote Viewer Click , the Loupe icon, to change the display magnification, or to move a displayed area. The enlarged display area can be moved. Click , the Loupe icon. - Page 111 Changing the Display Magnification of Remote Viewer To move the display area, click and drag the display area. DAB107...
-
Page 112: Participating In A Remote Whiteboard Session From Remote Viewer
8. Using Remote Viewer to Participate in a Remote Whiteboard Session Participating in a Remote Whiteboard Session from Remote Viewer • Remote Viewer can participate in a session opened in compatible mode or by a machine running system version 1.1.27.0 or earlier. If you use a web browser instead of Remote Viewer, you can participate in a remote whiteboard session opened by a machine running system version 1.3.0.0 or later. -
Page 113: Leaving A Remote Whiteboard Session From Remote Viewer
Participating in a Remote Whiteboard Session from Remote Viewer [Manual Entry] tab • Specify the IP address of the host whiteboard by entering it manually. After entering the address, click [Enter]. A confirmation message about the history appears. If you do not want to keep the entered IP address in the history, click [Cancel] in response to the message. -
Page 114: Managing A Remote Contact List Of Remote Viewer
8. Using Remote Viewer to Participate in a Remote Whiteboard Session Managing a Remote Contact List of Remote Viewer A contact list contains the names and addresses of the devices using remote whiteboard. After a contact list has been added, you can select a host whiteboard from the list. Creating a Remote Contact List of Remote Viewer Use a text editor, spreadsheet software, or other similar application to create a contact list. -
Page 115: Importing A Remote Contact List Of Remote Viewer
Managing a Remote Contact List of Remote Viewer Importing a Remote Contact List of Remote Viewer • When the import is complete, the contact list is overwritten. Create a contact list, and then save the list to the root directory of a USB memory device. Insert the USB memory device into the computer. - Page 116 8. Using Remote Viewer to Participate in a Remote Whiteboard Session...
-
Page 117: Changing The Machine Settings
9. Changing the Machine Settings The machine settings can be changed in General Settings and Administrator Settings. This chapter explains how to configure the General Settings and Administrator Settings. Displaying the Desktop You can open General Settings or Administrator Settings from the desktop. The procedure for displaying the desktop is as follows: Press and hold down , the Close icon, with the pen nib. - Page 118 9. Changing the Machine Settings Icon Behavior Reference Turns the power off. PowerOFF Opens General Settings. See page 117 "Opening General Settings". Settings...
-
Page 119: Opening General Settings
Opening General Settings Opening General Settings To check the system information or adjust the touch sensor, open General Settings. Display the desktop. For details about how to display the desktop, see page 115 "Displaying the Desktop". Touch [Settings] two times in quick succession. •... -
Page 120: Opening Administrator Settings
9. Changing the Machine Settings Opening Administrator Settings Open Administrator Settings to configure machine settings such as network or date and time settings. • For security reasons, make sure to change the initial administrator password. If you do not change the password, a message is displayed each time you open Administrator Settings. -
Page 121: Administrator Settings Icons
Opening Administrator Settings Administrator Settings Icons Touch the icon with the pen nib to activate an icon in Administrator Settings. The operations performed with the activated icons are as follows: Icon Behavior Changes the System Settings. For details about how to configure the settings, see page 151 System Settings "Changing the System Settings". - Page 122 9. Changing the Machine Settings Icon Behavior Adds or deletes a remote license. This setting is necessary to use remote whiteboard. Add/Delete Remote License For details about how to add or delete a remote license, see page 129 "Adding or Deleting Your Remote License". Updates the system to the latest version.
- Page 123 Opening Administrator Settings Icon Behavior You can change the administrator password. Enter the current password together with the new password to Change Administrator Password change the password. Displays the touch keyboard. This keyboard is used to enter text, such as an e-mail address or Display Touch Keyboard password.
-
Page 124: Adjusting Touch Sensor Positions
9. Changing the Machine Settings Adjusting Touch Sensor Positions If the position detected when the screen is touched by the pen is out of place, you can adjust the touch sensor position. Touch , the Adjust Touch Sensor Position icon, in General Settings. A screen for sensor adjustment is displayed on the entire display screen. -
Page 125: Configuring Network Settings
Configuring Network Settings Configuring Network Settings Touch , the Network Settings icon, in Administrator Settings. Change the settings displayed in the window that appears. Touch [OK]. The machine restarts automatically. Network Settings Window Item Description Initial value Network Auto Settings Specify whether or not to configure the Network Selected Settings automatically. - Page 126 9. Changing the Machine Settings Item Description Initial value DNS Auto Settings Specify whether or not to configure the DNS Selected server settings automatically if you do not want to configure the Network Settings automatically. If you clear this check box, specify the following settings: •...
-
Page 127: Setting The Date And Time
Setting the Date and Time Setting the Date and Time Touch , the Set Date/Time icon, in Administrator Settings. Change the settings displayed in the window that appears. Touch [OK]. • If you select the link for time setting, Internet Explorer may open. If Internet Explorer opens, close it. -
Page 128: Configuring Region And Language Settings
9. Changing the Machine Settings Configuring Region and Language Settings You can configure region and language settings by touching , the Region and Language icon, in Administrator Settings. Check the message that appears, and then touch [OK]. Change the settings displayed in the window that appears. Touch [OK]. - Page 129 Configuring Region and Language Settings [Keyboards and Languages] tab Specify the keyboard language and text display language you want to use. [Administrative] tab Specify the language you want to use to display text from a program that does not support Unicode.
- Page 130 9. Changing the Machine Settings • If you select the link for language setting, Internet Explorer may open. If Internet Explorer opens, close it.
-
Page 131: Adding Or Deleting Your Remote License
Adding or Deleting Your Remote License Adding or Deleting Your Remote License Remote whiteboard is optional. To use remote whiteboard, Interactive Whiteboard Remote License Type 1 is required. Use Administrator Settings to register your license code. Adding Your Remote License Touch , the Add/Delete Remote License icon, in Administrator Settings. -
Page 132: Deleting A Remote License
9. Changing the Machine Settings DAB102 Deleting a Remote License Touch , the Add/Delete Remote License icon, in Administrator Settings. Touch [Delete]. Touch [OK] in the message that appears. , the Share icon, is disabled. -
Page 133: Configuring Smtp Server Settings
Configuring SMTP Server Settings Configuring SMTP Server Settings Touch , the SMTP Server Settings icon, in Administrator Settings. Change the settings displayed in the window that appears. Touch [OK]. • Windows CAL might be required to use the Windows server functionality on the SMTP server. For details about the Windows CAL license, see the Microsoft home page. -
Page 134: Settings For Using The Mail To Print Function
9. Changing the Machine Settings Item Description Initial value Security Specify whether or not to encrypt e-mails Not selected destined for the SMTP server with STARTTLS. Set Max Size for Attached Specify whether or not to split an attached file to Selected Files be sent. -
Page 135: Managing A Remote Contact List
Managing a Remote Contact List Managing a Remote Contact List A contact list contains the names and addresses of the devices using remote whiteboard. After a contact list has been added, you can select a host whiteboard from the list. Creating a Remote Contact List Use a text editor, spreadsheet software, or other similar application to create a contact list. - Page 136 9. Changing the Machine Settings 4. Group column Enter the group name of the host whiteboard. When you enter a group name, you can sort or filter the rows by group. The number of characters must be 255 or less. If you omit the name, a blank entry is added.
-
Page 137: Adding A Remote Contact List
• Name column: The entry is named "Projector". • Address column: "IK_PROJECTOR" is entered. • Group column: The entry is included in the group "RICOH". 4. Fourth entry (5th row) The host whiteboard with an IP address of "123.45.67.89" is registered. -
Page 138: Exporting A Remote Contact List
9. Changing the Machine Settings Touch [Import] of "Contact List". Select the saved contact list. Touch [OK]. Import of the contact list begins. When the import is complete, a message is displayed. Touch [OK]. Exporting a Remote Contact List Insert a USB memory device into a USB port on the side of the display. Insert only one USB memory device. -
Page 139: Managing An Email Address Book
Managing an Email Address Book Managing an Email Address Book If an email address book is added, you can select a destination e-mail address from the added email address book when saving and sending pages. Creating an Email Address Book Use a text editor, spreadsheet software, or other similar application to create an email address book. - Page 140 9. Changing the Machine Settings Save the file. • You can specify any name for a file. • Save the file as a Unicode little endian text file (.txt) with comma-separated values. • There are different character encodings for Unicode. If the file is saved as a non-Unicode little endian file, the file cannot be used.
-
Page 141: Adding An Email Address Book
The e-mail address "name3@mail.com" is registered. • Name column: The entry is named "User003". • Address column: "name3@mail.com" is entered. • Group column: The entry is included in the group "RICOH". 4. Fourth entry (5th row) The e-mail address "guest@mail.co.jp" is registered. -
Page 142: Exporting An Email Address Book
9. Changing the Machine Settings Touch [OK]. Import of the email address book begins. When the import is complete, a message is displayed. Touch [OK]. Exporting an Email Address Book Insert a USB memory device into a USB port on the side of the display. Insert only one USB memory device. -
Page 143: Managing A Shared Folder List
Managing a Shared Folder List Managing a Shared Folder List If a shared folder list is added, you can select a shared folder from the added shared folder list when saving pages and importing a file. • Shared folders only support CIFS format. They do not support SMB or NTFS format. •... - Page 144 9. Changing the Machine Settings 4. User column Enter the user name of the user allowed to access the shared folder. If you omit the name, a blank entry is added. The available characters are as follows: • Uppercase letters: A-Z •...
- Page 145 Managing a Shared Folder List Sample shared folder list Using a text editor such as Notepad to create a shared folder list DEC005 Using spreadsheet software such as Excel to create a shared folder list DEC010 1. First entry (2nd row) The shared folder "Folder01"...
-
Page 146: Importing A Shared Folder List
9. Changing the Machine Settings • Writable column: The entry is listed in the file list. Importing a Shared Folder List • When the import is complete, the shared folder list is overwritten. Create a shared folder list and save it to the root directory of a USB memory device. Insert the USB memory device containing the shared folder list into a USB port on the side of the display. - Page 147 Managing a Shared Folder List CUE170 Touch , the Added Data Management icon, in Administrator Settings. Touch [Export] of "Shared Folder List". Export of the shared folder list begins. When the export is complete, a message is displayed. Touch [OK].
-
Page 148: Collecting Logs
9. Changing the Machine Settings Collecting Logs The information that is saved in the collection of logs is as follows: • Start time • End time • Screen operations • Error occurrence information • Page saved times • Page saving destination information •... -
Page 149: Attaching The Log To E-Mail
Collecting Logs Touch [OK]. The log is saved to the root directory of the USB memory device. Touch [OK]. Attaching the Log to E-mail You must first configure the network and SMTP server settings to send a log by e-mail. For details about how to configure the Network Settings, see page 123 "Configuring Network Settings". -
Page 150: Updating Your System
9. Changing the Machine Settings Updating Your System You can update the system version by touching , the System Update icon, in Administrator Settings. Item Description [Update from Network] Checks and updates the latest version of the system via a network. For details about how to update the system, see page 148 "Updating the System Via a Network". - Page 151 Updating Your System Change the settings displayed in the window that appears. Touch [Set]. Update from Network window Item Description Initial value Check update on startup Specifies whether or not to update the system Selected automatically. If you select this check box, the system automatically checks for any available system updates when the machine starts up.
-
Page 152: Updating The System Using A Usb Memory Device
Updating the System Using a USB Memory Device Insert a USB memory device which contains the system file, and then update the system manually. The system file can be downloaded from the Ricoh home page. (http://www.ricoh.com/downloads/) • Do not turn off the main unit power while the system update is in progress. -
Page 153: Changing The System Settings
Changing the System Settings Changing the System Settings Touch , the System Settings icon, in Administrator Settings. Change the settings displayed in the window that appears. Touch [OK]. System Settings Window Item Description Initial value Whiteboard Location Name To change the name, touch [Change]. Specifies Blank the name of the location where the machine is installed. - Page 154 9. Changing the Machine Settings Item Description Initial value Auto Standby Time Specifies the time interval before the machine 30 minutes automatically enters standby mode. If no screens or images from the connected device are displayed on the machine, and if no operations are performed on the screen that is displayed, the machine will enter standby mode automatically when the set time interval elapses.
- Page 155 Changing the System Settings Item Description Initial value Auto hide the main Specifies whether to automatically hide the Auto Hide operation panel's IP following information displayed at the top of the address, host name, and main operation panel: passcode • IP address •...
-
Page 156: Changing The Print Settings
9. Changing the Machine Settings Changing the Print Settings Touch , the Print Settings icon, in Administrator Settings. Change the settings displayed in the window that appears. Touch [OK]. Print Settings Window Item Description Initial value Printer Address Sets the IP address of the printer. You also can enter Blank the host name. - Page 157 Changing the Print Settings Item Description Initial value Password If "User Authentication" is selected in "Print Blank Authentication", enter a password that consists of a character string of 0 to 128 characters. Encrypt If "User Authentication" is selected in "Print Not selected Authentication", specify whether or not to encrypt the entered information.
-
Page 158: Exporting And Importing Configuration Settings
9. Changing the Machine Settings Exporting and Importing Configuration Settings You can export and save the information set in Administrator Settings. The exported information can also be imported. • Do not edit an exported configuration file. If an edited configuration file is imported, the system will not work correctly. -
Page 159: Importing Configuration Settings
Exporting and Importing Configuration Settings CUE170 In response to the message that appears, touch [OK]. The export begins. The configuration information is exported to the USB memory device. When the export is complete, the name of the exported file is displayed. The exported file name is in the format "iwb-settings-system version-date-time.zip". - Page 160 9. Changing the Machine Settings CUE170 In response to the message that appears, touch [OK]. Select the file that you want to import from the displayed list and touch [OK]. The import will then begin. When the import is complete, a message for confirming restart is displayed.
-
Page 161: Restoring The Factory Default Settings
Restoring the Factory Default Settings Restoring the Factory Default Settings You can reset the settings changed in Administrator Settings to the factory default values. Settings other than the date/time, region, and language settings are reset to the factory default values. In addition, all the entered data and logs are deleted. - Page 162 9. Changing the Machine Settings...
-
Page 163: 10. Troubleshooting
10. Troubleshooting This chapter explains what to do when a message is displayed or when the machine cannot be operated as wanted. If a Message is Displayed during Operation The following table lists the main messages and their recommended actions. •... -
Page 164: Message Related To Sensor Adjustment
10. Troubleshooting Message Related to Sensor Adjustment Problem Causes Solutions During startup, the The sensor adjustment Wait a while until the message "Processing..." message is function may have started disappears. If a message prompting for displayed at the top of the automatically. - Page 165 If a Message is Displayed during Operation Message Causes Solutions A communication timeout • The network cable is • Check whether the network cable has occurred. not connected, or the is connected or the cable is cable is broken. broken. Please try again or contact your administrator.
- Page 166 10. Troubleshooting Message Causes Solutions A communication timeout • The network cable is • Check that the network cable is has occurred. not connected or is connected or is not broken. broken. Possible causes may be as • Check the network band width or follows.
-
Page 167: Error Messages Related To Pdf File Saving
If a Message is Displayed during Operation Error Messages Related to PDF File Saving Message Causes Solutions You do not have the You do not have the Configure the USB memory device authority to write to the authority to write to the USB properties to allow information to be mounted USB memory memory device. -
Page 168: Error Messages Related To Temporarily Saved Files
10. Troubleshooting Message Causes Solutions Failed to send the email. The • The network cable is • Check whether the network cable following are possible not connected, or the is connected, or the cable is causes. cable is broken. broken. Failed to connect to the •... -
Page 169: Error Messages Related To The System
If a Message is Displayed during Operation Message Causes Solutions The meeting code is • The specified meeting • Enter the meeting code set when incorrect code is incorrect. temporarily saving the file. Enter the correct meeting • There is no temporarily •... - Page 170 10. Troubleshooting Message Causes Solutions Cannot import because the The format of the e-mail Check whether any of the following email address format is address is invalid. apply: incorrect. • The e-mail address is left blank. Use the correct email •...
-
Page 171: Error Messages Related To Web Page
If a Message is Displayed during Operation Message Causes Solutions Returned to factory defaults. Instead of pressing the Open Administrator Settings and Make the settings again on power button normally, one reconfigure the machine settings. For administrator settings. of the following actions was details about Administrator Settings, performed to force the see page 118 "Opening Administrator... -
Page 172: Other Error Messages
10. Troubleshooting Other Error Messages Message Causes Solutions Applications on the desktop You are attempting to open The main screen, General Settings, or cannot be double started two of the following at the Administrator Settings are already same time: the main screen, running. -
Page 173: When You Cannot Use The Machine As You Want
When You Cannot Use the Machine As You Want When You Cannot Use the Machine As You Want This section explains what to do when the machine cannot be operated as you want. • The laser pointer light may be hard to see when it is pointed at the display. For details about the laser pointer, see the user manual for the laser pointer. -
Page 174: When Using The Pen
10. Troubleshooting Problem Causes Solutions The power button is pressed, There may be a problem Press and hold the power button to but the system does not shut with the system. force the system to shut down. down. An abnormal sound is heard There may be a problem Quickly press and release the power from the controller. -
Page 175: When Displaying An Image
When You Cannot Use the Machine As You Want Problem Causes Solutions The pen nib or pen bottom is The pen nib and pen bottom The decision to replace the pen nib or worn down. are consumables. pen bottom depends on how frequently the pen nib and pen bottom were pressed. - Page 176 10. Troubleshooting Problem Causes Solutions The display does not When no image appears on Display an image on the display and respond when the [Menu] the display, the display does press the [Menu] button. button is pressed. not respond even if the [Menu] button is pressed.
-
Page 177: When Using The System As A Whiteboard
When You Cannot Use the Machine As You Want When Using the System as a Whiteboard Problem Causes Solutions A stroke is not displayed at • There is something on • Do not leave a pen or another the correct position. the display frame. - Page 178 10. Troubleshooting Problem Causes Solutions A stroke is suddenly • Something other than • Keep anything other than the pen displayed in an unintended the pen is touching the from touching the display. direction halfway. display. • Do not leave anything that can •...
-
Page 179: When Using The System As A Monitor
When You Cannot Use the Machine As You Want When Using the System as a Monitor Problem Causes Solutions An image from the computer • The cable is not • Reconnect the cable. Secure the is not displayed. connected correctly. VGA cable to the receptacle with screws. -
Page 180: While Using Remote Whiteboard
10. Troubleshooting While Using Remote Whiteboard Problem Causes Solutions A connection is not The entered passcode is A different passcode is generated established although the incorrect. each time the machine starts up. To previously used passcode participate in a remote whiteboard has been entered. -
Page 181: When Printing
When You Cannot Use the Machine As You Want Problem Causes Solutions The Web page is not • The target device is not • Turn the target device on. displayed. running. • Enter the IP address displayed at • The specified IP the top of the screen of the target address is not correct. -
Page 182: When Exporting Or Importing Registration Data
10. Troubleshooting When Exporting or Importing Registration Data Problem Causes Solutions The email address book The email address book is Check that the email address book is cannot be imported. not created correctly. created correctly. For details about how to create an email address book, see page 137 "Managing an Email Address Book". -
Page 183: 11. Appendix
11. Appendix Maintenance Inserting a Battery into the Pen • For safe operation, follow the warnings below regarding the batteries used in the pen. If you use the batteries incorrectly, it may result in fire or injury due to batteries leaking or exploding. •... - Page 184 11. Appendix Remove the battery cover. CUE075 Insert the battery. Be careful not to insert the battery the wrong way. CUE076 Replace the battery cover. CUE082...
-
Page 185: Replacing The Pen Nib
Maintenance Replacing the Pen Nib • Use a pushpin or similar solid pointed tool to replace the pen nib. Be careful not to injure yourself. If the pen nib is worn down or broken, replace the pen nib with the included spare nib. This example describes how to replace the pen nib using a pushpin. -
Page 186: Replacing The Pen Bottom
11. Appendix When the pen nib is removed from the pen body, insert and press the new pen nib straight onto the pen body. CUE074 Do not twist when pressing the pen nib. This might cause the pen nib to break. Replacing the Pen Bottom •... -
Page 187: Cleaning The Display
Maintenance Slowly remove the pen bottom from the pen body so that the inserted pushpin does not detach from the pen bottom. CUE155 When the pen bottom is removed from the pen body, insert and press the new pen bottom straight onto the pen body. CUE156 Do not twist when pressing the pen bottom. - Page 188 11. Appendix CUE097...
-
Page 189: Adjusting The Display
Adjusting the Display Adjusting the Display To adjust the display, use the [Menu] button on the side to display the menu. CUE116 • If no button is pressed for 15 seconds, the menu automatically disappears. To hide the menu manually, press the [Menu] button again. •... -
Page 190: Adjusting The Position Or Size Of A Subwindow
11. Appendix Item Setting Initial value Value range Brightness Adjusts the brightness. 0–5 The brightness can also be adjusted by pressing the [ ] or ] button, regardless of whether the menu is displayed. Press the [ ] or [ ] button, and then select the item you want to adjust. - Page 191 Adjusting the Display Item Setting Initial value Value range PIP-PIP Size Selects the sub-window size Middle • Small displayed when the [PIP] button is (384 × 288) pressed. • Middle (480 × 360) • Large (576 × 432) PIP-PIP Position Adjusts the position of sub- Upper right windows displayed when the...
-
Page 192: Changing The Menu Settings
11. Appendix Adjusting the PIP position Press the [ ] or [ ] button, and then select "PIP". Press the [Input/Enter] button. Press the [ ] or [ ] button, and then select "PIP Position". Press the [Input/Enter] button. Press the [ ], [ ], [ ], or [... - Page 193 Adjusting the Display Using OSD rotation Press the [ ] or [ ] button, and then select "OSD Rotation". Press the [Input/Enter] button. Press the [ ] or [ ] button, and then select an angle of rotation. Press the [Input/Enter] button. To close the "Setting"...
-
Page 194: List Of Video Input Signals Supported By The Machine
11. Appendix List of Video Input Signals Supported by the Machine Input terminals of the machine are located in the following locations: DAB028 1. VGA Input 2. DisplayPort Input DisplayPort 1.1a compliant The video input signal must satisfy the following conditions: The signal must comply with one of the following VESA standards: •... - Page 195 List of Video Input Signals Supported by the Machine Frequency DisplayPort Signal format Resolution VGA Input (Hz) Input VESA CVT 640 × 480 VESA GTF 640 × 480 VESA DMT 640 × 480 VESA GTF 640 × 480 VESA DMT 640 ×...
- Page 196 11. Appendix Frequency DisplayPort Signal format Resolution VGA Input (Hz) Input VESA GTF 800 × 600 VESA DMT 800 × 600 VESA CVT 848 × 480 VESA GTF 848 × 480 VESA DMT 848 × 480 VESA CVT 1024 × 768 VESA GTF 1024 ×...
- Page 197 List of Video Input Signals Supported by the Machine Frequency DisplayPort Signal format Resolution VGA Input (Hz) Input VESA GTF 1280 × 720 VESA CVT 1280 × 720 VESA GTF 1280 × 720 VESA GTF 1280 × 768 VESA DMT/CVT (RB) 1280 ×...
- Page 198 11. Appendix Frequency DisplayPort Signal format Resolution VGA Input (Hz) Input VESA GTF 1280 × 1024 VESA DMT 1280 × 1024 VESA CVT 1280 × 1024 VESA GTF 1280 × 1024 VESA DMT 1280 × 1024 VESA CVT 1280 × 1024 VESA GTF 1280 ×...
- Page 199 List of Video Input Signals Supported by the Machine Frequency DisplayPort Signal format Resolution VGA Input (Hz) Input VESA DMT/CVT 1440 × 900 VESA GTF 1400 × 1050 VESA CVT 1600 × 900 VESA CVT (RB) 1600 × 900 VESA GTF 1600 ×...
-
Page 200: Trademarks
11. Appendix Trademarks Intel and Core are trademarks of Intel Corporation in the U.S. and / or other countries. Google Chrome and Android are trademarks of Google Inc. Safari, iPad, iPhone, and iOS are trademarks of Apple Inc., registered in the U.S. and other countries. Firefox is a registered trademark of the Mozilla Foundation. -
Page 201: About Added Or Changed Features
About Added or Changed Features About Added or Changed Features The following features are added or changed when the system is updated. For details about these features and their operations, see the corresponding reference for each feature. Version 1.3.0.0/1.3.20.0 Feature Description Reference Shared Folder... - Page 202 11. Appendix Feature Description Reference Print pages Use a printing device that supports See page 42 "Printing Universal Print Driver. Pages". DVI Output You can connect a projector that See page 68 "Using a supports full-HD to the machine to Projector to Project a project screens.
- Page 203 About Added or Changed Features Feature Description Reference Contact List • Host whiteboard names can be • See page 80 displayed in multiple languages. "Specifying the Remote Whiteboard Session to • Rows can be sorted or filtered by Join". group. •...
- Page 204 11. Appendix Feature Description Reference Email Address Book • Names of e-mail addresses can • See page 39 "Viewing be displayed in multiple the Screen Used to languages. Specify a Destination E- mail Address". • Rows can be sorted or filtered by group.
- Page 205 About Added or Changed Features Feature Description Reference , the Information display For version 1.3.20.0 See page 13 "Viewing the icon Screen". The host name, IP address, and passcode can be displayed or hidden. Duplicated application start For version 1.3.20.0 See page 161 "If a Message is Displayed A message is displayed when an...
- Page 206 11. Appendix Version 1.1.25.0 Feature Description Reference SMTP Server Settings • Added the SMTP authentication See page 131 "Configuring methods for sending e-mail. SMTP Server Settings". • Added an e-mail sender settings field so that the administrator can change the sender's e-mail address from the default.
-
Page 207: Index
INDEX Copyright Information......... Copyright Information icon........ Add................. Create image of all pages and distribute.... Add Remote Contact List icon......Add/Delete Remote License......Added Data Management......... Date..............Added Data Management icon..135, 136, 139, Delete............... 46, 47 140, 144 Delete All Pages and Open........Added or changed features....... - Page 208 Main operation panel........13, 105 Main operation panel icons......... HDMI..............Manage..............Hide icon............13, 105 Manual Entry tab........39, 80, 110 Host................ Marker..............Host name.............. Meeting code........... 34, 54, 91 Hosting mode............Menu button............Message.............. Move Main Operation Panel icon. 13, 64, 65, 105 Image quality............
- Page 209 Redo icon............... Stroke thickness............. Reducing strokes............ Submenu..............Region and Language........Subwindow........... 64, 188 Region and Language icon........ Supported Ricoh projector models...... Region and Language Settings......Switch..............Remote contact list........112, 133 System Settings........... 119, 151 Remote Contact List Management icon.....
- Page 210 Version Information..........Version Information icon........VGA Input..........58, 61, 192 VGA Input 2............ 61, 63 Video conferencing device........Video input signal..........Web browser............Web page.............. Whiteboard............Whiteboard Location Name......Windows CAL..........131, 141 Writing information..........Zoom navigator............. Y300-7511B...
- Page 212 Y300-7511B © 2014 Ricoh Co., Ltd.