Accu-Chek Active User Manual
Blood glucose monitor
Hide thumbs
Also See for Accu-Chek Active:
- Quick start manual ,
- Instructions for use manual (135 pages) ,
- User manual (72 pages)
Table of Contents
Advertisement
Advertisement
Table of Contents

Related Manuals for Accu-Chek Accu-Chek Active


Summary of Contents for Accu-Chek Accu-Chek Active
- Page 1 Prüfmittel-Nr. 43 IX CCU- ® Active BLOOD GLUCOSE MONITOR User’s Manual 0088 ACCU-CHEK and SOFTCLIX are trademarks of a Member of the Roche Group. Roche Diagnostics GmbH D-68298 Mannheim, Germany www.accu-chek.com 015134 AccuChek Active_Eng.indd u2-u3 12.08.2004, 14:53:54...
-
Page 2: Table Of Contents
Contents Please read this manual carefully and completely before performing the first measurement. Should you have any questions, please contact one of our customer support and service centres. You will find a list of addresses in Chapter 9.4. On packaging, on the type plate and in the User’s Manual you may Introduction encounter the following symbols, shown here with their meaning: The monitor’s main features at a glance... - Page 3 Implausible results Out-of-monitor dosing Summary: All the display messages on your Testing by healthcare professionals Accu-Chek Active monitor About the display messages Using Accu-Chek Active as an electronic diary Messages and symbols Results memory Troubleshooting Retrieving results Possible sources of error...
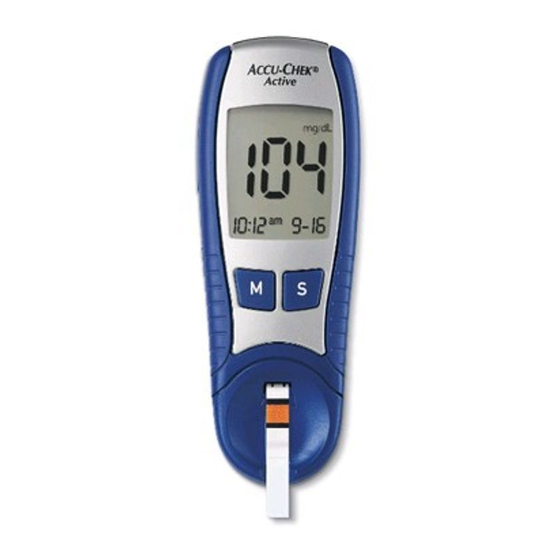
- Page 4 Parts summary Accu-Chek Active Parts summary Accu-Chek Active Liquid crystal display (LCD) M(emory) button S(et) button Test strip slot with switch Measurement optics Test strip guide Battery compartment Battery Coding chip 015134 AccuChek Active_Eng.indd 4-5 12.08.2004, 14:54:05...
- Page 5 Parts summary Accu-Chek Active Parts summary Accu-Chek Active Coding chip slot Infrared interface 015134 AccuChek Active_Eng.indd 6-7 12.08.2004, 14:54:06...
-
Page 6: Introduction
Your Accu-Chek Active blood glucose monitor is a state-of-the art Testing in record time: With a testing time of about precision instrument that will enable you to test your blood glucose 5 seconds, your Accu-Chek Active is one of the fastest blood simply and with confidence. glucose monitors available. - Page 7 Out-of-monitor dosing: After activating the test cycle you may Intelligent power supply: Accu-Chek Active shuts off automati- remove the test strip to apply blood (e.g. from an earlobe), cally after 1–2 minutes of non-use. Naturally, all of your results and then insert it again in the monitor.
-
Page 8: About This User's Manual
We recommend that you start by familiarizing yourself with all of the elements of your Accu-Chek Active shown on pages 4–7 of this Please read carefully all text in this manual that is preceded by the manual. Practise all of the operations described in this manual, and following symbols: also practise testing. -
Page 9: Modes
2.1 Test Mode As you will have gathered, your Accu-Chek Active monitor can do This is the main mode in which you will use your Accu-Chek Active much more than just measure blood glucose. It offers a number monitor and is used exclusively for testing your blood glucose. -
Page 10: Memory Mode
You can choose the format in which you wish the date and time to be displayed. Your Accu-Chek Active monitor can calculate the average of your glucose results over the last 7 or 14 days. You can enter the date and time (required once only). -
Page 11: Initial Steps Before Testing
3.1 After opening the pack Accu-Chek Active is sold complete with one lithium battery already When you turn on your Accu-Chek Active monitor for the first time, inserted. A plastic film protects the battery against becoming it has the following settings (which you can change): drained prematurely. - Page 12 If you see the correct unit, please enter the date and time as described below. Only then can your results be properly saved When you first turn on your Accu-Chek Active, please be sure to in “memory” with the correct date and timestamp.
-
Page 13: Turning The Monitor On In Set Mode
3.2 Basic settings Turning the monitor on in Set Mode You use only the M and S buttons on the front of your Accu-Chek Active to enter the desired settings. Briefly press the S button (for less than 3 seconds). Accu-Chek Active is now turned on and in Set Mode. - Page 14 3.2 Basic settings The way in which the date and time are displayed from here on depend on the chosen display format. If you wish to change the time display format, press the M button now. This allows you to choose between 24h and 12h display format.
-
Page 15: Setting The Date And Time
3.2 Basic settings Setting the date and time The procedure for setting the date and time is essentially the same for all units of time (day, hour, etc.): Use the S button to select the unit of time you wish to change. The unit will flash, indicating that it is ready to be changed. - Page 16 3.2 Basic settings Confirm the setting by pressing the S button again. The display moves on automatically to the next unit of time, which again flashes. Use the same procedure to set all the remaining units of time. The date and time are set in the following sequence: hours –>...
-
Page 17: Setting The Beep Tone
Press the S button to complete the settings procedure. Check that all the settings now shown on the display are correct. Press the S button again to turn off your Accu-Chek Active monitor. If any of the settings are incorrect, you may repeat the settings procedure (after turning the monitor on again). -
Page 18: Coding
3.3 Coding The properties of the Accu-Chek Active test strips you use with the Each time you open a new pack of test strips, you will need monitor may differ very slightly from one pack to another (because to insert the coding chip that came with that pack into your of lot-to-lot differences). -
Page 19: Inserting The Coding Chip
3.3 Coding Inserting the coding chip When coding, leave your Accu-Chek Active monitor turned off. Take the new coding chip from the pack of test strips. Gently slide the coding chip into the slot on the side of the ➉... -
Page 20: Measuring Blood Glucose With Your Accu-Chek Active Monitor
Chapter 6. A quality control test is carried out in the same way as a normal test, but with control solution the pack of Accu-Chek Active test strips you took the coding (a standardized glucose solution) instead of blood. -
Page 21: Testing Blood Glucose 38
4.3 Testing blood glucose Check the round control window on the back of the test strip with the colour scale printed on the test strip container. The colour of the control window must match that of the colour interval at the top (0 mg/dL / 0 mmol/L). - Page 22 4.3 Testing blood glucose The monitor carries out a display test (for details see page 87), then shows the code number. Is this the number printed on the test strip container? If not, check that you really did insert the coding chip from the new pack.
- Page 23 When the display test has been successfully completed and the code number matches, your Accu-Chek Active monitor is ready for testing. The flashing drop symbol is your cue to apply a drop of blood (within two minutes).
-
Page 24: In-Monitor Dosing
Use the lancing device to prick the side of the massaged fingertip. Your Accu-Chek Active monitor beeps briefly (provided the beep tone is enabled) to acknowledge application of blood and to Without pressing too hard, encourage a small drop of blood announce the start of testing. - Page 25 4.3 Testing blood glucose The hourglass symbol indicates that testing is in progress. The monitor beeps again after about 5 seconds to signal that the test is complete. The result appears in the display and is automatically saved together with the date and time. Remove the test strip from the monitor, which will now auto- matically turn off.
-
Page 26: Plausible Results
4.3 Testing blood glucose Plausible results Your Accu-Chek Active monitor measures blood glucose within a defined range (10-600 mg/dL or 0.6-33.3 mmol/L). Values outside this range are displayed as “Lo”- meaning the result is less than 10 mg/dL or 0.6 mmol/L - or “Hi”- meaning the result is greater than 600 mg/dL or 33.3 mmol/L. - Page 27 4.3 Testing blood glucose Turn over the test strip to reveal the round control window on the back. On the label of the test strip container is a colour scale with blood glucose values printed alongside. Select the blood glucose value that best approximates the reading you obtained.
-
Page 28: Implausible Results
Have the test strips expired? the following: Have the test strips been kept under suitable temperature With your Accu-Chek Active monitor, are you using only conditions (i.e. not in a car in very hot or cold weather)? Accu-Chek Active test strips? If the answer to all these questions is “yes”, carry out a quality... -
Page 29: Out-Of-Monitor Dosing
4.3 Testing blood glucose Out-of-monitor dosing The test procedure is mostly identical with “Testing blood glucose” on page 38. Follow the instructions given there up to the point where you are instructed to apply blood. Clean and massage the site you intend to collect blood from (for example, an ear lobe). - Page 30 4.3 Testing blood glucose Pull the strip out of the monitor. The two symbols (blood drop Apply the drop of blood to the middle of the orange-coloured and test strip) are flashing. You now have 20 seconds to apply pad. It is OK to touch this application area when applying blood, blood to the test strip and re-insert it before the monitor but do not attempt to spread the blood.
-
Page 31: Testing By Healthcare Professionals
Gently push the test strip back into the test strip slot of your 4.3 Testing blood glucose Accu-Chek Active monitor, until you feel it click into place. Your Accu-Chek Active monitor beeps briefly to acknowledge application of blood and to announce the start of testing. -
Page 32: Using Accu-Chek Active As An Electronic Diary
Using Accu-Chek Active as an electronic diary 5.1 Results memory Your Accu-Chek Active monitor has a 200-value memory for saving In addition to results, your monitor also stores all relevant additional results together with date and time. You do not need to save a information and display messages. -
Page 33: Retrieving Results
5.2 Retrieving results To use the memory functions of your Accu-Chek Active monitor, you must turn it on in Memory Mode. Briefly press the M button (for less than 3 seconds). In the display you see the following: at top left, “mem” (short for “memory”) followed by the most recent result (in memory location “1”),... - Page 34 5.2 Retrieving results To recall earlier results (in memory locations 2-200): Press the S button once to move back one result in time. As long as you keep the button pressed, the number of the memory location is displayed. As soon as you release the button, the result appears.
-
Page 35: Finding The 7 Or 14 Day Average
7 or 14 days. Start by pressing the M button to turn on your Accu-Chek Active monitor in Memory Mode. Then press the M and S buttons at the same time. The display shows “7 day ave” at top right. The figure shown is the average of glucose results for the last 7 days. - Page 36 5.2 Retrieving results Then press the M and S buttons again at the same time. The display changes; the figure shown is now the average value for the last 14 days. To exit from the “average” screen, press the S button. The display reverts to the last result shown before the average value.
-
Page 37: Erasing Results From Memory
Clearing the current value: longer than 3 seconds Turn on your Accu-Chek Active monitor by keeping the S button pressed for longer than 3 seconds. The display shows “Clr” and “mem” (flashing). - Page 38 5 seconds. You will hear 5 beeps. All information relating to the current result is cleared and set to zero. The memory location remains occupied. Your Accu-Chek Active monitor turns off automatically after you have cleared the result. 015134 AccuChek Active_Eng.indd 72-73...
-
Page 39: Downloading Data To A Pc
Data can only be evaluated on a PC as long as you have set the full date and time (see Chapter 3.2). General information Your Accu-Chek Active monitor has an inbuilt infrared interface about data downloading (see illustration on pages 6–7), permitting cordless data down- loading to a suitably equipped PC. -
Page 40: Downloading Procedure
Point the two infrared windows towards one another. longer than 3 seconds Turn on your Accu-Chek Active monitor by keeping the M button pressed (for longer than 3 seconds) until “PC” appears flashing in the display. This indicates the monitor is ready to communicate. - Page 41 During active downloading, “PC” remains constant in the display On completion of downloading, “End” appears in the display. Following the download you can turn off your Accu-Chek Active monitor with the M button, if the PC has not already shut down the monitor.
-
Page 42: Checking Accu-Chek Active
6.1 Quality control testing with control solution To ensure your results are always dependable, you must periodically after you have opened a new pack of Accu-Chek Active test check the performance of your Accu-Chek Active monitor. strips and consequently replaced the coding chip,... -
Page 43: Preparing For The Quality Control Test
6.2 Preparing for the quality control test For the quality control test, please have the following items ready: your Accu-Chek Active monitor with the coding chip inserted, the pack of Accu-Chek Active test strips you took the coding chip from, the Accu-Chek Active Control solutions. -
Page 44: Quality Control Test Procedure
Inserting the test strip automatically puts the monitor in Test Mode. against the colour scale printed on the test strip container. Please remember that your Accu-Chek Active monitor automatically The colour of the control window must match that of the turns off after about 1–2 minutes of non-use (i.e. - Page 45 6.3 Quality control test procedure The monitor performs a display test lasting 2 seconds. Check that all the segments making up the numerals (“ ” or “ ”) are properly displayed. If a segment is missing, 88.8 test results may be displayed inaccurately (e.g. through being confused with ).
- Page 46 6.3 Quality control test procedure When the display test has been successfully completed and the code number matches, your Accu-Chek Active monitor is ready for testing. The display screen that follows signals: That the test strip has been inserted. The flashing drop symbol is your cue to apply the control solution (blood in the case of a real test).
- Page 47 Apply one drop of the selected control solution to the test pad of the strip. Your Accu-Chek Active monitor beeps briefly to acknowledge application of solution and to announce the start of testing. After 5 seconds a second beep tone indicates that testing is complete, and the result appears in the display.
- Page 48 6.3 Quality control test procedure If you performed the test with Accu-Chek Active Control 1, refer to row 1 for the permitted range. If you performed the test with Accu-Chek Active Control 2, refer to row 2 for the permitted range.
- Page 49 If the colours are a close match, quality control testing of your Accu-Chek Active monitor has been successfully concluded. The monitor is now ready to perform further blood glucose tests. If the measurement optics or any other part of your Accu-Chek Active become soiled during testing, please clean the monitor as instructed in Chapter 7.1.
-
Page 50: Performing A Full Display Check
Press any key to terminate the display test and turn off your Accu-Chek Active monitor. If you do not press a key, the monitor will shut off automatically after about 2 minutes. 015134 AccuChek Active_Eng.indd 96-97... -
Page 51: Keeping Your Monitor In Tip-Top Condition
Keeping your monitor in tip-top condition 7.1 Cleaning your Accu-Chek Active monitor Your Accu-Chek Active monitor has no moving parts and so will Accu-Chek Active utilises an optical measuring method that relies not suffer any mechanical wear and tear. As with any precision heavily on all of its components being clean. - Page 52 7.1 Cleaning your Accu-Chek Active monitor Clean the measurement optics carefully with nothing other than cold water, soft lint-free cloths and cotton swabs. For disinfec- tion you may use 70 % alcohol. Any other cleaning agents may damage the monitor or impair its measuring function.
- Page 53 7.1 Cleaning your Accu-Chek Active monitor Wipe the measurement optics components with a soft lint- free cloth and/or a cotton swab. The cloth/cotton swab may be slightly moistened with water or 70% alcohol. Make sure that no liquid enters the monitor itself. Avoid scratching the measurement optics, as this will impair the measuring function.
-
Page 54: Cleaning And Disinfection In The Professional Area
A potential infection risk exists. Medical staff and other persons using Accu-Chek Active to test blood glucose from more than one patient must be aware that any item coming into contact with human blood is a potential source of infection. -
Page 55: Battery Life And Battery Replacement
(cold surroundings) can affect its performance even further. Insert a new battery into the monitor as follows: Turn your Accu-Chek Active monitor over. At the top you see the recess for opening the battery compartment cover. Use your thumb to slide the cover out of the monitor. -
Page 56: Measurement And Storage Conditions
(between +5 °C and +10 °C or +40 °C and +45 °C), but the result should be interpreted with caution. A is displayed. Remove the battery if your Accu-Chek Active monitor is to remain unused for some time. Tests cannot be performed if the temperature is below (under +5 °C) or above (over +45 °C) these limits;... - Page 57 Relative humidity must be below 85%. Never try to speed up warming or cooling of your Accu-Chek Active Sudden changes in temperature cause condensation within the monitor artificially (e.g. by placing it on a radiator or in a refrige- monitor.
-
Page 58: Summary: All The Display Messages On Your Accu-Chek Active Monitor
Summary: All the display messages on your 8.2 Messages and symbols Accu-Chek Active monitor 8.1 About the display messages When you use your Accu-Chek Active monitor, various letters and This message appears ... and means: symbols will appear on the display, at times also error messages. - Page 59 8.2 Messages and symbols This message appears ... and means: This message appears ... and means: in Test Mode The ambient temperature during testing The test is in progress. ● ● ● ● when the result is displayed is/was close to the limit ●...
-
Page 60: Troubleshooting
Please move to another The wrong coding chip is inserted. This coding location. chip does not belong to Glucose test strips from the Glucotrend or Accu-Chek Active blood glucose systems. Remove this coding chip, insert the correct coding chip. (flashing) in Test Apply a drop of blood ●... - Page 61 The coding chip is missing or has a fault. blood to the strip. Repeat the test with a new Accu-Chek Active test strip. The Accu-Chek Active monitor has a fault and cannot be used. Please call your customer support The measurement optics are dirty or you have and service centre.
-
Page 62: Possible Sources Of Error
Are the test strips and/or control solution still within the stated implausible results, please check the following: expiry date? With your Accu-Chek Active monitor, are you using only Have you cleaned your Accu-Chek Active monitor (especially Accu-Chek Active test strips? the test strip guide and measurement optics) as instructed in Chapter 7.1? -
Page 63: Appendix
When using different specimen material please refer to the Interface infrared interface, LED/IRED package insert that came with the Class 1 Accu-Chek Active test strips. System operating temp. 10–40 °C Measuring range 10–600 mg/dL (0.6–33.3 mmol/L) Atmospheric humidity up to 85% relative humidity Measuring time approx. -
Page 64: System Components
These are available from your pharmacist. Softclix Pro lancing device and special lancets Accu-Chek Softclix Pro Lancet. For quality control testing of your Accu-Chek Active monitor use only Accu-Chek Active Control solutions (see Chapter 6). For virtually pain-free blood sampling we recommend the All of the system components are carefully matched. -
Page 65: Guarantee
Some problems, however, cannot be solved over the phone, in which case you will be asked to send your Accu-Chek Active monitor together with the test strips you used and (if applicable) the completed warranty card to your local Roche Diagnostics represen tative. -
Page 66: Addresses
9.5 Addresses Argentina Chile Ecuador Hungary Productos Roche S.A.Q. e I. - Productos Roche Ltda. Roche Ecuador S.A. Roche Magyarország Kft. DIAGNOSTICS DIVISION Avda. Quilín 3750 Av. Gaspar de Villarroel 1701 H-2040 Budaörs, Edison u. 1. Rawson 3150, B1610BAL Ricardo Rojas -... - Page 67 Peru Singapore Taiwan Roche Diagnostics (M) Sdn Bhd Productos Roche QFSA Roche Diagnostics Asia Pacific Pte. Ltd Roche Diagnostics Ltd. Infinite Centre 1, 1st Floor, Lot 1, Jalan 13/6 Av. Javier Prado Este 1921 298, Tiong Bahru Road 11F, No. 35 Sec.
-
Page 68: Alphabetical Index
10. Alphabetical index Ambient temperature 114, 119 Enabling and disabling the beep tone Atmospheric humidity 111, 123 Erasing results 71ff. Average value 10, 67ff., 93, 115 Error messages/error symbols 112-119 Battery 5, 18, 81, 106ff. Infrared cable 75, 77 Battery capacity 11, 114, 123 Infrared interface 7, 9, 75, 123... - Page 69 10. Alphabetical index Saving results Service 51, 87, 25ff. Set Mode 17, 23ff Setting the date 25ff. Setting the time 25ff. Setting the year Shut-off time 11, 39, 85, 123 Shut-off, automatic 47, 73, 93, 97, 123 Special testing situations 55, 59 Storage conditions 109ff., 120...
- Page 70 Warranty Card Name Street City/post code Telephone No. Date Signature 015134 AccuChek_Garantie_Eng.indd 1 12.08.2004, 14:46:21...
- Page 71 Accu-Chek Active Warranty Card Please let this card be completed by the dealer and preserve it carefully. If this card was not filled out at the time of purchase please submit the original receipt with your claim. Serial-No. The statutory guarantee provisions governing the sale of Date of purchase consumer goods in the country of purchase shall prevail.