Ricoh D5500 Quick Start Manual
Interactive whiteboard
Hide thumbs
Also See for D5500:
- Operating instructions manual (224 pages) ,
- Read this first manual (48 pages) ,
- User manual (48 pages)
Table of Contents
Advertisement
Quick Links
Advertisement
Table of Contents

Related Manuals for Ricoh D5500


Summary of Contents for Ricoh D5500
- Page 1 Quick Start Guide...
-
Page 2: Table Of Contents
Adding a new page ..................................11 Deleting pages ................................... 11 Duplicating pages ..................................11 Exiting Meeting ..................................11 Using the D5500 To Remotely Operate Your PC Installing Software ..................................14 Initiating Connection between PC and D5500 .......................... 15 Ending Connection ..................................15 Collaboration Starting Meeting from Host ............................... - Page 3 Quick Start - Stand-alone Usage...
-
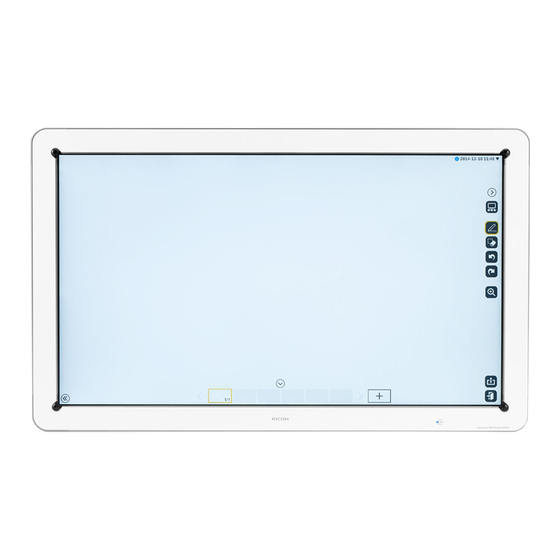
Page 4: Interactive Whiteboard Functionality Overview
18. Information Display 17. Auto Firmware Download Display IP address, and Pass code to Check and Download new IWB firmware automatically connect from other IWB, and PC 1. Remote Screen Share Share screen with other IWB and PC 2. Remote PC Operation 3. -
Page 5: Choosing Pen Style
1. Turn on the power switch by the line cord and then press the power button on the front of the D5500 Soft Power Switch found Main power Switch found by power cord 2. Wait for Ready To use Message to be displayed 1. -
Page 6: Erasing / Modifying Writing
2. Erasing / Modify Writing Click on the Erase / Modify Icon using the pen, •Erase complete line Erase Segment of line Select area for moving / resizing Use the rear side of the pen to erase 3. Undo / Redo Using the Pen, click on the Undo / Redo icons 1. -
Page 7: Email
4. Email Whiteboard Click on the eMail Icon using the pen, To use email feature, SMTP server must be setup in the Admin settings. When selected, the pages will be converted to a PDF file and emailed. Pre-configured email addresses are displayed ... -
Page 8: Saving A File
6. Saving a file Using the Pen, click on the file icon All the pages can be saved together to a USB memory device or in a shared folder. They can also be saved temporarily on the ma- chine. The pages are saved in PDF format. Select location to save your file If you select Temporary, you will be required to create a password. -
Page 9: Using Finger To Highlight
7 Using Finger to highlight screen You can drag your finger across any image on the screen to temporarily highlight a key point. 8. Using Finger to zoom in or move image Touch the screen with your fingers to change the display magnification of a displayed page or to move the display area of an en- larged page. -
Page 10: Printing
9. Printing Using the Pen, click on the Print icon One or all pages can be printed using a preconfigured Ricoh printer or MFP. Click on the print icon and select if it is color or B&W, paper size, number of prints and one or all pages. -
Page 11: Capturing Active Screen To New Page
11. Capturing screen to new page With the page / image on the screen, click on the capture icon and the screen will be captured as a new page. Duplicate Delete page Add Page Capture 12. Adding new page To add a new page, click on Add page icon on the bottom of the page (up to 99 pages can be added. 13. -
Page 12: Using The D5500 To Remotely Operate Your Pc
Quick Start - Using the D5500 To Remotely Operate Your PC... - Page 13 After you install IWB Remote Desktop Software on your computer, you can display your computer screen via a network. You can also perform operations on the computer screen from the display of the machine.
-
Page 14: Installing Software
1. Install the IWB Remote Desktop Software (First Time User) A) From the PC, use your Web browser to connect to the IWB’ s IP address and select “Download Software”. B) Click on download and Run C) After the application is downloaded, it will start the installation process. -
Page 15: Initiating Connection Between Pc And D5500
D) After the application is installed, double click on the icon to launch the application. 2. To connect the PC to the whiteboard, enter the IP address of the whiteboard and the password that is dis- played in the information area. You can also set an auto disconnect time . 3. - Page 16 Quick Start - Collaboration...
- Page 17 As an option, the D5500 can connect to up to a combination of 4 other D5500’s or Ricoh interactive projec- tors. Each D5500 in the meeting can have up to 20 devices viewing the meeting through the boards web portal.
-
Page 18: Starting Meeting From Host
Host will need to provide IP Address and Password From the Host D5500 to attendees. 1. Turn on the D5500 and confirm it is connected to the network. 2. Using the Pen select the meeting icon and select “Open” select options to require password to be used. -
Page 19: Joining Meeting From Other D5500
Joining a Remote Meeting From an additional D5500 1. Turn on the D5500 and confirm it is connected to the network. 2. Using the Pen select the meeting icon and select “Join” 3. After connecting, you will be prompted on the time it will take to download the existing meeting pages. -
Page 20: Viewing A Meeting From A Web Browser
You can connect to a shared meeting as a viewer from any device with a web browser. 1. After the Host starts a meeting, using the devices web browser, navigate to the IP address of the D5500. 2. Select Participate in Remote Whiteboard...