Table of Contents
Advertisement
2.5 HP CHIPPER/SHREDDER
Model 92281
ASSEMBLY AND OPERATING INSTRUCTIONS
®
3491 Mission Oaks Blvd., Camarillo, CA 93011
Visit our Web site at: http://www.harborfreight.com
TO PREVENT SERIOUS INJURY,
READ AND UNDERSTAND ALL WARNINGS
AND INSTRUCTIONS BEFORE USE.
©
®
Copyright 2004 by Harbor Freight Tools
. All rights reserved. No portion of this
manual or any artwork contained herein may be reproduced in any shape or form
without the express written consent of Harbor Freight Tools.
For technical questions, please call 1-800-444-3353.
Advertisement
Table of Contents

Related Manuals for Chicago Electric 92281


Summary of Contents for Chicago Electric 92281
- Page 1 Copyright 2004 by Harbor Freight Tools . All rights reserved. No portion of this manual or any artwork contained herein may be reproduced in any shape or form without the express written consent of Harbor Freight Tools. For technical questions, please call 1-800-444-3353.
-
Page 2: Product Specifications
When unpacking, check to make sure all the parts shown on the Parts Lists on page 16 are included. If any parts are missing or broken, please call Harbor Freight Tools at the number shown on the cover of this manual as soon as possible. -
Page 3: Work Area
Do not use a power tool while tired or under the influ- ence of drugs, alcohol, or medication. A moment of inattention while operat- ing power tools may result in serious personal injury. SKU 92281 For technical questions, please call 1-800-444-3353. WORK AREA... - Page 4 Do not use a damaged tool. Tag damaged tools “Do not use” until repaired. Check for misalignment or binding of moving parts, breakage of parts, and SKU 92281 For technical questions, please call 1-800-444-3353. TOOL USE AND CARE...
-
Page 5: Grounded Tools: Tools With Three Prong Plugs
(See Figure A, next page.) SKU 92281 For technical questions, please call 1-800-444-3353 SERVICE... -
Page 6: Extension Cords
If you are using one extension cord for more than one tool, add the nameplate amperes and use the sum to determine the required minimum cord size. (See Figure B.) SKU 92281 For technical questions, please call 1-800-444-3353 EXTENSION CORDS... - Page 7 7.1-12.0 12.1-16.0 16.1-20.0 *Based on limiting the line voltage drop to five volts at 150% of the rated amperes. FIGURE B FIGURE C SKU 92281 For technical questions, please call 1-800-444-3353. (115 VOLT) EXTENSION CORD LENGTH FEET FEET SYMBOLOGY Double Insulated...
-
Page 8: Specific Safety Rules
Maintain labels and nameplates on the Chipper/Shredder. These carry important information. If unreadable or missing, contact Harbor Freight Tools for a replacement. Use the right product for the right job. There are certain applications for which this product was designed. Do not use small equipment, tools, or attach- ments to do the work of larger industrial equipment, tools, or attachments. - Page 9 Do not force limbs into the Blades (15) when cutting. Apply moderate pres- sure, allowing the Blades to cut without being forced. Never attempt to remove material stuck in the moving parts of the Chipper/ Shredder while it is plugged in.
-
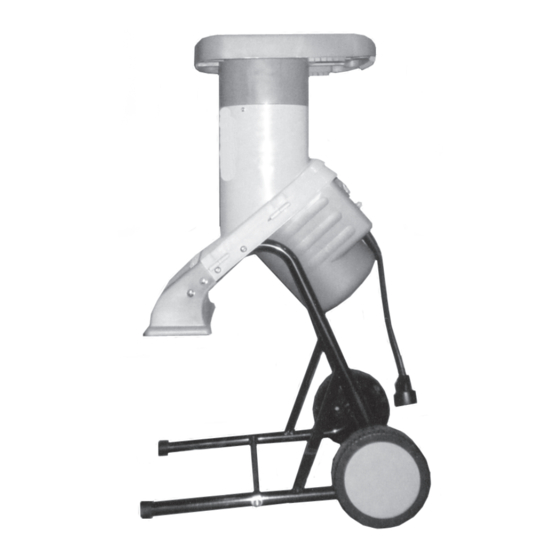
Page 10: Product Description
HOPPER (1) CHUTE (32) STAND ASSEMBLY FIGURE D SKU 92281 For technical questions, please call 1-800-444-3353. Some dust created by power sanding, sawing, grinding, drill- SAVE THESE INSTRUCTIONS PRODUCT DESCRIPTION... -
Page 11: Assembly Instructions
NOTE: For additional information regarding the parts listed in the following pages, refer to the Assembly Diagram on page 17. WARNING! Always make sure the Power Switch (47) of the Chipper/Shred- der is in its “OFF” position and the unit is unplugged from its electrical outlet prior to assembling the unit, unclogging the unit, or making any adjustments to the unit. -
Page 12: Left Side View
(See Figure (G.) WASHER WHEEL (38) BUSHING (37) SCREW (22) WASHER (36) SCREW (65) WHEEL COVER (21) SKU 92281 For technical questions, please call 1-800-444-3353. MOTOR SUPPORT (26) FIGURE F (36) AXLE (62) AXLE (62) END CAP (63) WASHER (36) -
Page 13: Operating Instructions
Make sure to position the Chipper/Shredder on a flat, level, dry ground surface. Position the machine so that the Chute (32) is pointed in a safe direction, at least 25 feet from any people, animals, or objects. - Page 14 Hopper (1), Body (13), Motor Support (26), and Chute (32). (See Figure H.) Make sure to store the Chipper/Shredder in a clean, dry, safe location out of reach of children and other unauthorized people.
-
Page 15: Inspection, Maintenance, And Cleaning
Disc. (See Figure I.) To clean the exterior parts: Use only a clean cloth and mild detergent to clean the body of the Chipper/Shredder. Do not use solvents. Do not immerse any electrical part of the tool in liquid. When storing, Store the Chipper/Shredder in a clean, dry, safe location out of reach of children and other unauthorized people. -
Page 16: Please Read The Following Carefully
R ig h t S u p p o rt L e g W a s h e r Some parts are listed and shown for illustration purposes only, and are not available individually as replacement parts. SKU 92281 For technical questions, please call 1-800-444-3353. PARTS LIST Q ty . -
Page 17: Assembly Diagram
ASSEMBLY DIAGRAM NOTE: Some parts are listed and shown for illustration purposes only, and are not available individually as replacement parts. SKU 92281 For technical questions, please call 1-800-444-3353. PAGE 17... -
Page 18: Wiring Diagram
WIRING DIAGRAM SKU 92281 For technical questions, please call 1-800-444-3353. PAGE 18...