Vaisala DRYCAP DMT340 Series User Manual
Dewpoint and temperature transmitter
Hide thumbs
Also See for DRYCAP DMT340 Series:
- User manual (196 pages) ,
- Manual (3 pages) ,
- Quick reference manual (40 pages)

Related Manuals for Vaisala DRYCAP DMT340 Series


Summary of Contents for Vaisala DRYCAP DMT340 Series
- Page 1 USER'S GUIDE Vaisala DRYCAP® Dewpoint and Temperature Transmitter Series DMT340 M210704EN-E...
- Page 2 PUBLISHED BY Vaisala Oyj Phone (int.): +358 9 8949 1 P.O. Box 26 Fax: +358 9 8949 2227 FI-00421 Helsinki Finland Visit our Internet pages at http://www.vaisala.com/ © Vaisala 2009 No part of this manual may be reproduced in any form or by any means, electronic or mechanical (including photocopying), nor may its contents be communicated to a third party without prior written permission of the copyright holder.
-
Page 3: Table Of Contents
________________________________________________________________________________ Table of Contents CHAPTER 1 GENERAL INFORMATION................13 About This Manual ..............13 Contents of This Manual ............. 13 Version Information ............. 14 General Safety Considerations ........... 14 Feedback................14 Product Related Safety Precautions ........15 ESD Protection..............15 Recycling ................ - Page 4 USER'S GUIDE____________________________________________________________________ DMT347 Small Pressure-tight Probe........41 Pressure-Tight Swagelok Installation Kits for DMT347..41 DMT348 For Pressurized Pipelines........43 Tightening the Clasp Nut.............45 Ball Valve Installation Kit for DMT348 .........46 Leak Screw Installation ............49 Mounting the Probe Directly to the Process......50 Sampling Cell for DMT348 ..........52 Optional Modules ..............54 Power Supply Module ............54 Installation ..............55...
-
Page 5: Vaisala
________________________________________________________________________________ Using Serial Line ............89 Telnet Settings ..............89 Web Configuration for LAN and WLAN....... 90 Terminal Program Settings ..........91 Opening a Serial/USB connection ......... 91 Opening a Telnet session (LAN/WLAN) ......92 List of Serial Commands ............. 94 Getting the Measurement Message from Serial Line .. - Page 6 USER'S GUIDE____________________________________________________________________ Analog Output Tests............118 ITEST ................118 Analog Output Fault Indication Setting......119 AERR................119 Operation of Relays..............120 Quantity for Relay Output..........120 Measurement-Based Relay Output Modes .......120 Relay Setpoints ............120 Hysteresis..............121 Relay Indicating Transmitter Error Status ......122 Enabling/Disabling the Relays...........123 Operation of the Indication LEDs ........124 Setting the Relay Outputs ..........124 RSEL ................125 Testing the Operation of Relays........126...
- Page 7 ________________________________________________________________________________ Adjustment Information ............. 143 CTEXT and CDATE ............. 143 Adjusting Dewpoint T ............144 Two-point Relative Humidity Adjustment using Display/Keypad ..............144 Two-point Relative Humidity Adjustment Using Serial Line146 One-point Dewpoint Adjustment Using Display/Keypad... 146 One-point Dewpoint Adjustment Using Serial Line ... 148 Adjusting Temperature ............
- Page 8 USER'S GUIDE____________________________________________________________________ This page intentionally left blank. 8 ___________________________________________________________________ M210704EN-E...
- Page 9 ________________________________________________________________________________ List of Figures Figure 1 Transmitter Body ..............21 Figure 2 Inside the Transmitter............... 22 Figure 3 Probe Options ................23 Figure 4 Standard Mounting ..............25 Figure 5 Mounting with Wall Mounting Kit ..........26 Figure 6 Dimensions of the Plastic Mounting Plate (mm/inch)....26 Figure 7 Mounting with Metal Wall Mounting Plate ........
- Page 10 USER'S GUIDE____________________________________________________________________ Figure 54 Service Port Connector and User Port Terminal on the Mother Board ..................81 Figure 55 Connection Example Between PC Serial Port and User Port ..82 Figure 56 Network Interface Menu ............85 Figure 57 IP Configuration Menu..............85 Figure 58 Wireless LAN Settings..............88 Figure 59 Entering Network SSID.............88...
- Page 11 ________________________________________________________________________________ List of Tables Table 1 Manual Revisions ..............14 Table 2 Application, Location Classes ..........16 Table 2 Quantities and Their Abbreviations .......... 19 Table 3 Optional Quantities and Their Abbreviations ......20 Table 4 DMT348 Probe Dimensions ............. 44 Table 5 Connecting the Twisted Pair Wires to the Screw Terminals ..
- Page 12 USER'S GUIDE____________________________________________________________________ This page intentionally left blank. 12 __________________________________________________________________ M210704EN-E...
-
Page 13: General Information
Chapter 1 ________________________________________________________ General Information CHAPTER 1 GENERAL INFORMATION About This Manual This manual provides information for installing, operating, and ® maintaining Vaisala DRYCAP Dewpoint and Temperature Transmitter Series DMT340. Contents of This Manual This manual consists of the following chapters: - Chapter 1, General Information, provides general notes for the manual and the product. -
Page 14: Version Information
USER'S GUIDE____________________________________________________________________ Version Information Table 1 Manual Revisions Manual Code Description M210704EN-A April 2005 - First release M210704EN-B November 2006 M210704EN-C June 2007 - Data logger module and USB-RJ45 cable added as new options. Support for Chinese language. M210704EN-D May 2008 – New options added: LAN Interface, WLAN Interface. -
Page 15: Product Related Safety Precautions
Chapter 1 ________________________________________________________ General Information Product Related Safety Precautions The DMT340 Dewpoint and Temperature Transmitter delivered to you has been tested for safety and approved as shipped from the factory. Note the following precautions: Ground the product, and verify outdoor installation grounding WARNING periodically to minimize shock hazard. -
Page 16: Regulatory Compliances
USER'S GUIDE____________________________________________________________________ Regulatory Compliances DNV Type Approval The Vaisala DRYCAP® Dewpoint and Temperature Transmitter Series DMT340 is found to comply with Det Norske Veritas' Rules for Classification of Ships, High Speed & Light Craft and Det Norske Veritas' Offshore standards. Applicable tests carried out according to Standard for Certification No. -
Page 17: Transmitters With Wlan Interface
Chapter 1 ________________________________________________________ General Information no guarantee that interference will not occur in a particular installation. If this equipment does cause harmful interference to radio or television reception, which can be determined by turning the equipment off and on, the user is encouraged to try to correct the interference by one or more of the following measures: - Reorient or relocate the receiving antenna. -
Page 18: License Agreement
USER'S GUIDE____________________________________________________________________ License Agreement All rights to any software are held by Vaisala or third parties. The customer is allowed to use the software only to the extent that is provided by the applicable supply contract or Software License Agreement. Warranty For certain products Vaisala normally gives a limited one-year warranty. -
Page 19: Chapter 2 Product Overview
This chapter introduces the features, advantages, and the product ® nomenclature of the Vaisala DRYCAP Dewpoint and Temperature Transmitter DMT340 Series. Introduction to DMT340 The DMT340 transmitter measures dewpoint temperature accurately in a measurement range from -60ºC to +80 ºC (-76 ... +176 ºF). The AutoCal feature provides excellent long term stability of the measurement. -
Page 20: Basic Features And Options
USER'S GUIDE____________________________________________________________________ Table 4 Optional Quantities and Their Abbreviations Quantity Abbreviation Metric Unit Non Metric Unit Relative humidity RH Temperature T ºC ºF Dewpoint/frost point in the TDFA ºC atm ºF atm atmospheric pressure (T Absolute humidity (a) gr/ft Absolute humidity in standard ANTP gr/ft pressure and temperature (NTP) -
Page 21: Structure Of The Transmitter
Chapter 2 __________________________________________________________ Product Overview Structure of the Transmitter 0604-005 Figure 1 Transmitter Body The numbers refer to Figure 1: Signal + powering cable gland Cable gland for optional module, or WLAN antenna connector Cable gland for optional module Cover screw (4 pcs) Display with keypad (optional) Cover LED VAISALA _______________________________________________________________________ 21... -
Page 22: Figure 2 Inside The Transmitter
USER'S GUIDE____________________________________________________________________ 0604-006 Figure 2 Inside the Transmitter Numbers refer to Figure 2: Service port (RS-232) Dip switches for analog output settings Power supply and signal wiring screw terminals Relay, data logger, RS-422/485, LAN, or WLAN module (optional) Grounding connector Power supply module (optional) Relay, data logger, or analog output module (optional) Dewpoint probe... -
Page 23: Probe Options
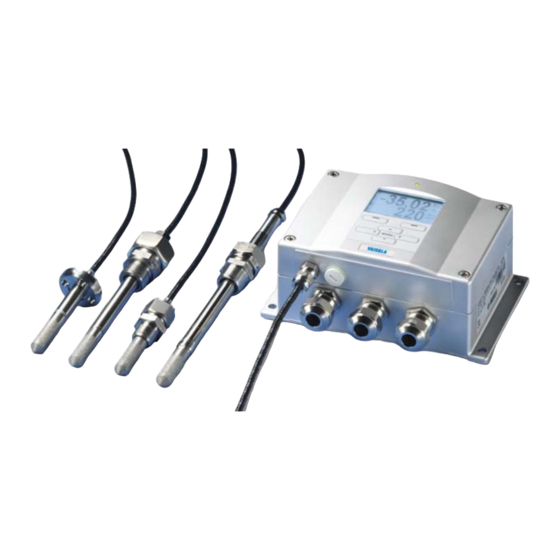
Chapter 2 __________________________________________________________ Product Overview Probe Options DMT342 DMT344 DMT347 DMT348 small-size for high probe with for pressurized flanged probe pressure Swagelok pipelines for use with applications connector sampling cell 0503-019 Figure 3 Probe Options Probe cable lengths are 2 m, 5 m and 10 m. VAISALA _______________________________________________________________________ 23... - Page 24 USER'S GUIDE____________________________________________________________________ This page intentionally left blank. 24 __________________________________________________________________ M210704EN-E...
-
Page 25: Chapter 3 Installation
Chapter 3 _______________________________________________________________ Installation CHAPTER 3 INSTALLATION Mounting the Housing The housing can be mounted either without the mounting plate or with optional mounting plates. Standard Mounting without Mounting Plate Mount the housing without the mounting plate by fastening the transmitter to the wall with 4 screws, for example M6 (not provided). -
Page 26: Wall Mounting With Wall Mounting Kit
USER'S GUIDE____________________________________________________________________ Wall Mounting with Wall Mounting Kit When mounting with wall mounting kit the mounting plate (Vaisala order code 214829) can be installed directly on wall or onto a standard wall box (also US junction box). When wiring through back wall, remove the plastic plug from the wiring hole in the transmitter before mounting. -
Page 27: Figure 7 Mounting With Metal Wall Mounting Plate
Chapter 3 _______________________________________________________________ Installation 0503-041 Figure 7 Mounting with Metal Wall Mounting Plate Numbers refer to Figure 7: Mount the plate to wall with 4 screws M8 (not provided) Fasten DMT340 to the mounting plate with 4 fixing screws M6 (provided) Note the position of the arrow when mounting. -
Page 28: Mounting With Din Rail Installation Kit
USER'S GUIDE____________________________________________________________________ Mounting with DIN Rail Installation Kit DIN rail installation kit includes a wall mounting kit, 2 clip-fasteners and 2 screws M4 x 10 DIN 7985 (Vaisala order code 215094). Attach two spring holders to the plastic mounting plate by using the screws provided in the installation kit. -
Page 29: Pole Installation With Installation Kit For Pole Or Pipeline
Chapter 3 _______________________________________________________________ Installation Pole Installation with Installation Kit for Pole or Pipeline Installation kit for pole or pipeline (Vaisala order code: 215108) includes the metal mounting plate and 4 mounting nuts for pole mounting. When mounting, the arrow in the metal mounting plate must point upwards, see Figure 7 on page 27. -
Page 30: Mounting The Rain Shield With Installation Kit
USER'S GUIDE____________________________________________________________________ Mounting the Rain Shield with Installation Kit Vaisala order code: 215109 0503-008 Figure 12 Mounting the Rain Shield with Installation Kit Numbers refer to Figure 12 above. Fasten the rain shield with installation kit to the metal mounting plate with 2 (M6) mounting screws (provided). Fasten the mounting plate with rain shield with installation kit to the wall or to the pole (see pole installation). -
Page 31: Figure 13 Panel Mounting Frame
Chapter 3 _______________________________________________________________ Installation Remove the paper protecting the adhesive tape on the frame, and attach the frame around the transmitter. Refer to Figure 13 below. 0704-002 Figure 13 Panel Mounting Frame The following numbers refer to Figure 13 above: = Panel (not included) = Panel mounting frame 0804-083... -
Page 32: Wiring
USER'S GUIDE____________________________________________________________________ Wiring Cable Bushings A single electrical cable with a screen and three to ten wires is recommended for power and analog/serial connections. The cable diameter should be 8...11 mm. The number of cable bushings depends on the transmitter options. See the following recommendations for the cable bushings: 0503-010 Figure 15... -
Page 33: Grounding The Cables
Chapter 3 _______________________________________________________________ Installation Grounding the Cables Ground the screen of the electrical cable properly to achieve the best possible EMC performance. 0504-049 Figure 16 Grounding the Screen of Electrical Cable Cut back outer sheath to desired length. Cut back screen braiding or screen foil to dimension X (see figure 3). -
Page 34: Transmitter Housing Grounding
USER'S GUIDE____________________________________________________________________ Push the seal with the contact socket of the gland and (item 2+3) flush into the lower part (item 5). Fasten the domed cap nut (item 1) onto the lower part (item 5). Transmitter Housing Grounding In case you need to ground the transmitter housing, the grounding connector is found inside the housing (see Figure 1 on page 21) Note anyhow that the probe is connected to the same potential as the housing. -
Page 35: Connections To A 24 Vac Power Supply
Chapter 3 _______________________________________________________________ Installation WARNING Make sure that you connect only de-energized wires. Open the transmitter cover by taking out the four cover screws. Insert the power supply wires and signal wires through the cable bushing in the bottom of the transmitter; see the grounding instructions in the previous sections. -
Page 36: Probe Mounting
USER'S GUIDE____________________________________________________________________ 0703-041 Figure 18 Connections to 24 VAC Power Supply Probe Mounting When measuring temperature dependent quantities make sure that the NOTE temperature at the measurement point is equal to that of the process, otherwise the moisture reading may be incorrect. 36 __________________________________________________________________ M210704EN-E... -
Page 37: Dmt342 Small-Size Flanged Probe For Use With Sampling Cell
Chapter 3 _______________________________________________________________ Installation DMT342 Small-size Flanged Probe for Use with Sampling Cell The DMT342 probe is a small pressure-tight probe equipped with installation flange. When sampling in pressurized processes, the sampling cell HMP302SC is available as an optional accessory. It may be necessary to use the sampling cell if the process (for example a pipe) is too small for the DMT342 probe. -
Page 38: Figure 20 Hmp302Sc Optional Sampling Cell
USER'S GUIDE____________________________________________________________________ 0503-017 Figure 20 HMP302SC Optional Sampling Cell Numbers refer to Figure 20 above. Gas in Probe Gas out Probe Sampling cell Clamp (not needed if sampling cell is supported on the piping) CAUTION In pressurized processes it is essential to tighten the supporting nuts and screws very carefully to prevent loosening of the probe by the action of pressure. -
Page 39: Dmt344 For High-Pressure Applications
Chapter 3 _______________________________________________________________ Installation DMT344 For High-pressure Applications The DMT344 probe is for the dewpoint measurements in pressurized rooms and industrial processes. The probe is provided with a nut, a fitting screw and a sealing washer. Keep the fitting screw and the nut in place on the body of the probe during handling to prevent damage to the highly polished surface of the probe. -
Page 40: Figure 22 Tightening The Nut
USER'S GUIDE____________________________________________________________________ Tighten the nut a further 30º (1/12) turn or if you have a torque spanner tighten it with a torque of 80 ± 10 Nm (60 ± 7 ft-lbs). 0503-034 Figure 22 Tightening the Nut NOTE When re-tightening the nut after detachment the nut must be tightened without increased effort. -
Page 41: Dmt347 Small Pressure-Tight Probe
Chapter 3 _______________________________________________________________ Installation NOTE When the DMT340 is installed in a process with a pressure differing from the selected operating pressure at the time of ordering, please enter the pressure value of the process into the transmitter memory, see section Pressure Compensation Setting on page 101. -
Page 42: Figure 25 Dmt347 Probe Installation To Pipeline With Swagelok Installation Kit
USER'S GUIDE____________________________________________________________________ 0503-021 Figure 25 DMT347 Probe Installation to Pipeline with Swagelok Installation Kit Numbers refer to Figure 25 above: Probe Duct connector ISO1/2", ISO3/8" or NPT1/2" thread Swagelok connector Ferrules Preparing Installation. The connector options are the following: R3/8" ISO (Swagelok code SS-12M0-1-6RTBT) 1/2"... -
Page 43: Dmt348 For Pressurized Pipelines
Chapter 3 _______________________________________________________________ Installation NOTE If the Swagelok connector is tightened at an incorrect position, it is possible that the probe will not fit the calibration station. Be sure that the probe position follows step 2 above. DMT348 For Pressurized Pipelines Due to the sliding fit the DMT348 is easy to install into and remove from the pressurized process. -
Page 44: Figure 27 Leak Screw In The Dmt348 Probe
USER'S GUIDE____________________________________________________________________ 0503-005 Figure 27 Leak Screw in the DMT348 Probe Number refers to Figure 27 above: Non-leaking screw (A) (factory setting) or leak screw (B) (included in the package) Table 5 DMT348 Probe Dimensions Probe type Probe Dimension Adjustment Range Standard 178 mm 120 mm... -
Page 45: Tightening The Clasp Nut
Chapter 3 _______________________________________________________________ Installation Tightening the Clasp Nut Adjust the probe to a suitable depth according to the type of installation. Tighten the clasp nut first manually. Mark the fitting screw and the clasp nut. Tighten the nut a further 50 … 60º (ca. 1/6 turn) with a wrench. If you have suitable torque spanner, tighten the nut to max 45 ±... -
Page 46: Ball Valve Installation Kit For Dmt348
USER'S GUIDE____________________________________________________________________ CAUTION In pressurized processes it is essential to tighten the supporting nuts and screws very carefully to prevent loosening of the probe by the action of pressure. NOTE When the DMT340 is installed in a process with a pressure differing from the selected operating pressure at the time of ordering, please enter the pressure value of the process into the transmitter memory, see section Pressure Compensation Setting on page 101. -
Page 47: Figure 30 Installing The Dmt348 Probe Through A Ball Valve Assembly
Chapter 3 _______________________________________________________________ Installation 0507-043 Figure 30 Installing the DMT348 Probe Through a Ball Valve Assembly The following numbers refer to Figure 30 above: Manual press tool Handle of the ball valve Probe Process chamber or pipeline Groove on the probe indicates the upper adjustment limit Filter Ball of the ball valve Fitting screw... - Page 48 USER'S GUIDE____________________________________________________________________ Follow the steps below to install the DMT348 probe through a ball valve assembly. After the installation, the probe should be sitting in the process chamber or pipeline as shown in Figure 30 on page 47. Shut down the process if the process pressure is more than 10 bars. If the pressure is lower there is no need to shut down the process.
-
Page 49: Leak Screw Installation
Chapter 3 _______________________________________________________________ Installation Leak Screw Installation When the probe cannot be installed directly in the pressurized process or process pipe, a leak screw installation can be used. In this installation method, you must install the DMT348 probe using a fitting body with leak screw, see Figure 27 on page 44. -
Page 50: Mounting The Probe Directly To The Process
USER'S GUIDE____________________________________________________________________ Mounting the Probe Directly to the Process Select a point, which gives a true picture of the process. The transmitter can be installed directly in the process wall, especially if the pressure of the process is 1 bar (atmospheric processes). It may be necessary to use the sampling cell if the process (for example a pipe) is too small for the DMT348 probe. -
Page 51: Figure 33 Example Of Installing The Probe Directly On The Process Pipe
Chapter 3 _______________________________________________________________ Installation If the probe is installed in a pressurized chamber, always make sure that the pressure of the chamber is equalized with the ambient pressure prior to removing the probe. When the probe is pulled out for maintenance, cap the hole with a capped nut. -
Page 52: Sampling Cell For Dmt348
USER'S GUIDE____________________________________________________________________ Sampling Cell for DMT348 It may be necessary to use a sampling cell if the process (for example a pipe) is too small for the DMT348 probe. Furthermore, if the process is very hot (>80 °C) or particularly dirty, the probe is installed in a sampling cell behind a cooling coil and/or filter. -
Page 53: Figure 35 Installing The Probe In High Temperatures
Chapter 3 _______________________________________________________________ Installation An overpressure in the process is necessary to create a flow through the sampling cell. Note that the pressure of the sampling cell must not differ from that of the process because dewpoint temperature changes with pressure. -
Page 54: Optional Modules
USER'S GUIDE____________________________________________________________________ Optional Modules Power Supply Module The mains power connection may be connected to the power supply module only by an authorized electrician. A readily accessible disconnect device shall be incorporated in the fixed wiring. 0506-027 Figure 36 Power Supply Module Numbers refer to Figure 36 above: Connect AC mains voltage wires to these terminals Grounding terminal... -
Page 55: Installation
Chapter 3 _______________________________________________________________ Installation Installation Disconnect the power. Remove the protective plug from the cable gland and thread the wires. In case the power supply module is installed in the factory, continue with the step 5. To attach the module, open the transmitter cover and fasten the power module to the bottom of the housing with four screws. - Page 56 USER'S GUIDE____________________________________________________________________ Ce produit est conforme à la Directive relative à la Basse Tension (2006/95/EEC). Seul un électricien compétent est habilité à raccorder le module d’alimentation au secteur. Ne pas détacher le module d’alimentation du transmetteur lorsqu’il est en service. Ne pas raccorder le secteur au module d’alimentation lorsque celui-ci n’est pas installé...
- Page 57 Chapter 3 _______________________________________________________________ Installation Het is niet toegestaan de stroomtoevoer module van de transmitter los te koppelen wanneer de stroom aan is. Het is niet toegestaan de stroom aan de stroomtoevoer module aan te sluiten als deze niet in een DMT340-transmitter is gemonteerd. Altijd beschermend aardcontact aansluiten! Este producto cumple con la directiva de bajo voltaje (2006/95/EEC).
-
Page 58: Galvanic Isolation For Output
USER'S GUIDE____________________________________________________________________ Ten produkt spełnia wymogi Dyrektywy niskonapięciowej (2006/95/EEC). Napięcie zasilające powinno zostać podłączone do modułu zasilacza tylko przez wykwalifikowanego elektryka. Nie wolno odłączać modułu zasilacza od nadajnika, kiedy zasilanie jest włączone. Nie wolno podłączać napięcia zasilającego do modułu zasilacza, kiedy nie jest on zamontowany w nadajniku DMT340. -
Page 59: Third Analog Output
Chapter 3 _______________________________________________________________ Installation Third Analog Output 0503-030 Figure 38 Third Analog Output Numbers refer to Figure 38 above Flat cable pins Screw terminals for signal line Dip switches to select the output mode and range Installation and Wiring Disconnect the power. In case the analog output module is installed in the factory, continue with the step 4. -
Page 60: Alarm Relays
USER'S GUIDE____________________________________________________________________ 0508-029 Figure 39 Third analog output selection Connect the power. Select the quantity and scale the channel via the serial line or display/keypad, see section Analog Output Quantities on page 116. For testing the analog output, see section Analog Output Tests on page 118. -
Page 61: Selecting The Activation State Of The Relay
Chapter 3 _______________________________________________________________ Installation Selecting the Activation State of the Relay The middlemost C terminal and either one of the terminals NO/NC shall be connected. The polarity can be freely selected. Normally open Common relay Normally closed Relay NOT activated: C and NC outputs are closed, NO is open Relay IS activated: C and NO outputs are closed, NC is open. -
Page 62: Rs-422/485 Interface
USER'S GUIDE____________________________________________________________________ RS-422/485 Interface 0503-029 Figure 41 RS-485-Module Numbers refer to Figure 41 above: Flat cable pins Selection switches Screw terminals for wiring The markings on the module and in this manual are according to the line NOTE driver manufacturers’ application notes, where A is posive against B when measured with a voltmeter. -
Page 63: Figure 42 4-Wire Rs-485 Bus
Chapter 3 _______________________________________________________________ Installation Table 6 Connecting the Twisted Pair Wires to the Screw Terminals Data line Data line (2-wire RS-485) (4-wire RS-485/422) Screw terminal (not connected) (not connected) Data pair shield Data pair shield If you use RS-485 (or RS-422) to connect just one DMT340 to a master computer,enable the internal termination of DMT340 by switching switches 1 and 2 ON. -
Page 64: Lan Interface
USER'S GUIDE____________________________________________________________________ Table 7 4-Wire (Switch 3:On) RS-485 master Data DMT340 → → ← ← Table 8 2-Wire (Switch 3:Off) RS-485 master Data DMT340 ↔ ↔ When operating in communication mode RS-422, set both switches 3 and 4 to ON position (4-wire wiring is required for RS-422 mode). -
Page 65: Wlan Interface
Chapter 3 _______________________________________________________________ Installation The LAN interface can use both static and dynamic network settings. If the interface is configured to use dynamic settings, the network where the LAN interface is connected must have a DHCP server that provides the settings. -
Page 66: Attaching The Wlan Antenna
USER'S GUIDE____________________________________________________________________ dynamic settings, the network where the WLAN interface is connected must have a DHCP server that provides the settings. The WLAN interface also provides a web configuration interface, which you can access by entering the IP address of the WLAN interface in the address field of a web browser. - Page 67 Chapter 3 _______________________________________________________________ Installation observation period, the module stores the minimum and maximum values during the interval, as well a data trend value that is averaged from samples taken during the interval (see Table 9 on page 67). Table 9 Observartion Periods and Resolution Observation Period Period for Trend/Max/Min...
-
Page 68: Figure 45 Data Logger Module
USER'S GUIDE____________________________________________________________________ 0706-068 Figure 45 Data Logger Module The following numbers refer to Figure 45 above: Flat cable pins Battery After a reset or a power up, it will usually take at least 10 seconds before the data logger module is initialized. The real time clock and the data logging and reading functions are not available before the initialization is complete. -
Page 69: 8-Pin Connector
Chapter 3 _______________________________________________________________ Installation 8-pin Connector 0503-026 Figure 46 Wiring of the Optional 8-pin Connector Table 10 Wiring of the 8-pin connector PIN/Terminal Wire Serial Signal Analog Signal RS-232 (EIA- RS-485 (EIA- 232) 485) White Data out TX Brown (serial GND) (serial GND) Signal GND (for both... - Page 70 USER'S GUIDE____________________________________________________________________ This page intentionally left blank. 70 __________________________________________________________________ M210704EN-E...
-
Page 71: Chapter 4 Operation
Chapter 4 ________________________________________________________________ Operation CHAPTER 4 OPERATION This chapter contains information that is needed to operate this product. Getting Started Within a few seconds after power-up the LED on the cover of the transmitter is lit continuously indicating normal operation. When the transmitter is turned on the first time, the language selection window opens: Select the language with ▼▲... -
Page 72: Graphic History
USER'S GUIDE____________________________________________________________________ 0706-009 Figure 47 Basic Display The numbers refer to Figure 47 above: The Info shorcut button The Graph shortcut button changes the display into a curve mode Selected quantities Press the INFO button (in the basic display) to see the device information views, see section Device Information on page 107. -
Page 73: Figure 49 Graphical Display With Data Logger
Chapter 4 ________________________________________________________________ Operation Max/min graph: Shows you the minimum and maximum values in a form of curve. Each value is max/min over a time period. See Table 11 below. The period for the trend and max/min calculations depends on the selected graph window as follows: Table 11 Periods for Trend and Max/Min Calculations... -
Page 74: Menus And Navigation
USER'S GUIDE____________________________________________________________________ Table 12 Graph Information Messages Failure Message Interpretation Power outage Power failure (marked also with dashed vertical line) No data Quantity has not been selected for the display Device failure General device failure. T meas. failure Temperature measurement/sensor failure RH meas. -
Page 75: Changing The Language
Chapter 4 ________________________________________________________________ Operation 0706-011 Figure 50 Main Views Some menu items, such as Relay outputs in the Interfaces menu, are only shown if supported by the transmitter and the installed options. Changing the Language Go back to the basic display by keeping the right-hand button pressed for four seconds. -
Page 76: Rounding Setting
USER'S GUIDE____________________________________________________________________ Rounding Setting Round off one decimal by using the Rounding function . The default setting is rounding on. Rounding has no effect on quantities without decimals. Open the MAIN MENU by pressing any of the ▲▼◄► arrow buttons. Select ►Display and confirm by pressing the ►... -
Page 77: Menu Pin Lock
Chapter 4 ________________________________________________________________ Operation Menu PIN Lock You can prevent unauthorized changes of the device settings by activating the menu PIN lock. When this function is activated, the basic display and graphical view are available but access to the menus is locked. -
Page 78: Display Alarms
USER'S GUIDE____________________________________________________________________ Display Alarms The Display Alarm feature provides two independently configurable alarms for transmitters with the display/keypad option. Each alarm tracks a selected quantity, with a freely configurable low and high limit. Each alarm also has a configurable hysteresis value to prevent unnecessary triggering when the measurement fluctuates around an alarm limit. -
Page 79: Figure 52 Display Alarms
Chapter 4 ________________________________________________________________ Operation 0802-069 Figure 52 Display Alarms Use the arrow keys to select an alarm to configure. The alarm editing page opens. NOTE Changes you do on the alarm editing page will take effect immediately, and may cause an alarm to appear on the screen. To select a quantity for the alarm, press the Change button and select the quantity from the list. -
Page 80: Mi70 Link Program For Data Handling
USER'S GUIDE____________________________________________________________________ MI70 Link Program for Data Handling The real-time window function of the MI70 Link program allows you to monitor transmitter readings directly with a PC when transmitter is connected with a serial or USB cable. You can also transfer recorded data from the main transmitter memory in numeric or graphical format, for further use in a spreadsheet program (such as Microsoft Excel) or virtually any other application. -
Page 81: User Port Connection
Chapter 4 ________________________________________________________________ Operation 0605-039 Figure 54 Service Port Connector and User Port Terminal on the Mother Board Numbers refer to Figure 54 above: Service port connector User Port Terminals User Port Connection Use suitable serial cable between the user port RxD, GND and TxD screw terminals and the PC serial port. -
Page 82: Service Port Connection
USER'S GUIDE____________________________________________________________________ – Ch1+ 1 2 3 4 5 Ch1– 6 7 8 9 Ch2+ Ch2– IOIOI 0506-033 Figure 55 Connection Example Between PC Serial Port and User Port Connections to pins 4,6,7 and 8 are required only if your software requires hardware handshaking. -
Page 83: Using The Service Port
Chapter 4 ________________________________________________________________ Operation Insert the media that came with the cable, or download the driver from www.vaisala.com. Execute the USB driver installation program (setup.exe), and accept the installation defaults. The installation of the driver may take several minutes. After the driver has been installed, connect the USB cable to a USB port on your PC. -
Page 84: Lan Communication
USER'S GUIDE____________________________________________________________________ LAN Communication To enable LAN communication, a LAN or WLAN interface must be physically connected to the network, and the networking settings must be suitable for your network. For a description of interfaces, see sections LAN Interface on page 64 and WLAN Interface on page 65. The LAN and WLAN interfaces both operate by accessing the serial interface (User Port) of the transmitter. -
Page 85: Using Display/Keypad
Chapter 4 ________________________________________________________________ Operation Using Display/Keypad You can configure the IP settings of the LAN and WLAN interfaces using the display/keypad as follows: Press any of the arrow buttons to open the MAIN MENU. Press the ► arrow button to select Interfaces. Press ►... -
Page 86: Using Serial Line
USER'S GUIDE____________________________________________________________________ Using Serial Line Use the serial line command NET to view or set the network settings for the LAN and WLAN interfaces. You can also refresh the network information or disconnect all active connections. NET [REFRESH] [DISCONNECT] [DHCP WEB] [DHCP IP SUBNET GATEWAY WEB] where REFRESH... -
Page 87: Wireless Lan Configuration
Chapter 4 ________________________________________________________________ Operation >net off 192.168.0.101 255.255.255.0 192.168.0.1 off DHCP : OFF IP address : 192.168.0.101 Subnet mask : 255.255.255.0 Default gateway: 192.168.0.1 Web config. : OFF MAC address : 00:40:9d:2c:d2:05 Telnet : Connected > Wireless LAN Configuration The settings of the WLAN interface are described in Table 16. The current settings can be viewed on the serial line or using the device information display;... -
Page 88: Figure 58 Wireless Lan Settings
USER'S GUIDE____________________________________________________________________ 0802-111 Figure 58 Wireless LAN Settings The Name entry on the page shows the SSID of the currently selected wireless network. To change the SSID, press the SET button. Use the ▲▼ arrow buttons to change the character under the cursor, and ◄►... -
Page 89: Using Serial Line
Chapter 4 ________________________________________________________________ Operation After setting the wireless network parameters, press the Exit button in the Wireless Network Settings menu. You will be asked to confirm the new settings. Note that when new settings are saved, all currently active WLAN connections are disconnected. Using Serial Line Use the serial line command WLAN to view or set the wireless network settings. -
Page 90: Web Configuration For Lan And Wlan
USER'S GUIDE____________________________________________________________________ These settings can be changed using the display/keypad, using the serial line (user port or service port), or on-the-fly during the telnet session. The display menu path to the telnet settings is: Main menu ► Interfaces ► Network Interface ► Telnet settings. The commands for changing the settings are SMODE, INTV, ADDR, and ECHO. -
Page 91: Terminal Program Settings
Chapter 4 ________________________________________________________________ Operation 0802-114 Figure 61 Web Configuration Interface for WLAN Terminal Program Settings The instructions below describe how to connect to the DMT340 using the PuTTY terminal application for Windows. Perform the necessary cabling and configuration of the transmitter before following the instructions. PuTTY is available for download at www.vaisala.com. -
Page 92: Opening A Telnet Session (Lan/Wlan)
USER'S GUIDE____________________________________________________________________ Check that the other serial/USB line settings are correct for your connection, and change if necessary. The default settings (shown in Figure 1) are used by the Service Port of the DMT340. 0810-070 Figure 62 Opening a Serial Connection Click the Open button to open the connection window and start using the serial line. -
Page 93: Figure 63 Opening A Telnet Connection
Chapter 4 ________________________________________________________________ Operation Enter the IP address of your transmitter in the Host Name (or IP address) field. If you do not know the port, the default port 23 is likely correct. 0810-071 Figure 63 Opening a Telnet Connection Click the Open button to open the connection window and start using the telnet session. -
Page 94: List Of Serial Commands
USER'S GUIDE____________________________________________________________________ List of Serial Commands The bold text in the brackets is the default setting. Enter commands by typing them on your computer and pressing the Enter key. Table 17 Measurement Commands Command Description Start the Continuous Outputting Stop the Continuous Outputting INTV [0 ... - Page 95 Chapter 4 ________________________________________________________________ Operation Table 20 Purge Commands Command Description Purge settings PURGE Start manual purge Table 21 Autocalibration Commands Command Description AUTO Autocal settings AUTOCAL Start manual autocal Table 22 Calibration and Adjustment Commands Command Description FCRH RH 2-point-adjustment IKØ...
-
Page 96: Getting The Measurement Message From Serial Line
USER'S GUIDE____________________________________________________________________ Command Description XPRES Set pressure (temporarily) MOL/MOLI View/set molecular weight parameter Getting the Measurement Message from Serial Line Starting Continuous Outputting Enter the R command to start the continuous output of measurements. Example: >r Tdf=-20.6 'C H2O= 958 ppmV x= 0.6 g/kg >r Tdf=-20.7 'C H2O=... -
Page 97: Formatting Serial Line Message
Chapter 4 ________________________________________________________________ Operation Formatting Serial Line Message FTIME and FDATE FTIME and FDATE commands will enable/disable output of time and date to the serial line. To add time to R and SEND outputs press FTIME [x]. FTIME To add date to R and SEND outputs press FDATE [x] FDATE where = ON or OFF... -
Page 98: General Settings
USER'S GUIDE____________________________________________________________________ g/kg Tw= 15.6 'C ppm= 11980 pw= 12.00 hPa pws= 29.91 hPa 43.2 kJ/kg >purge Purge started, press any key to abort. >send 134 RH= 40.2 %RH T= 24.1 'C Td= 9.8 'C Tdf= 9.8 'C a= 8.8 g/m3 g/kg Tw= 15.7 'C ppm= 12084 pw= 12.10 hPa pws=... -
Page 99: Using Serial Line
Chapter 4 ________________________________________________________________ Operation Press EXIT to return to the basic display. To select display units:. Press any of the arrow buttons to open the MAIN MENU. Press the ► arrow button to select Display. Use the ▲▼arrow buttons to select Units. Confirm the selection by pressing the right-hand arrow button. -
Page 100: Unit
USER'S GUIDE____________________________________________________________________ Modifier Description Tabulator Carriage-return Line feed “" String constant #xxx Special character, code "xxx" (decimal), for example #027 for ESC Unit field and length ADDR Transmitter address with two characters [00...99] Error flags for P, T, Ta, RH [0000 ... 1111], 0 = no error STAT Transmitter status in 7 character field, for example: no heating... -
Page 101: Pressure Compensation Setting
Chapter 4 ________________________________________________________________ Operation where M or N where Metric units Non-metric units NOTE This command changes both the serial output and display units to either metric or non-metric units. When you want to output both metric and non-metric units simultaneously on the display, select the display units by using the display/keypad. -
Page 102: Using Buttons On The Motherboard
USER'S GUIDE____________________________________________________________________ Select Measuring and press the ► arrow button to confirm your selection. Select Pressure compensation and press the ► arrow button to confirm you selection. Press SET and enter the pressure value by using the arrow buttons. Press OK and EXIT to return to the basic display. Using Buttons on the Motherboard Pressure set buttons (P and P... -
Page 103: Date And Time
Chapter 4 ________________________________________________________________ Operation where aaaa.a = Absolute process pressure (hPa) Example: >pres Pressure : 1013.00 hPa ? >pres 2000 Pressure : 2000.00 hPa > Table 27 Multiplication Factors From To: hPa mbar PaN/m2 0.01 mmHg torr 1.333224 inHg 33.86388 0.09806650 2.490889 1013.25... -
Page 104: Using Serial Line
USER'S GUIDE____________________________________________________________________ Press EXIT to return to the basic display. Using Serial Line To set time enter the TIME command. To set date enter the DATE command. TIME DATE These time and date settings are shown on the timestamps of PLAY command. -
Page 105: Seri
Chapter 4 ________________________________________________________________ Operation Use the arrow buttons to set the transmitter address. Press OK to confirm the setting. Use the arrow buttons to select ECHO. Press ON to turn to it on. Press OFF to turn it off. Press EXIT to return to the basic display. SERI Use the serial line command SERI [b p d s] to set communication settings for the user port. -
Page 106: Intv
USER'S GUIDE____________________________________________________________________ INTV Use the command INTV[xxx yyy] to set the outputting interval for the RUN mode. where Output inverval (0 ... 255). 0: the fastest possible output rate. Unit (s, min or h) Example: >INTV 10 min Output intrv. : 10 min ECHO Use the command ECHO [x] to set the user port echo. -
Page 107: Filt
Chapter 4 ________________________________________________________________ Operation Press any of the arrow buttons to open the MAIN MENU. Select Measuring by pressing the ► arrow button. Select Filtering and press CHANGE to confirm your selection. Select Off/Standard/Extended and press SELECT to confirm your selection. Press EXIT to return to the basic display. - Page 108 USER'S GUIDE____________________________________________________________________ Proceed in the information views by pressing the MORE button as many times as you get the desired information. You can browse through the information displays also with arrow buttons. Press OK to return to the basic display. Use the serial line command ? to check the current transmitter configuration.
-
Page 109: Help
Chapter 4 ________________________________________________________________ Operation HELP Use the command HELP to list the commands. >help ACAL ADDR AERR ALSEL ASCL ASEL CDATE CLOSE CODE CTEXT DATE DELETE DSEL DSEND ECHO ERRS FCRH FDATE FILT FORM FTIME HELP INTV ITEST MODS OPEN PLAY PRES RESET... -
Page 110: Resetting The Transmitter Using Serial Line
USER'S GUIDE____________________________________________________________________ Resetting the Transmitter Using Serial Line RESET The RESET command resets the transmitter. The user port switches to start-up output mode selected with command SMODE. Locking Menu/Keypad by Using Serial Line LOCK Use the LOCK command to prevent the user from entering the menu using the keypad, or to lock the keypad completely. -
Page 111: Data Recording
Chapter 4 ________________________________________________________________ Operation Data Recording Data recording function is always on and collects data automatically into the memory of the device. If the optional data logger module is installed, the transmitter uses it automatically. Recorded data does not disappear from the memory when the power is switched off. -
Page 112: Dir
USER'S GUIDE____________________________________________________________________ Use the serial line and enter the DIR command to check the available files. Without the data logger module, the transmitter records five files (five observation periods) for each selected quantity. The data logger raises the number of recorded files to six for each quantity. Thus, the total amount of the files varies between 5 and 18. -
Page 113: Play
Chapter 4 ________________________________________________________________ Operation PLAY Use the PLAY command to output the selected file to the serial line. If the data logger module is installed, you can specify an interval to be outputted. Data in the output is <TAB> delimited. This is compatible with most spreadsheet programs. -
Page 114: Deleting The Recorded Files
USER'S GUIDE____________________________________________________________________ Deleting the Recorded Files You can delete the recorded data files using the keypad/display, or the DELETE command on the serial line. The deletion is always done for all data; you cannot delete individual files. Note that the transmitter automatically overwrites the old data when the memory is full, so manual deletion of the recorded files is not necessary in normal use. -
Page 115: Figure 66 Current/Voltage Switches Of Output Modules
Chapter 4 ________________________________________________________________ Operation 0503-045 Figure 66 Current/Voltage Switches of Output Modules Numbers refer to Figure 66 above: Current/voltage selection output switches (from 1 to 2) Current/voltage range selection switches (from 3 to 7) in analog output 1 and 2. Switches for service use only. -
Page 116: Analog Output Quantities
USER'S GUIDE____________________________________________________________________ Example: 0 ... 5 V voltage output selected for channel 1 and 4...20 mA selected for channel 2. Selection █ █ Voltage output selected █ █ █ █ 0 ... 5 V selected █ █ █ Current output selected █... -
Page 117: Amode/Asel
Chapter 4 ________________________________________________________________ Operation Select the upper limit by pressing the ▲▼arrow buttons. Use the arrow buttons to set the upper limit value. Press SET to confirm your selection. Press OK to confirm your setting. Press EXIT to return to the basic display. AMODE/ASEL Use the serial line to select and scale the analog output quantities. -
Page 118: Analog Output Tests
USER'S GUIDE____________________________________________________________________ Analog Output Tests Use the display/keypad for testing to test the operation of the analog by forcing the outputs to known values. Measure then the values with a current/voltage meter. Use the display/keypad for testing. Press any of the arrow buttons to open the MAIN MENU. Select System by pressing the ►... -
Page 119: Analog Output Fault Indication Setting
Chapter 4 ________________________________________________________________ Operation Analog Output Fault Indication Setting Factory default state for analog outputs during error condition is 0 V/ 0mA. Please be careful when selecting the new error value. The error state of the transmitter should not cause unexpected problems in process monitoring. -
Page 120: Operation Of Relays
USER'S GUIDE____________________________________________________________________ Operation of Relays Quantity for Relay Output A relay monitors the quantity chosen for the relay output. Any of the quantities available can be chosen. Measurement-Based Relay Output Modes Relay Setpoints When the measured value is in between the "above" and "below" values, the relay is passive. -
Page 121: Hysteresis
Chapter 4 ________________________________________________________________ Operation Mode 4 is usually used if an alarm needs to be triggered when the measured value exceeds a safe range. The relay is active when measurement is in range, and is released if the value goes out of range or the measurement fails. -
Page 122: Relay Indicating Transmitter Error Status
USER'S GUIDE____________________________________________________________________ Relay Indicating Transmitter Error Status You can set a relay to follow the operation status of the device. By selecting FAULT/ONLINE STATUS for output quantity a relay changes state on the basis of the operation status as follows: FAULT STATUS Normal operation: relay active (C and NO outputs are closed) Not measuring state (error state or power off): relay released (C and NC... -
Page 123: Enabling/Disabling The Relays
Chapter 4 ________________________________________________________________ Operation 0610-077 Figure 68 FAULT/ONLINE STATUS Relay Output Modes FAULT/ONLINE STATUS relays are usually used in conjunction with an analog output to obtain validity information for the output value. NOTE If transmitter loses its power, all status-based relays are released similarly to the case of an instrument failure. -
Page 124: Operation Of The Indication Leds
USER'S GUIDE____________________________________________________________________ Operation of the Indication LEDs Relay is activated: LED is lit. Relay is not activated: LED is not lit. Setting the Relay Outputs NOTE When having only one relay module installed, its relays are called 'relay 1' and 'relay 2'. When having two relay modules, the relays of the the module connected MODULE 1 to slot... -
Page 125: Rsel
Chapter 4 ________________________________________________________________ Operation by using the arrow buttons. Select REMOVE if you want to remove the setpoint. Select Hysteresis Press SET. Set the hysteresis by using the arrow buttons. Press OK. Select Relay enable, press ON/OFF to enable/disable the relay. RSEL Use the serial line to select the quantity, setpoints and hysteresis or enable/disable the relay outputs. -
Page 126: Testing The Operation Of Relays
USER'S GUIDE____________________________________________________________________ Example of normal limit switch (one setpoint for relay activation/deactivation): Selecting relay 1 to follow relative humidity, relay 2 to follow temperature, relay 3 to follow dewpoint and relay 4 to follow dewpoint. One setpoint is chosen for all the outputs. >rsel rh t td td Rel1 RH above: 60.00 %RH ? 70... -
Page 127: Rtest
Chapter 4 ________________________________________________________________ Operation Select Invert relay 1... , press TEST. Now the selected relay output is forced to opposite state. Press OK to return to normal operation. Press EXIT to return to the basic display. RTEST Use the serial line command RTEST [ON/OFF ON/OFF] to test the operation of the relays. -
Page 128: Sdelay
USER'S GUIDE____________________________________________________________________ RS-485 configuration commands SERI; ECHO; SMODE; INTV and ADDR may be entered by using either the service port or RS-422/485 port. Also the optional display/keypad can be used, see section Display/Keypad on page 71. SDELAY With the SDELAY command you can set delay (response time) for user port (RS232 or RS485), or view currently set delay value. -
Page 129: Intv
Chapter 4 ________________________________________________________________ Operation where In STOP mode: measurements output only by command, all commands can be used In RUN mode: outputting automatically, only command S can be used to stop, see command INTV below. In POLL mode: measurements output only with command SEND. See command ADDR below. -
Page 130: Open [Nn]
USER'S GUIDE____________________________________________________________________ OPEN [nn] When all transmitters on the RS-485 bus are in POLL mode the OPEN [nn] command sets one transmitter temporarily to STOP mode so that other commands can be entered. where address of the transmitter (0 ... 99) CLOSE The CLOSE command switches the transmitter back to the POLL mode. -
Page 131: Automatic Autocal
Chapter 4 ________________________________________________________________ Operation If the adjustment in the AutoCal reaches a preset maximum value or if the AutoCal correction fails, for example, because of unstable conditions, a new AutoCal will take place later (if the automatic AutoCal is turned on). -
Page 132: Manual Sensor Purge
USER'S GUIDE____________________________________________________________________ Sensor Purge is an automatic procedure, in which the sensor is dried. Thus, the sensor will response very fast when installing the probe from an ambient to a dry gas. This will also ensure together with AutoCal the best measurement accuracy and long-term stability. -
Page 133: Power-Up Purge
Chapter 4 ________________________________________________________________ Operation Power-up Purge Purge can be set to start within 10 seconds from the power-up of the device. This function can be enabled by using the serial line or the display/keypad. 0706-016 Figure 72 Activating Start-up Purge Press ON to activate Start-up Purge. -
Page 134: Sensor Warming
USER'S GUIDE____________________________________________________________________ Example: >purge Purge started, press any key to abort. > The prompt '>' appears when the heating period is over. However, the transmitter outputs are locked to values measured before purge until the settling time is over. Sensor Warming DMT340 contains a sensor warming function, that is, when humidity reaches a set limit (default: 70%RH), sensor warming operation is activated automatically. -
Page 135: Chapter 5 Maintenance
Chapter 5 ______________________________________________________________ Maintenance CHAPTER 5 MAINTENANCE Periodic Maintenance Cleaning Clean the transmitter enclosure with a soft, lint-free cloth moistened with mild detergent. Changing the Probe Filter Turn the filter counter-clockwise to loosen it. Remove the filter from the probe. Be careful not to touch the sensor with the filter. -
Page 136: Error States
USER'S GUIDE____________________________________________________________________ Error States In error state the quantity is not measured and the output is shown as follows: - analog channel outputs 0 mA or 0 V (you can use the serial line command AERR or display/keypad to change this fault indication value, see section Analog Output Fault Indication Setting on page 119) - the serial port outputs stars (***) - Page 137 Chapter 5 ______________________________________________________________ Maintenance Table 30 Error Messages Error Code Error Message Action Humidity sensor Check the integrity of the humidity probe and the measurement malfunction. probe cable. Clean the probe from dirt, water, ice or other contaminants. Humidity sensor short Check the integrity of the humidity probe and the circuit probe cable.
-
Page 138: Technical Support
USER'S GUIDE____________________________________________________________________ Error Code Error Message Action Internal analog voltage out Internal transmitter failure. Remove the of range transmitter and return the faulty unit to Vaisala Service. Internal system voltage Internal transmitter failure. Remove the out of range transmitter and return the faulty unit to Vaisala Service. -
Page 139: Vaisala Service Centers
Chapter 5 ______________________________________________________________ Maintenance Vaisala Service Centers Vaisala Service Centers perform calibrations and adjustments as well as repair and spare part services. See contact information below. Vaisala Service Centers also offer accredited calibrations, maintenance contracts, and a calibration reminder program. Do not hesitate to contact them to get further information. - Page 140 USER'S GUIDE____________________________________________________________________ This page intentionally left blank. 140 _________________________________________________________________ M210704EN-E...
-
Page 141: Calibration And Adjustment
Chapter 6 ___________________________________________________ Calibration and adjustment CHAPTER 6 CALIBRATION AND ADJUSTMENT Calibration DMT340 is fully calibrated and adjusted as shipped from the factory. The typical calibration interval is two years. Calibration must always be done when there is reason to believe that the device is not within the accuracy specifications. -
Page 142: Opening And Closing The Adjustment Mode
USER'S GUIDE____________________________________________________________________ To ensure the correctness of the adjustment, the reference dewpoint meter must be calibrated at a recognized laboratory with a known uncertainty and traceability to national or international standards. To see when the adjustment was made last, select Adjustment information (with keypad INFO button in the main view, or with serial commands ? and CDATE) or check the date from the Device information. -
Page 143: Adjustment Information
Chapter 6 ___________________________________________________ Calibration and adjustment Adjustment Information These data are shown on the device information. (see section Device Information on page 107. Use the display/keypad to feed the adjustment information. If you are not in the adjustment menu, press the ADJ button on the motherboard to open the ADJUSTMENT MENU. -
Page 144: Adjusting Dewpoint Two-Point
USER'S GUIDE____________________________________________________________________ Adjusting Dewpoint T Before adjusting dewpoint, first carry out the two-point relative humidity adjustment, which will ensure the basic adjustment level. After that, continue with the actual T adjustment. Two-point Relative Humidity Adjustment using Display/Keypad For DMT340 M-sensor, the humidity references of 0 % (for example Nitrogen) and 10 ... -
Page 145: Figure 76 Following The Rh Trend On Graphical Display
Chapter 6 ___________________________________________________ Calibration and adjustment Press GRAPH to follow the RH and T stabilization on graphical display: 0706-020 Figure 76 Following the RH Trend on Graphical Display Follow the instructions on the display. Use the arrow buttons to enter the actual humidity of the reference used. 0706-021 Figure 77 Ending Adjustment of Point 1... -
Page 146: Two-Point Relative Humidity Adjustment Using Serial Line146
USER'S GUIDE____________________________________________________________________ Two-point Relative Humidity Adjustment Using Serial Line Perform purge before adjustment. Use the PURGE command. See section PURGE on page 133. Then press adjustment button on the motherboard inside the transmitter to enable adjustments Perform adjustment with the FCRH command. Wait at least 1 hour before adjusting each point. -
Page 147: Figure 80 Following Stabilization
Chapter 6 ___________________________________________________ Calibration and adjustment 0706-024 Figure 80 Following Stabilization Purge will be performed next. Follow the purge progress on the display. Let the sensor stabilize for at least 1 hour after the purge before proceeding with the adjustment. Press READY when stabilized. 0706-025 Figure 81 Proceeding with T... -
Page 148: One-Point Dewpoint Adjustment Using Serial Line
USER'S GUIDE____________________________________________________________________ One-point Dewpoint Adjustment Using Serial Line Let the sensor stabilize for at least 5 hours. Use the command PURGE to start the manual Purge. See section PURGE on page 133. Wait at least 1 hour. Then press adjustment button on the motherboard inside the transmitter to enable adjustments. -
Page 149: Adjusting Temperature
Chapter 6 ___________________________________________________ Calibration and adjustment Adjusting Temperature Adjusting Temperature Using Display/Keypad Use preferably the display/keypad to adjust the temperature. Press the ADJ button on the motherboard to open the ADJUSTMENT MENU Press the ► arrow button to select Adjust T measurement. Select by pressing 1-point or 2-point adjustment. -
Page 150: Adjusting Temperature Using Serial Line
USER'S GUIDE____________________________________________________________________ Adjusting Temperature Using Serial Line Use the serial line command CT to adjust the temperature. Press the ADJ button on the motherboard to open the adjustment mode. Remove the probe filter and insert the probe into the reference temperature. -
Page 151: Adjusting Analog Outputs
Chapter 6 ___________________________________________________ Calibration and adjustment Adjusting Analog Outputs In the analog output calibration the analog output is forced to the following values: current output = 2 mA and 18 mA voltage output = 10 % and 90 % of the range Connect DMT340 to a calibrated current/voltage meter in order to measure either current or voltage depending on the selected output type. -
Page 152: Adjusting Analog Outputs Using Serial Line
USER'S GUIDE____________________________________________________________________ Adjusting Analog Outputs using Serial Line ACAL Use the serial line to perform the analog output adjustment. Use the ACAL command and enter the multimeter reading. Example (current outputs): >ACAL (mA) ? 2.046 (mA) ? 18.087 (mA) ? 2.036 (mA) ? 18.071... -
Page 153: Chapter 7 Technical Data
Chapter 7 ____________________________________________________________ Technical Data CHAPTER 7 TECHNICAL DATA Specifications Performance Measured variables Dewpoint Sensor Vaisala DRYCAP®180M Measurement range -70 ... +80 °C (-94 ... +176 °F) Td For continuous use -70 ... +45 °C (-94 ... +113 °F) Td Accuracy up to 20 bar / 290 psia see the accuracy graph... -
Page 154: Operating Environment
USER'S GUIDE____________________________________________________________________ Response time 63% [90%] at +20°C gas temperature Flow rate 1 l/min and 1 bar pressure -60 -> -20 °C Td (-76 -> -4 °F Td) 5s [10s] -20 -> -60 °C Td (-4 -> -76 °F Td) 45s [10min] Temperature Measurement range... -
Page 155: Mechanics
Chapter 7 ____________________________________________________________ Technical Data Max wire size 0.5 mm2 (AWG 20) stranded wires recommended Digital outputs RS-232, RS-485 (optional) Relay outputs (optional) 0.5 A, 250 VAC, SPDT Display (optional) LCD with backlight, graphic trend display Menu languages English, French, Spanish, German, Japanese, Russian, Swedish, Finnish, Chinese Mechanics... -
Page 156: Technical Specifications Of Optional Modules
USER'S GUIDE____________________________________________________________________ Technical Specifications of Optional Modules Power Supply Module Operating voltage 100 ... 240 VAC 50/60 Hz Connections screw terminals for 0.5 ... 2.5 mm wire (AWG 20 ... 14) Bushing for 8 ... 11 mm diameter cable Operating temperature -40 ... -
Page 157: Rs-485 Module
Chapter 7 ____________________________________________________________ Technical Data RS-485 Module Operating temperature range -40 ... +60 ºC (-40 ... +140 ºF) Operating modes 2-wire (1-pair) half duplex 4-wire (2-pair) full duplex Operating speed max 115.2 kbaud Bus isolation 300VDC Power consumption @ 24V max 50 mA External loads standard loads... -
Page 158: Options And Accessories
USER'S GUIDE____________________________________________________________________ Options and Accessories Table 32 Options and Accessories Description Order Code MODULES Relay module RELAY-1 Analog Output Module AOUT-1 Isolated RS485 Module RS485-1 Power Supply Module POWER-1 Galvanic Isolation Module DCDC-1 FILTERS Sintered Filter AISI 316L HM47280SP Stainless Steel Filter HM47453SP TRANSMITTER MOUNTING ACCESSORIES Wall Mounting Kit... - Page 159 Chapter 7 ____________________________________________________________ Technical Data Description Order Code Male Connector 8-pin M12 with Cable and 214806SP Adapter CABLE BUSHINGS Cable Gland M20×1.5 for 8 ... 11mm Cable 214728SP Cable Gland M20×1.5 for 11 ... 14mm Cable 214729 Conduit Fitting M20×1.5 for NPT1/2 Conduit 214780SP Dummy Plug M20×1.5 214672SP...
-
Page 160: Dimensions (Mm/Inch)
USER'S GUIDE____________________________________________________________________ Dimensions (mm/inch) 0506-035 Figure 84 DMT340 Transmitter Body Dimensions 160 _________________________________________________________________ M210704EN-E... -
Page 161: Figure 85 Wlan Antenna Dimensions
Chapter 7 ____________________________________________________________ Technical Data 0804-035 Figure 85 WLAN Antenna Dimensions 0506-034 Figure 86 Sampling Cell Dimensions VAISALA ______________________________________________________________________ 161... -
Page 162: Figure 87 Dmt342 Probe Dimensions
USER'S GUIDE____________________________________________________________________ 0503-044 Figure 87 DMT342 Probe Dimensions 0804-059 Figure 88 DMT344 Probe Dimensions 162 _________________________________________________________________ M210704EN-E... -
Page 163: Figure 89 Dmt347 Probe Dimensions
Chapter 7 ____________________________________________________________ Technical Data 0804-129 Figure 89 DMT347 Probe Dimensions 0704-054 Figure 90 DMT348 Standard Probe Dimensions VAISALA ______________________________________________________________________ 163... -
Page 164: Figure 91 Npt 1/2" Nut Dimensions
USER'S GUIDE____________________________________________________________________ 0704-056 Figure 91 NPT 1/2" Nut Dimensions 0704-055 Figure 92 DMT348 Optional 400mm Probe Dimensions 164 _________________________________________________________________ M210704EN-E... -
Page 165: Appendix Acalculation Formulas
CALCULATION FORMULAS This Appendix contains the formulas used for the calculated output quantities. The DMT340 series transmitters measure relative humidity and temperature. From these values dewpoint, mixing ratio, absolute humidity and enthalpy in normal pressure are calculated using the following equations: Dewpoint: ... - Page 166 USER'S GUIDE____________________________________________________________________ Absolute humidity: Enthalpy: . 1 ( 00189 The water vapour saturation pressure P is calculated by using two equations (5 and 6): where: temperature in K coefficients 0.4931358 -0.46094296 * 10 -2...
- Page 167 Appendix A ______________________________________________________ Calculation Formulas The water vapor pressure is calculated using: Parts per million by volume is calculated using: Symbols: Td = dewpoint temperature (°C) Pw = water vapour pressure (hPa) Pws = water vapour saturation pressure (Pa) RH = relative humidity (%)
- Page 168 USER'S GUIDE____________________________________________________________________ This page intentionally left blank. 168 _________________________________________________________________ M210704EN-E...
- Page 169 www.vaisala.com *M210704EN*...