Ricoh Aficio SP 3410DN Hardware Manual
Hardware guide
Hide thumbs
Also See for Aficio SP 3410DN:
- Quick manual (2 pages) ,
- Operating instructions manual (288 pages) ,
- Notes for users (32 pages)
Table of Contents
Advertisement
Read this manual carefully before you use this machine and keep it handy for future reference. For safe and correct use, be sure to read "Safety
Information" before using the machine.
Guide to the Printer
1
Installing the Printer and Options
2
Connecting the Printer
3
Paper and Other Media
4
Replacing Consumables
5
Cleaning the Printer
6
Troubleshooting
7
Removing Misfed Paper
8
Appendix
9
Operating Instructions
Hardware Guide
Advertisement
Table of Contents
Troubleshooting

Related Manuals for Ricoh Aficio SP 3410DN


Summary of Contents for Ricoh Aficio SP 3410DN
-
Page 1: Operating Instructions
Operating Instructions Hardware Guide Guide to the Printer Installing the Printer and Options Connecting the Printer Paper and Other Media Replacing Consumables Cleaning the Printer Troubleshooting Removing Misfed Paper Appendix Read this manual carefully before you use this machine and keep it handy for future reference. For safe and correct use, be sure to read “Safety Information”... - Page 2 Introduction This manual contains detailed instructions and notes on the operation and use of this machine. For your safety and benefit, read this manual carefully before using the machine. Keep this manual in a handy place for quick reference. Important Contents of this manual are subject to change without prior notice.
-
Page 3: Table Of Contents
TABLE OF CONTENTS Positions of RWARNING and RCAUTION labels ..........1 Power Switch Symbols....................1 Manuals for This Printer..................2 How to Read This Manual ..................3 Symbols ........................3 Printer Types ......................4 Using Manuals......................5 Installing Manuals on Your Computer ................5 Opening Manuals .......................6 Removing Manuals from Your Computer..............7 1. - Page 4 5. Replacing Consumables Replacing the Print Cartridge ................59 6. Cleaning the Printer Cautions to Take When Cleaning ...............65 Cleaning the Friction Pad and the Paper Feed Roller ........66 7. Troubleshooting Error & Status Messages on Smart Organizing Monitor........69 Panel Indicator .....................74 Printer Does Not Print ..................75 When the Printer is Directly Connected to a Computer via USB Cable ....76 Other Printing Problems ..................79...
-
Page 5: Positions Of Rwarning And Rcaution Labels
Positions of RWARNING and RCAUTION labels This machine has labels for RWARNING and RCAUTION at the positions shown below. For safety, please follow the instructions and handle the machine as indicated. BXG001 Do not incinerate toner or toner containers. Toner dust may cause flashback when exposed to an open flame. Do not touch the parts a label indicates. -
Page 6: Manuals For This Printer
Manuals for This Printer For particular functions, see the relevant parts of the manual. ❖ Safety Information Provides information on safe usage of this printer. To avoid injury and prevent damage to the printer, be sure to read this. ❖ Quick Installation Guide Contains procedures for removing the printer from its box, and connecting it to a computer. -
Page 7: How To Read This Manual
How to Read This Manual Symbols This manual uses the following symbols: Important Indicates points to pay attention to when using the machine, and explanations of likely causes of paper misfeeds, damage to originals, or loss of data. Be sure to read these explanations. -
Page 8: Printer Types
Printer Types This printer comes in two models that have different duplex functions. When describing procedures that are model-specific, this manual refers to the different printer models as Type 1 or Type 2. The following table describes the model types. ❖... -
Page 9: Using Manuals
Using Manuals Be sure to read this section before any other part of this manual. • This manual uses procedures based on Windows XP as an example, unless otherwise specified. Procedures and screens might vary depending on the operating system you are using. Installing Manuals on Your Computer The manuals for this printer are provided as HTML and/or PDF documents on the included CD-ROM. -
Page 10: Opening Manuals
Opening Manuals This section describes how to open the manuals. There are three ways to view the manuals. Opening from the desktop icon Follow the procedure below to open the manuals from the desktop icon. Double-click the manual icon on your desktop. The manual opens. -
Page 11: Removing Manuals From Your Computer
Note ❒ If you are using a computer running a Windows operating system, the CD- ROM opens automatically. However, AutoRun may not work under cer- tain operating system settings. If this is the case, launch “setup.exe” from the CD-ROM root directory. Removing Manuals from Your Computer Follow the procedure below to remove manuals from your computer. -
Page 13: Guide To The Printer
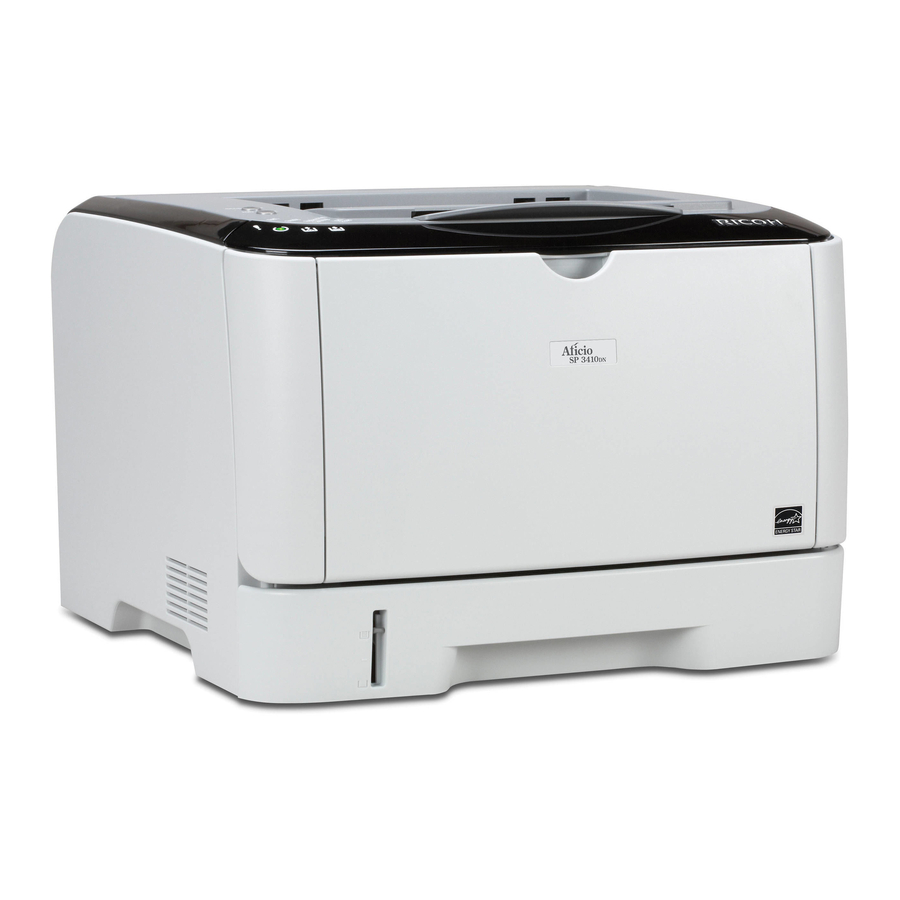
1. Guide to the Printer Exterior: Front View BXG003 Control Panel Front Cover Contains keys for printer control and in- Open this cover to replace the print car- dicators that show the printer status. tridge or remove jammed paper. Stop Fences Tray 1 Raise this fence to prevent paper from This tray can hold up to 250 sheets of... -
Page 14: Exterior: Rear View
Guide to the Printer Exterior: Rear View BXG004 Ethernet Port Tray 1 Rear cover Use a network interface cable to connect Remove this cover when you load paper the printer to the network. larger than A4 in the paper tray. USB Port Power Socket Use a USB cable to connect the printer to... -
Page 15: Interior
Interior Interior BXG005 Print Cartridge If a toner end indicator on the control panel lights up, replace the print car- tridge. Reference For details about the messages that appear on the screen when consumables need to be replaced, see p.69 “Error & Status Messages on Smart Organizing Monitor”. -
Page 16: Control Panel
Guide to the Printer Control Panel BXG220 {Stop/Start} key Alert Indicator If you press this key, the printer stops re- Lights up whenever a printer error occurs. ceiving data, and printing is not possible. Use Smart Organizing Monitor to check Press the {Stop/Start} key again to return the error. -
Page 17: Installing The Printer And Options
2. Installing the Printer and Options Installing the Printer This section describes how to install the printer and perform settings after instal- lation. Where to Put the Printer The printer’s location should be carefully chosen because environmental condi- tions greatly affect its performance. R WARNING: •... - Page 18 Installing the Printer and Options R CAUTION: • Keep the machine away from humidity and dust. Otherwise a fire or an electric shock might occur. Do not place the machine on an unstable or tilt- ed surface. If it topples over, an injury might occur. •...
- Page 19 Installing the Printer ❖ Optimum Environmental Conditions Permissible and recommended temperature and humidity ranges are as fol- lows: BSP023S • White area: Permissible Range • Gray area: Recommended Range Note ❒ To avoid buildup of ozone, be sure to locate this machine in a large, well ventilated room that has an air turnover of more than 30 m /hr/person.
-
Page 20: Unpacking
Installing the Printer and Options Unpacking To protect it from shock and vibration during transit, this printer comes pack- aged in cushioning foam and secured with tape. Remove these protective mate- rials after bringing the printer to where it will be installed. R WARNING: •... - Page 21 Installing the Printer Take out the printer from the box, and then remove the plastic bag. Lift the printer by using the inset grips on both sides of the printer. BXG010 Remove the protective materials attached on the printer's exterior. BXG011 BXG012 The actual printer may come with protective materials attached in different...
- Page 22 Installing the Printer and Options Push the side button to open the front cover, and then carefully lower it. BXG013 Remove the protective material attached inside the printer. BXG014 Unpack the print cartridge. Then, place it on a flat surface, and remove the protection sheet.
- Page 23 Installing the Printer Shake the print cartridge from side to side five or six times. BSP038S Slide the print cartridge in horizontally. When the cartridge can go no fur- ther, raise it slightly and push it fully in. Then push down on the cartridge until it clicks into place.
- Page 24 Installing the Printer and Options Carefully pull tray 1, and then pull out with both hands. BXG204 Remove the protective material attached inside the tray. BXG205 Carefully push tray 1 straight into the printer. BXG210...
-
Page 25: Turning The Power On
Installing the Printer Pull out and raise the stop fence. BXG019 Turning the Power On Follow the procedure below to turn the power on. R WARNING: • Plug and unplug the power cable with dry hands, or an electric shock could occur. - Page 26 Installing the Printer and Options Turn the power switch to ”aOn”. BXG020 The Ready indicator on the control panel lights up. Note ❒ Wait until the Ready indicator turns on. ❒ The printer may make a noise while initializing. This noise does not indi- cate a malfunction.
-
Page 27: Installing The Optional Paper Feed Unit
Installing the Optional Paper Feed Unit Installing the Optional Paper Feed Unit This section describes how to install the optional paper feed unit. R WARNING: • Touching the prongs of the power cable's plug with anything metallic constitutes a fire and electric shock hazard. R CAUTION: •... - Page 28 Installing the Printer and Options Remove the protective material attached inside the tray. BXG205 Lift the printer using the inset grips on both sides. BXG010 There are three upright pins on the optional paper feed unit. Align them with the holes on the underside of the printer, and then carefully lower the printer onto them.
- Page 29 Installing the Optional Paper Feed Unit Note ❒ When moving the printer, remove the optional paper feed unit. ❒ After installing the optional paper feed unit, select tray 2 in the printer driver. For details, see the printer driver Help. ❒...
- Page 30 Installing the Printer and Options...
-
Page 31: Connecting The Printer
3. Connecting the Printer Network Connection Follow the procedure below to connect the printer to a computer through a net- work. Prepare the hub and other network devices before connecting the 10BASE-T or 100BASE-TX cable to the printer's Ethernet port. R CAUTION: •... -
Page 32: Reading The Led Lamps
Connecting the Printer Reading the LED Lamps BSP048S Yellow: Lights up when 10BASE-T connection is properly established. Flashes when data is being transmitted. Green: Lights up when 100BASE-TX connection is properly established. Flashes when data is being transmitted. -
Page 33: Usb Connection
USB Connection USB Connection Important ❒ USB 2.0 interface cable is not supplied. Obtain a USB cable that is correct for the computer you are using. ❒ USB connection is possible under Windows 2000/XP/Vista, Windows Server 2003/2003 R2/2008, and Mac OS X. ❒... - Page 34 Connecting the Printer...
-
Page 35: Paper And Other Media
4. Paper and Other Media Supported Paper for Each Tray This section describes the type, size, and weight of paper that can be loaded into each tray. The capacity of each paper tray is also provided. Note ❒ All paper must be set vertically, regardless of the paper size. ❖... -
Page 36: Bypass Tray
Paper and Other Media ❖ Bypass tray Type Size Weight Capacity Plain paper 52 to 162 g/m Thin paper B5 JIS (13.8 to 43.0 lb.) (80 g/m , 20 lb.) Thick paper 1 Thick paper 2 B6-S Recycled paper " × 14 ") Color paper Legal (8 Preprinted paper... -
Page 37: Paper Recommendations
Paper Recommendations Paper Recommendations Loading Paper Important ❒ Do not use ink-jet printer paper because it may stick to the fusing unit and cause a paper misfeed. ❒ When printing on OHP transparencies that have a print side, load them with the print side over on the bypass tray. -
Page 38: Types Of Paper And Other Media
Paper and Other Media Types of Paper and Other Media This section provides information about the types of paper supported by this printer and cautions for use. Setting the paper type Use the printer driver or Smart Organizing Monitor to specify the paper type you want to use. -
Page 39: Thin Paper
Paper Recommendations Item Description Notes • The number of sheets that can be printed in one minute is approximately half that of plain paper. • The number of sheets that can be printed in one minute may become lower than normal when printing on paper "... -
Page 40: Preprinted Paper
Paper and Other Media ❖ Preprinted paper Item Description Paper thickness 75 to 90 g/m (20 to 24.0 lb.) Supported paper tray Any input tray can be used. " × 14 "), Letter (8 " × 11 ") Duplex supported size A4, Legal (8 Notes If the paper thickness is outside the specified range, select... - Page 41 Paper Recommendations ❖ Cardstock Item Description Paper thickness 105 to 160 g/m (28.0 to 42.6 lb.) Supported paper tray Tray 1 and bypass tray Duplex supported size None Notes • The number of sheets that can be printed in one minute is approximately half that of plain paper.
-
Page 42: Paper Not Supported By This Printer
Paper and Other Media ❖ Envelope Item Description Supported paper tray Bypass tray Duplex supported size None Notes • Avoid using self-adhesive envelopes. They may cause printer malfunctions. • The number of envelopes that can be printed in one minute is approximately half that of plain paper. •... -
Page 43: Print Area
Paper Recommendations Print Area The following shows the print area for this printer. Be sure to set the print mar- gins correctly by the application. ❖ Paper BSP056S Print area Feed direction Approximately 4.2 mm (0.17 inches) Approximately 4.2 mm (0.17 inches) Note ❒... - Page 44 Paper and Other Media ❖ Envelope BSP057S Print area Feed direction Approximately 4.2 mm (0.17 inches) Approximately 4.2 mm (0.17 inches) Note ❒ The print area may vary depending on the paper size, printer language and printer driver settings. ❒ For better print quality, we recommend the right, left, top, and bottom print margins to be at least 15 mm (0.6 inches) each.
-
Page 45: Loading Paper
Loading Paper Loading Paper This section describes how to load paper into the paper tray and bypass tray. R CAUTION: • Do not pull out the paper tray forcefully. If you do, the tray might fall and cause an injury. Loading Paper in Tray 1 The following example explains the loading procedure for the standard paper tray (Tray 1). - Page 46 Paper and Other Media Pinch the clip on the side paper guide and slide it to match the standard size. BXG032 BXG104 When loading custom size paper, position the paper guide slightly wider than the actual paper size. Pinch the end paper guide and slide it inward to match the standard size. BXG105...
- Page 47 Loading Paper BXG106 When loading custom size paper, position the paper guide slightly wider than the actual paper size. Load the new paper stack print side down. Make sure paper is not stacked higher than the upper limit marked inside the tray.
- Page 48 Paper and Other Media Check there are no gaps between the paper and the paper guides; both side and end paper guides. BXG109 If there is a gap between the paper and the end paper guide, as in the example below, the paper might not feed in correctly.
- Page 49 Loading Paper Reference For details about paper types supported by the printer, see p.31 “Support- ed Paper for Each Tray”. For details about the paper settings, see p.34 “Types of Paper and Other Media”. Loading legal size paper This section explains how to load Legal size paper into the printer. The same procedure applies to A4 paper (297 mm) or larger.
- Page 50 Paper and Other Media Release the extender locks on both sides of the tray, and then pull out the extender until it clicks. BXG211 After extension, make sure the extender's inner surface and the scale are aligned. BSP070S Lock the extender in the extended position. BXG212...
- Page 51 Loading Paper Pinch the clip on the side paper guide, and then slide it to match the stand- ard size. BXG103 BXG104 Pinch the end paper guide and slide it inward to match the Legal paper size. BXG214 BXG106...
- Page 52 Paper and Other Media Load the new paper stack print side down. Make sure paper is not stacked higher than the upper limit marked inside the tray. BXG107 Slide the guides inward, until they are flush against the paper's sides. Make sure the paper is not stacked higher than the projection on the side paper guides.
- Page 53 Loading Paper If there is a gap between the paper and the end paper guide, as in the example below, the paper might not feed in correctly. BXG108 Carefully push tray 1 straight into the printer. BXG040 To avoid paper jams, make sure the tray is securely inserted. Note ❒...
-
Page 54: Loading Paper In Tray 2
Paper and Other Media Loading Paper in Tray 2 The following example explains the loading procedure for tray 2. Pull tray 2, and then pull it out with both hands. BXG048 Place the tray on a flat surface. Pinch the clips on the side paper guide, and then slide it to match the paper size. - Page 55 Loading Paper BXG106 When loading custom size paper, position the paper guide slightly wider than the actual paper size. Load the new paper stack print side down. Make sure paper is not stacked higher than the upper limit marked inside the tray.
- Page 56 Paper and Other Media Check there are no gaps between the paper and the paper guide; both side and end paper guides. BXG109 Carefully push tray 2 straight into the printer. BXG049 Note ❒ The remaining paper indicator on the left front side of the paper tray shows approximately how much paper is remaining.
-
Page 57: Loading Paper In The Bypass Tray
Loading Paper Loading Paper in the Bypass Tray Important ❒ Set the size and direction of the loaded paper using Smart Organizing Moni- tor or the printer driver. Make sure the settings do not conflict. Otherwise, the paper may jam or the print quality may be affected. ❒... - Page 58 Paper and Other Media Slide the side guides outward, then load paper with the print side up, and push in until it stops against the printer. BXG052 Adjust the side guides to the paper width. BXG053 Note ❒ After loading paper in the tray, specify the paper type and size using Smart Organizing Monitor or the printer driver.
- Page 59 Loading Paper Loading envelopes R CAUTION: • The inside of this machine becomes very hot. Do not touch parts labelled “v” (indicating a hot surface). Important ❒ Before printing on envelopes, make sure to lower the levers on the printer rear, inside the rear cover, to avoid envelopes coming out creased.
- Page 60 Paper and Other Media Slide the side guides outward, then load envelopes with the print side up, and push in until it stops against the printer. You can print on envelopes with flaps folded or unfolded. When using enve- lopes with flaps folded, check that the flaps are folded properly and there is no air inside.
- Page 61 Loading Paper Lower the green levers on both sides. BXG056 Make sure to raise the levers back to their original positions after printing. Close the rear cover. BXG071 Note ❒ After loading envelopes in the tray, specify the paper type and size using Smart Organizing Monitor or the printer driver.
- Page 62 Paper and Other Media...
-
Page 63: Replacing Consumables
5. Replacing Consumables Replacing the Print Cartridge R WARNING: • Do not incinerate used toner or toner containers. Toner dust might ignite when exposed to an open flame. Dispose used toner contain- ers in accordance with local regulations. • Do not store toner, used toner, or toner containers in a place with an open flame. - Page 64 Replacing Consumables ❖ When to replace the print cartridge If the Alert indicator or Replace Print Cartridge indicator on the control panel light up, or the following message appears on the Smart Organizing Monitor dialog box, replace the print cartridge. “...
- Page 65 Replacing the Print Cartridge Carefully pull out the print cartridge horizontally, holding its center. BXG058 • Do not shake the removed print cartridge. Doing so can cause remaining toner to leak. • Place the old print cartridge on paper or similar material to avoid dirtying your workspace.
- Page 66 Replacing Consumables Hold the print cartridge and shake it from side to side five or six times. BSP038S Even distribution of toner within the bottle improves print quality. Slide the print cartridge in horizontally. When the cartridge can go no fur- ther, raise it slightly and push it fully in.
- Page 67 Replacing the Print Cartridge Put the protective sheet you removed in step on the old print cartridge. Then, put the old print cartridge into the bag, and then put it into the box. BSP117S Note ❒ Make sure to cover the old print cartridge with the protective cover for recycling and environmental purposes.
- Page 68 Replacing Consumables...
-
Page 69: Cleaning The Printer
6. Cleaning the Printer Cautions to Take When Cleaning R WARNING: • Do not attempt any maintenance or troubleshooting other than that mentioned in this manual. This machine contains a laser beam gener- ator and direct exposure to laser beams can cause permanent eye damage. -
Page 70: Cleaning The Friction Pad And The Paper Feed Roller
Cleaning the Printer Cleaning the Friction Pad and the Paper Feed Roller If the friction pad or paper feed roller is dirty, a multi-feed or misfeed might occur. In this case, clean the friction pad and paper feed roller as follows: R CAUTION: •... - Page 71 Cleaning the Friction Pad and the Paper Feed Roller Wipe the rubber part of the roller with a soft damp cloth. After that, wipe it with a dry cloth to remove the moisture. BXG064 Reload the removed paper into the tray, and then push the tray carefully into the printer until it clicks into place.
- Page 72 Cleaning the Printer...
-
Page 73: Troubleshooting
7. Troubleshooting Error & Status Messages on Smart Organizing Monitor This section explains what the messages that appear on the Smart Organizing Monitor dialog box mean and what to do when a particular message appears. Message Explanation Recommended Action An error has occurred with The printer detected the net- Turn off the power, and then the network device. - Page 74 Troubleshooting Message Explanation Recommended Action No Response from I/O Device No information has been re- Check the main power switch is ceived from the printer. turned on and the power cord Check the cable, power cord, is securely connected. Check and main switch.
- Page 75 Error & Status Messages on Smart Organizing Monitor Message Explanation Recommended Action Paper Misfeed There is a misfeed in the Remove the misfed paper. printer. Pull out the indicated unit, See p.85 “Removing Jammed and then remove any misfed (Tray 2 jam) Paper from the Inner/Tray paper.
- Page 76 Troubleshooting Message Explanation Recommended Action Paper Type Mismatch The paper type setting in the Load paper of the selected type tray differs from that of actual in the tray, and then change the Paper of the selected type is paper type in the tray. paper type setting with Smart not loaded in the indicated Organizing Monitor.
- Page 77 Error & Status Messages on Smart Organizing Monitor Message Explanation Recommended Action Unit Not Detected The print cartridge is not set Set the print cartridge correctly. correctly, or not set. Open the indicated cover, and See p.59 “Replacing the Print then check Print Cartridge.
-
Page 78: Panel Indicator
Troubleshooting Panel Indicator The following table explains the meaning of the various Indicator patterns that the printer alerts to users about its conditions. Indicator patterns Cause All indicators are lit. There are problems with the printer. Check the printer status on the Smart Organizing Monitor dialog box. -
Page 79: Printer Does Not Print
Printer Does Not Print Printer Does Not Print Possible Cause Solutions Is the power on? Confirm that the cable is securely plugged into the power outlet and the printer. Turn the power on. Does the Alert indicator If so, check the error message on the Smart Organizing Monitor stay red? dialog box and take the required action. -
Page 80: When The Printer Is Directly Connected To A Computer Via Usb Cable
Troubleshooting When the Printer is Directly Connected to a Computer via USB Cable Windows When the printer is directly connected via a USB cable to a computer but the Ready indicator does not flash or light up, use the following method to check the port connection: •... - Page 81 Printer Does Not Print Windows XP Home Edition On the [Start] menu, click [Control Panel]. Click [Printers and Other Hardware]. Click [Printers and Faxes]. Click to select the icon of the printer. Next, on the [File] menu, click [Properties]. Click the [Ports] tab. Check the [Print to the following port(s).] box to confirm that the correct port is selected.
- Page 82 Troubleshooting Mac OS X When the printer is connected to Mac OS X and the Ready indicator does not flash or light up, try the following procedures to check the port connection. • Use [About This Mac] to check the USB information. •...
-
Page 83: Other Printing Problems
Other Printing Problems Other Printing Problems Status Possible Causes, Descriptions, and Solutions Toner smears appear on the The paper setting may not be correct. For example, although print side of the page. you are using thick paper, the setting for thick paper may not be set. - Page 84 Troubleshooting Status Possible Causes, Descriptions, and Solutions Multiple pages are fed at once. • There may be a gap between the front end paper guide and the paper, or between the paper guide both side and the paper in the paper tray. Make sure there are no gaps. See p.41 “Loading Paper”.
- Page 85 Other Printing Problems Status Possible Causes, Descriptions, and Solutions Images are printed diagonally Adjust the front end paper guide and both side paper guides to the pages to match the paper size. See p.41 “Loading Paper”. ASH103S Horizontal lines appear on the •...
- Page 86 Troubleshooting Status Possible Causes, Descriptions, and Solutions Photo images are coarse. Some applications lower the resolution for making prints. Change the [Dithering:] setting in the printer driver's dialog Fine dot pattern does not print. box. See the printer driver Help. Change the [Dithering:] setting in the printer driver's dialog Solid lines are printed as broken lines.
-
Page 87: Additional Troubleshooting
Additional Troubleshooting Additional Troubleshooting Problems Solutions Strange noise is heard. If a supply was recently replaced or an option in the area the strange noise is coming from, check the supply or option is properly attached. If the strange noise persists, contact your sales or service representative. - Page 88 Troubleshooting...
-
Page 89: Removing Misfed Paper
8. Removing Misfed Paper When Paper is Jammed If a paper jam occurs, the Alert indicator on the control panel flashes and the fol- lowing message appears on the Smart Organizing Monitor dialog box: “ ” Paper Misfeed. Open the indicated cover or pull out the indicated unit, and then remove any misfed paper. - Page 90 Removing Misfed Paper If paper is loaded in the bypass tray, remove the paper. Close the bypass tray. Push the side button to open the front cover, and then carefully lower it. BXG057 Carefully pull out the print cartridge horizontally, holding its center. BXG058 •...
- Page 91 When Paper is Jammed Slide the print cartridge in horizontally. When the cartridge can go no fur- ther, raise it slightly and push it fully in. Then push down on the cartridge until it clicks into place. BXG060 Using both hands, carefully push up the front cover until it closes. BXG061 Note ❒...
-
Page 92: Removing Jammed Paper From The Bypass Tray
Removing Misfed Paper Removing Jammed Paper from the Bypass Tray Use the following procedure to remove paper that has become jammed after being fed in from the bypass tray. R CAUTION: • The inside of this machine becomes very hot. Do not touch parts labelled “v”... - Page 93 When Paper is Jammed Carefully pull out the print cartridge horizontally, holding its center. BXG058 • Do not shake the removed print cartridge. Doing so can cause remaining toner to leak. • Place the print cartridge on paper or similar material to avoid dirtying your workspace.
-
Page 94: Removing Jammed Paper From The Exit Area/Duplex Unit
Removing Misfed Paper Using both hands, carefully push up the front cover until it closes. BXG061 Note ❒ When closing the front cover, push the upper area of the cover firmly. After closing the cover, check that the error is cleared. Removing Jammed Paper from the Exit Area/Duplex Unit Use the following procedure to remove paper that has become jammed in the exit area or inside the duplex unit. - Page 95 When Paper is Jammed Remove the jammed paper carefully. BXG070 Close the rear cover. BXG071 Pull tray 1 halfway out, and check for jammed paper. If there is jammed paper, remove it carefully. BXG073...
- Page 96 Removing Misfed Paper Pull tray 1 out completely with both hands. BXG072 Place the tray on a flat surface. Push the blue lever. Pushing the blue lever lowers the duplex transport unit. BSP237S If there is jammed paper, carefully remove it. BSP120S...
- Page 97 When Paper is Jammed With the duplex transport unit still lowered, carefully slide tray 1 back in until it stops. BXG040 If paper is loaded in the bypass tray, remove the paper and close the bypass tray. Push the side button to open the front cover, and then carefully lower it. BXG057 Carefully pull out the print cartridge horizontally, holding its center.
- Page 98 Removing Misfed Paper Lifting the guide plate, remove the jammed paper carefully. BXG067 Slide the print cartridge in horizontally. When the cartridge can go no fur- ther, raise it slightly and push it fully in. Then push down on the cartridge until it clicks into place.
-
Page 99: Appendix
9. Appendix Moving and Transporting the Printer R CAUTION: • The printer weighs approximately 12 kg (26.4 lb.). When moving the printer, use the inset grips on both sides, and lift slowly in pairs. The printer will break or cause injury if dropped. •... -
Page 100: Moving Over A Long Distance
Appendix Lift the printer by using the inset grips on both sides of the printer, and then move it horizontally to the place where you want to use it. BXG010 If you have removed tray 2, reinstall it. Note ❒ Be sure to hold the printer level while carrying it. To prevent toner from spilling, move the printer carefully. -
Page 101: Disposal
Disposal Disposal Ask your sales or service representative for information about correct disposal of this printer. -
Page 102: Consumables
Appendix Consumables R CAUTION: • Our products are engineered to meet high standards of quality and func- tionality, and we recommend that you use only the expendable supplies available at an authorized dealer. Print Cartridges Average printable number of pages Print cartridge per cartridge Black... -
Page 103: Specifications
Specifications Specifications This section lists the printer's specifications. Main Unit ❖ Configuration Desktop ❖ Print process Laser electrostatic transfer ❖ Warm-up time Less than 20 seconds (23 °C, 71.6 °F) ❖ Paper sizes • Standard paper sizes " × 14 "), Letter (8 "... - Page 104 Appendix ❖ Paper weight • Tray 1 52 to 162 g/m (13.8 to 43.0 lb.) • Tray 2 (option) 60 to 105 g/m (16.0 to 28.0 lb.) • Bypass tray 52 to 162 g/m (13.8 to 43.0 lb.) ❖ Memory 64 MB ❖...
-
Page 105: Paper Feed Unit Tk1080
Specifications ❖ Printer language PCL 6, PostScript 3 ❖ Fonts 80 fonts ❖ Network protocol TCP/IP, IPP Paper Feed Unit TK1080 ❖ Paper capacity 250 sheets ❖ Paper size " × 14"), Letter (8 " × 11), Half Letter (5 A4, B5 JIS, A5, Legal (8 "... -
Page 106: Electromagnetic Interference
Appendix Electromagnetic Interference If this machine is located close to another electronic device, both devices may malfunction due electromagnetic interference. Televisions and radios may produce noise if located too close to this machine. If this happens, do the following: • Move the television or radio as far as possible from the machine. •... -
Page 107: Index
INDEX Additional troubleshooting Manual duplex Appendix Manuals for this printer Auto duplex Model types Moving and transporting the printer Moving over a long distance Cleaning Connecting the printer network connection Network USB connection Consumables Opening manuals Options Disposal Other printing problems Error and status messages Panel indicator Ethernet... - Page 108 Setting the paper type Smart Organizing Monitor Specification Specifying standard size paper tray 1 tray 2 Storing paper Toner Tray 2 Turning the power on Type 1 model Type 2 model Types of paper Unpacking USB port Using manuals Where to put the printer M012-8602...
- Page 109 The meanings of the symbols for the switches on this machine are as follows: a:POWER ON. b:POWER OFF. Trademarks ® ® ® ® Microsoft , Windows , Windows Server , and Windows Vista are registered trademarks of Microsoft Corporation in the United States and/or other countries. Adobe, Acrobat, Acrobat Reader, PostScript, and Reader are registered trademarks of Adobe Systems Incorporated.
- Page 110 EN GB M012-8602...