
Related Manuals for Vaisala INTERCAP HMDW80 SERIES


Summary of Contents for Vaisala INTERCAP HMDW80 SERIES
- Page 1 USER'S GUIDE ® Vaisala INTERCAP Humidity and Temperature Transmitters HMDW80 Series M211510EN-C...
- Page 2 English versions are applicable, not the translations. The contents of this manual are subject to change without prior notice. This manual does not create any legally binding obligations for Vaisala towards customers or end users. All legally binding obligations and agreements are included exclusively in the applicable supply contract or the General Conditions of Sale and General Conditions of Service of Vaisala.
-
Page 3: Table Of Contents
Wall installation ..............25 Wiring ..................26 HMD82(D), HMW88(D), and HMS82 ........26 TMD82 ................. 26 HMD83(D), HMW89(D), and HMS83 ........27 TMD83 ................. 27 HMW82 ................28 TMW82 ................28 HMW83 ................29 TMW83 ................29 VAISALA _________________________________________________________________________ 1... - Page 4 User's Guide _______________________________________________________________________ DIP Switches ................30 CHAPTER 4 MAINTENANCE .................... 33 Cleaning ................... 33 Calibration ................33 ® Replacing the INTERCAP Humidity Sensor ....... 34 ® Replacing the INTERCAP Sensor on Models HMD82/83 and HMW88/89 ..............34 ® Replacing the INTERCAP Sensor on Wall Models HMW82/83 ................
- Page 5 Specifications for HMD82/83D and HMW88/89D ....47 Table 12 Operating Environment (All Models) ........47 Table 13 Inputs and Outputs ..............47 Table 14 Mechanics ................48 Table 15 HMDW80 Series Spare Parts and Accessories ....... 48 VAISALA _________________________________________________________________________ 3...
- Page 6 User's Guide _______________________________________________________________________ This page intentionally left blank. 4 ____________________________________________________________________ M211510EN-C...
-
Page 7: Chapter 1 General Information
- Chapter 4, Maintenance, provides information that is needed in basic maintenance of HMDW80 series. - Chapter 5, Troubleshooting, describes possible problems, their probable causes and remedies, and provides contact information for technical support. - Chapter 6, Technical Data, provides the technical data of the HMDW80 series. VAISALA _________________________________________________________________________ 5... -
Page 8: Version Information
User's Guide _______________________________________________________________________ Version Information Table 1 Manual Revisions Manual Code Description M211510EN-C June 2013. This manual. Changes: Added outdoor transmitter models HMS82 and HMS83. Changed PTFE membrane filter model from 230727SP (30 mm long) to ASM210856SP (24.5 mm long). Changed PTFE filter model from 219452SP (40 mm long) to DRW239993SP (22 mm long). -
Page 9: Safety
ESD Protection Electrostatic Discharge (ESD) can cause immediate or latent damage to electronic circuits. Vaisala products are adequately protected against ESD for their intended use. It is possible to damage the product, however, by delivering electrostatic discharges when touching, removing, or inserting any objects inside the equipment housing. -
Page 10: Regulatory Compliances
Vaisala Oyj. Software License This product contains software developed by Vaisala. Use of the software is governed by license terms and conditions included in the applicable supply contract or, in the absence of separate license terms and conditions, by the General License Conditions of Vaisala Group. -
Page 11: Chapter 2 Product Overview
- Several output parameters; see section HMDW80 Series Transmitter Models on page 10 for list of supported parameters by transmitter model. - Several IP65-classified models for demanding HVAC applications. - UL-V0 flammability rating. VAISALA _________________________________________________________________________ 9... -
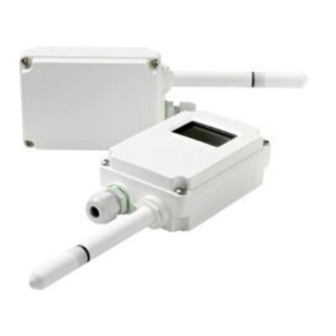
Page 12: Hmdw80 Series Transmitter Models
User's Guide _______________________________________________________________________ HMDW80 Series Transmitter Models Table 3 below lists the most important differences between the HMDW80 series transmitter models. For technical specifications, see Chapter 6, Technical Data, on page 45. Table 3 HMDW80 Series Transmitter Models Model Type Outputs Display IP Rating... -
Page 13: Transmitter Parts - Duct Models
9 = Cable gland. Suitable for 4 ... 8 mm diameter cable. 10 = Display (in HMD82D and HMD83D models). 11 = Screw terminals. 12 = Window for display (in HMD82D and HMD83D models). 13 = Transmitter cover with captive screws. VAISALA ________________________________________________________________________ 11... -
Page 14: Transmitter Parts - Wall Models
User's Guide _______________________________________________________________________ Transmitter Parts – Wall Models 1302-019 Figure 2 Parts of Wall Mounted Models (HMW88/89) 1 = Screw holes for mounting (2 pcs). 2 = Display (in HMW88D and HMW89D models). 3 = Type label. 4 = DIP switches for selecting humidity parameter and display units 5 = Cable gland. -
Page 15: Figure 3 Parts Of Wall Mounted Models (Hmw82/83 And Tmw82/83)
1 = Opening tab: push down to open the transmitter. 2 = Direction arrow. Must point up after mounting base has been installed on the wall. 3 = Wiring label. 4 = Screw terminals. 5 = Mounting base. 6 = Transmitter cover with component board. VAISALA ________________________________________________________________________ 13... -
Page 16: Transmitter Parts - Outdoor Models
User's Guide _______________________________________________________________________ Transmitter Parts – Outdoor Models 1304-048 Figure 4 Parts of Outdoor Models (HMS82/83) 1 = Radiation shield. Do not remove for installation, only when changing sensor or filter. 2 = Long screws that keep the radiation shield in place (2 pcs), 3 mm hex socket. -
Page 17: Display
Depending on the error, the affected measurement readings may be replaced by asterisks “*”. For more information on the possible errors, see section Error Messages on the Display on page 42. 1302-025 Figure 7 Measurement Screen with Error (HMD83D) VAISALA ________________________________________________________________________ 15... -
Page 18: Analog Output Overrange Behavior
User's Guide _______________________________________________________________________ Analog Output Overrange Behavior Analog outputs of the HMDW80 series transmitters have a defined behavior when the values measured by the transmitter are outside the scaled analog output range: - Output is clipped at the end of the range. - Output is set to error state when measured value is 5% outside the scaled range. -
Page 19: Chapter 3 Installation
North side of the building typically provides a suitable shaded location. - Avoid placing the transmitter near windows, air conditioning units, or other heat and moisture sources such as cooling towers. - Install the transmitter at least 2.5 m above ground level. VAISALA ________________________________________________________________________ 17... -
Page 20: Installing Duct Models Hmd82/83 And Tmd82/83
User's Guide _______________________________________________________________________ Installing Duct Models HMD82/83 and TMD82/83 Medium size crosshead screwdriver (Pozidriv) for screws on REQUIRED cover and flange. TOOLS Small slotted screwdriver for screw terminals. Drill with 2.5 mm and 13 mm bits for making the installation holes. -
Page 21: Figure 8 Duct Model Installation
Chapter 3 ________________________________________________________________ Installation 1302-026 Figure 8 Duct Model Installation 1302-027 Figure 9 Position the Sensor to Center of Duct 290.8 40.6 250.2 244.5 Ø12 Ø3.5 Ø12 Ø4...8 1302-028 Figure 10 Duct Model Dimensions (HMD82/83 and TMD82/83) VAISALA ________________________________________________________________________ 19... -
Page 22: Installing Wall Models Hmw88 And Hmw89
User's Guide _______________________________________________________________________ Installing Wall Models HMW88 and HMW89 Medium size crosshead screwdriver (Pozidriv) for cover screws. REQUIRED Small slotted screwdriver for screw terminals. TOOLS Two installation screws: Ø < 3.5 mm, head Ø < 10 mm. Depending on the wall material and screw type, you may need a drill and a suitable drill bit to make installation holes for screws. -
Page 23: Installing Wall Models Hmw82/83 And Tmw82/83
Route the power and signal cable to the screw terminals and connect the wires. Refer to section Wiring on page 26. Close the transmitter cover when done. 76.9 Ø4.4 Ø4.4 32.4 60.3 1302-030 Figure 12 Wall Model Dimensions (HMW82/83 and TMW82/83) VAISALA ________________________________________________________________________ 21... -
Page 24: Installing Outdoor Models Hms82/83
User's Guide _______________________________________________________________________ Installing Outdoor Models HMS82/83 WARNING Assess the risks posed by the height and accessibility of the installation location, and plan your work so it is carried out safely. Try avoiding work at height, if you can. Medium size crosshead screwdriver (Pozidriv) REQUIRED Small slotted screwdriver for screw terminals. -
Page 25: Configuration And Wiring
Make the cable short enough to close the cover without leaving a cable loop in the transmitter. Tighten the cable gland. Leave the cover off for now. 1304-059 Figure 14 Location of DIP Switches and Screw Terminal VAISALA ________________________________________________________________________ 23... -
Page 26: Pole Installation
User's Guide _______________________________________________________________________ Pole installation NOTE Recommended pole diameter for HMS82/83 installation with the supplied clamp and screws is 25 ... 60 mm. Use the supplied clamp and screws to mount the transmitter on a pole. To prevent the transmitter from turning on the pole, tighten the set screw on the center hole of the clamp. -
Page 27: Wall Installation
Secure the cable to the wall using cable ties. Allow some cable to hang down from the cable gland to prevent water from running to the transmitter along the cable. 1304-057 Figure 18 Securing the Cable on a Wall VAISALA ________________________________________________________________________ 25... -
Page 28: Wiring
User's Guide _______________________________________________________________________ Wiring WARNING Connect only de-energized wires. NOTE Transmitters with a configurable humidity output parameter use the marking HUM on the screw terminal labels. The default output parameter is relative humidity (RH) with output scaled to 0 ... 100 %RH, but the parameter can be changed using DIP switches. -
Page 29: Hmd83(D), Hmw89(D), And Hms83
R L = min. 10 kΩ T-/HUM- VDC+/AC 35 VDC Terminals 2 and 5 are VDC-/AC internally connected on or 24 VAC the transmitter, so you can also use a cable with HUM+ three wires. R L = min. 10 kΩ T-/HUM- VAISALA ________________________________________________________________________ 27... -
Page 30: Hmw82
User's Guide _______________________________________________________________________ HMW82 Two 4 ... 20 mA outputs, temperature output scaling -5 ... +55 °C (+23 ... +131 °F). 28 VDC You must connect the RH channel of the 28 VDC HMW82, even if you only want to measure temperature. -
Page 31: Hmw83
R L = min. 10 kΩ 3-wire connection with -VS as common ground. Not recommended if 35 VDC cable resistance is more or 24 VAC than 2.5 Ω. R L = min. 10 kΩ VAISALA ________________________________________________________________________ 29... -
Page 32: Dip Switches
User's Guide _______________________________________________________________________ DIP Switches The DIP switches on the component board control the humidity output parameter and scaling, and the units that are shown on the display. The switches are present on the following models: - HMD82(D) and HMD83(D) - HMW88(D) and HMW89(D) - HMS82 and HMS83 Figure 19 below shows the default position of the DIP switches. -
Page 33: Table 5 Dip Switch Positions For Metric Output
-40 ... +140 °F Enthalpy (h) h (BTU/lb) -10 ... +190 BTU/lb Temperature (T) T (°F) -40 ... +140 °F Wet bulb temperature (Tw) Tw (°F) -40 ... +140 °F Temperature (T) T (°F) -40 ... +140 °F VAISALA ________________________________________________________________________ 31... - Page 34 User's Guide _______________________________________________________________________ This page intentionally left blank. 32 ___________________________________________________________________ M211510EN-C...
-
Page 35: Maintenance
NOTE Instead, replace them with new parts. Filters and sensors can be purchased from Vaisala. For order codes, see section Spare Parts and Accessories on page 48. Calibration You can verify the performance of your HMDW80 series transmitter by... -
Page 36: Replacing The Intercap
Verify that the transmitter now provides a valid humidity reading. 1305-024 Figure 20 Sensors on HMD82/83 and HMW88/89 Models 1 = Vaisala INTERCAP® sensor. Handle by the plastic frame. 2 = Temperature sensor. Do not touch or attempt to remove. 3 = Sensor socket. 4 = Transmitter probe. -
Page 37: Figure 21 Intercap ® Sensor On Hmw82/83 Models
Remove the old sensor, and insert the new one. See Figure 21 below. Reconnect the cover to the mounting base. Verify that the transmitter now provides a valid humidity reading. 1305-018 ® Figure 21 INTERCAP Sensor on HMW82/83 Models VAISALA ________________________________________________________________________ 35... -
Page 38: Replacing The Intercap
User's Guide _______________________________________________________________________ ® Replacing the INTERCAP Sensor on Outdoor Models HMS82/83 ® New INTERCAP humidity sensor. REQUIRED New filter (always recommended when replacing the sensor). TOOLS Medium size crosshead screwdriver (Pozidriv) Flat head screwdriver 3 mm hex key (Allen key) for opening the radiation shield screws. If transmitter mounted on pole: 2.5 mm hex key for opening and tightening the set screw. -
Page 39: Figure 23 Opening The Radiation Shield Screws
Chapter 4 _______________________________________________________________ Maintenance Open the two long screws that hold the radiation shield, and pull them out. 1305-020 Figure 23 Opening the Radiation Shield Screws 1305-021 Figure 24 Removing the Radiation Shield Screws VAISALA ________________________________________________________________________ 37... -
Page 40: Figure 25 Location Of Locking Tab
User's Guide _______________________________________________________________________ Use a flat head screwdriver to push on the visible plastic tab below the radiation shield. 1305-022 Figure 25 Location of Locking Tab Tilt the radiation shield away from the opened tab. This opens the second tab on the other side, allowing you to remove the radiation shield. -
Page 41: Figure 27 Filter Removed
1305-024 Figure 28 Sensors on HMS82/83 Models 1 = Vaisala INTERCAP® humidity sensor. Handle by the plastic frame. 2 = Temperature sensor. Do not touch or attempt to remove. 3 = Sensor socket. 4 = Transmitter probe. - Page 42 User's Guide _______________________________________________________________________ This page intentionally left blank. 40 ___________________________________________________________________ M211510EN-C...
-
Page 43: Troubleshooting
Analog output reading is The analog output channel may be in an unchanging and incorrect. error state. See section Analog Output Error State on page 42. VAISALA ________________________________________________________________________ 41... -
Page 44: Analog Output Error State
Possible Cause and Solution INTERNAL 1 Internal problem with the transmitter. Restart the INTERNAL 2 transmitter to see if the problem remains. Contact Vaisala INTERNAL 3 technical support if unable to remove the problem. ERROR HUM Humidity measurement failed. Check if the humidity sensor is damaged or missing. -
Page 45: Technical Support
Chapter 5 ____________________________________________________________ Troubleshooting Technical Support For technical questions, contact the Vaisala technical support by e-mail at helpdesk@vaisala.com. Provide at least the following supporting information: - Name and model of the product in question - Serial number of the product... - Page 46 User's Guide _______________________________________________________________________ This page intentionally left blank. 44 ___________________________________________________________________ M211510EN-C...
-
Page 47: Technical Data
+10 … +30 °C (+50 °F … +86 °F) ±0.5 °C (±0.9 °F) -5 … +10 °C, +30 … +55 °C (+23 ... +50 °F, +86 ... +131°F) ±1.0 °C (±1.8 °C) Temperature sensor Digital temperature sensor VAISALA ________________________________________________________________________ 45... -
Page 48: Table 10 Specifications For Hmd82/83, Tmd82/83, Hmw88/89, And Hms82/83
0 … 100 %RH ±7 %RH Stability in typical HVAC applications ±2 %RH over 2 years ® Humidity sensor Vaisala INTERCAP Temperature Measurement range -40 ...+60 °C (-40 ... +140 °F) Accuracy At +20 °C (+68 °F) ±0.3 °C (±0.54 °F) Temperature dependence ±0.01 °C/°C... -
Page 49: Table 11 Specifications For Hmd82/83D And Hmw88/89D
20 ... 28 VDC at 600 Ω load 10 ... 28 VDC at 0 Ω load Voltage output models (3-wire) Outputs 0 ... 10 V Load resistance 10 kΩ min Supply voltage 18 ... 35 VDC 24 VAC ±20 % 50/60 Hz VAISALA ________________________________________________________________________ 47... -
Page 50: Spare Parts And Accessories
PC + 10%GF (UL-V0 approved) Spare Parts and Accessories Table 15 HMDW80 Series Spare Parts and Accessories Description Item Code Sensors ® Vaisala INTERCAP humidity sensor, 1 piece ● ● ● ● 15778HM ® Vaisala INTERCAP humidity sensor, 10 pcs ●... - Page 51 *M211510EN*...